Note: The SMCR Module is only available to UK/EU Clients. The Accountability/SMCR Module must be Licensed to your system for this menu option to appear.
About Submissions
Each Submissions Record contains the Submission details including the Submitted and Returned date, Documents and Notes.
SMCR Security
Access to SMCR Menus is restricted to Administrators, Administrators - Accountability, and Positions that appear in Work with Accountable People.
Administrators and Administrators - Accountability have view and full edit access to all records in the SMCR Module.
Positions that appear in Work with Accountable People have view access only to records.
The Submissions List page
The Submissions List page displays all Submission records, less any record filtering you may have applied.
The SMCR Submissions List Page
Click on any Submissions record 4 to see it’s details.
Click this icon to Delete a Submission. A ‘Confirm Delete’ dialog is displayed to remind you that deleting this Record will result in instant and unrecoverable removal of data. Note: This icon only displays if you have ‘Edit’ security access.
7
Add ‘Notes’ icon
Click this icon to add a new Note to this Submissions record.
8
‘Show Person’ icon
Click this icon to open the SMCR Details page of this person.
9
‘Submission Documents’ icon
Click this icon to open the Submission Documents window. This window display the Documents for this Submission. Additional Documents can be added to this Submission.
10
‘New Submission’ icon
Click this icon to add a new Submission via the ‘New Submission’ window.
Use the controls in this panel to save and load different grid layouts. Click the Reset Grid icon to return to the default view. Note: the last icon is the ‘Reset grid’ icon. Click this icon to reset the columns in the grid to a default state.
The Submission page
The Submission page contains details pertaining to the Submission.
The ‘Submission’ page
The Submission Page elements
The Submission Page elements
ID
Element
Description
1
Submitted For Person
Displays the person this Submission is for.
2
‘Entity’ field
Display the Entity of this Submission.
3
‘Type’ field
Displays the Type of Submission.
4
‘Submitted By’ field
Displays the Submitting By Person.
5
‘Submitted’ date
Displays the date of the Submission.
6
‘Returned’ date
Displays the date of the Return.
7
‘Reference’ field
Displays the Reference field.
8
‘Status’ field
Displays the Status of this Submission.
9
‘Documents’ section
This section displays when a Document(s) have been attached to this Submission.
10
‘Documents’ List
The List of Document(s) that have been attached to this Submission.
11
‘Save’ icon
Click this icon to save the Submission record.
12
‘Cancel’ icon
Click this icon to Close the ‘Submission’ window.
Procedures
Accessing the Submissions records list
From the main menu, click or mouse hover over the SMCR menu to see the SMCR menu items. Click Work with Submissions.
On the ‘Submissions list’ page, hover over the Options Menu icon to display the options. Click the ‘New Submission’ 1 icon.
The ‘New Submission’ window opens. Complete the Submission details fields 1 through 8 as required. (See The Submission Page elements for details on each field). Click the Save 9 icon to complete adding the new Submission record. The Submission List will display with this new record. (Or, click the cancel 10 icon to close the ‘New Submission’ window without saving the record.)
The new Submission record is display in the Submission list.
If the Save 1 icon is displayed, you have security access to update the values on this Submission record. Update the values as required, then click the Save 11 icon.
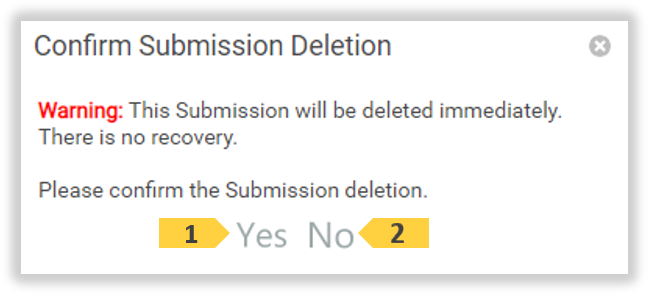
Delete a Submission record
Note: Only Administrators and Administrators - Accountability positions can delete a Submission record.
Note: Submission record delete is instant and permanent. There is no Undelete functionality.
Deleting a Submission is NOT recommended if you wish to retain the historic content of this record.
Enter the Note text in the edit area 1. Then click the Save 2 icon to save this note. (Or, click the Cancel 4 icon.)
View Notes
On the ‘Submissions list’ page, hover over the Options Menu icon to display the options. Click the ‘Hide/Show Columns’ 1 icon.Click, hold and drag the Notes 2 Column into the Submission columns.
The Persons Details will display from Work with Accountable People. View the details, then use the breadcrumb trail link to click back to the Submissions page if required.