Displays the unique code identifying this Prescribed Responsibility.
5
‘Title’ field
Displays the title of this Prescribed Responsibility.
6
‘Is Applicable’ selector
Displays if this Prescribed Responsibility is Applicable.
7
‘NED’ selector
This field displays if this Prescribed Responsibility is NED.
8
‘Relevant_to_small_firm’ selector
This field displays if this Prescribed Responsibility is Relevant to small firm.
9
‘Tags’ field
Displays the tabs selected for this Prescribed Responsibility.
10
‘Regulator Reference’ field
This optional text field displays the Regulator Reference of this Prescribed Responsibility.
The Notes tab
The Notes tab displays a list of all Notes that have been added to this Prescribed Responsibility record. This tab can be used to add any relevant information relating to the Prescribed Responsibility record as required. Positions with View or Edit access are permitted to add Notes. Positions with Edit access can also update or delete the Notes.
The ‘Notes’ tab
The Notes tab elements
The ‘Notes’ tab elements
ID
Element
Description
1
‘Add Note’ icon
Click this icon to a new Note. The ‘Add Note’ window is displayed. Note: This icon only displays if you have ‘Edit’ security access.
Use the controls in the Column Headers to filter the Notes in the list.
4
Notes list
Each Note in the list consists of two parts: the top part is the Note itself, and the bottom part (shaded) displays the Name of the person who created the Note plus a date of when the Note was created.
5
‘Edit Note’ icon
Click this icon to Edit a Note. The ‘Edit Note’ window is displayed. Note: This icon only displays if you have ‘Edit’ security access.
6
‘Delete Note’ icon
Click this icon to Delete a Note. A ‘Confirm Delete’ dialog is displayed to remind you that deleting this Record will result in loss of data. Note: This icon only displays if you have ‘Edit’ security access.
The Allocated To tab
The Allocated To tab displays positions that are allocated to this Prescribed Responsibility and for what duration.
Each position duration can be added, and can be deleted as an Allocated To, on this tab.
The ‘Allocated To’ tab
The Allocated To tab elements
The ‘Allocated To’ tab elements
ID
Element
Description
1
‘Add Allocated To’ icon
Click this icon to allocate a position to the Prescribed Responsibility record. The new Position is displayed in the Allocated To list 5.
Use the controls in the Column Headers to filter the Allocated To in the list.
5
‘Allocated To’ List
This list displays all Allocated To records of the currently selected Prescribed Responsibility 1. Click a Record in this list to open the Record in its own page for viewing or editing depending on your Security access.
6
‘Delete Allocated To’ icon
Click this icon to Delete a Allocated To. A ‘Confirm Delete’ dialog is displayed to remind you that deleting this Record will result in the permanent removal of this data.
7
‘Show Details’ icon
Click this icon to open the details of this person.
The Links window
The Links window displays entity records that are linked to this Prescribed Responsibility. Tabs displayed here will depend on which modules are installed on your site.
Each Module tab allows new Links to be added to records of that module. Existing links can be removed as required.
The ‘Links’ window
The Links window elements
The ‘Links’ window elements
ID
Element
Description
1
Module tabs
Click the appropriate tab to view, and if you have Edit access security, create and remove links to that Module’s Records. The tabs displayed are dependent on the modules your site has Licenced.
2
Record Selector field
Each of the Linked Record tabs 1 has a Record Selector field. Click the Record Selector dropdown to view a list of available records that you can link to this Prescribed Responsibility record. Select the record you wish to link then click the Add Link icon 3Note: The drop-down list only displays available Records to which you have security access.
3
‘Add Link’ icon
Once you have selected a Record 2, click the ‘Add Link’ icon to create a link from that record to the Prescribed Responsibility record. The linked Record is displayed in the Linked Record List 7.
Use the controls in the Column Headers to filter the Links in the list.
7
Linked Record List
This list displays all linked Records of the currently selected module 1. Click a Record in this list to open the Record in its own page for viewing or editing depending on your Security access.
8
‘Remove Link’ icon
Each Record in the list has its own ‘Remove Link’ icon that will display for Edit access security. Click this icon to remove the link to the Record. A Confirm Delete dialog is displayed. Once you confirm the link’s removal, the Record is no longer displayed in the Linked Record List 7. Note: The Prescribed Responsibility record link will also be removed from the Links Module tab of the corresponding record.
9
‘Close’ button
Click this button to close the Links window.
Procedures
Accessing the Prescribed Responsibility records list
Note: The SMCR Module must be enabled for this menu option to appear.
From the Main Menu, select SMCR | Work with Prescribed Responsibility.
A Prescribed Responsibility record can be created either from the Prescribed Responsibility List page, or from the Prescribed Responsibility page, or from the repository.
On the ‘Prescribed Responsibility List’ page, hover over, or click, the Options Menu icon to display the options. Click the ‘New Prescribed Responsibility’ 1 option. Or, from the ‘Prescribed Responsibility List’, click on a Prescribed Responsibility record in the list to open the ‘Prescribed Responsibility’ page. Hover over, or click, the Options Menu icon to display the options. Click the ‘New Prescribed Responsibility’ 2 option.
The ‘New Prescribed Responsibility’ window opens. Complete the Prescribed Responsibility details in the window (see New Prescribed Responsibility window elements for details on each field).
Click the Save 8 icon to complete adding the new Prescribed Responsibility record. The Prescribed Responsibility page will display with this new record. Clicking the cancel 9 icon will close the ‘New Prescribed Responsibility’ window without saving the record.
‘New Prescribed Responsibility’ window elements
‘New Prescribed Responsibility’ window elements
ID
Element
Description
1
‘Entity’ selector
Select the Entity of this Prescribed Responsibility.
2
‘Code’ field
Enter the unique code identifying this Prescribed Responsibility.
3
‘Title’ field
Enter the title of this Prescribed Responsibility.
4
‘Is Applicable’ selector
Check this box if this Prescribed Responsibility is Applicable.
5
‘NED’ selector
Select this field if this Prescribed Responsibility is NED.
6
‘Relevant_to_small_firm’ selector
Select this field if this Prescribed Responsibility is Relevant to small firm.
7
‘Regulator Reference’ field
Optionally enter the Regulator Reference of this Prescribed Responsibility.
8
‘Save’ icon
Click this icon to save the Prescribed Responsibility record.
9
‘Cancel’ icon
Click this icon to Close the ‘New Prescribed Responsibility’ window.
Click on a Prescribed Responsibility record in the list to open the The ‘Prescribed Responsibility’ page. Click the Details tab. Update the field values as required.
Hover over, or click the Menu Options icon, then click the Save 1 option. Note: If the Save option does not displayed, you do not have security access to update the values on this Prescribed Responsibility record. The Save action applies fields on the Details tab.
Delete a Prescribed Responsibility record
Note: Only Administrators and Administrators - Accountability can delete a Prescribed Responsibility record.
Deleting a Prescribed Responsibility is NOT recommended if you wish to retain the content of this record.
Click on a Prescribed Responsibility record in the list to open the The ‘Prescribed Responsibility’ page. Hover over, or click, the Menu Options icon and then click the Delete 1 option.
A ‘Confirm Delete’ dialog is displayed. Click Yes to delete the Prescribed Responsibility, or click No to cancel.
Undelete a Prescribed Responsibility record
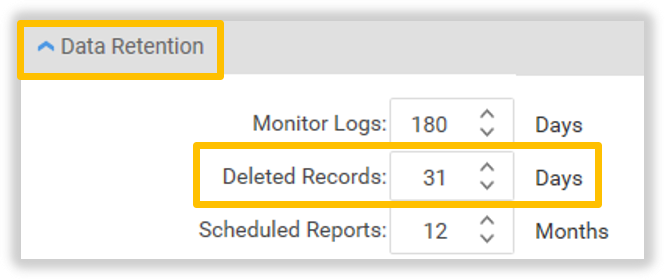
The Prescribed Responsibility record is not deleted immediately when you click delete, but rather it’s status is changed to ‘To Be Deleted’ for a limited time determined by your configuration settings. Hence the record can still be view and the record can also be recovered/undeleted, from this ‘To Be Deleted’ status.
The Record will be permanently deleted on its scheduled date by the overnight Monitor and cannot be recovered/undeleted after this time.
The days delay until the deletion of a record is configured by the Administrator on the General Configuration tab. For example, this setting is 31 days:
The ‘Prescribed Responsibility’ page is displayed with that record. Hover over, or click, the Options Menu icon. Click the Print Preview 1 Option.
A Preview Page opens showing a Report for the Prescribed Responsibility. Navigate, search, print and/or save the Report using the Preview Page Toolbar. Click the Close icon 1 to close this window.
Only Administrator or Administrator - Accountability position’s can add new Allocated To records.
Click the Add Allocated To 1 icon.
Select a Position 1. When a Person 1 is selected, the Accountable To Person 4 may also display. Select the date range From 2 and To 3. Click the Save 5 icon to save the Allocated To.
Or, click the Cancel 6 icon to stop adding the Allocated To.
Edit Allocation Dates
Only Administrator or Administrator - Accountability position’s can add edit Allocated To records.
Click the Allocated To 1 record.
Update the From 1 and To 2 fields as required. Click the Save 3 icon to save these updates.
Or, click the Cancel 4 icon to stop the update.
Delete an Allocated To
Only Administrator or Administrator - Accountability position’s can delete Allocated To records.
Click the Delete this Allocation 1 icon on the Allocated To record.
The ‘Confirm’ window appears. Click OK to delete, or click Cancel.
View Show Person
Click the Show Person 1 icon on the Allocated To record.