Click this icon to filter the Committees List using the Filter builder facility.
The Committee page
The Committee page contains details pertaining to the Committee.
Actions available from this page include
View and updating fields, links, members and documents,
Adding new Committee records.
Print previewing the record.
Deleting the Committee record.
The ‘Committee’ page
The Committee Page elements
‘Committee’ page elements
ID
Element
Description
1
Current Record selector
Use this selector to change to another Committee record.
2
Committee tabs
Click on each tab to display each titled information
3
‘Save’ icon
Click this icon to save all updates to Details tab field changes.
4
‘New Committee’ icon
Click this icon to open The ‘New Committee’ window.
5
‘Print Preview’ icon
Click this icon to open a preview window of the printed layout page.
6
‘Delete’ icon
Click this icon to mark this Committee record for deletion .
The Details tab
The Details tabs displays the main fields of the Committee.
The ‘Details’ tab
The Details tab elements
The ‘Details’ tab elements
ID
Element
Description
1
‘Entity’ field
Display the Entity of this Committee.
2
‘Name’ field
Displays the unique code identifying this Committee.
3
‘Record_Status’_selector
Displays the status of this Committee. A Committee can be made Active or Inactive at any time. If the Status is Inactive, this Committee will not display in the lists of Active Committees. Committee Membership, or Members dates are not effected by Status changes. When the Status is changed, the Start Date 3a field will display.
3a
‘Start Date’ field
Not Shown. This field displays when the Record Status 3 is changed. When shown, this field is mandatory. Select today’s date, or enter/select a retrospective date. This information is displayed on the History Tab.
3b
‘since’ Date field
Not Shown. This field displays the date this Committee was recorded as ‘Inactive’. This field only displays when the Status is ‘Inactive’.
3c
‘Deletion Date’ field
Not Shown. This field displays the deletion date of this Committee record. This field only displays when the Status is ‘To Be Deleted’. See Delete a Committee record for more information.
3d
‘Set to Active’ icon
Not Shown. This icon displays when the record is scheduled for deletion and the deletion date is showin. Click this icon to ‘undelete’ this Committee record and set its Status to ‘Active’. See Delete a Committee record for more information.
4
‘Reports To’ field
Optional. This Committee can report to another Committee. Select from the list of other Committees that also belong to this Committee’s Entity 1 .
6
‘Description’ field
Displays the descriptive information about this Committee.
The Members tab
The Members tab displays a list of all Members that are members currently in this Committee. When the filters are turned off 9, all previous members will also be displayed. The ‘From’ Date shows when the person joined the Committee. The 'To Dates shows the date the Member is leaving, or has left, the Committee.
The ‘Members’ tab
The Members tab elements
The ‘Members’ tab elements
ID
Element
Description
1
‘Show Current Members’ icon
Click this icon to apply the filter that only shows the current members of this Committee. This is the default display of this list.
2
‘Add Members’ selector
Click this field to display the list of People that can be added to this Committee. Select the required person, then click the Add Members 3 icon to add this person to the Members list 5 of this Committee.
3
‘Add Members’ icon
Click this icon to add the selected person 1 to Members list 6 of this Committee.
Use the controls in the Column Headers to filter the Members in the list.
6
Members list
Displays the Members of this Committee, and additionally displays the Chair, and dates of membership. Click on each record to edit that record. Note: Also See Show Previous Members.
7
‘Show Person’ icon
Click this icon to open the SMCR Details page of this person.
8
‘Remove from the Committee’ icon
Click this icon to display the ‘Remove Committee Member’ window. Update the ‘To’ Date (the last date), this person will be in the Committee. This effectively makes them a past member of this Committee, from that date onward.
9
‘Clear’ filters button
Click this button to remove all filters to show all past and present Members of this Committee ever.
10
Filter icon
A Filter icon which is shaded blue indicates a filter is being applied in this column. Click this icon to show the filtering being applied.
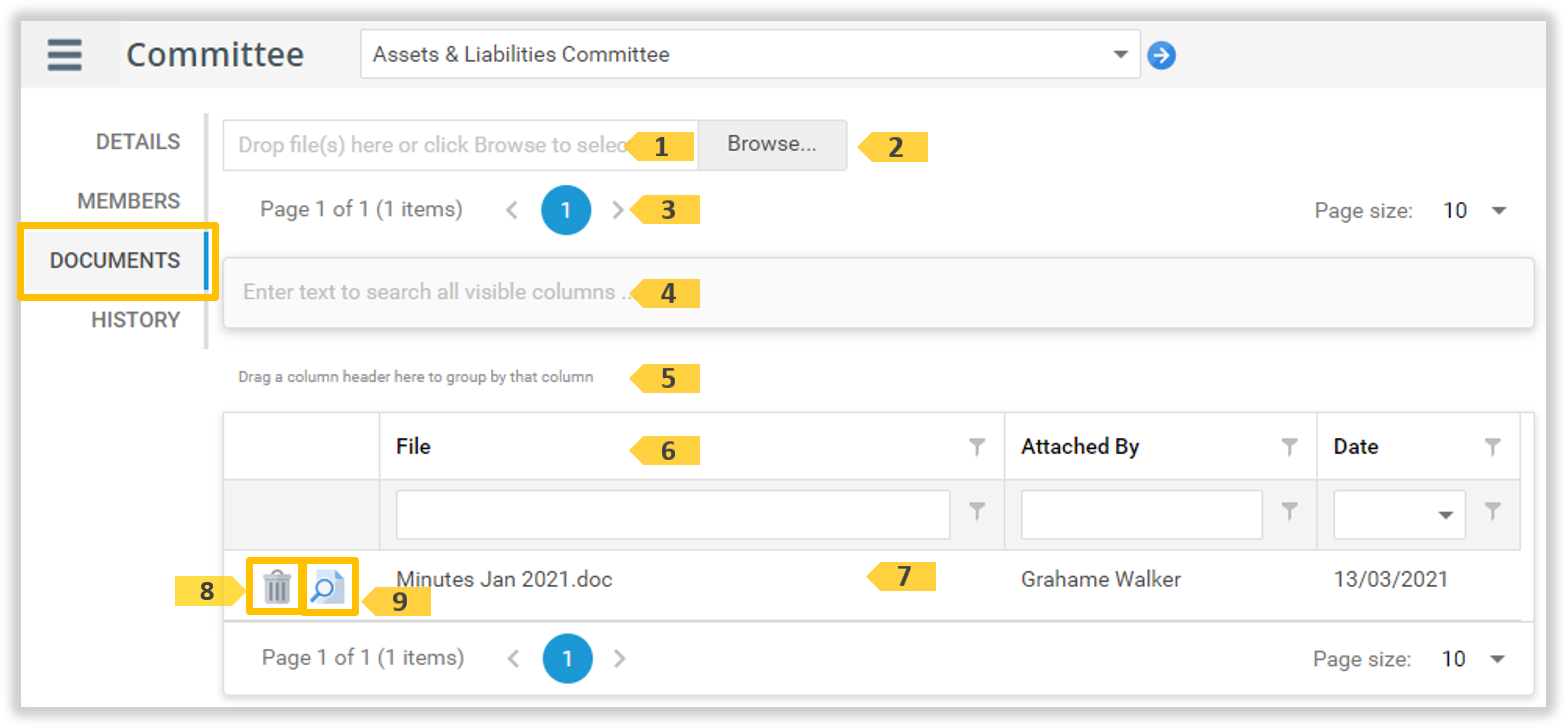
The Documents tab
The Documents tab displays the List of Document that have been uploaded to this Committee record.
Each Document can be viewed by clicking the View Document 9 icon.
The ‘Documents’ tab
The Documents tab elements
The ‘Documents’ tab elements
ID
Element
Description
1
‘Document Drop’ field
Document files ‘mouse drag dropped’ or selected via the Browsed 2 button, will appear in this field for a few seconds before automatically being added to the Document list 7 below.
2
‘Browse’ button
Click Browse and then select the document to be attached. The selected document name will momentarily appear in the Document 1 field, before automatically being added to the Document list 7 below.
On the ‘Committees list’ page, hover over, or click, the Options Menu icon to display the options. Click the ‘New Committee’ 1 option. Or, from the ‘Committees List’, click on a Committee record in the list to open the ‘Committee’ page. Hover over, or click, the Options Menu icon to display the options. Click the ‘New Committee’ 2 option.
The ‘New Committee’ window opens. Enter the Committee details as required. (See New Committee window elements for details on each field).
Click the Save 5 icon to complete adding the new Committee record. The Committee page will display with this new record. Clicking the cancel 6 icon will close the ‘New Committee’ window without saving the record.
‘New Committee’ window elements
‘New Committee’ window elements
ID
Element
Description
1
‘Entity’ selector
Select the Entity this Committee will belong to.
2
‘Name’ field
Enter the unique name identifying this Committee.
3
‘Start Date’ field
Enter or select the Date you wish to record this Committee as becoming ‘Active’.
4
‘Reports To’ selector
Optional. Select the Committee this Committee Reports To. Note: Only Committee’s belonging to this Entity 1 will be displayed.
5
‘Description’ field
Enter the descriptive information for this Committee.
6
‘Save’ icon
Click this icon to save the Committee record.
7
‘Cancel’ icon
Click this icon to Close the ‘New Committee’ window without saving.
Click on a Committee record in the list to open the The ‘Committee’ page. Click the Details tab. Update the field values as required.
Hover over, or click the Menu Options icon, then click the Save 1 option. Note: If the Save option does not displayed, you do not have security access to update the values on this Committee record. The Save action applies fields on the Details tab.
Deactivate a Committee
Committee deactivation and activation is retained in the Detail History tab.
Click on a Committee record in the list to open the The ‘Committee’ page. Click the Details tab. Click the Status 1 field to display the dropdown selection. Click the ‘Inactive’ 2 option.
‘Inactive’ 1 displays in the Status field and a ‘Starting from’ 2 date selection field appears.
Enter the date 1 the Committee became Inactive. This date can be today, or a date prior to today.
Hover over, or click, the Menu Options icon, then click the Save option. A date since 1 the Committee was made inactive is displayed.
This Committee will not display in the Committee List with the default filters applied. Change the filters to display all Inactive Committees, to see this record.
Reactivate a Committee
Committee deactivation and activation is retain in the Detail History tab.
Click the Status Filter 1 icon. Click to unselect Active2. Click to select Inactive3. Click the OK 4 button.
All ‘Inactive’ Committees are displayed. Click on the ‘Inactive’ Committee record 1 required to be reactivated.
The ‘Committee’ page opens. Click the Details tab. Click the Status 1 field to display the dropdown selection. Click the Active2 option.
‘Active’ 1 displays in the Status field and a ‘Starting from’ 2 date selection field appears. Enter the date 1 the Committee became Active. This date can be today, or a date prior to today.
Hover over, or click, the Menu Options icon, then click the Save option. The ‘Active’ Status 1 is displayed.
Delete a Committee record
Note: Only Administrators and Administrators - Accountability positions can delete a Committee record.
Deleting a Committee is NOT recommended if you wish to retain the historic content of this record.
Click on a Committee record in the list to open the The ‘Committee’ page. Hover over, or click, the Menu Options icon and then click the Delete 1 option.
A ‘Confirm Delete’ dialog is displayed. Click Yes to delete the Committee record together with all its history, or click No to cancel.
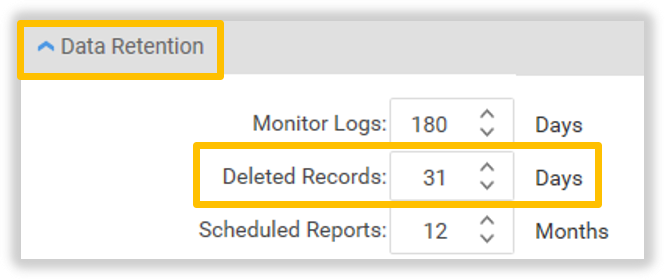
Undelete a committee record
The Committee record is not deleted immediately when you click delete, but rather it’s status is changed to ‘To Be Deleted’ for a limited time determined by your configuration settings. Hence the record can still be view and the record can also be recovered/undeleted, from this ‘To Be Deleted’ status.
The Record will be permanently deleted on its scheduled date by the overnight Monitor and cannot be recovered/undeleted after this time.
The days delay until the deletion of a record is configured by the Administrator on the General Configuration tab. For example, this setting is 31 days:
The ‘Committee’ page is displayed with that record. Hover your mouse pointer over the Options Menu icon and then click the Print Preview 1 icon.
A Preview Page opens showing a Report for the Committee. Navigate, search, print and/or save the Report using the Preview Page Toolbar. Click the Close icon 1 to close this window.
Manage Members
People can be ongoing members of a Committee without an end date. People can have a end date, and when that end date is past, they are no-longer considered a current member of that Committee, they are considered to be a past member. Past Committee members can be made current again.
On the Committee Members tab, click the Add Member 1 dropdown. Click the person 2 you wish to add to the Members list
The clicked on person will appear in this field. Click the Add Members 1 icon to add this person to the Committee.
The Add Member to Committee window will appear. Update the Chair 1, Role 2 and Start Date 3 fields. Click the Save 4 icon to complete adding the new Menber to the Committee. The Member list will display with this new member. (Or, click cancel 5 icon to close the ‘Add Member to Committee’ window without saving.)
This person is now be in the Members List.
Edit a Member
Only Administrators and Administrators - Accountability can edit Members.
On the Committee Members tab, click the Member 1 record to edit the Member.
The Committee Member window appears. 1. Update the Chair 2, Member 3 and Start Date 4 fields. Click the Save 5 icon to save these changes. (Or, click the Cancel 6 icon to stop these changes.)
These updates are displayed in the Members List.
Remove Member from Committee
Only Administrators and Administrators - Accountability can remove Members.
On the Committee Members tab, click the Remove 1 icon on the Member to remove.
The Remove Member from Committee window appears. Select the date 1 the Member will cease to be on the Committee. Click the Save 2 icon to save this change. Or, click the Cancel 3 icon to stop this change.
If the date selected is prior to today, that member will not appear in the current list of Members. (See Show Previous Members.)
Show Member Details
On the Committee Members tab, click the Show Member Details 1 icon in the Members list.
On the Committee Members tab, click the Clear Filters 1 icon in the top left hand corner of the Members list grid.
All previous members 1 of the Committee will now display in the Committee Members list. To return the list to showing only current Members, click the Show Current Member 2 icon.
Re-Add a Previous Member
On the Committee Members tab, click the Add Member 1 field to show the dropdown list of people. Click the person 2 you wish to re-add to the Members list. This Members prior ‘To Date’ must be before today’s date.
The ‘Committee’ page is displayed with that record. Click the Documents tab to display the Documents of this Committee.
Add a new Document
On the Documents tab, either click the Browse 1 button and select your documents, or directly drop documents in the drop 2 field.
After a few seconds, the document will load from this field into the Documents list 1.
Document can now be viewed with the Show Document icon.
View a Document
On the Documents tab, click the Show Document 1 icon.
The viewing Document window will display this Document.
Delete a Document
On the Documents tab, click the Delete Document 1 icon.
The ‘Confirm’ window appears. Click OK to delete instantly, or click Cancel.
View Committee Map
From the main menu, click or mouse hover over the SMCR menu to see the SMCR menu items. Click Committee Map.
A Committees Map 4 is displayed. Select the ‘Entity’ 1 and ‘As at’ 2 Date, then click the ‘show Map’ 3 icon. Use the Page Help 5, or Export 6 facility as required.