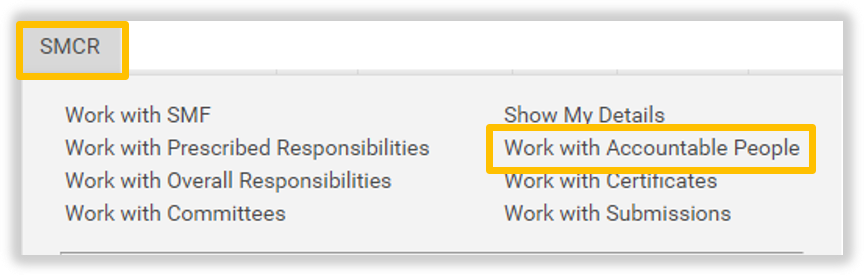
Note: The SMCR Module is only available to UK/EU Clients. The SMCR Module must be enabled in your system configuration for this menu option to appear.
About Accountable People
The list of Accountable People is comprised of either, or both of
non TriLine GRC users added via the ‘New Accountable Only People’ menu option ( or, via the Security centre on the Accountability Only tab), or
TriLine GRC Positions added via the Accountability People ‘Select Existing Positions’ menu option. All TriLine GRC Positions can be select to appear in this list.
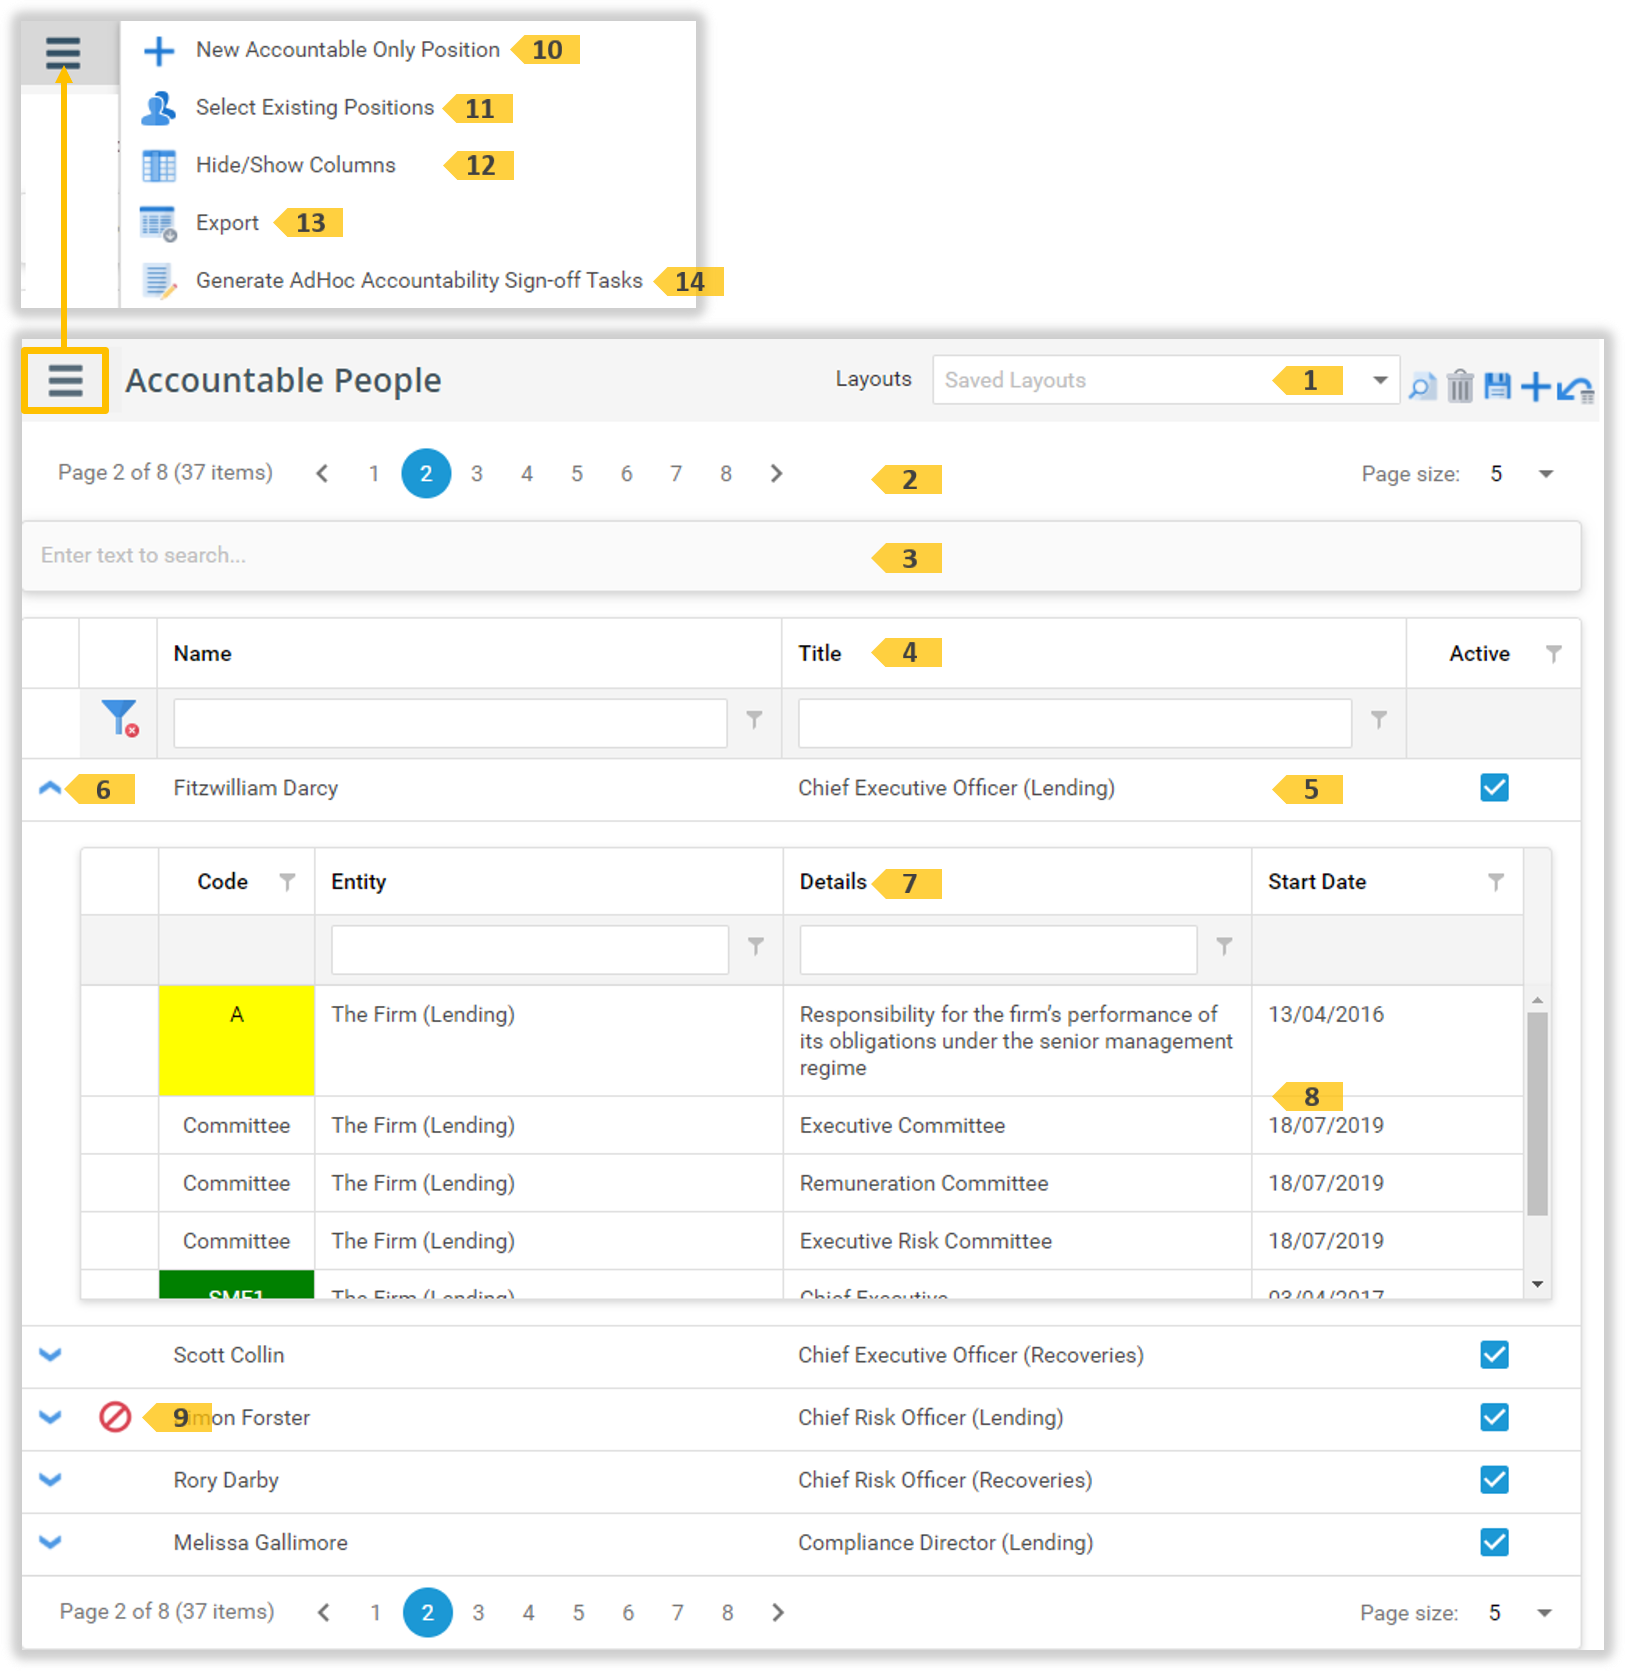
The Accountable People list page
The Accountable People list page displays all people selected to have Accountable records.
The Accountable People list page
Click on any Accountable People record 4 to see their details.
Use the controls in this panel to save and load different grid layouts. The last icon is the ‘Reset grid’ option. Click this option to reset the columns in the grid to a default layout.
Use the controls in the column headers to filter the SMCR Records. Perform advanced filtering of the List to find a particular SMCR Record.
8
A persons SMCR list
Displays the SMCR records for this Accountable Person. Click on a row to open that record.
9
‘Remove’ icon
This icon appears when the Accountable Person has no SMCR records. This Accountable Person can currently be removed from the Accountable People. Once this icon no longer displays, it is not possible to remove this person from this list.
10
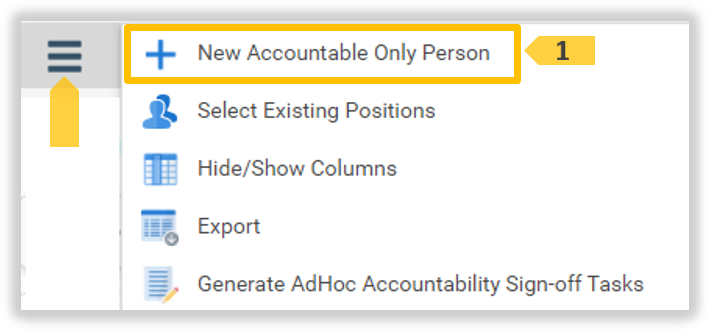
‘New Accountable Only Person’ option
Click this option to add a SMCR Accountability Only person. This person will be available view and to have Accountable records. This person will appear in the Accountable People 5 list.
11
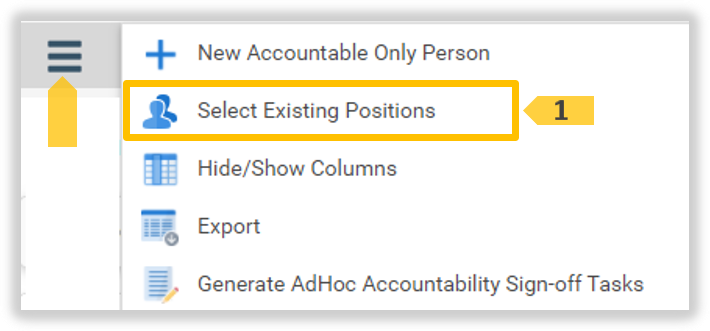
‘Select Existing Positions’ option
Click this option to add a TriLine GRC person to be available to have Accountable records and appear in the Accountable People list.
12
‘Hide/Show Column’ option
Click this option to hide/show Accountable Person list columns using the Field Chooser.
13
‘Export’ option
Click this option to export the List in Microsoft Excel or Word format.
Click this option to immediately generate AdHoc Accountability Sign-off Tasks.
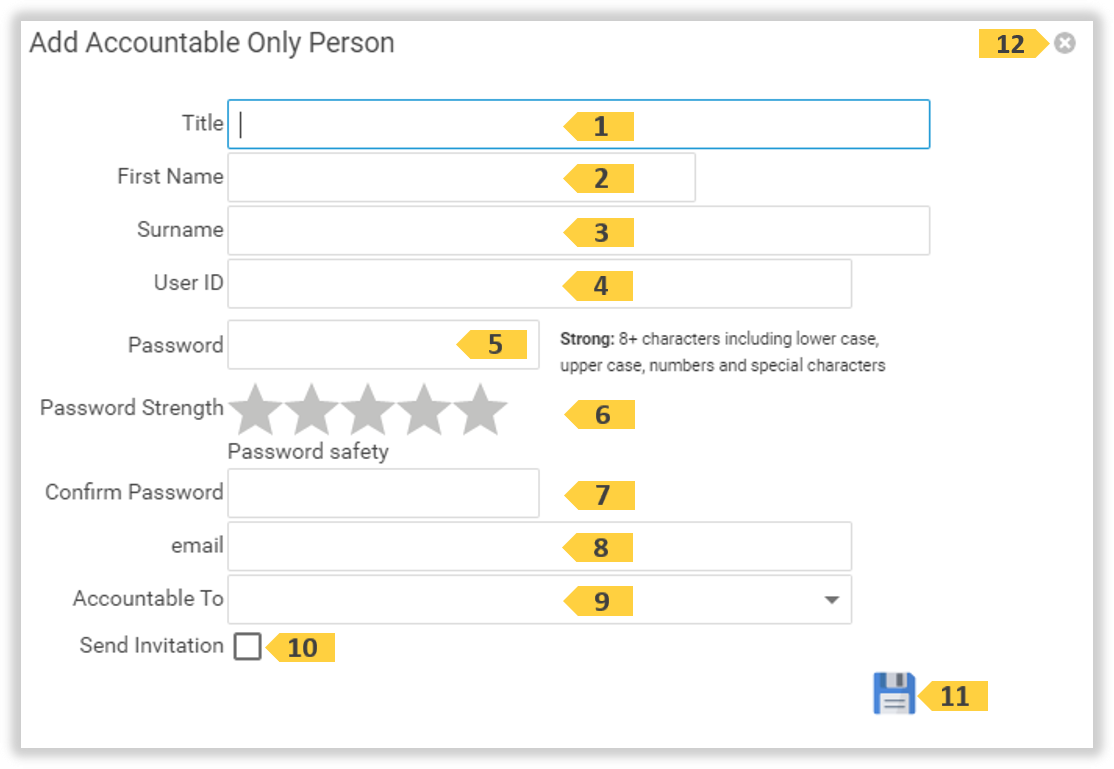
The Add Accountable Only Person window
The Add Accountable Only Person window is used to add people outside of the TriLine GRC Positions list (people who are not TriLine GRC users) to allow them view access to SMCR only.
The Accountable Person page
The ‘Add Accountable Only Person’ window elements
‘Add Accountable Only Person’ window elements
ID
Field
Description
1
‘Title’ field
Enter an unique Position Title reflective of their role in your organisation.
2
‘First Name’ field
Enter the first name of this person.
Note: If you have two or more people with exactly the same First and Last name, add a middle initial (etc) to each First Name, so that each person can be uniquely identified by name.
3
‘Surname’ field
Enter the last name of this person.
4
‘User ID’ field
Enter an unique ID. For non SSO sites, this id is used to successfully authenticate logging into TriLine GRC.
5
‘Password’ field
Enter a (temporary) password that meets the Password Strength requirement. Selecting ‘Send Invitation’ will require this person to store a new password the first time they login.
6
‘Password_Strength’_indicator
The strength of the ‘Password’ is indicated here. A 5 star Password is required. It must have at least 8 characters, consisting of a combination of lower case characters, upper case characters, numbers and/or special characters.
7
‘Confirm Password’ field
Re-type the Password, ensuring it matches what is in the ‘Password’ field.
8
‘Email’ field
Enter the email address of this person. This field is optional and can be left blank.
9
‘Accountable To’ selector
This is an optional field. If required, select the Position that this person is to be Accountable To.
10
‘Send Invitation’ checkbox
Tick this field to send an invitation email to this person, the Save 11 icon is clicked. The invitation will contain the content in the Security Centre, User Emails, Accountability Only tab.
11
‘Save’ icon
Click this icon to save the new Position. If ‘Send Invitation’ 10 is ticked, the Invitation will go out with this save action.
12
‘Close’ icon
Click to close this window without saving.
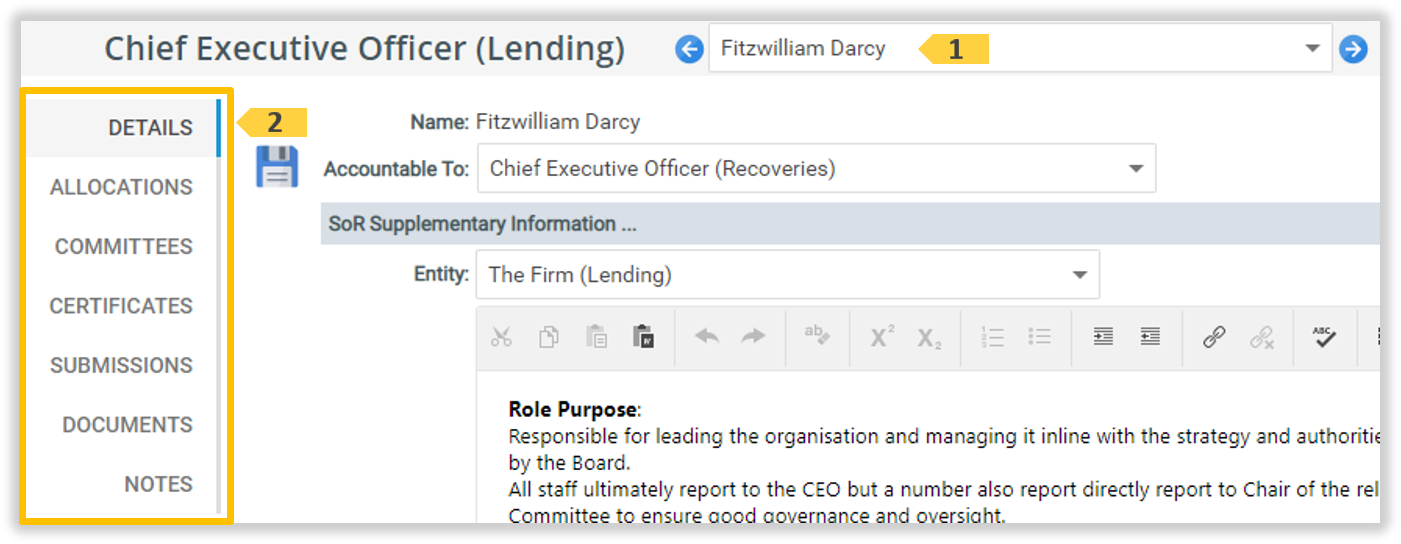
The Accountable Person page
The Accountable People page contains all this persons Accountable records.
The Accountable Person page
The Accountable Person Page elements
Accountable Person page elements
ID
Element
Description
1
Current Person selector
Use this selector to change to another Person’s record.
2
Accountable Person tabs
Click on each tab to display each titled information.
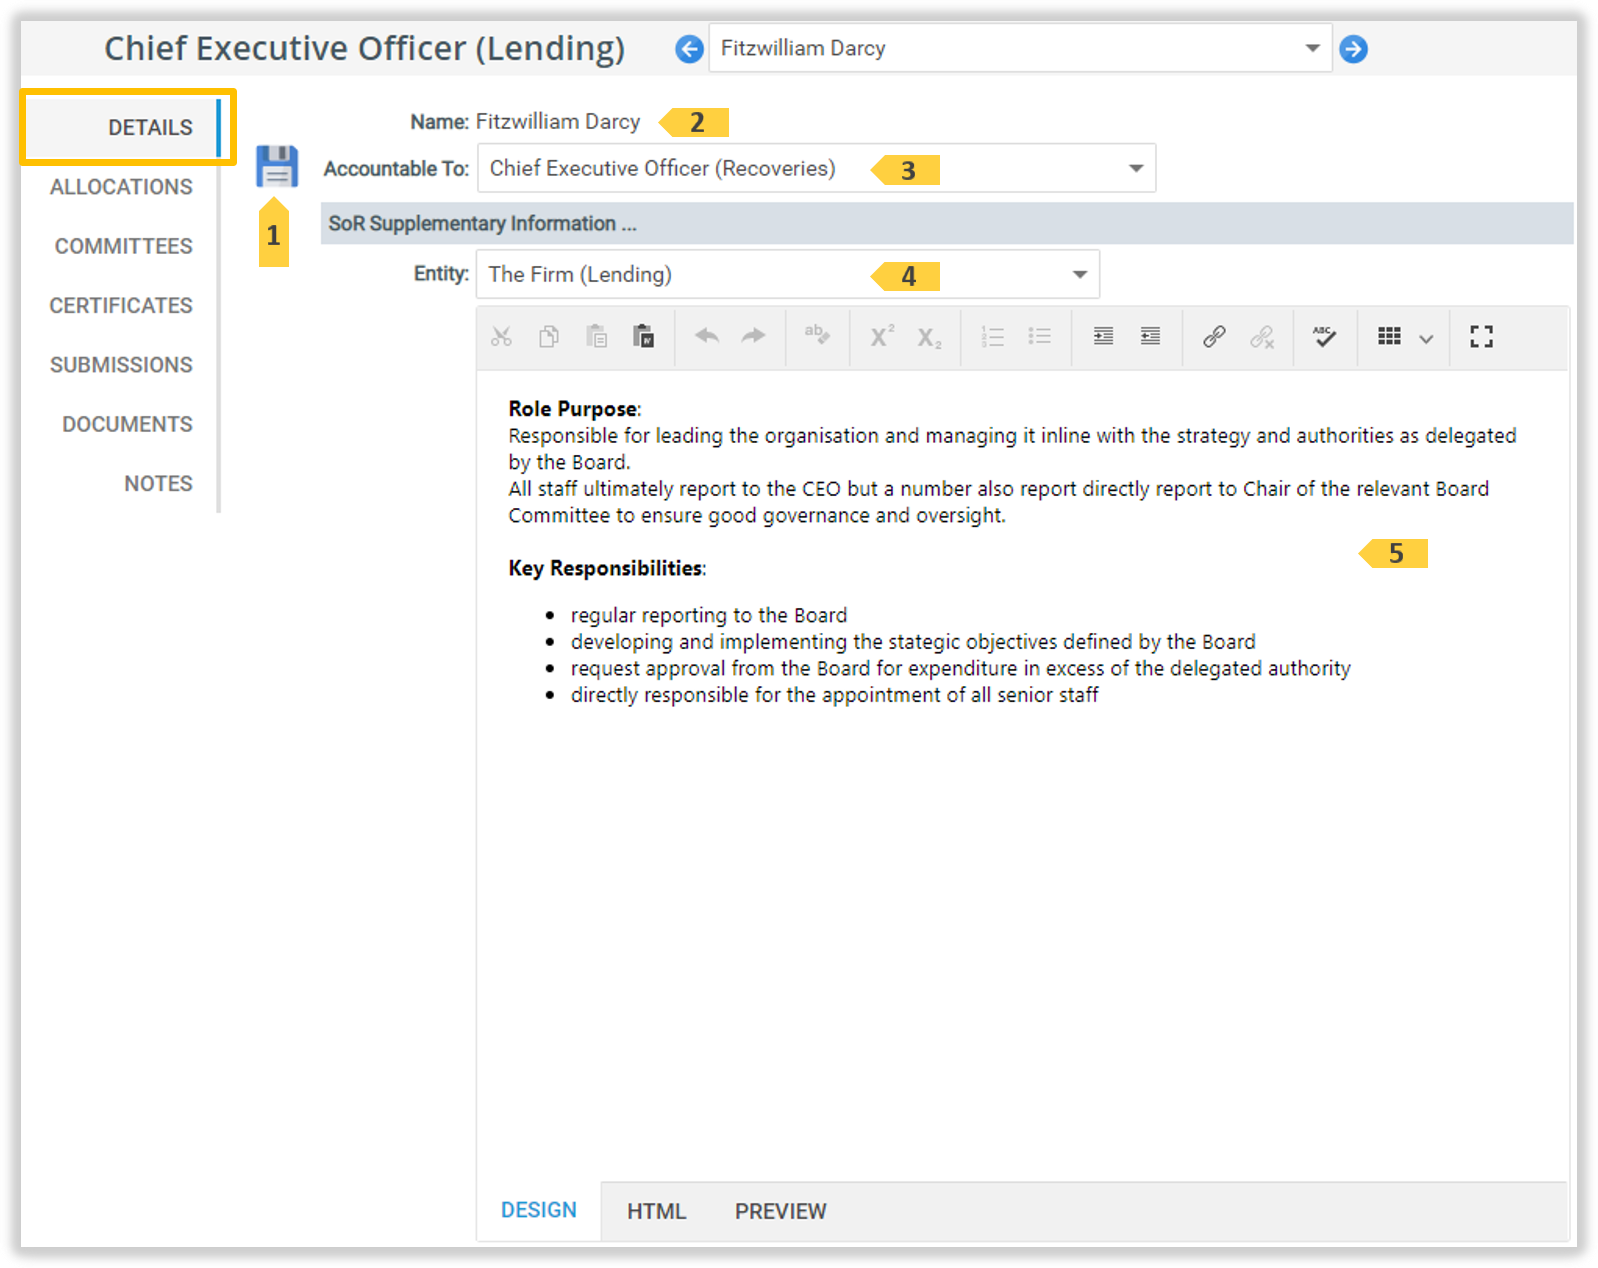
The Details tab
This Details tab displays the ‘Accountability To’ and ‘SoR Supplementary Information’, of the selected Person.
The ‘Details’ tab
The Details tab elements
The ‘Details’ tab elements
ID
Element
Description
1
‘Save’ icon
Click this icon to save the change to the fields 3 to 5 only.
2
‘Name’ field
Display the name of the Accountable Person.
3
‘Accountable To’ selector
Displays the Person the selected Person 2 is accountable to. The possible ‘Accountable To’ people can be view by clicking this selector.
4
‘Entity’ selector
Click this field to select the available Entities.
5
Information field.
This is an optional field to to store any Supplementary Information for a Statement of Responsibility. (Also see Show Statement of Responsibility.)
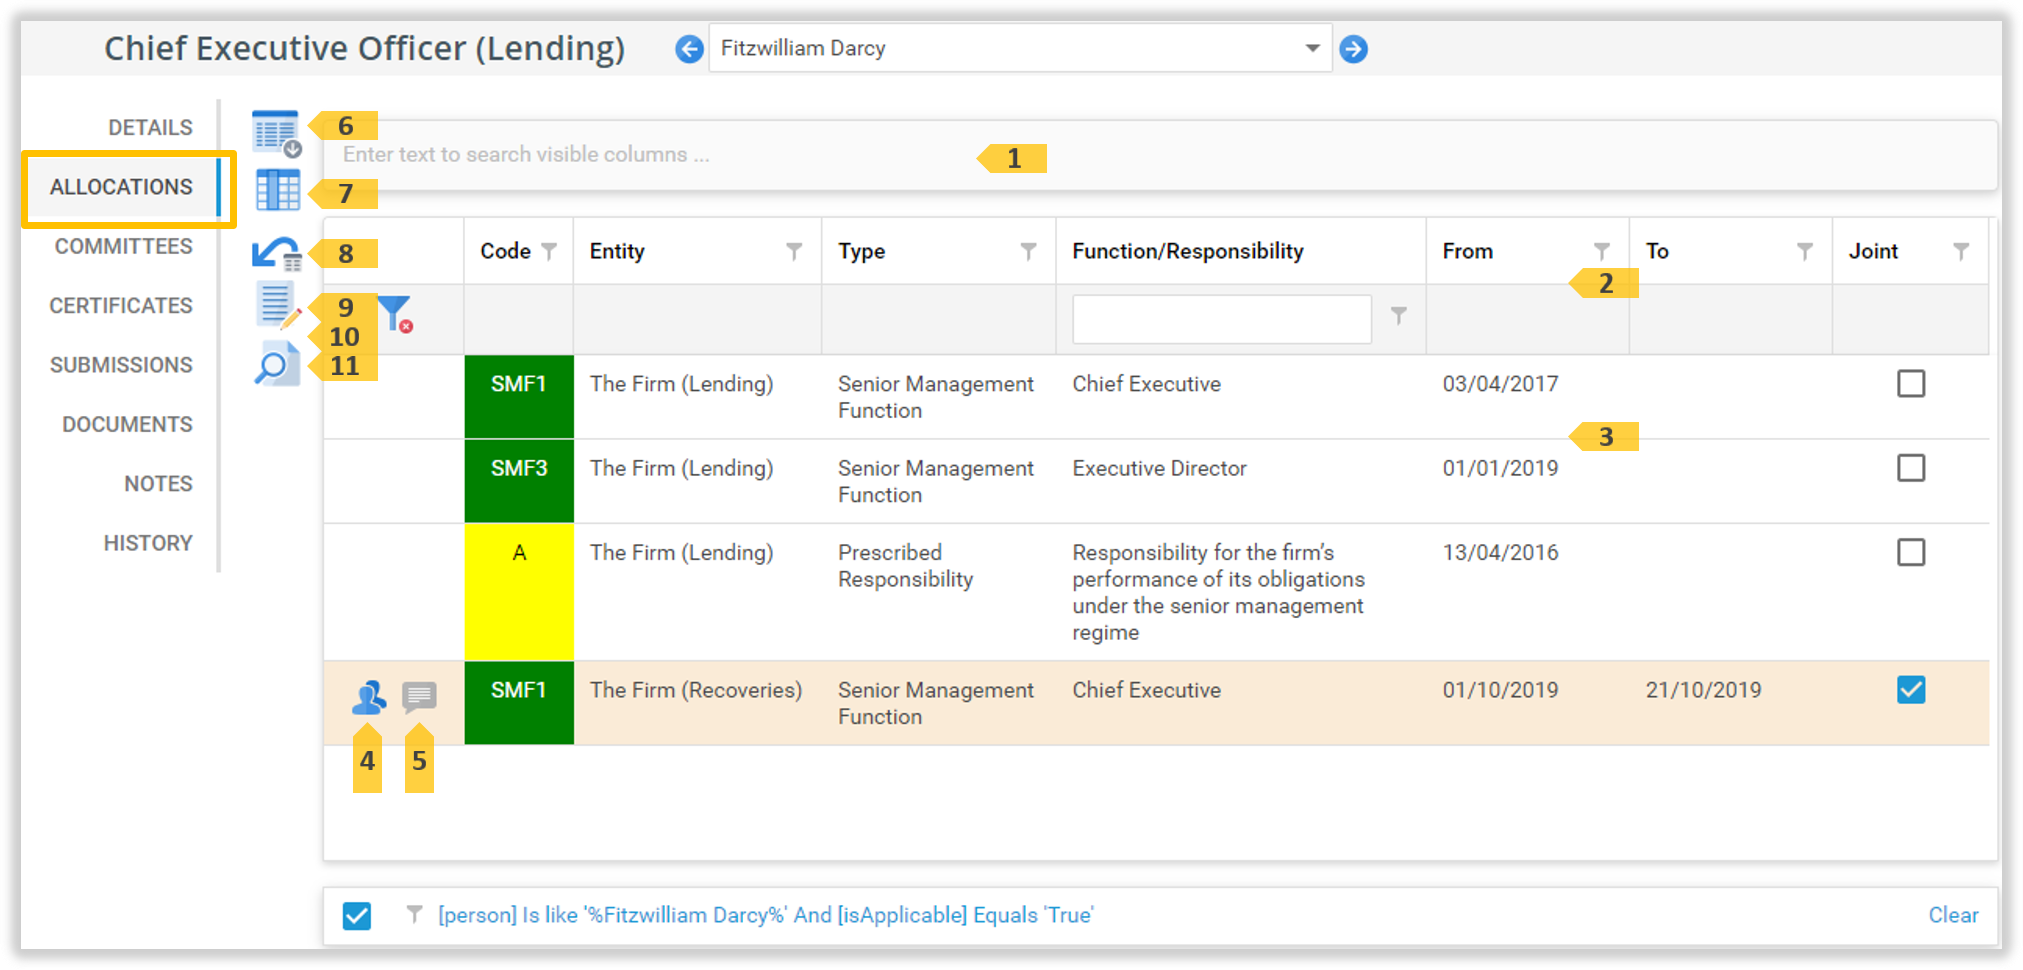
The Allocations tab
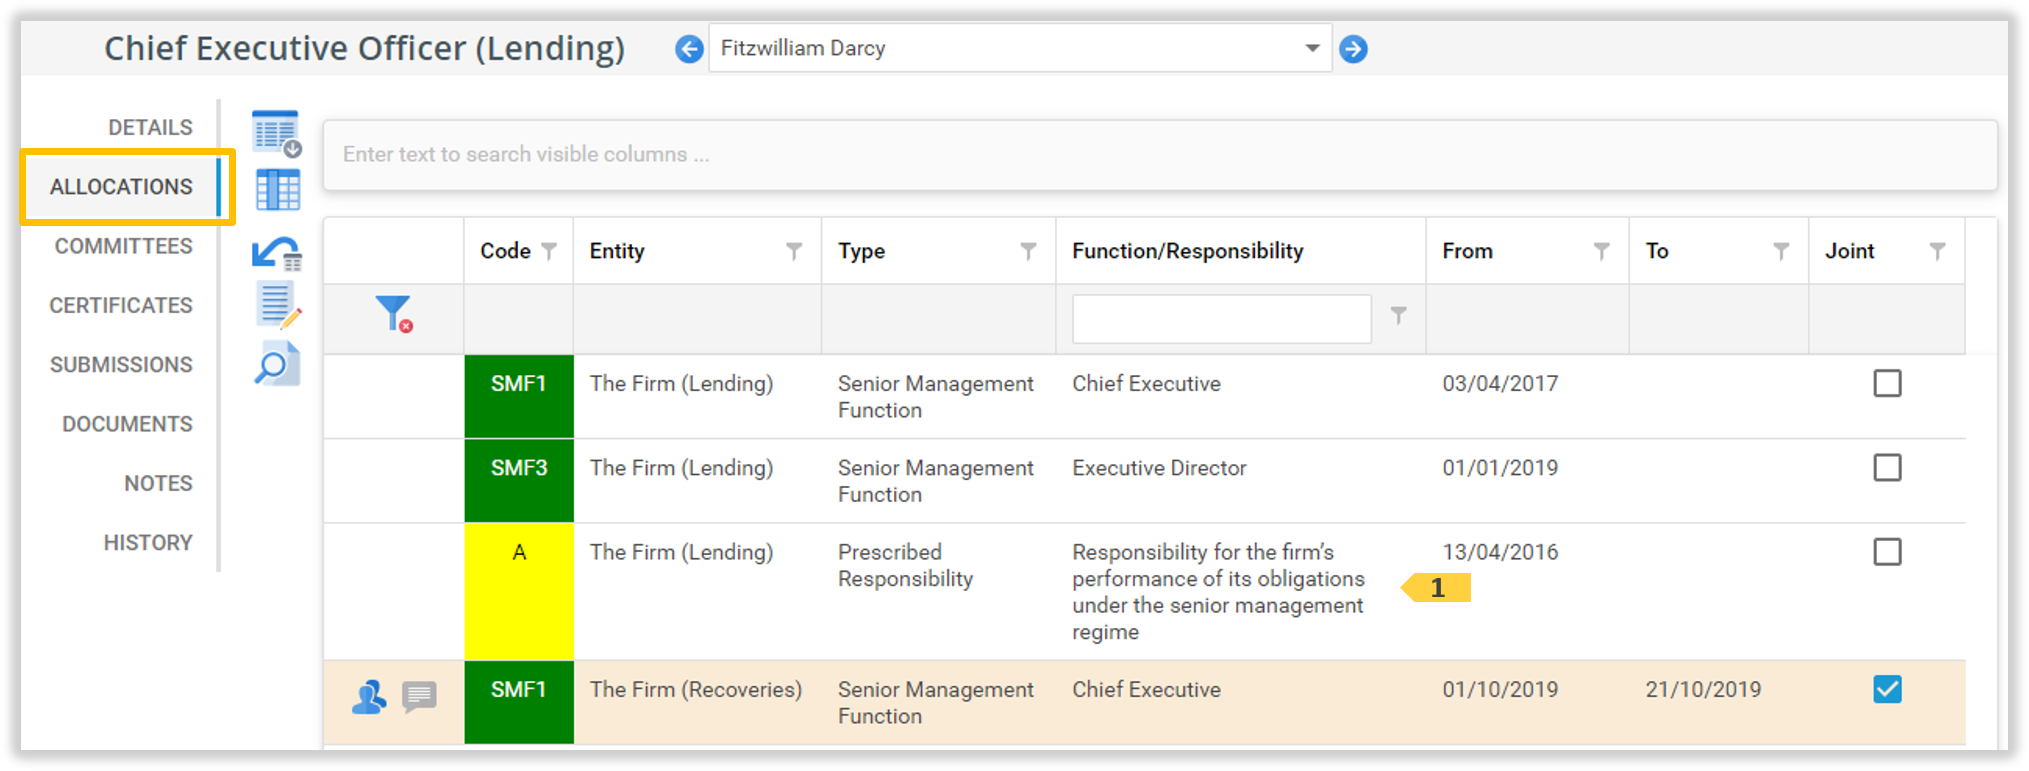
The Allocations tab displays the allocations to this Accountable Person and for what duration.
Use the controls in the Column Headers to filter the Allocations in the list.
3
‘Allocations’ List
This list displays all the allocations for the Accountable Person. Click a Record in this list to edit the ‘From’ and ‘To’ date. Editing requires the correct Security access.
4
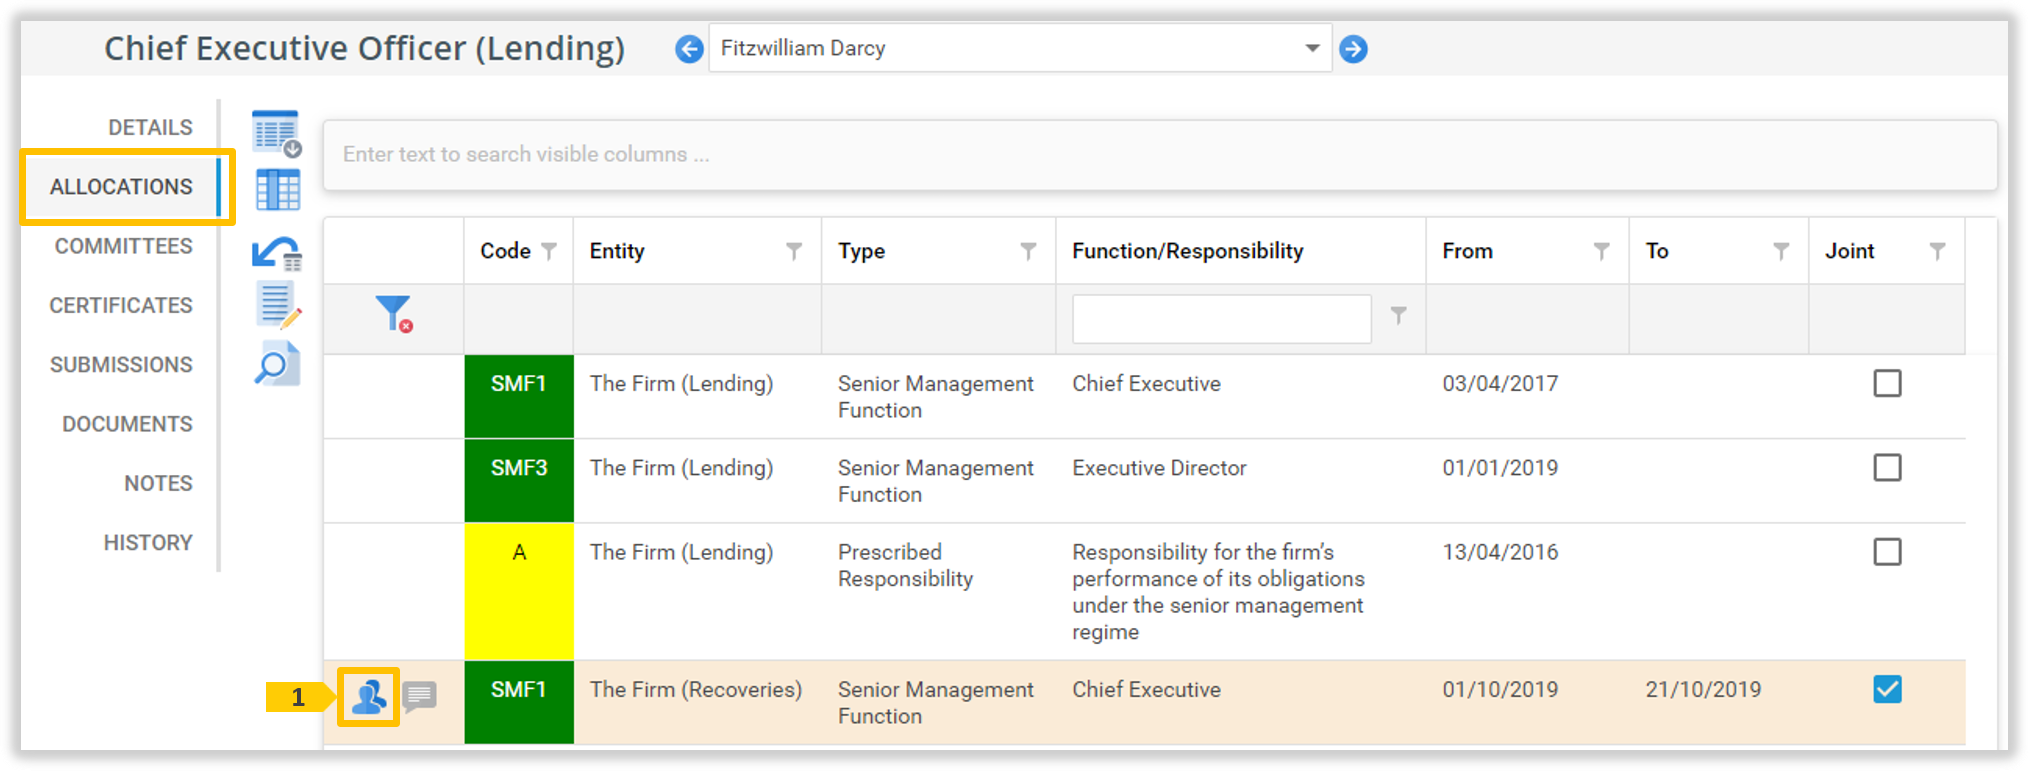
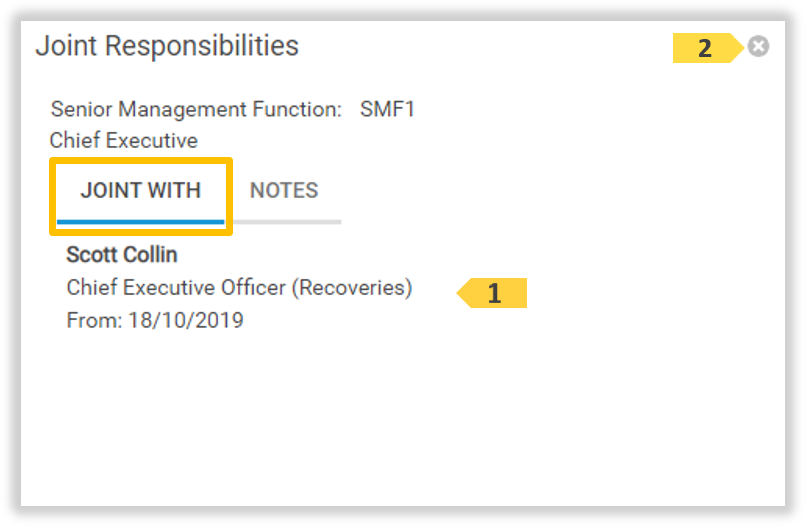
‘Show Joint Responsibility’ icon
This icon displays when responsibilities overlap between accountable people as indicated by the Joint column. Click this icon to view with whom and when the Joint Responsibilities occur.
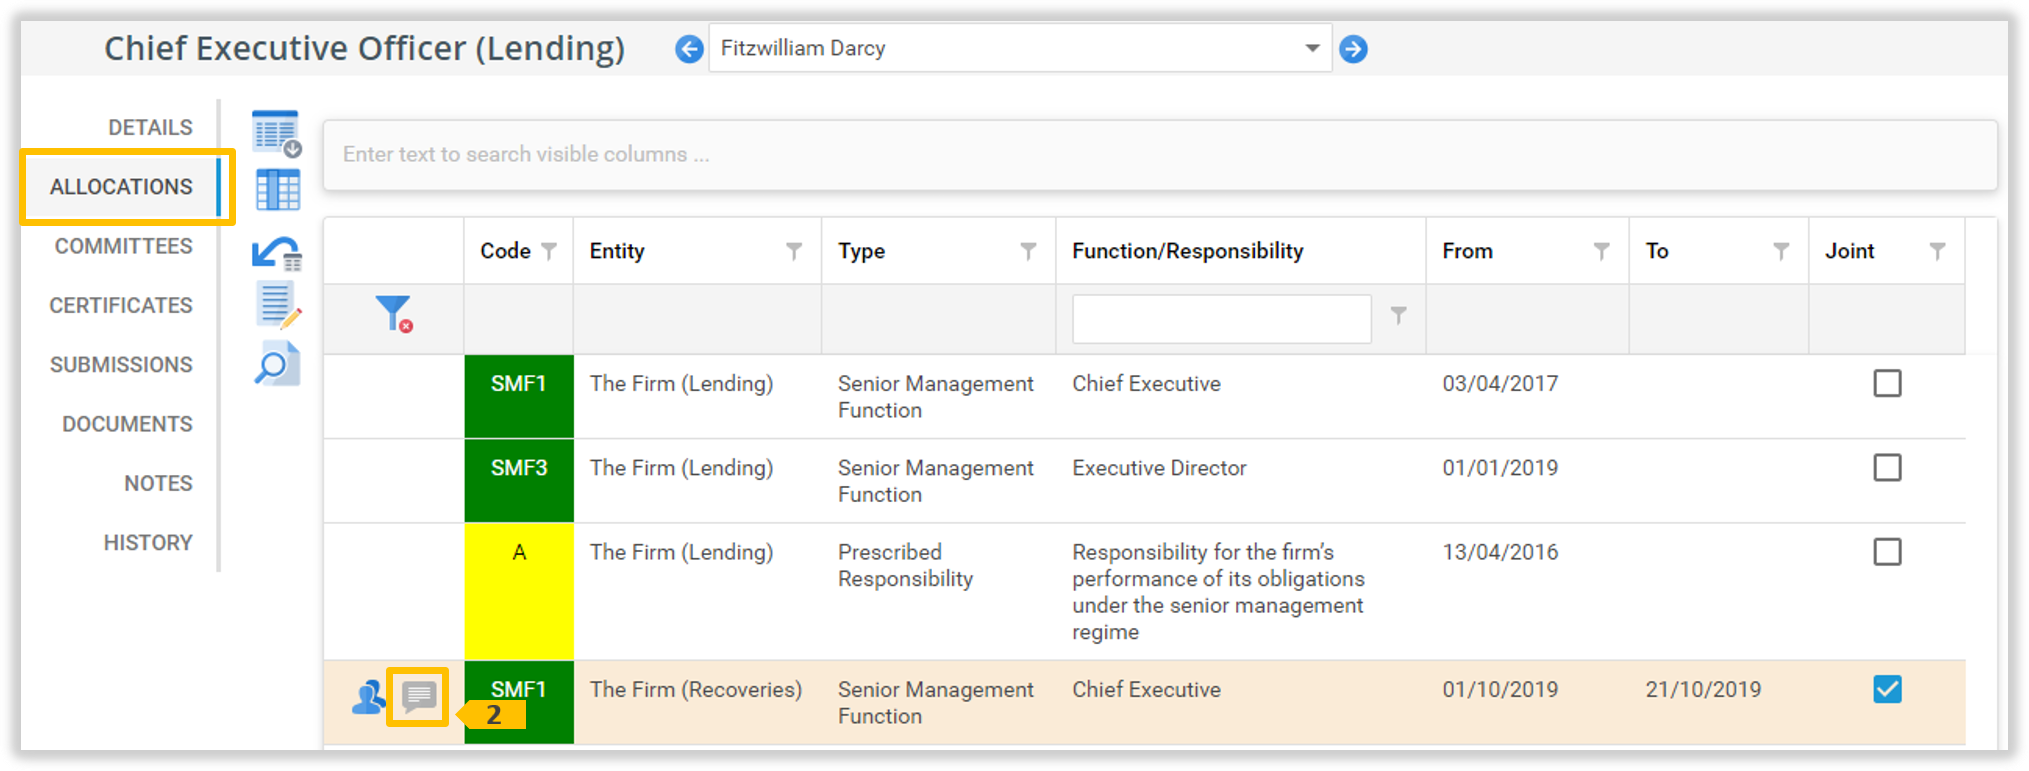
5
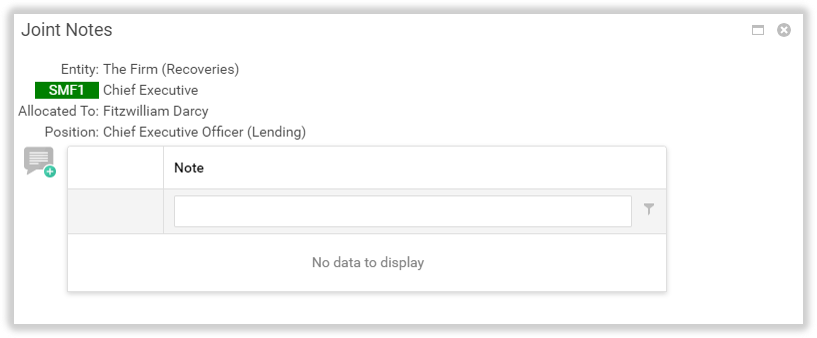
‘Joint Notes’ icon
Click this icon to display the Notes added for this Joint Responsibility.
6
‘Export’ icon
Click this icon to export the Allocations 3 List in Microsoft Excel or Word format.
7
‘Hide/Show Column’ icon
Click this icon to hide/show Allocation columns using the Field Chooser. Fields can be sorted and filtered while hidden.
8
‘Reset grid’ icon
Click this icon to reset the columns in the grid to a default layout.
9
‘Accountability Sign-off Tasks’ icon
Click this icon to open the ‘Accountability Sign-off Tasks’ window.
10
‘Accountability Sign-off History’ icon
Not Shown. Click this icon to open the ‘Accountability Sign-off History’ window.
11
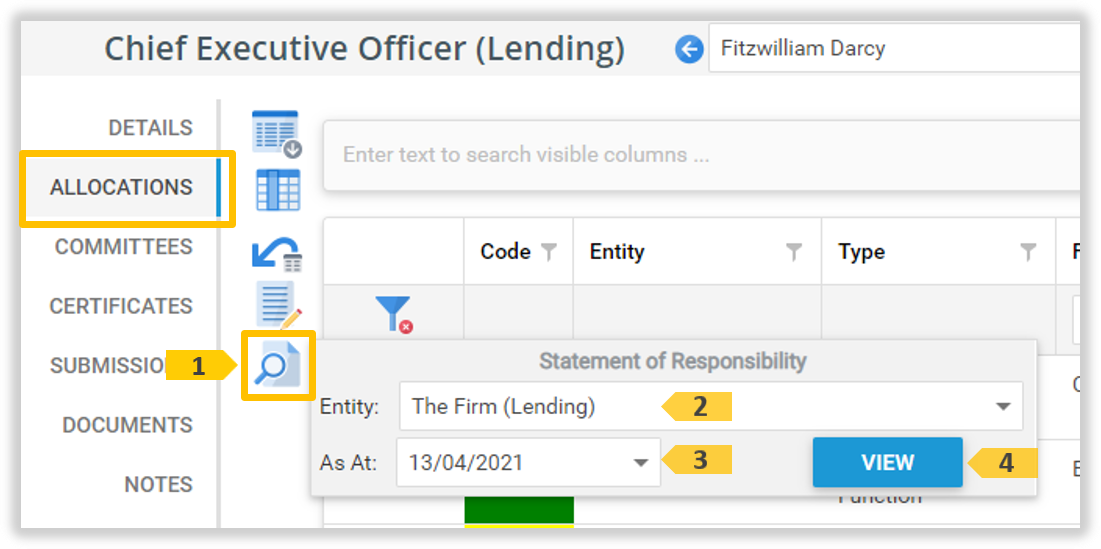
‘Statement of Responsibility’ icon
Hover over, or click, this icon to open the ‘Statement of Responsibility’ selection window. Select the Entity and ‘As At’ date, then click the ‘View’ button to open the ‘Statement of Responsibility’ content window.
The Committees tab
The Committees tab displays all the Committees for this Accountable Person and for what duration.
Use the controls in the Column Headers to filter the Committees in the list.
3
‘Committees’ List
This list displays all the Committees for the Accountable Person. Click a Record in this list to open the Committee Record page for viewing or editing depending on your Security access.
4
‘Export’ icon
Click this icon to export the Committees 3 List in Microsoft Excel or Word format.
5
‘Hide/Show Column’ icon
Click this icon to hide/show Committees columns using the Field Chooser. Fields can be sorted and filtered while hidden.
6
‘Reset grid’ icon
Click this icon to reset the columns in the grid to a default layout.
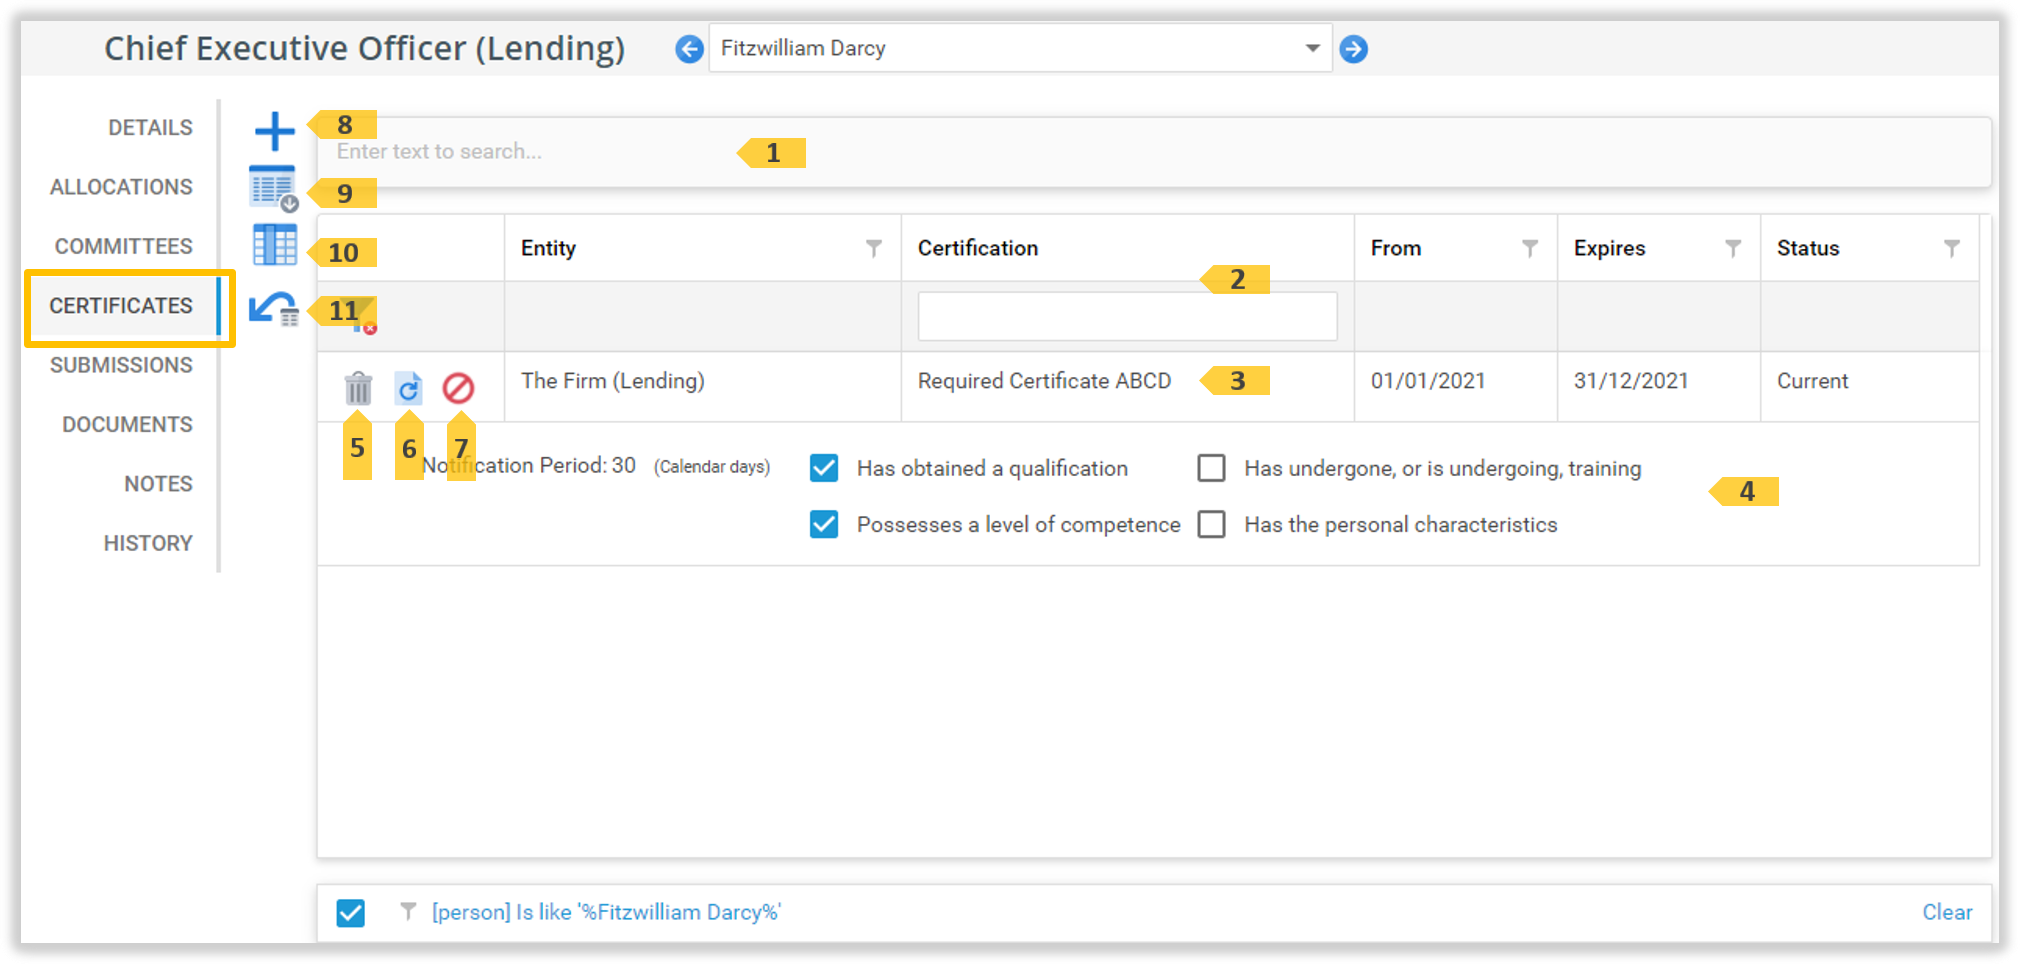
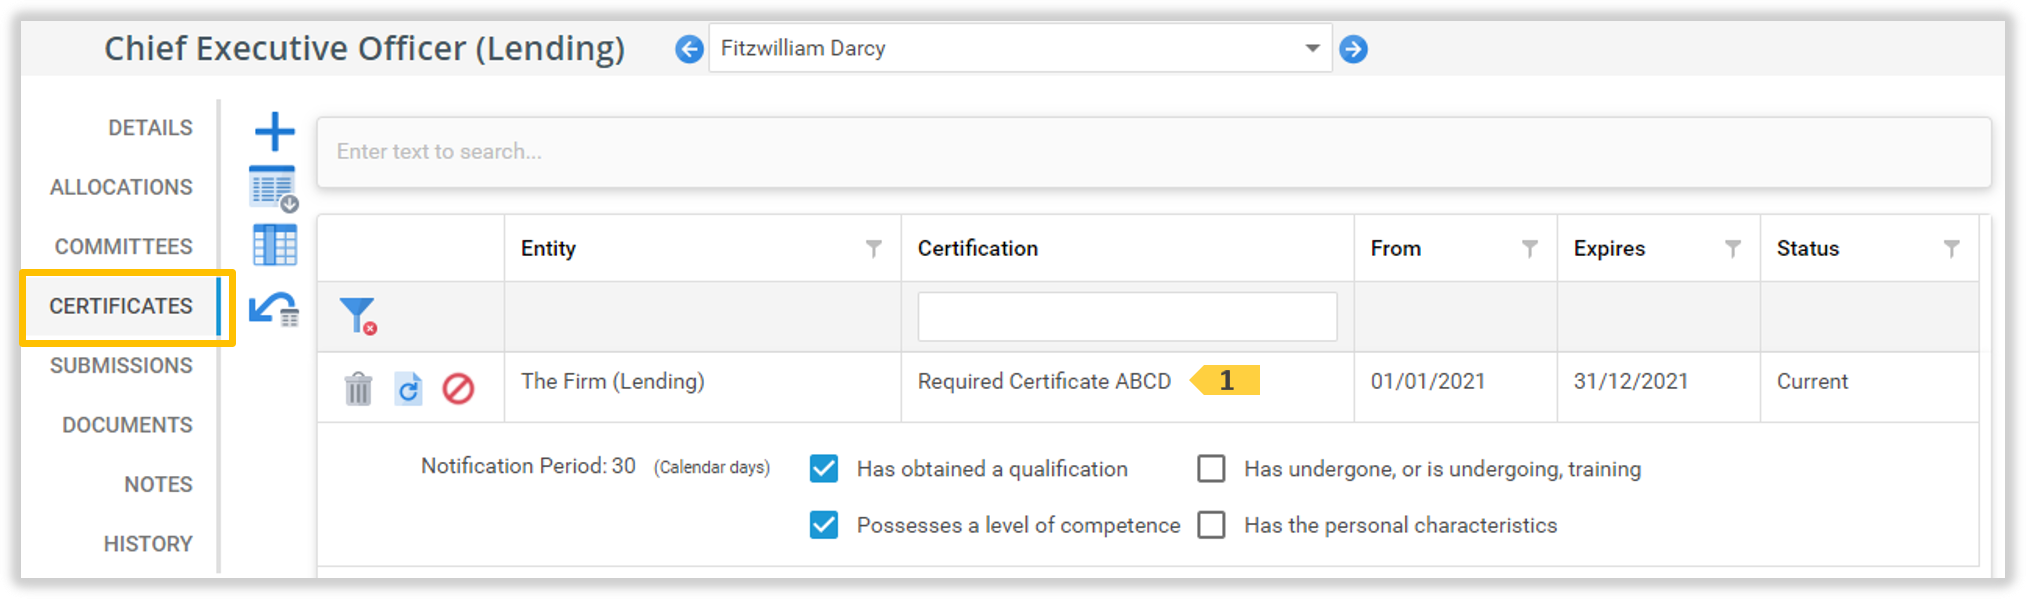
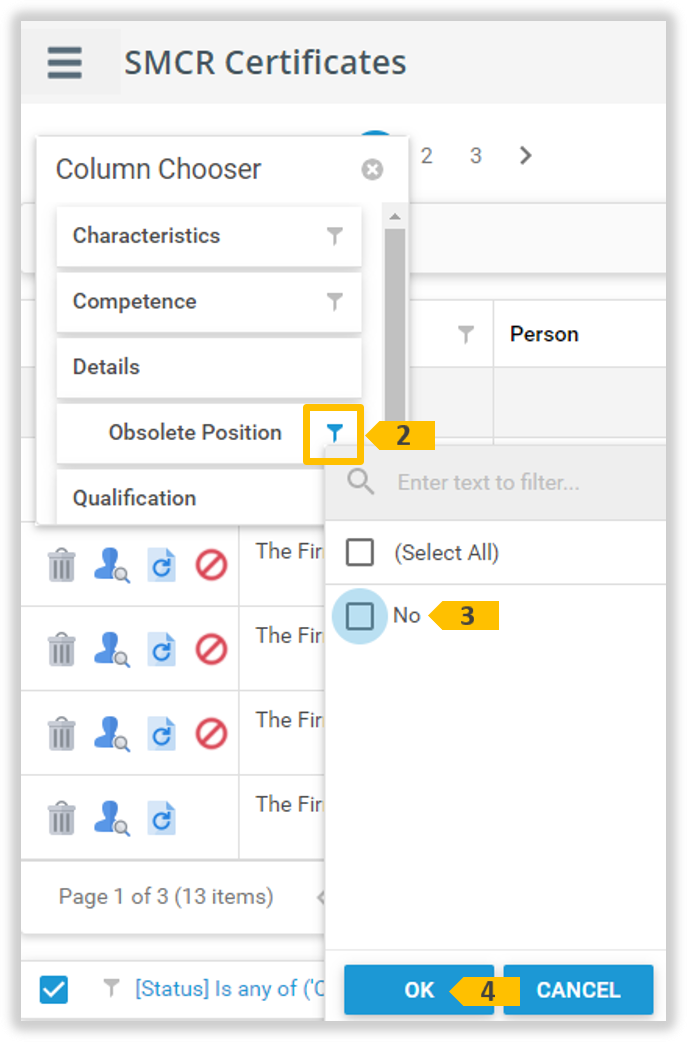
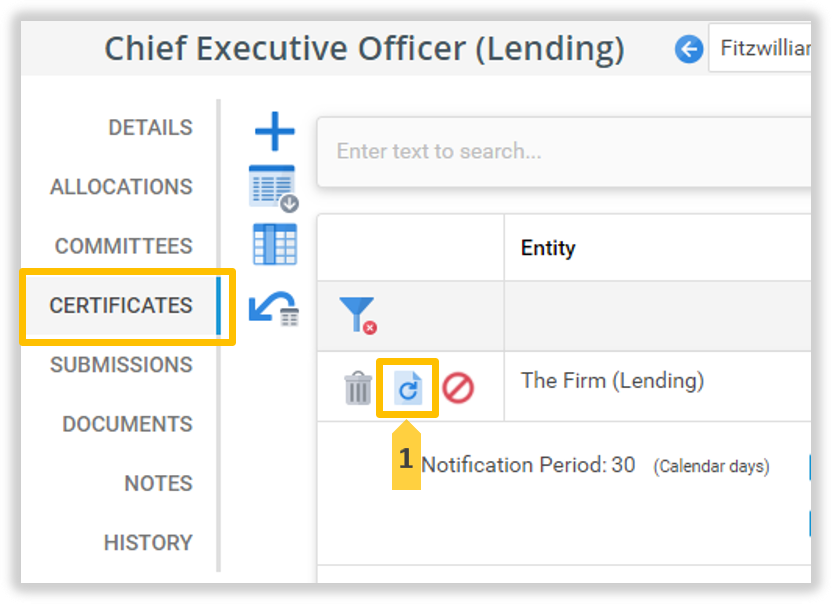
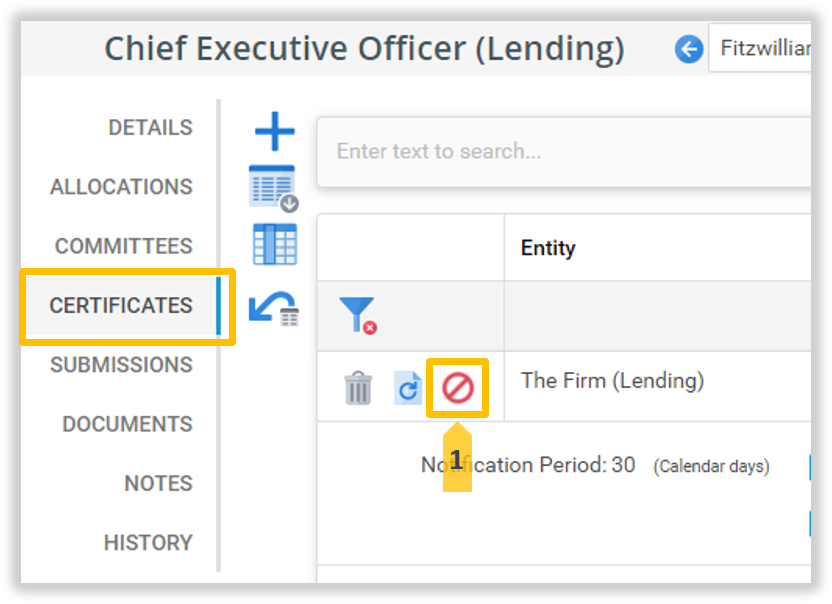
The Certificates tab
The Certificates tab displays all the Certificates for this Accountable Person, showing the duration/ongoing period, and when they were/are current.
Use the controls in the Column Headers to filter the Certificates in the list.
3
‘Certificates’ List
This list displays all the Certificates for the Accountable Person. Click a Record in this list to open the Certificates window for viewing or editing depending on your Security access. A Certificate Renewal task scheduled can be setup.
4
Certificate List
This is the Notification section of the Certificate 3 record.
5
‘Delete’ icon
Click this icon to Delete this Certificate. A ‘Confirm Delete’ dialog is displayed to remind you that deleting this Record will result in instant and unrecoverable removal of data. Note: This icon only displays if you have ‘Edit’ security access.
6
‘Renew’ icon
Click this icon to open the Renew Certificate window. The dates of the Certificate can be manually updated here.
7
‘Terminate’ icon
Click this icon to open the Terminate Certificate window. The Date and Reason for Termination can be record here.
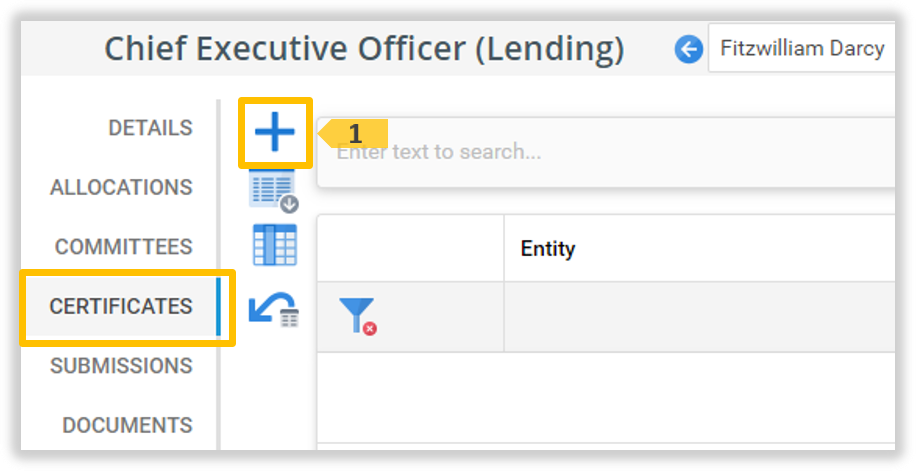
8
‘New Certificate’ icon
Click the ‘New Certificate’ icon to create a new Certificate for this Accountable Person. Each new Certificate Record is displayed in the Certificates 3 List .
9
‘Export’ icon
Click this icon to export the Certificates 3 List in Microsoft Excel or Word format.
10
‘Hide/Show Column’ icon
Click this icon to hide/show Certificates columns using the Field Chooser. Fields can be sorted and filtered while hidden.
11
‘Reset grid’ icon
Click this icon to reset the columns in the grid to a default layout.
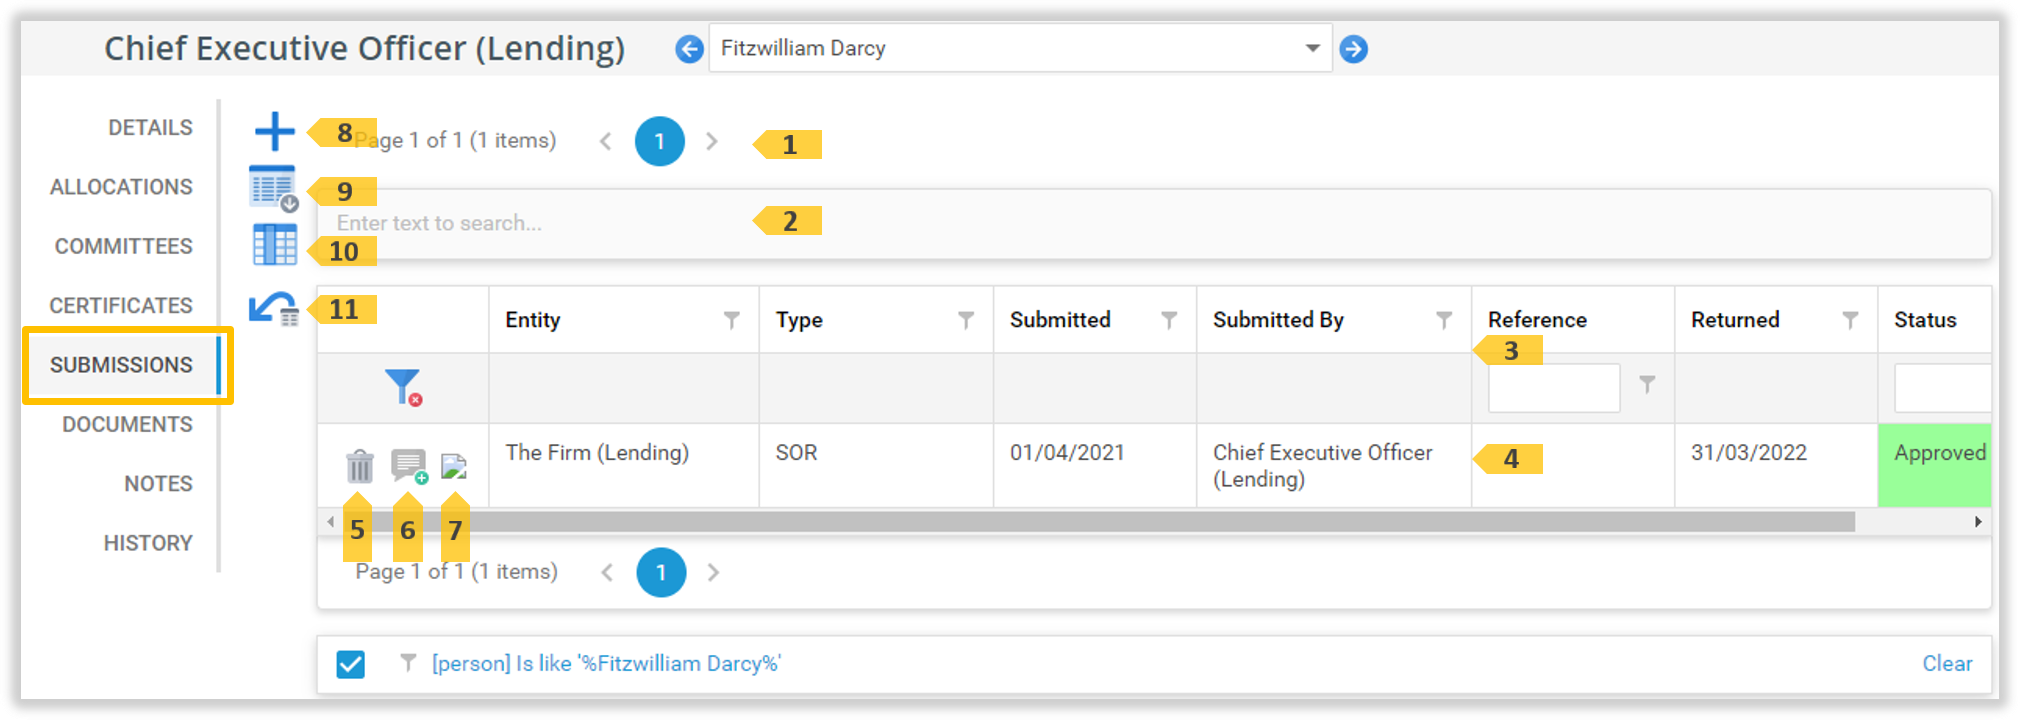
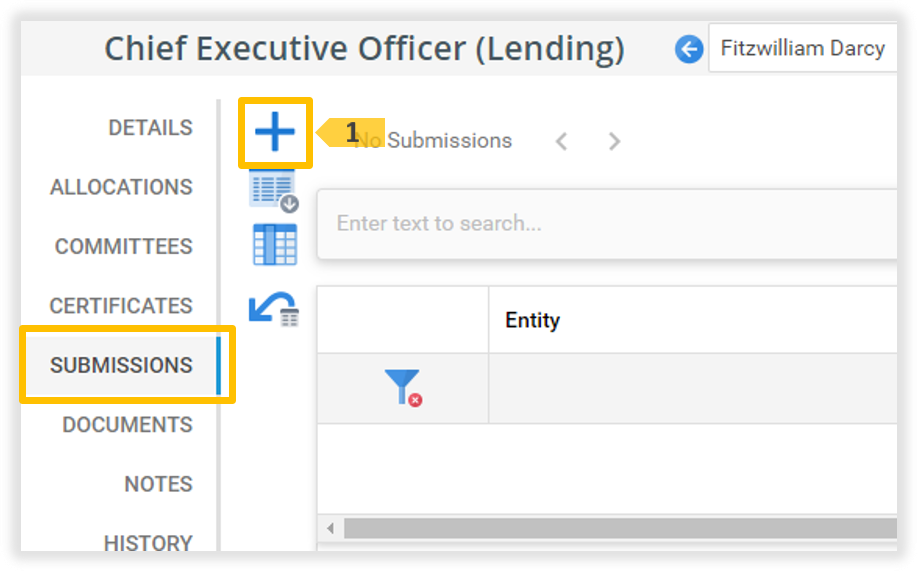
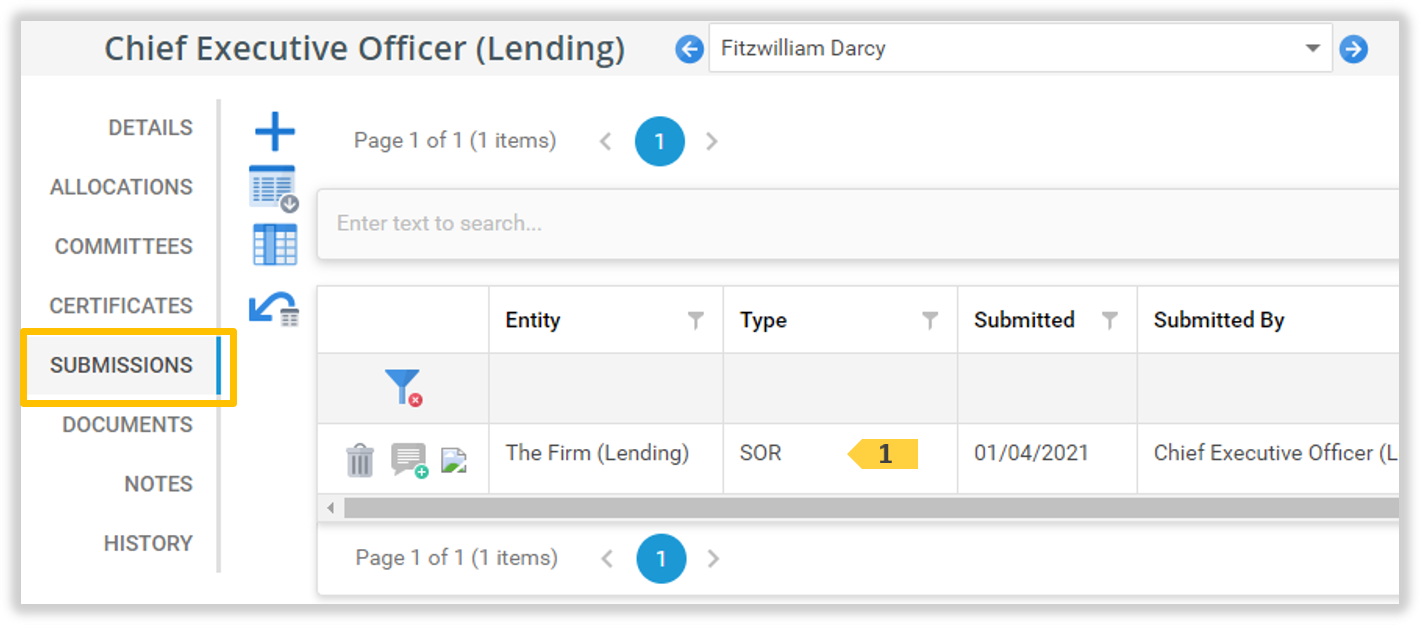
The Submissions tab
The Submissions tab displays all the Submissions for this Accountable Person and when they were current.
Use the controls in the Column Headers to filter the Submissions in the list.
4
‘Submissions’ List
This list displays all the Submissions to this Accountable Person. Click a Record in this list to open the Record in its own page for viewing or editing depending on your Security access.
5
‘Delete Submissions’ icon
Click this icon to Delete a Submission. A ‘Confirm Delete’ dialog is displayed to remind you that deleting this Record will result in instant and unrecoverable removal of data. Note: This icon only displays if you have ‘Edit’ security access.
6
Add ‘Notes’ icon
Click this icon to add a new Note to this Submissions record.
7
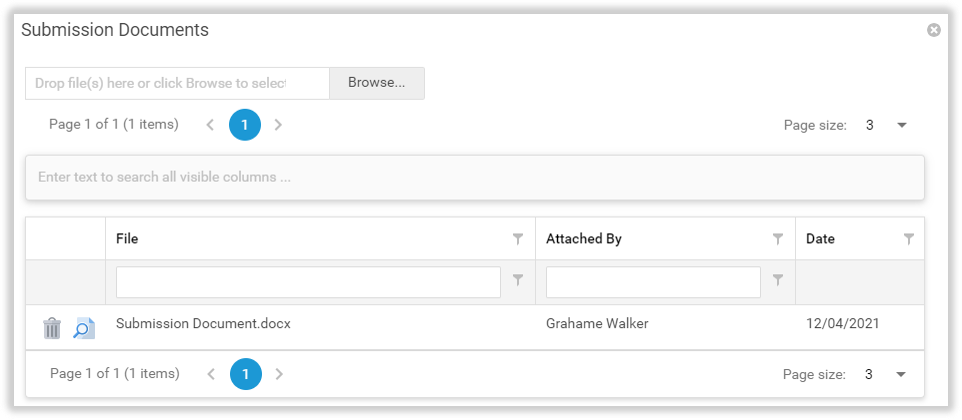
‘Submission Documents’ icon
Click this icon to open the Submission Documents window. This window display the Documents for this Submission. Additional Documents can be added to this Submission.
8
‘Add Submissions’ icon
Click this icon to create a new Submission for this Accountable Person. When added, the new Submission Record is displayed in the Submission 4 List.
9
‘Export’ icon
Click this icon to export the Submissions 4 List in Microsoft Excel or Word format.
10
‘Hide/Show Column’ icon
Click this icon to hide/show Submissions columns using the Field Chooser. Fields can be sorted and filtered while hidden.
11
‘Reset grid’ icon
Click this icon to reset the columns in the grid to a default layout.
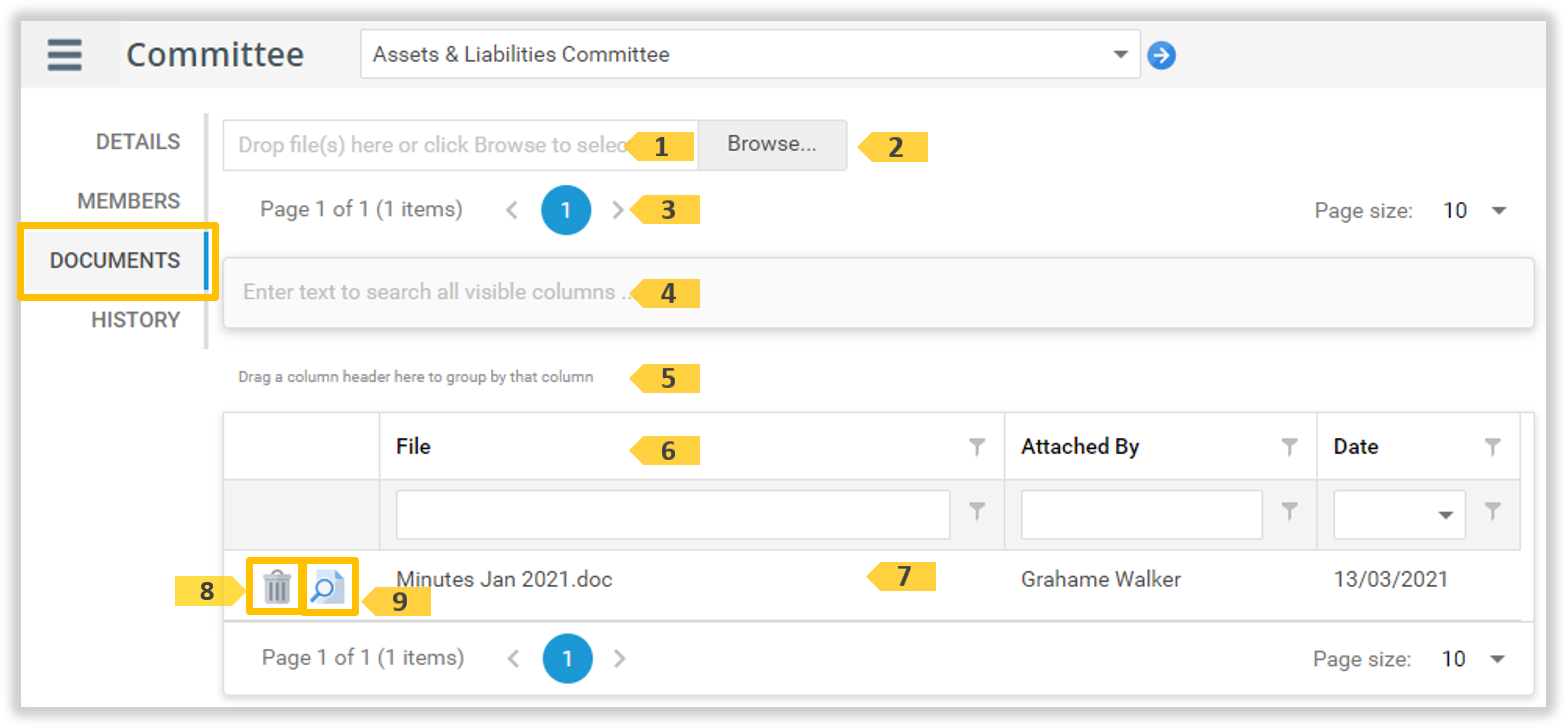
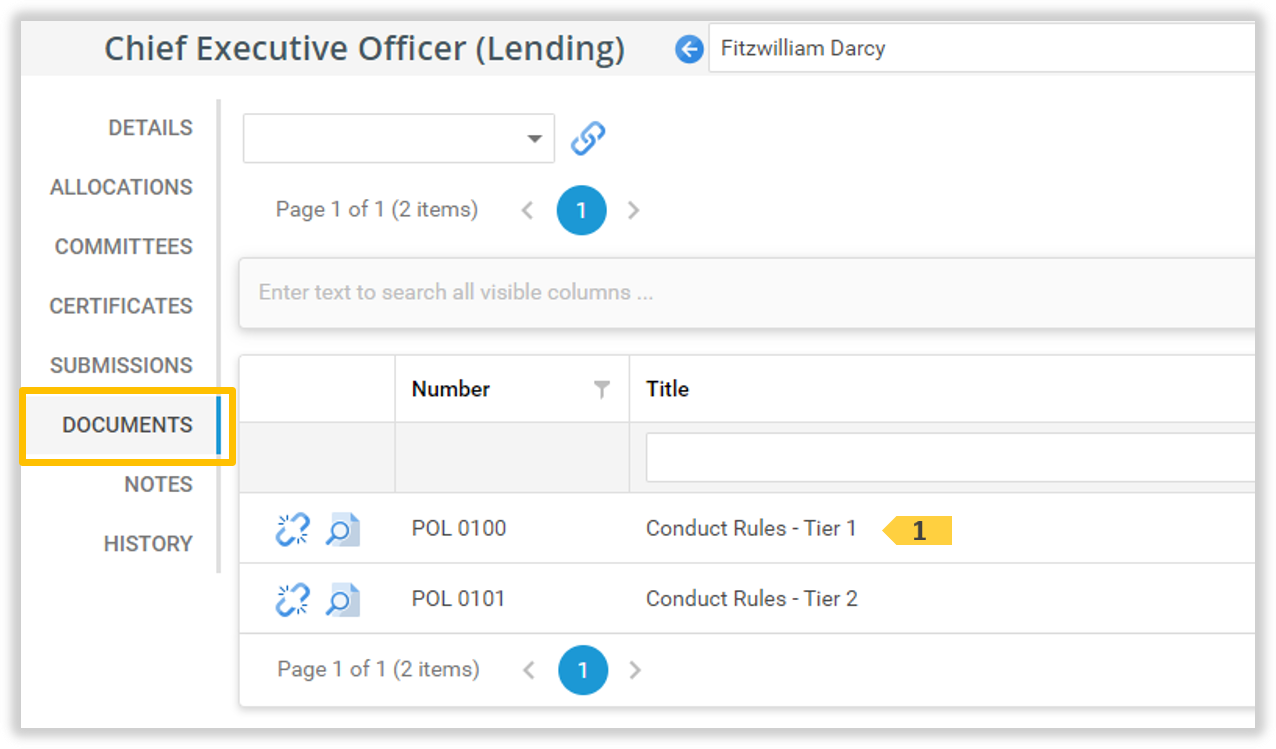
The Documents tab
The Documents tab displays the List of Document that have been linked to this Accountable Person.
Each Document can be viewed by clicking the View Document icon.
The ‘Documents’ tab
The Documents tab elements
The ‘Documents’ tab elements
ID
Element
Description
1
‘Document Drop’ field
Document files ‘mouse drag dropped’ or selected via the Browsed 2 button, will appear in this field for a few seconds before automatically being added to the Document list 7 below.
2
‘Browse’ button
Click Browse and then select the document to be attached. The selected document name will momentarily appear in the Document 1 field, before automatically being added to the Document list 7 below.
Use the controls in the Column Headers to filter the Documents in the list.
7
‘Documents’ list
This list displays all Documents linked to this Accountable Person.
8
‘Delete’ icon
Click this icon to Delete a Document. A ‘Confirm Delete’ dialog is displayed to remind you that deleting this Document is instant and not reversible.
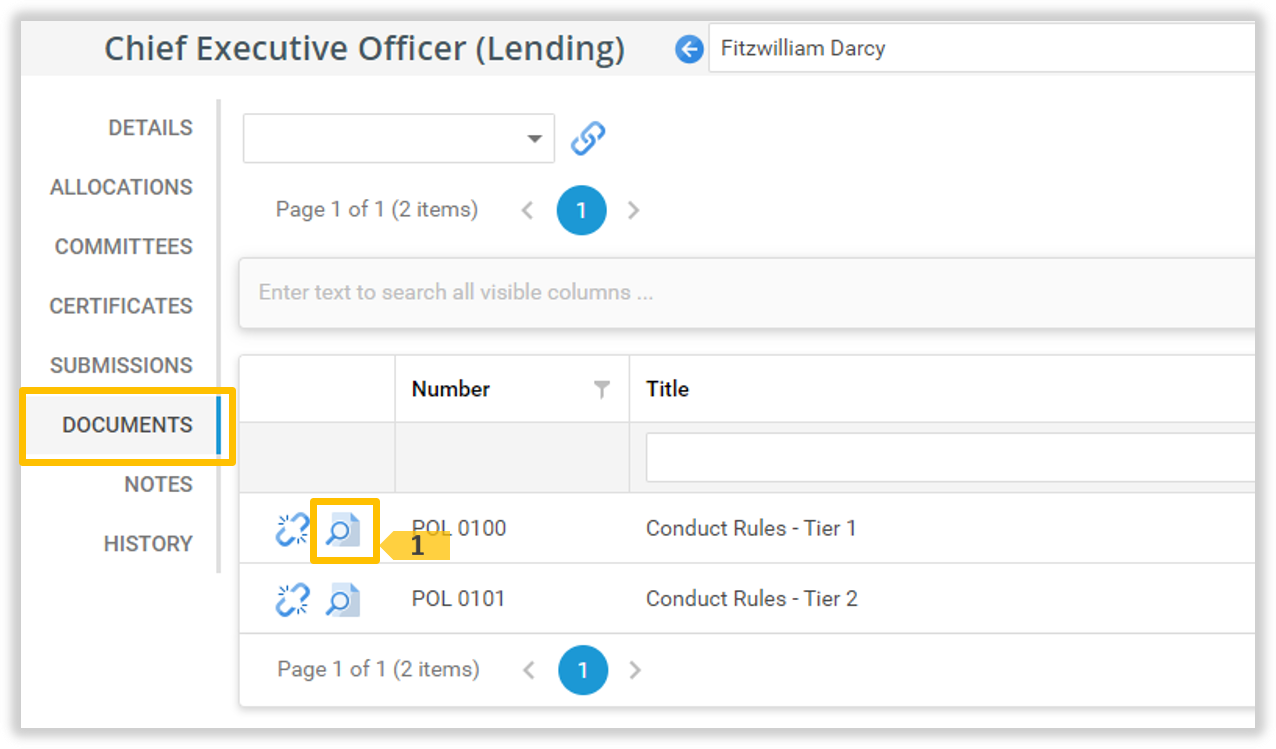
9
‘View the Document’ icon
Click this icon to open a Document viewing window.
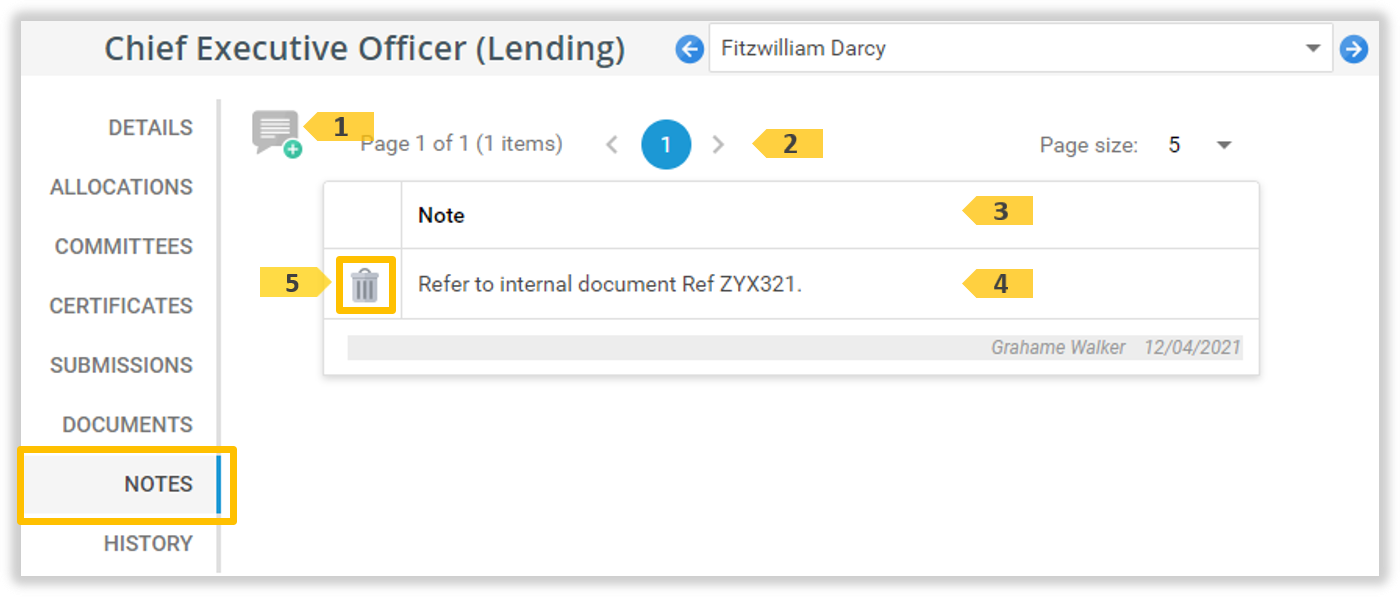
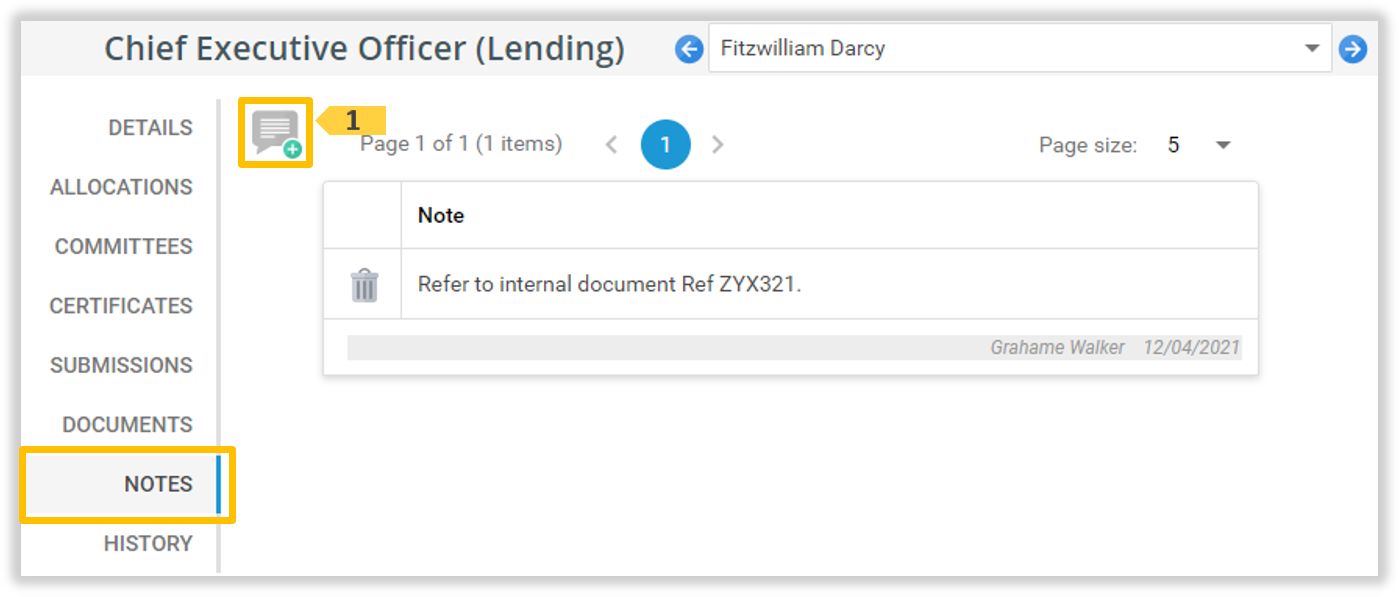
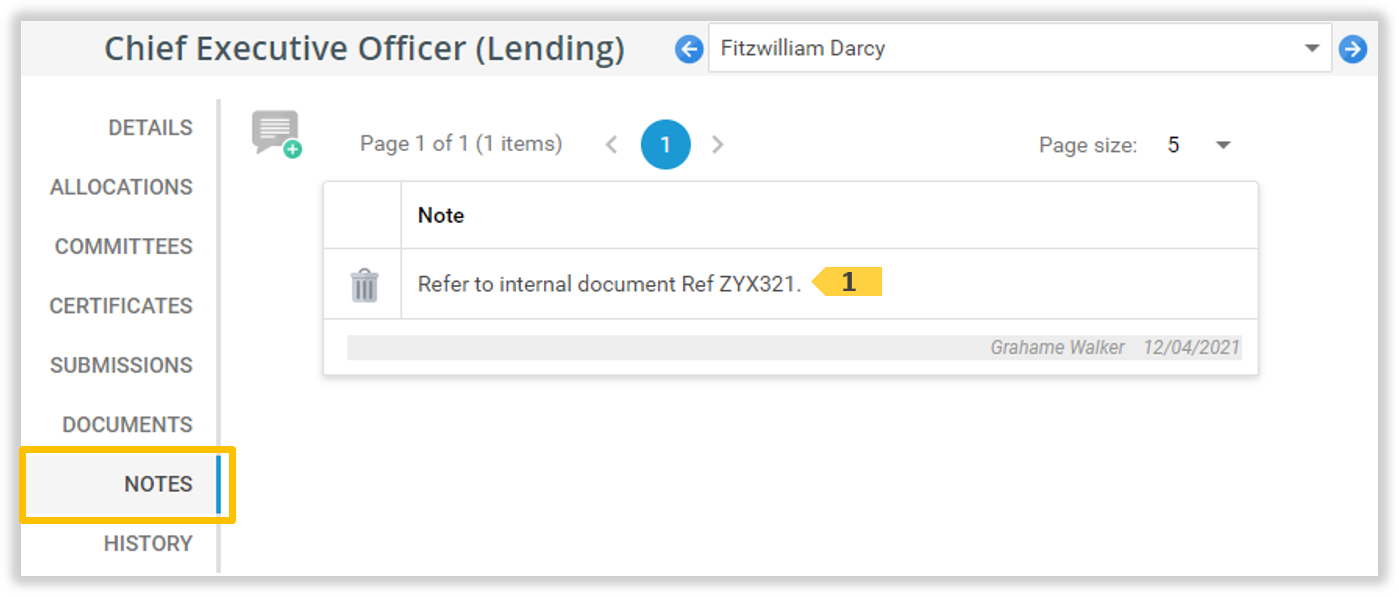
The Notes tab
The Notes tab displays a list of all Notes that have been added to this Accountable Person record. This tab can be used to add any relevant information relating to this Person as required. Positions with View or Edit access are permitted to add Notes. Positions with Edit access can also update or delete the Notes.
The ‘Notes’ tab
The Notes tab elements
The ‘Notes’ tab elements
ID
Element
Description
1
‘Add Note’ icon
Click this icon to a new Note. The ‘Add Note’ window is displayed. Note: This icon only displays if you have ‘Edit’ security access.
Use the controls in the Column Headers to filter the Notes in the list.
4
Notes list
Each Note in the list consists of two parts: the top part is the Note itself, and the bottom part (shaded) displays the Name of the person who created the Note plus a date of when the Note was created. Click this record to Edit this Note. The ‘Edit Note’ window is displayed. Note: The edit window will not displays if you do not have ‘Edit’ security access.
5
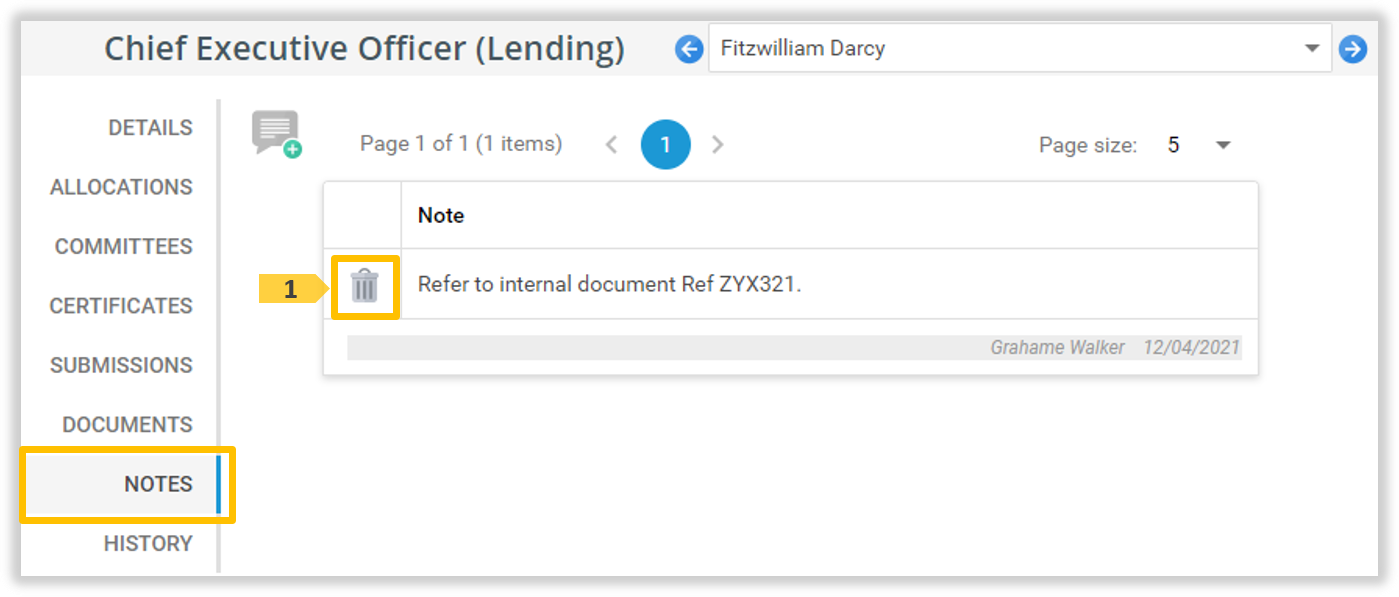
‘Delete Note’ icon
Click this icon to Delete a Note. A ‘Confirm Delete’ dialog is displayed to remind you that deleting this Record will result in loss of data. Note: This icon only displays if you have ‘Edit’ security access.
Procedures
Note: The SMCR Module must be enabled and, your Position must have access to SMCR records, for the SMCR menu options to appear.
Hover over, or click, the Menu Options (hamburger) icon, click the New Accountable Only Person option.
The Add Accountable Only Person window displays. Enter the fields 1 through 10 as required (see The Add Accountable Only Person window for more information on each field). Click the ‘Save’ 10 icon. (Or, click the Cancel 12 icon.)
The new Person displays in the Accountable People list.
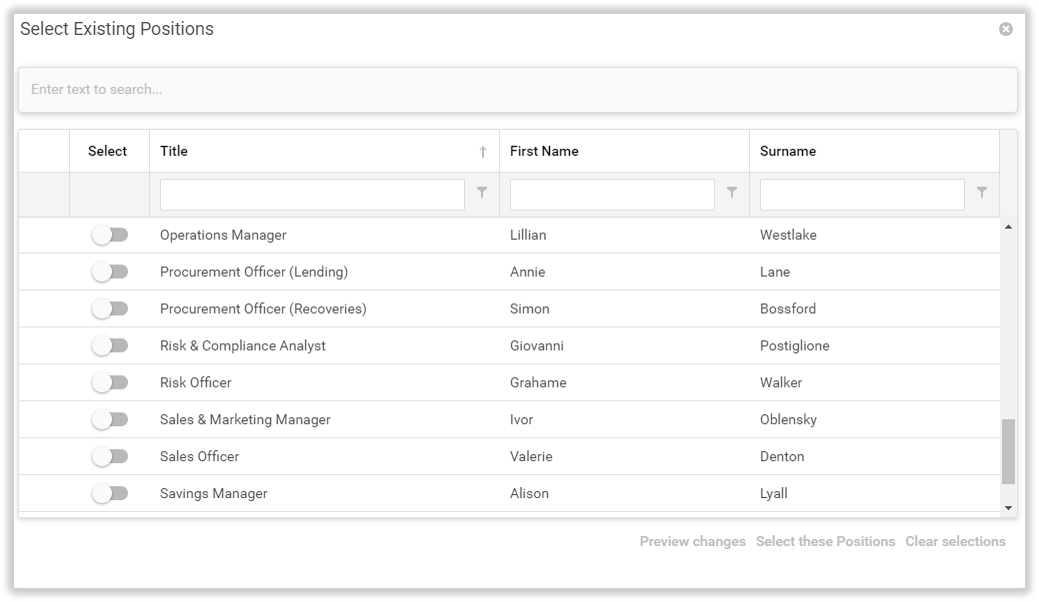
Add Existing Positions
Existing Positions in TriLine GRC can be given view access to the SMCR module. This can also be done from the Security Centre.
Hover over, or click, the Menu Options (hamburger) icon, click the Select Existing Positions option.
The Select Existing Positions window displays. The Positions listed currently do not have access to SMCR.
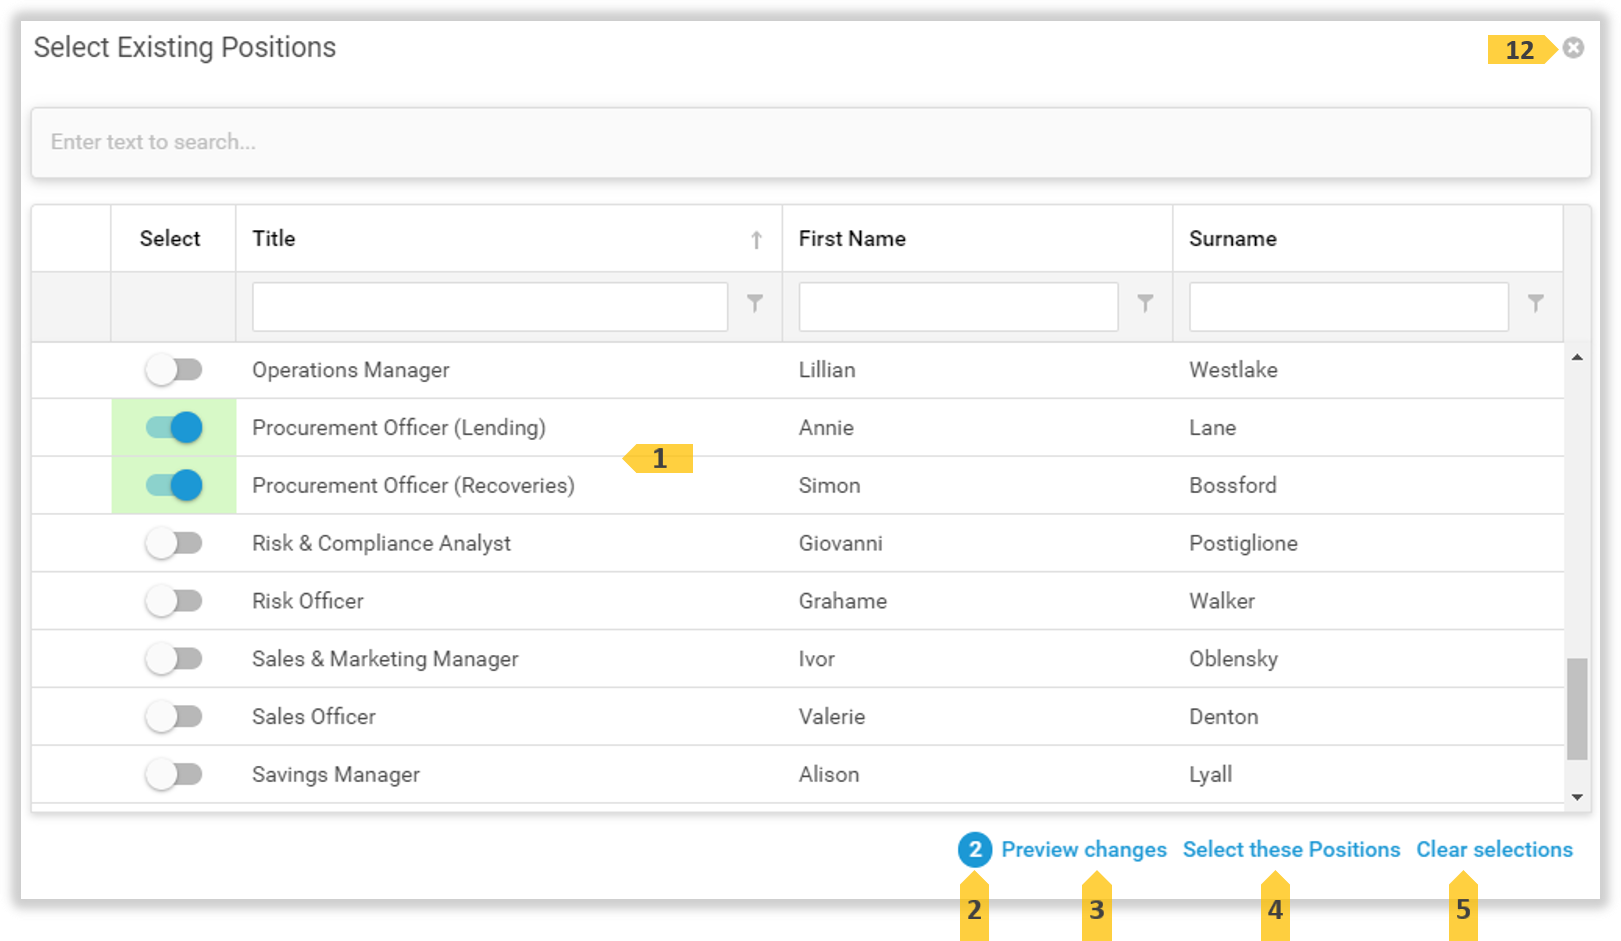
Click the Selection switch 1 of People you with to give View access SMCR. The number of selections you have made will be shown in counter 2. Click the Preview changes3 button.
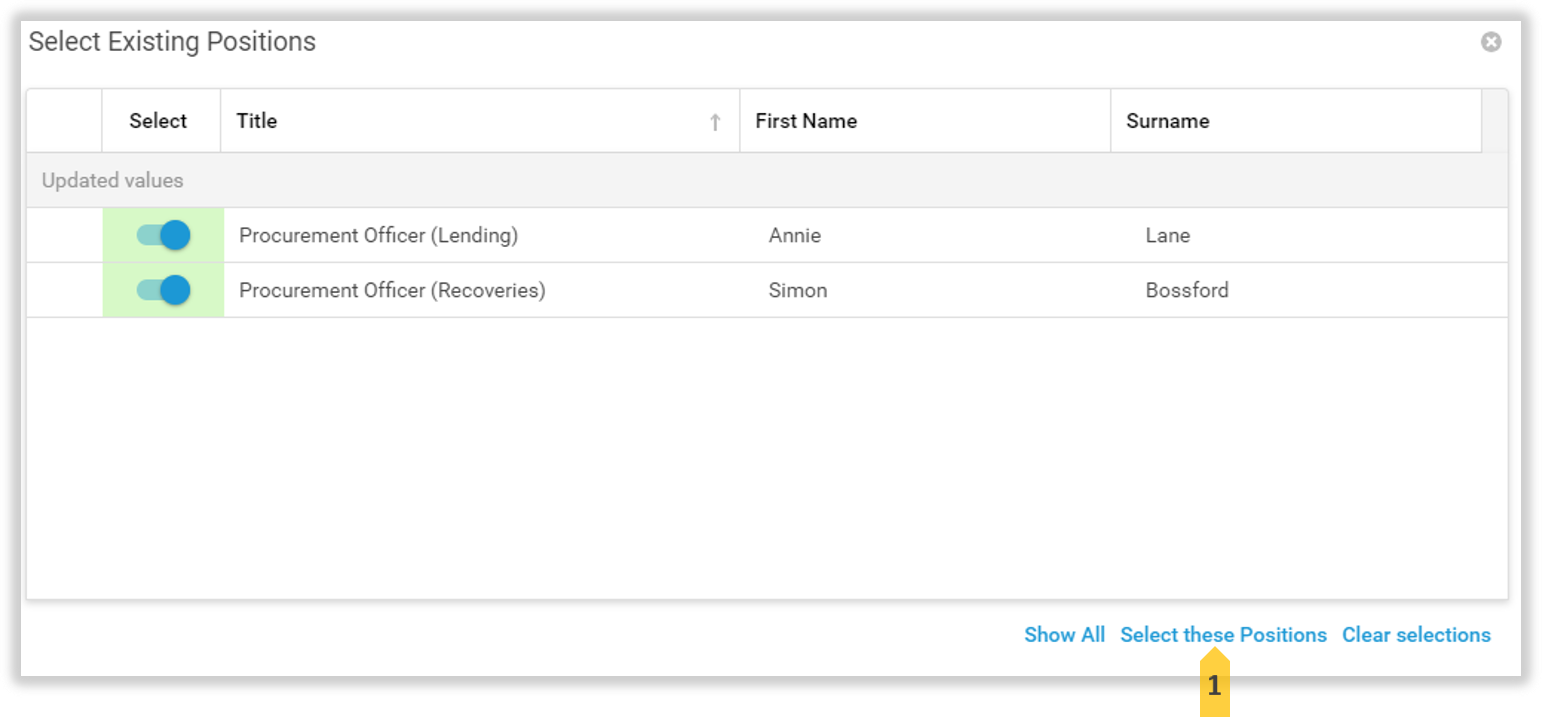
The list is filtered to display your selections. Selections can be removed if required. Click the Select these Positions1 button, to add these Positions to the Positions that can access SMCR.
Those positions now have access to SMCR. The list of remaining Positions that do not have access to SMCR is re-displayed. More Positions can be select by following steps 4 and 5. To finish, click the Close window 1 icon.
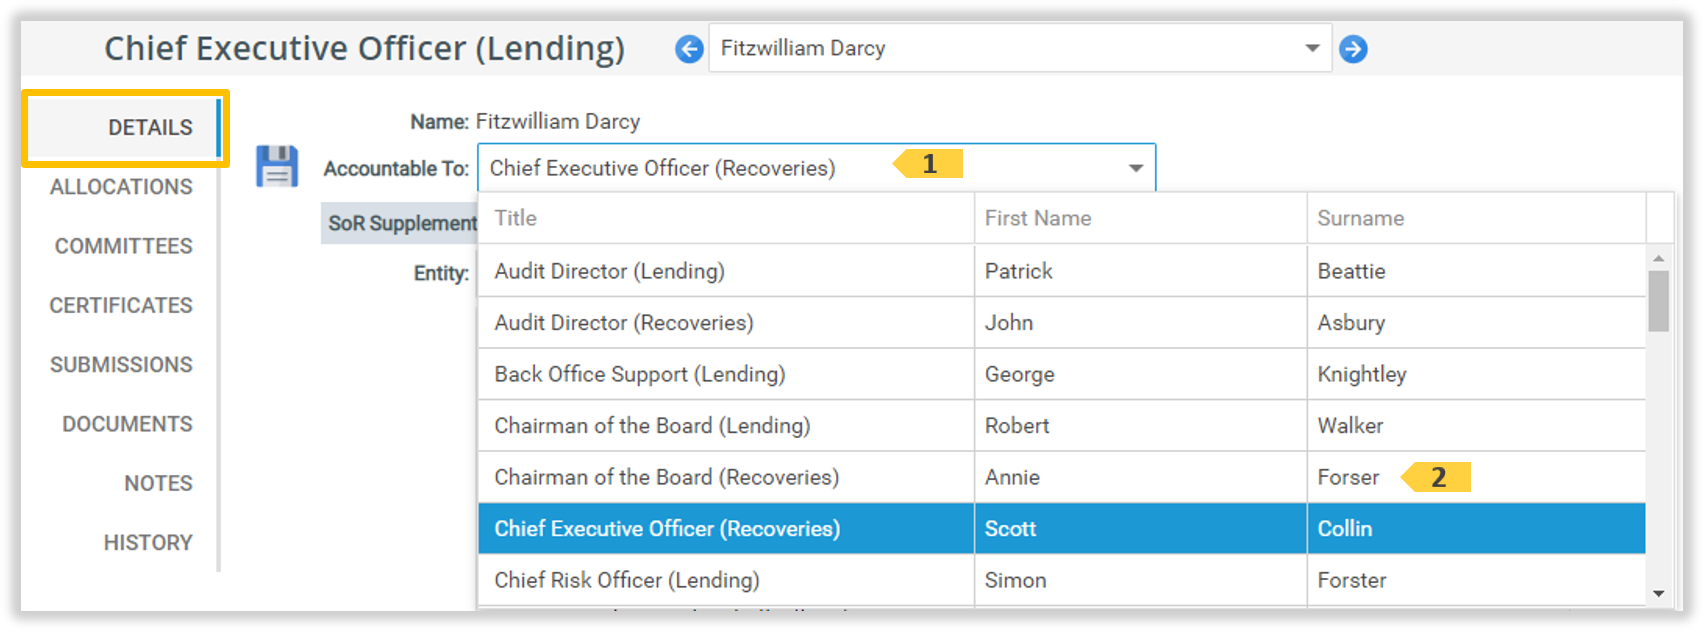
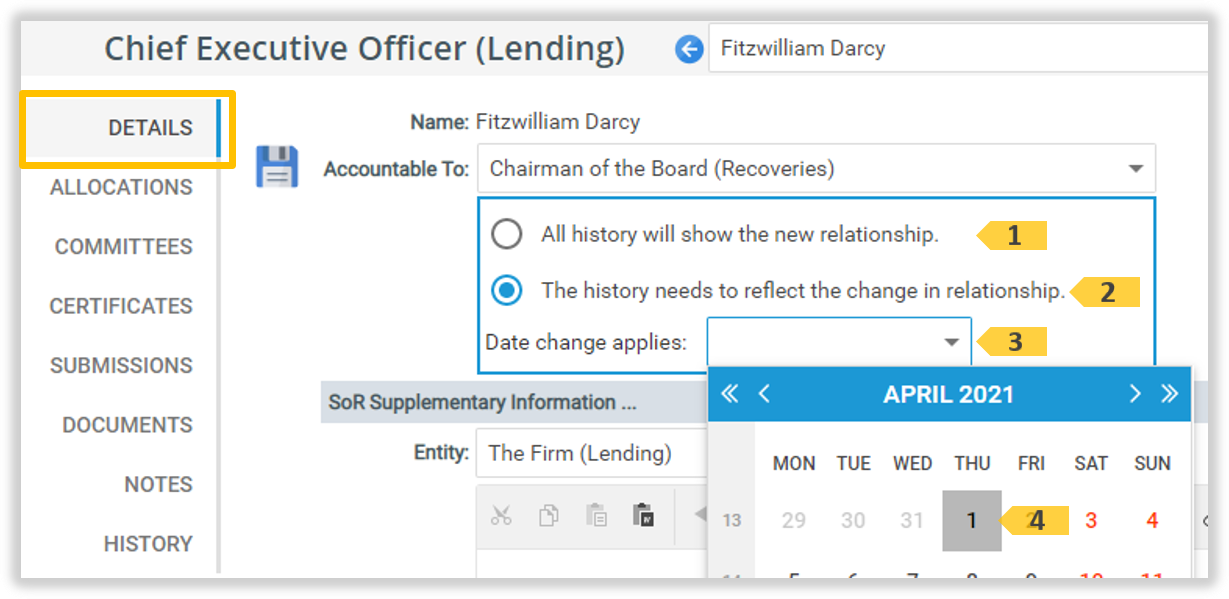
To change the ‘Accountable To’ person, click the ‘Accountable To’ 1 field to display the list of Accountable To people. Click the required ‘Accountable To’ 2 person from this list.
Once selected, the Relationship Selection options will appear. Select either, option 1 All History to this relationship, or option 2 if the History is to show the relationship starting an a particular date. If later is chosen, click the ‘Date change applies’ 3 field and enter, or click the required Date 4 from the Date selector.
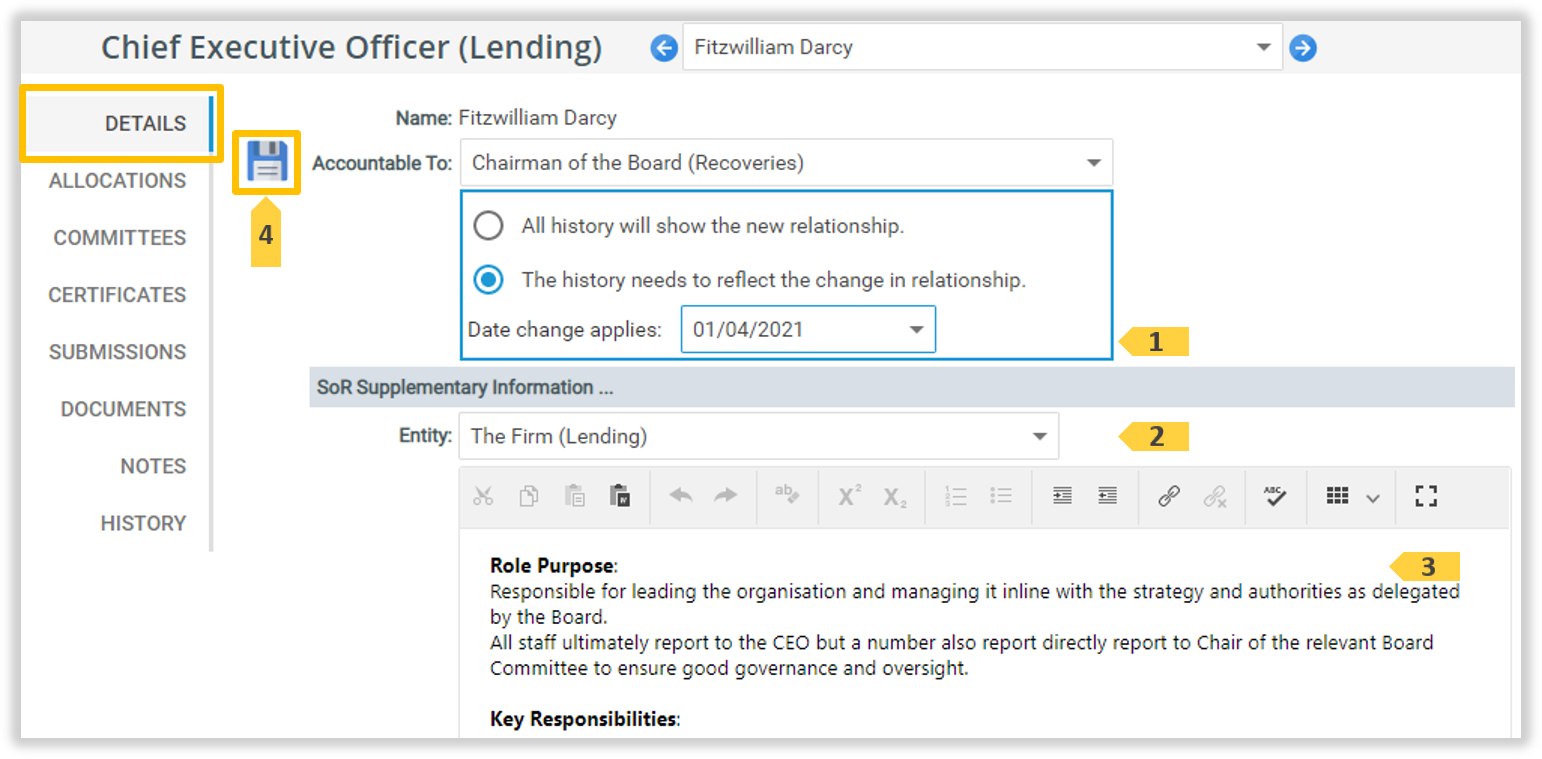
If the Date was selected, this will now display in the ‘Date change applies’ 1 field. Update the the SoR Supplementary fields Entity 2 and Information 3 as required. Click the Save 4 icon to update this record.
A confirming message is display that the record is updated.
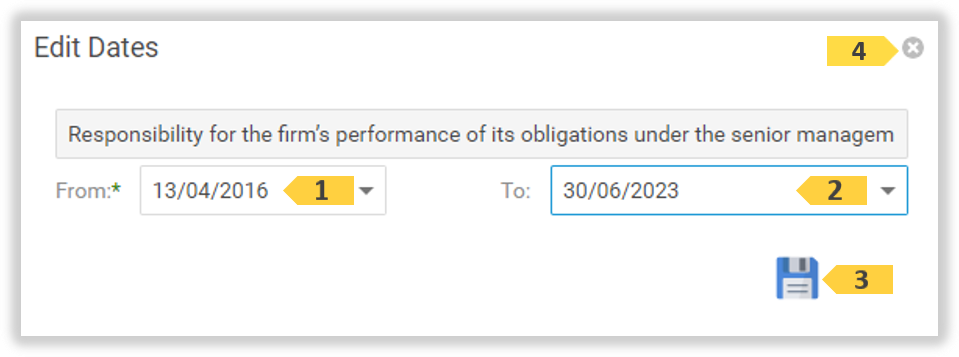
The ‘Edit Dates’ window displays. Update the From 1 and To 2 fields as required. Click the Save 3 icon to save these updates. (Or, click the Cancel 4 icon.)
A confirming message is displayed that the record is updated.
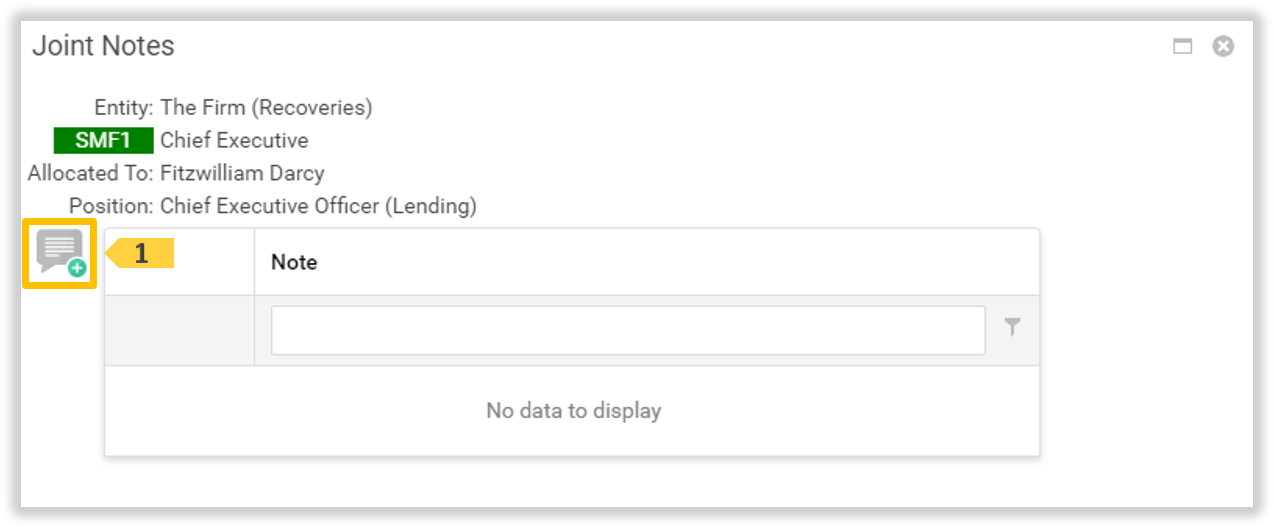
On the Allocations record of interest, click the Show Joint Responsibility 1 icon.
The ‘Joint Responsibilities’ window displays. The list of Joint Responsibility people 1 is displayed on the ‘Joint With’ tab. Click the ‘Notes’ tab to view the Joint notes. Click the close window 2 icon to close this window.
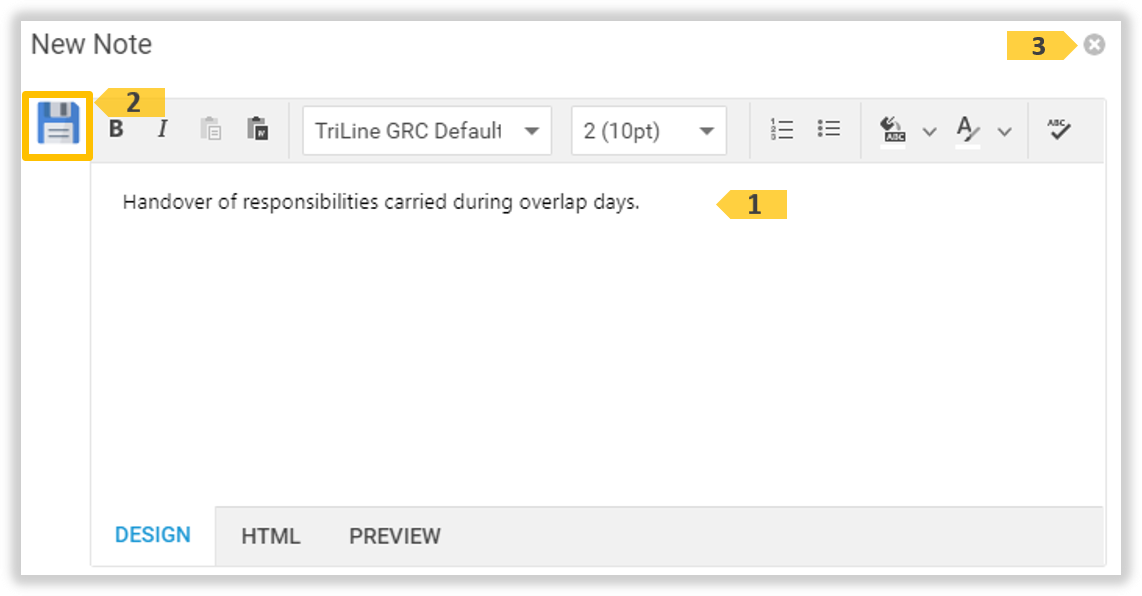
The ‘New Note’ window displays. Enter the Note text in the edit area 1. Click the Save 2 icon to save this note. (Or, click the Cancel 3 icon to stop adding the Note.)
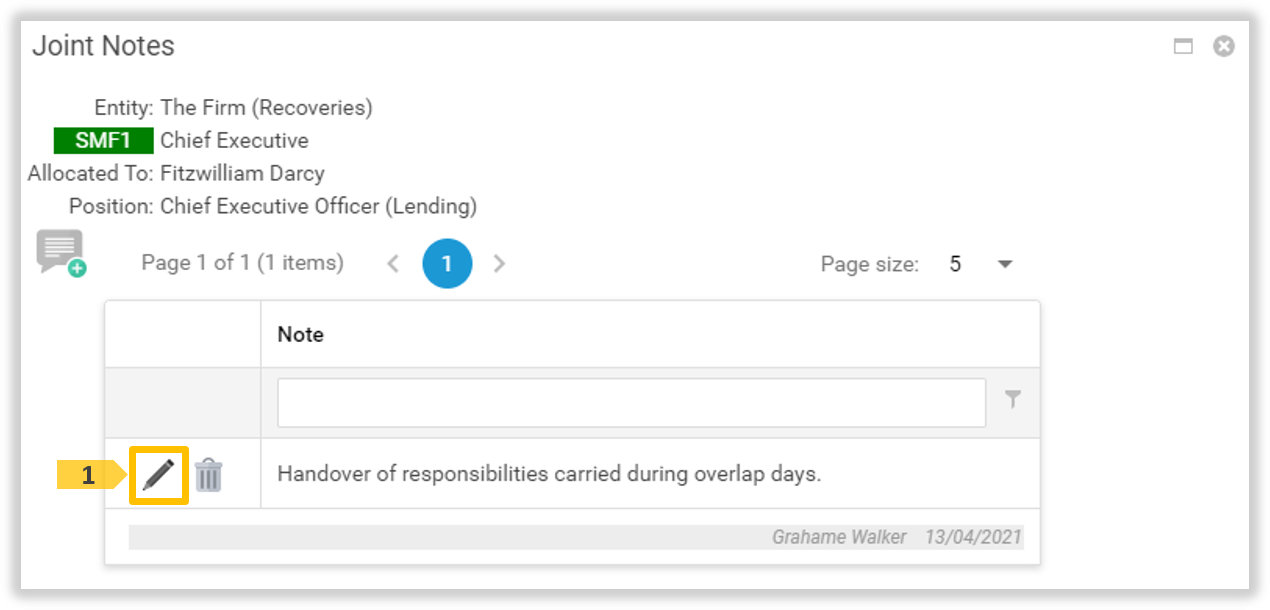
Edit a Joint Note
Click the Edit Note 1 icon on the Note to update.
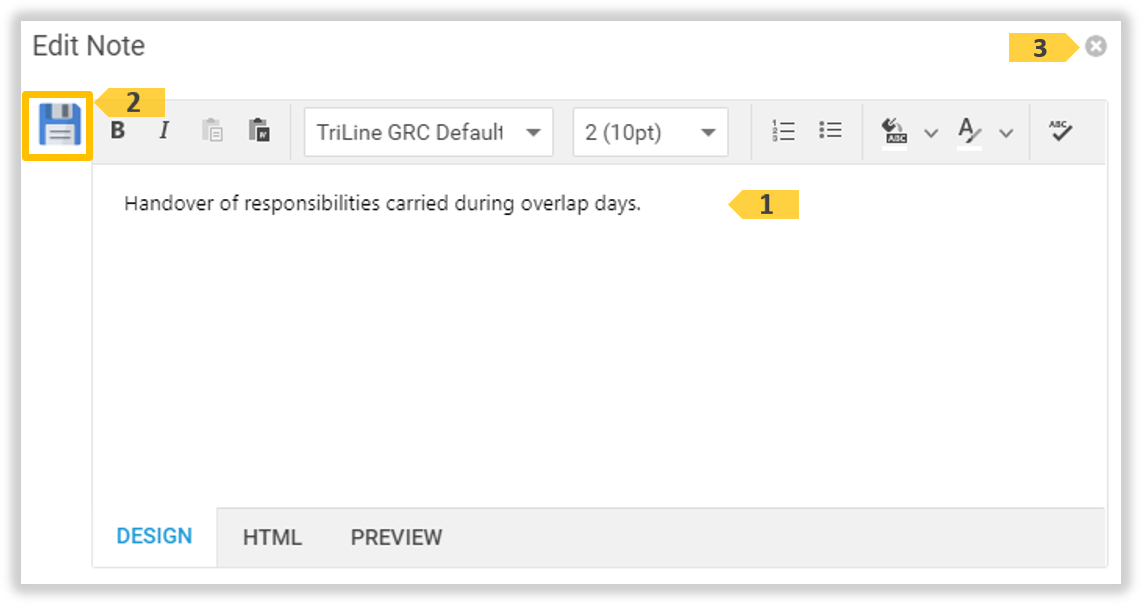
The ‘Edit Note’ window displays. Update the Note text in the edit area 1. Click the Save 2 icon to save these changes. (Or, click the Cancel 3 icon to stop updating the Note.)
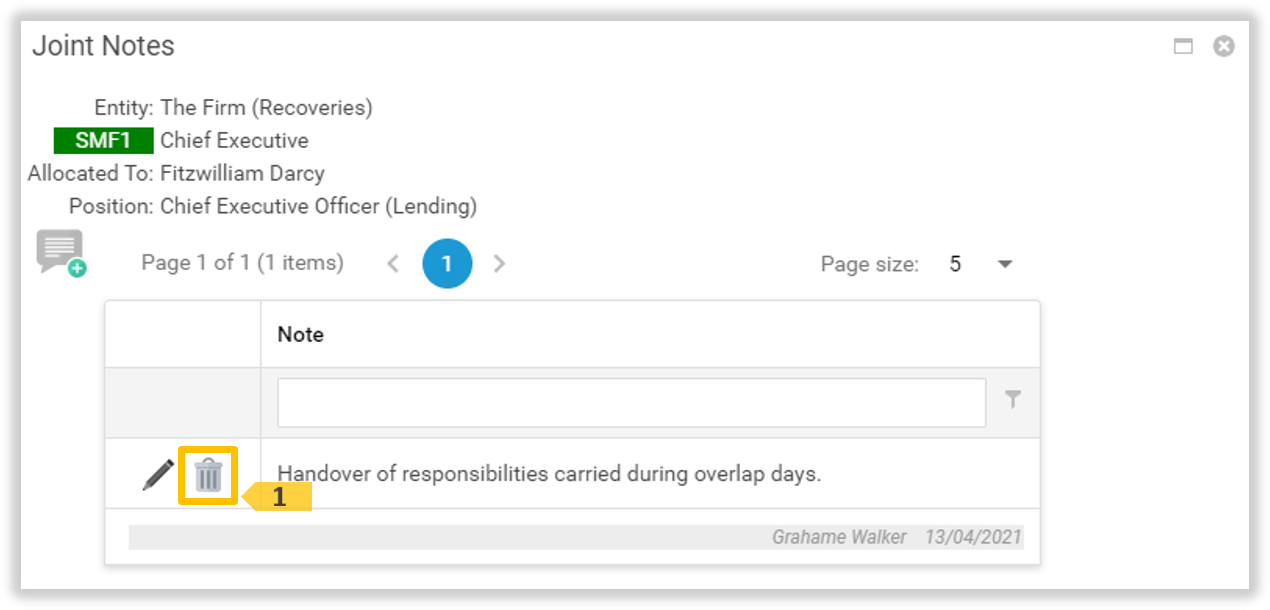
Delete a Joint Note
Click the Delete Note 1 icon on the Note to delete.
The ‘Confirm’ delete window appears. Click OK to delete, or click Cancel.
Hover over, or click, the show ‘Statement of Responsibility’ 1 icon. The ‘Statement of Responsibility’ selection panel appears. Select the required ‘Entity’ 2 and ‘As At’ 3 date, then click the View button.
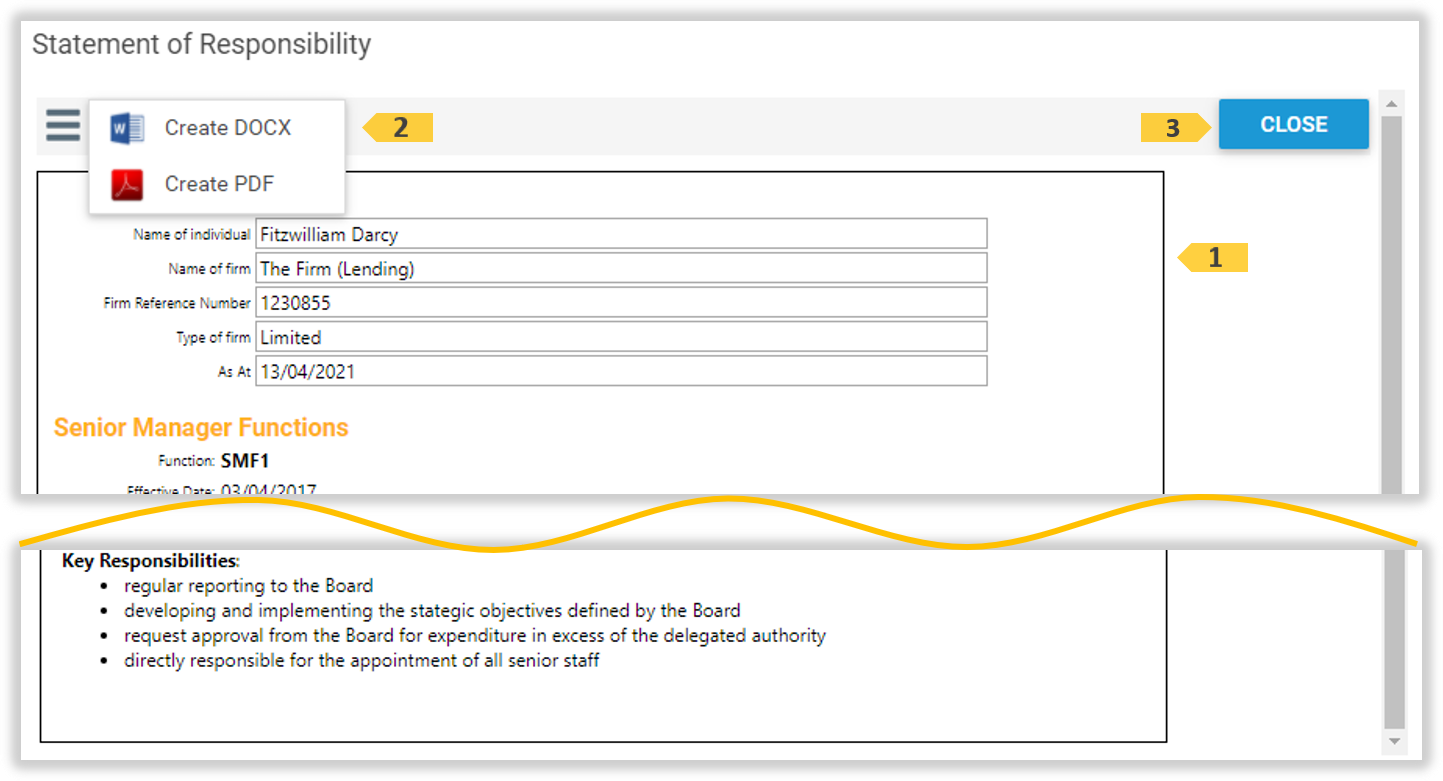
The ‘Statement of Responsibility’ window displays. If required, hover over, or click, the menu options 2 icon and select which document type you would like created. Click the Close3 button to close this window.
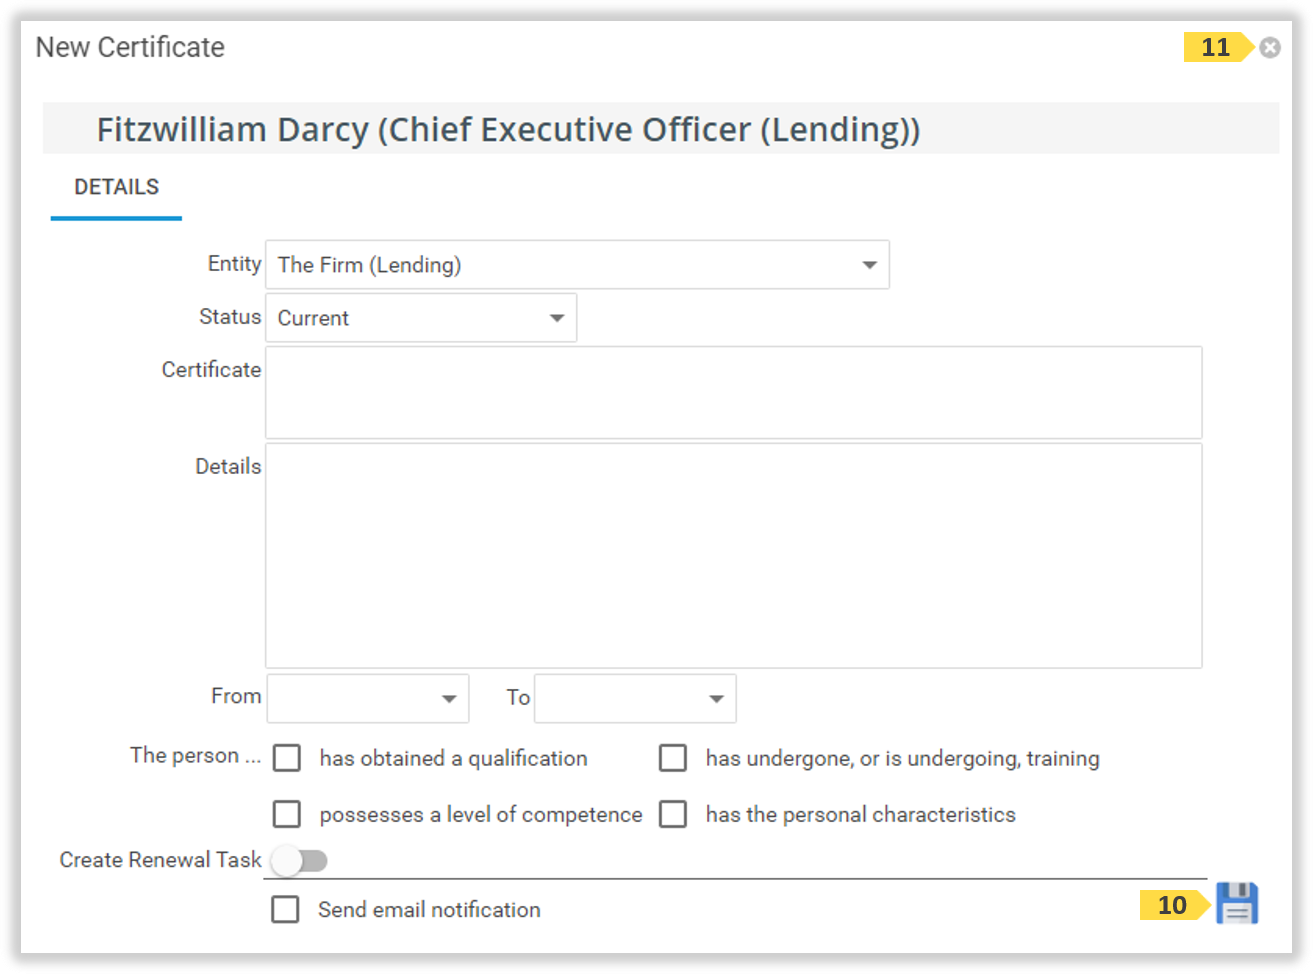
Click the Save 10 icon to complete adding the new Certificate record. The Certificate List will display with this new record. Clicking the cancel 11 icon will close the ‘New Certificate’ window without saving the record.
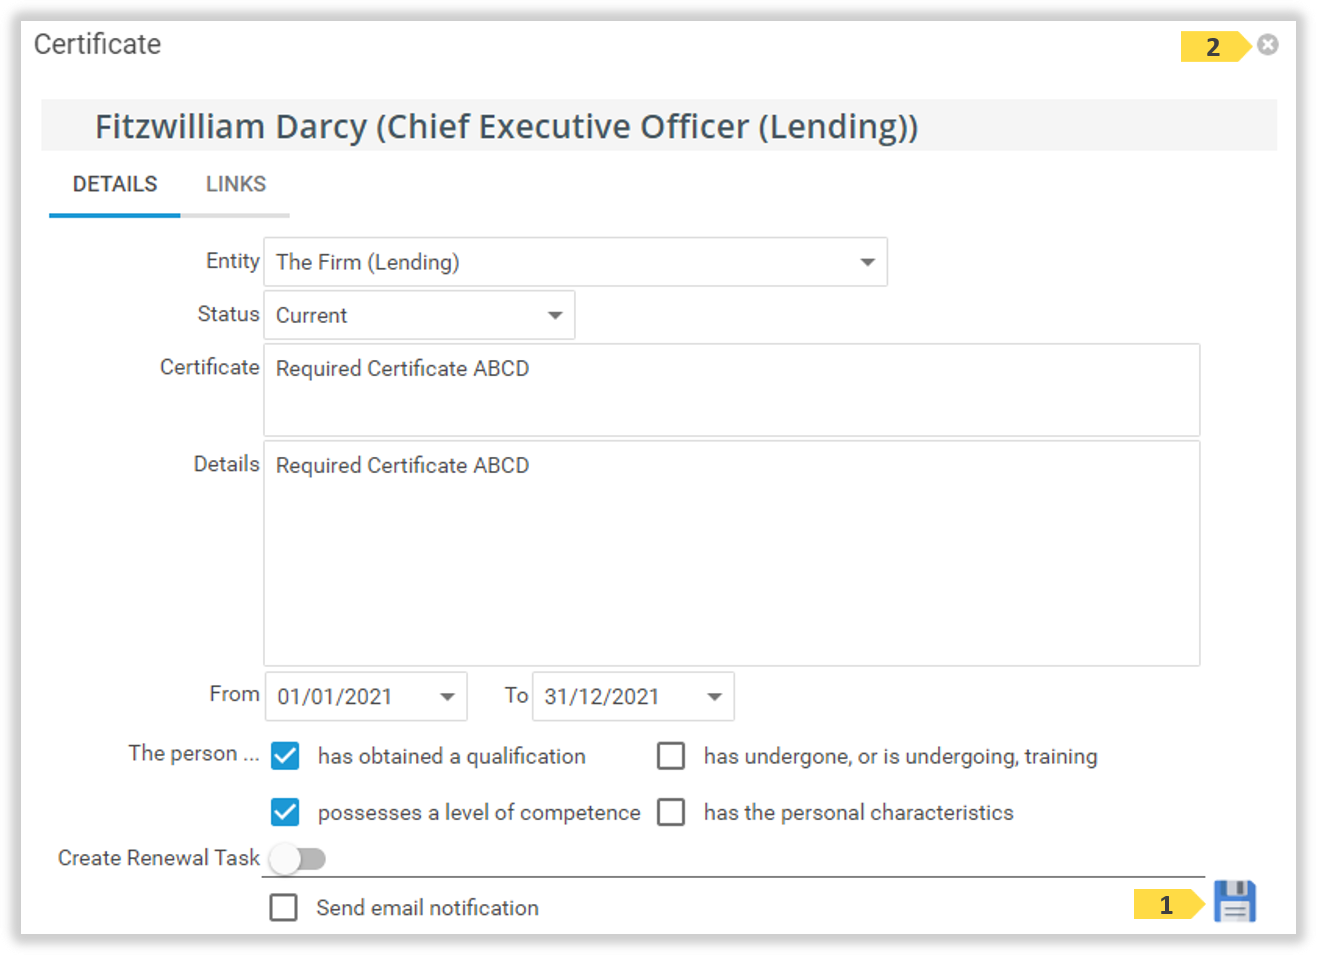
The ‘Certificate’ window displays. If the Save 1 icon is displayed, you have security access to update the values on this Certificate record. Update the fields and values as required. Click the Save 1 icon to save updates. (Or, click the cancel 2 icon to close the this window without saving the record.)
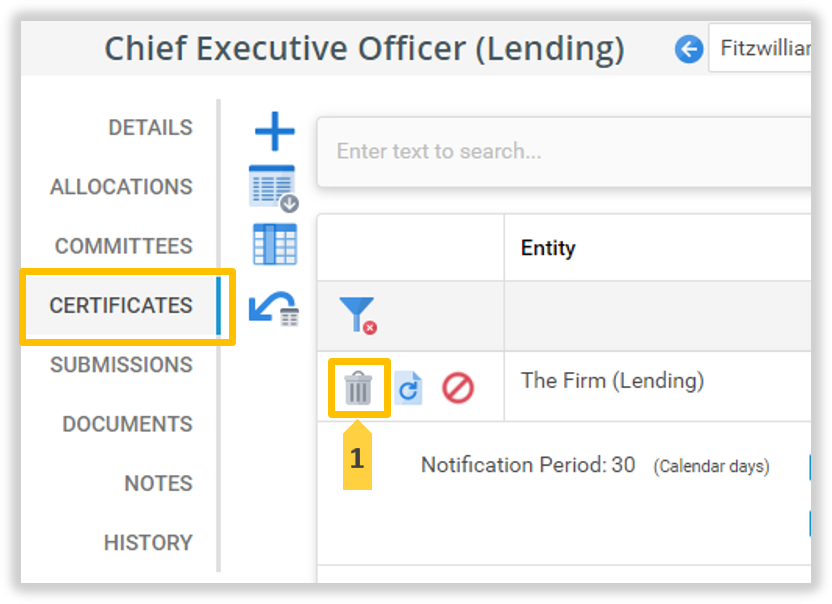
Delete a Certificate record
Note: Only Administrators and ‘Administrators - Accountability’ positions can delete a Certificate record. The Certificate record and history is delete instantly and permanently.
Deleting a Certificate is NOT recommended if you wish to retain the historic content of this record.
Click the Delete 1 icon.
A ‘Confirm Delete’ dialog is displayed. Click OK to delete the Certificate record, or click Cancel to cancel.
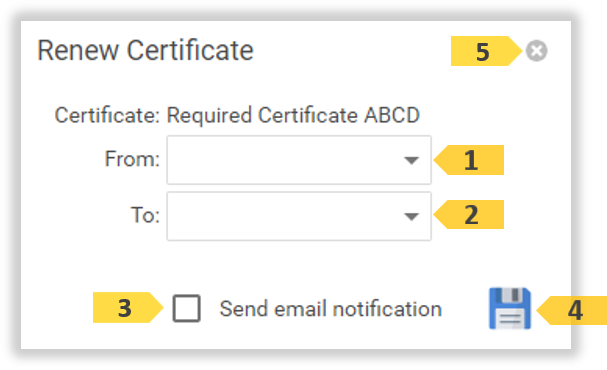
Renew a Certificate
Click the Renew Certificate 1 icon.
The ‘Renew Certificate’ window is displayed. Enter the From 1 and To 2 dates. Click the Send email notification3 checkbox if required. Click the Save 4 icon to Save the Renew details. (Or, click the Cancel 5 icon to cancel.)
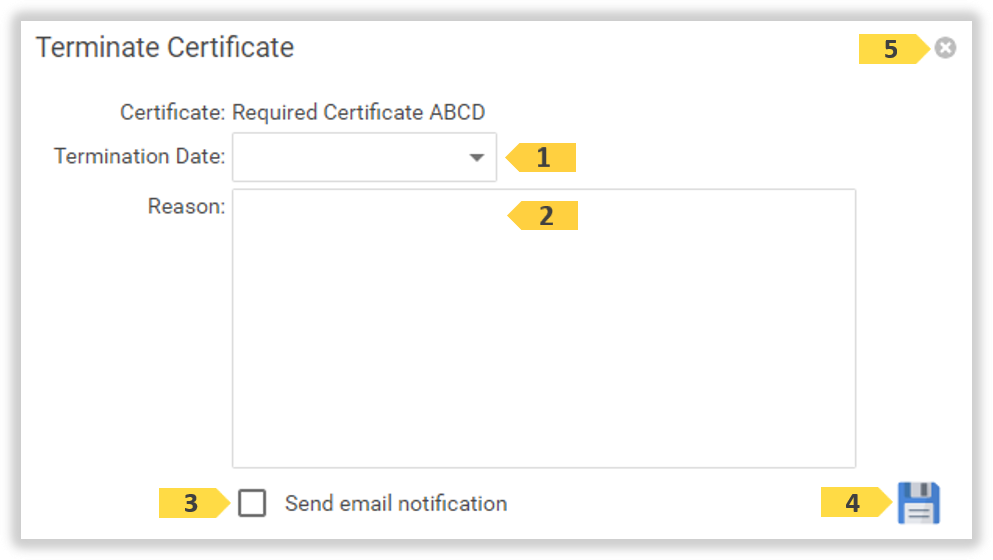
Terminate a Certificate
Click the Terminate Certificate 1 icon.
The ‘Termination Certificate’ window is displayed. Enter the Termination Date 1 and the Reason 2 for Termination. Click the Send email notification3 checkbox if required. Click the Save 4 icon to Save the Termination details. (Or, click the Cancel 5 icon to cancel.)
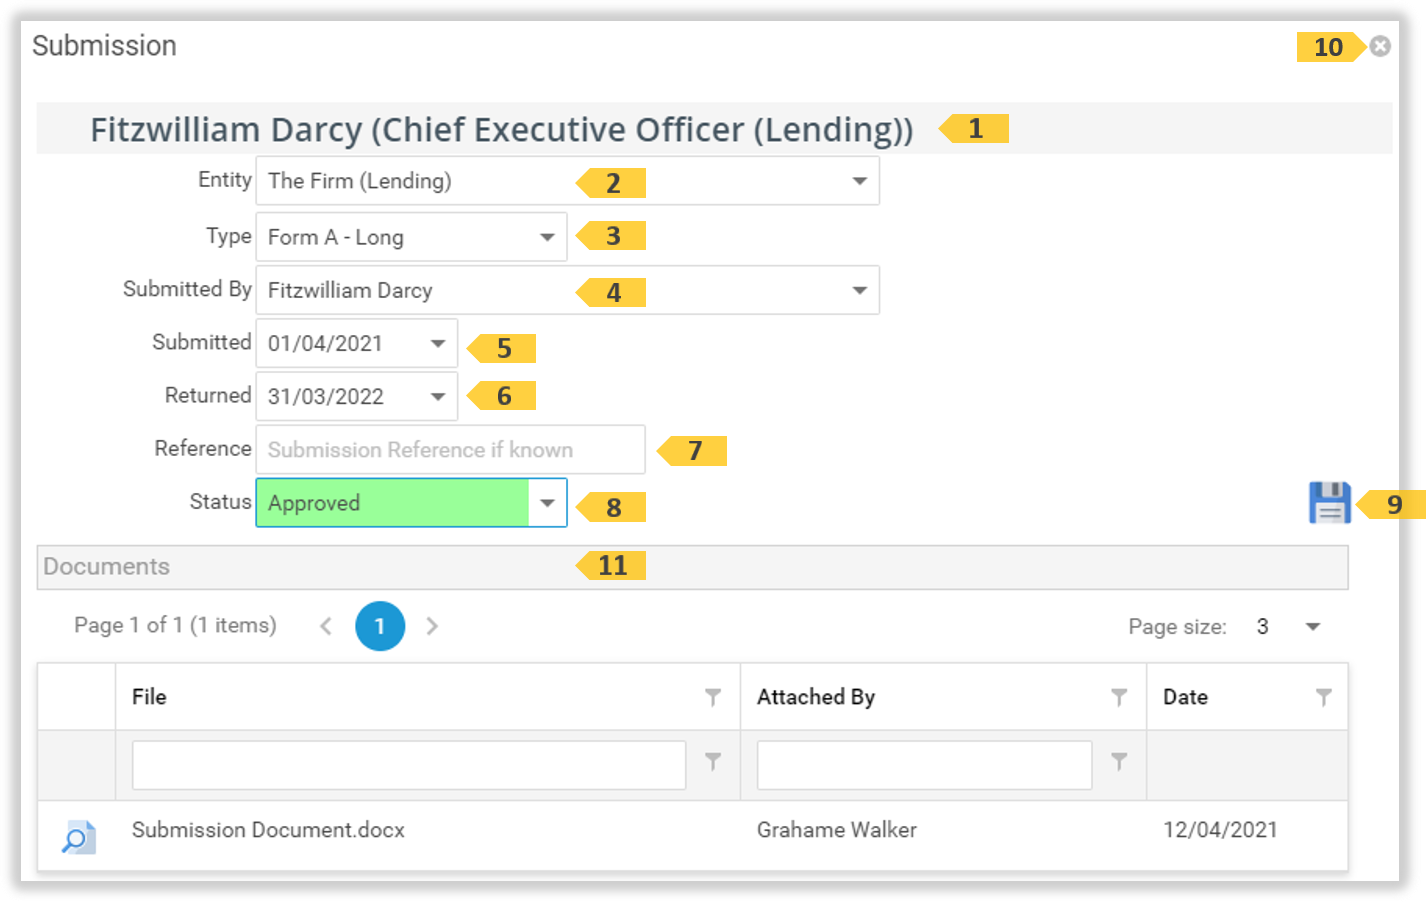
The ‘New Submission’ window opens. Complete the Submission details as required. (See The Submission Page elements for details on each field). Click the Save 9 icon to complete adding the new Submission record. The Submission List will display with this new record. (Or, click the cancel 10 icon to close the window without saving.)
View and Edit Submission details
Click on a Submission record in the list to open the ‘Submission’ page.
The ‘Submissions’ window is displayed. If the Save 9 icon is displayed, you have security access to update the values on this Submission record. Update the values 2 through 18 as required, then click the Save 9 icon. (Or, click the cancel 10 icon to close the window without saving.) Note: The Documents Section 11 will only display if Documents have been attached to this Submission.
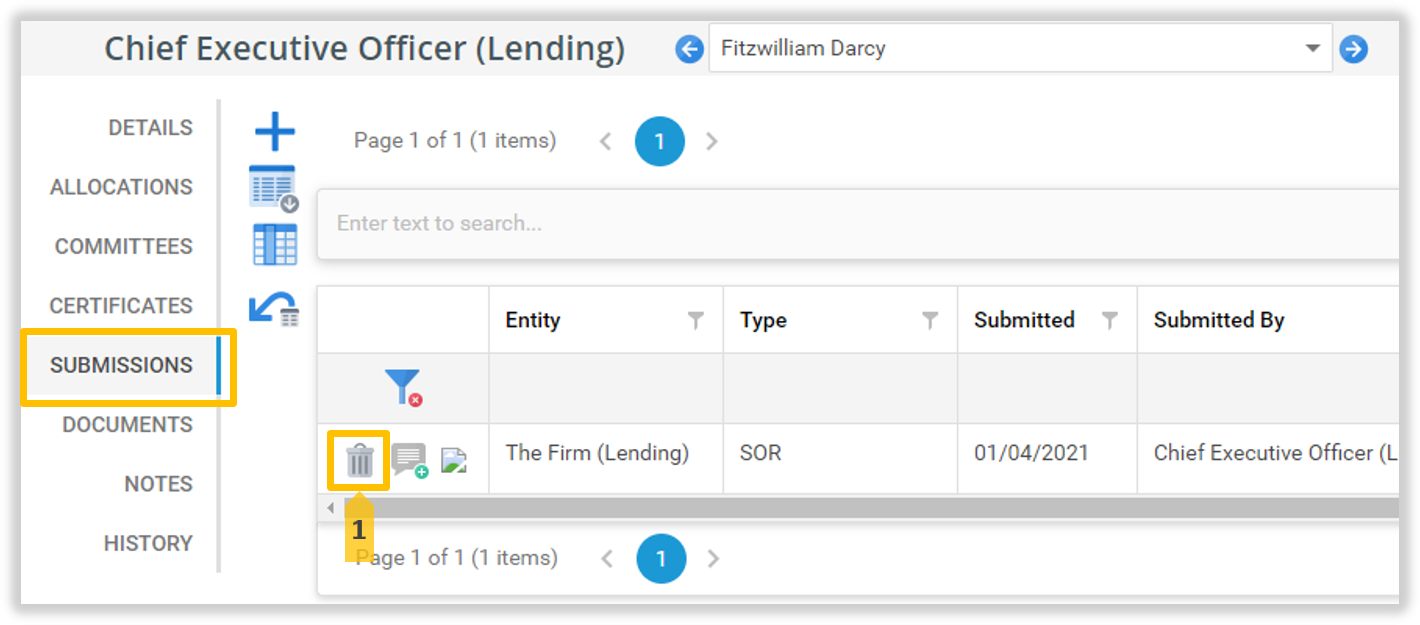
Delete a Submission record
Note: Only Administrators and Administrators - Accountability positions can delete a Submission record. The Submission record and history is delete instantly and permanently.
Deleting a Submission is NOT recommended if you wish to retain the historic content of this record.
Click the Delete 1 icon.
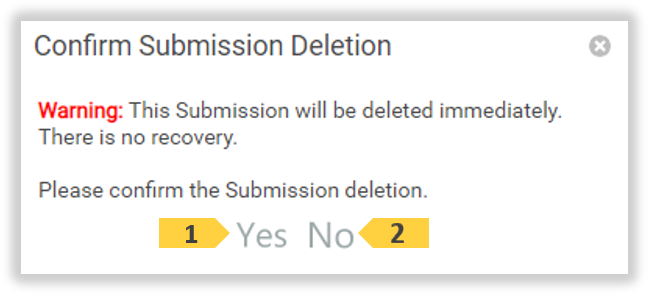
A ‘Confirm Delete’ dialog is displayed. Click OK to delete the Submission record, or click Cancel to cancel.
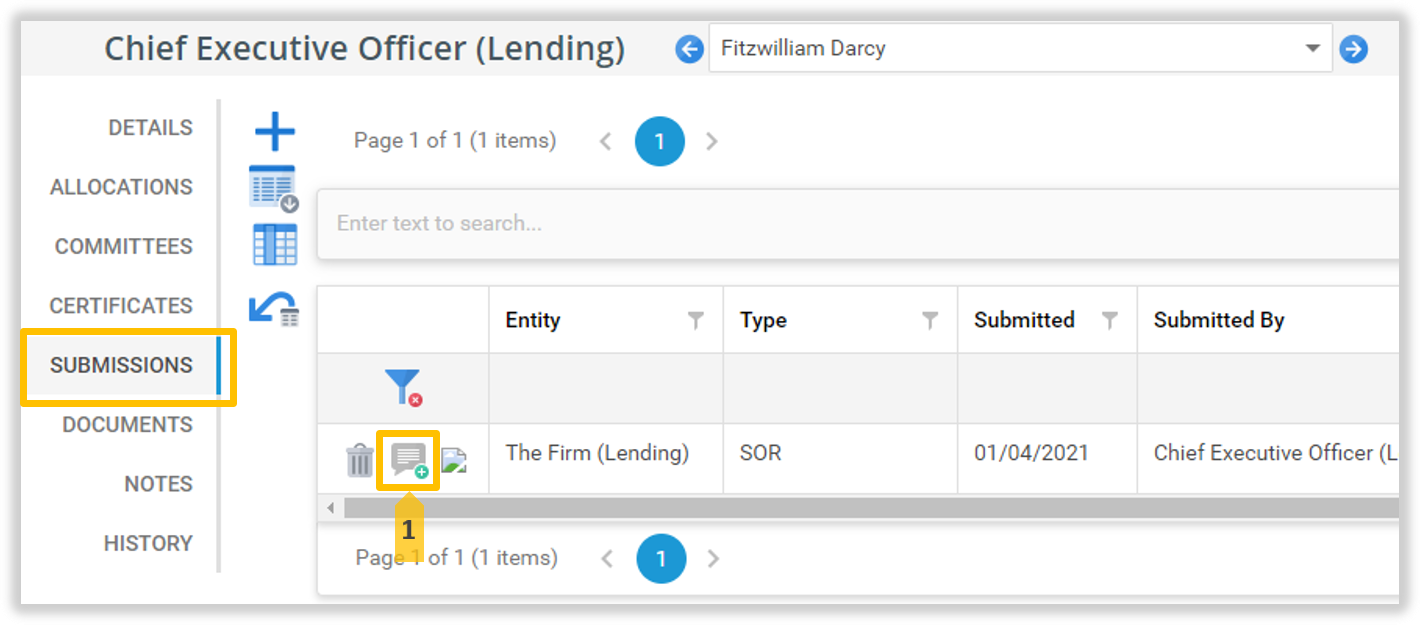
Manage Submission Notes
Add a new Submission Note
Click the Add Note 1 icon.
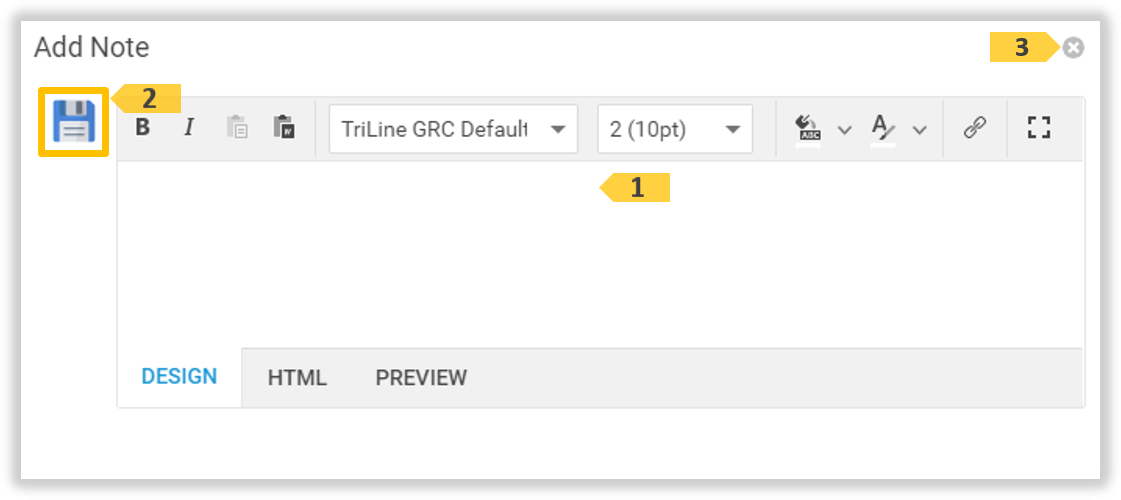
The ‘Add Note’ window displays. Enter the Note text in the edit area 1. Then click the Save 2 icon to save this note. (Or, click the Cancel 3 icon to stop adding the Note.)
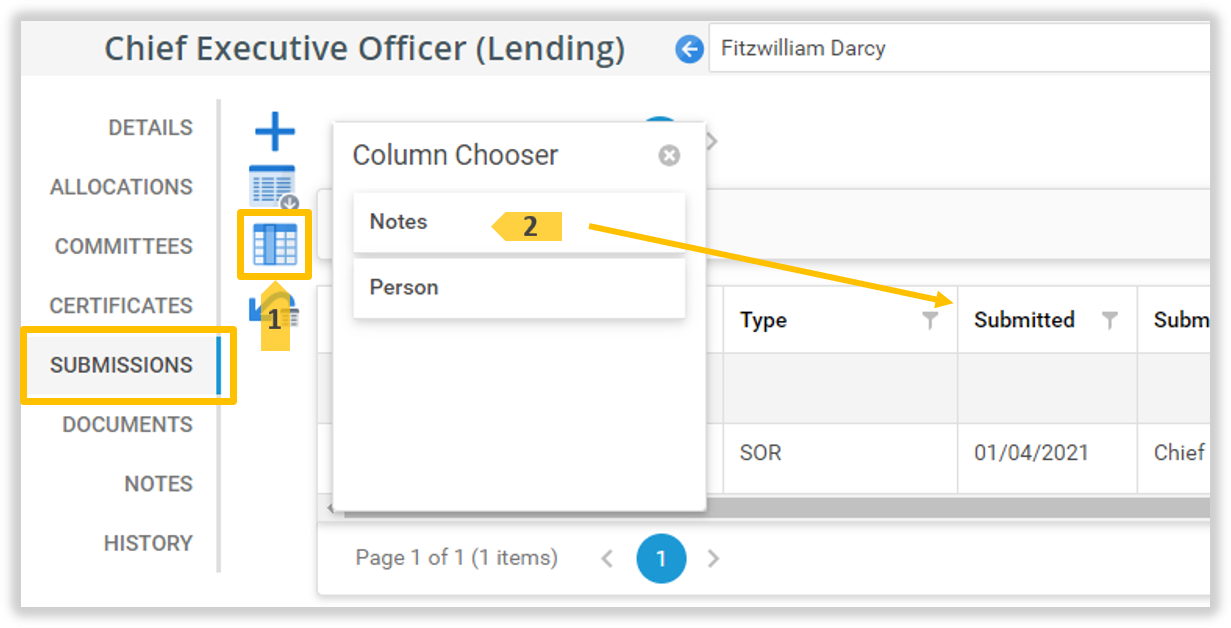
View Submission Notes
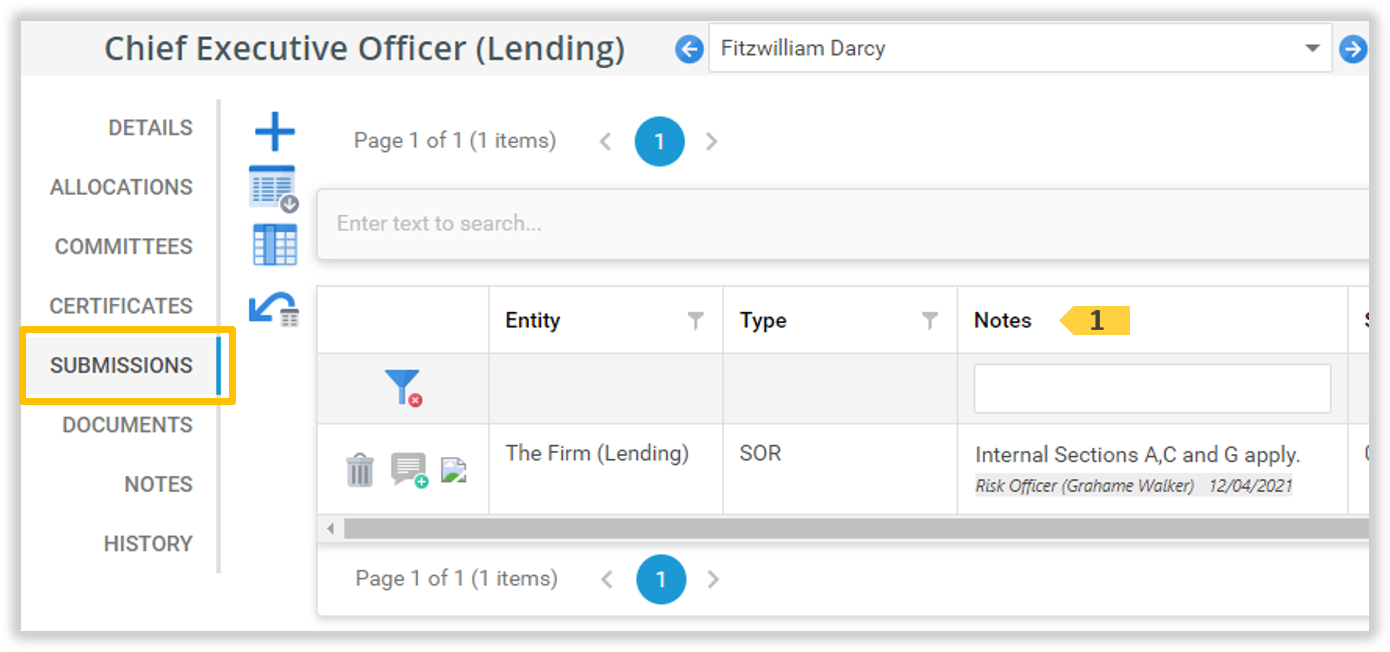
On the ‘Submissions’ tab, click the ‘Hide/Show Columns’ 1 icon. Click and drag the Notes 2 Column into the Submission columns.
The Notes 1 are displayed in the Submission List.
Submission Documents
Click the ‘Submission Documents’ 1 icon.
The ‘Submission Documents’ window is displayed. Add, view or remove Submission Documents as required.
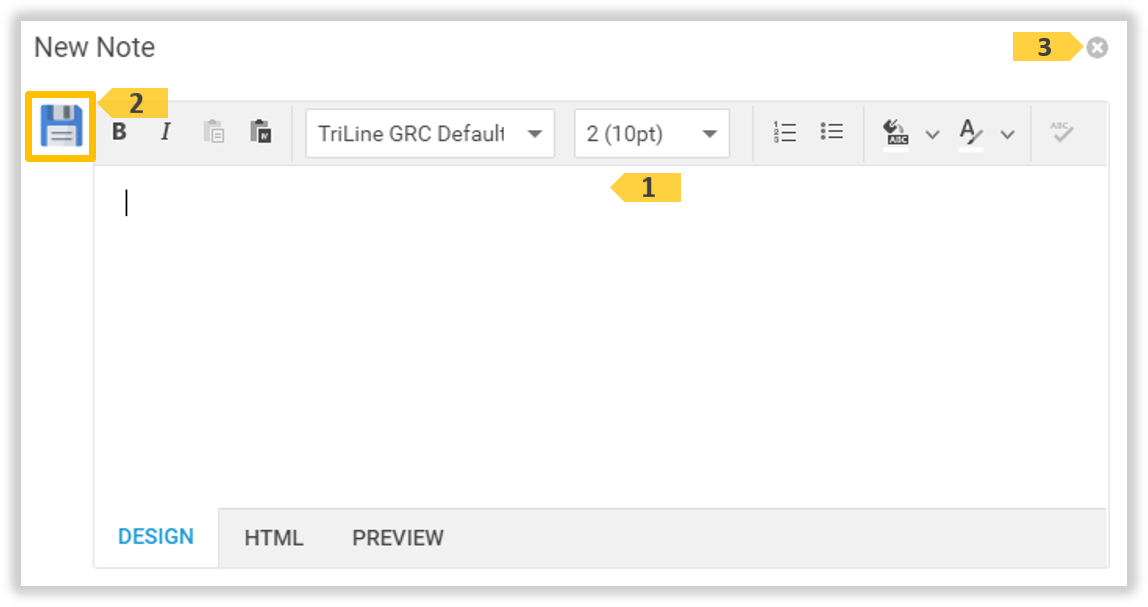
All positions that can view a Accountable Person record can add notes to the record.
Click the Add Note 1 icon.
The ‘New Note’ window displays. Enter the Note text in the edit area 1. Then click the Save 2 icon to save this note. (Or, click the Cancel 3 icon to stop adding the Note.)
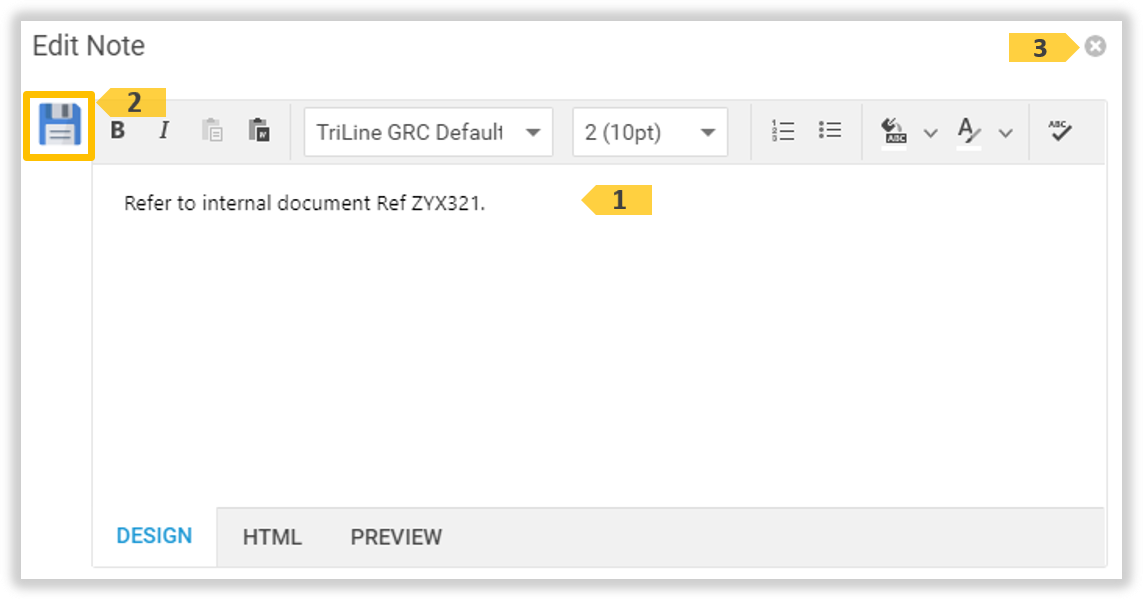
Edit a Note
Only position’s with edit access to a Accountable Person record can edit notes on that record.
Click the Note 1 record to update the Note.
The ‘Edit Note’ window displays. Update the Note text in the edit area 1. Then click the Save 2 icon to save these changes. (Or, click the Cancel 3 icon to stop updating the Note.)
Delete a Note
Only position’s with edit access to a Accountable Person record can delete notes on that record.
Click the Delete Note 1 icon on the Note to delete.
The ‘Confirm’ window appears. Click OK to delete, or click Cancel.