A Process Control is the given name of the Compliance Process task.
A task is made of four main elements:
the details of the instruction or action required,
the schedule, including the frequency, Reminder Days and Due Date,
the Actioned by(s) Position(s),
and the Escalation Position, to whom the notification goes of the task not being completed by the Due Date.
A Task is an instruction or action required to be completed by a specific date. The Task maybe required to be carried out by more than one position. The Task will either be required to be performed once (adhoc), or to be performed on a cyclic roll.
On the first reminder day, the task is generated into a Current Task. The Current Task contains the instructions and the Due Date, but is its only entity, separate from the Process Control (template) it was created from. A separate Current Task is generated to each Actioned By Position. Each Actioned By Position will complete their own Current Tasks.
New Task Notifications
A new task notification will be sent on the Reminder Day date. If the task has a second reminder, a notification will be sent on this date. If the task is Critical, and the task is not completed on the Due Date by the Critical time, a notification will be sent on the Due Date at this time. If the task is not completed by the Due Date, a notification will be sent everyday the task is overdue until the task is complete.
Elements of a Process Control
Adding or Editing a Process Control reveals two tabs,
The Details tab contains the instruction or action required by this task.
The ‘Process Controls Details’ tab
The Details tab elements
1 Compliance Process number and Title
The Compliance Process to which the new task is being added.
2 Information icon
Click the icon to show information about the fields on this tab.
3 Save icon
After entering all required information on both tabs, click this icon to save this New Task.
4 Status selector field
Click this field and select the Status of the Process Control (see Record Status). An Active task will be generated into a Current Task on the 1st reminder date for each Actioned By. An Inactive task will only roll over on the Due Date and no Current Task(s) will be generated.
5 Blind Task option
Tick this checkbox to set the Process Control as a Blind Task. (A Blind Task can be assigned to a Position that does not have ‘View’ or ‘Edit’ Security Rights to the parent Compliance Process, but a higher level of security is applied for these positions.)
6 Critical Task option
Tick this checkbox to set the Process Control as a Critical Task. If selected, an additional reminder notification will be sent to the Actioned By if the generated task to them is not completed at the configured critical time on the Scheduled Due Date.
7 Sequence field
Type a unique Sequence number or up to 3 characters, to determine the Process Control’s Position in the list.
Tip: Consider sequencing if there is a logical order in which the Process Controls are completed or dependent.
8 An Attachment is mandatory for Task Completion option
Tick this checkbox if you require the ‘Actioned By’ Position to upload an attachment in order to complete the Process Control. Current tasks generated from this task, will not display an Express Complete option, on the My Summary | Current Tasks tab, with this option on.
9 Outcome selector field
The Outcome allows more information about the completion of a task. Attestation: Completion of the task is sufficient True/False: A true or false response is required (e.g. All items where correct) Yes/No: A yes or no response is required (e.g. At least 10 items were checked)
When ‘Pass / Fail’ or ‘Yes / No’ is select, an Outcome is mandatory to be selected on the generated Current Task.
Depending on configuration setting, Current Tasks with ‘Pass / Fail’ or ‘Yes / No’ Outcome will display as an Express Complete option on the My Summary | Current Tasks tab. Express completing this Current Task will default select the positive Outcome ‘Pass’ or ‘Yes’.
10 Outcome Label field
Applies where the Outcome is not Attestation. Provide your own label. Maximum of 100 characters allowed.
If the Outcome field is being used, then propose the question that the Position needs to answer in order to successfully complete the Task.
11 Task description field
Use the Text Editor to detail the steps necessary to complete the Task. These details are emailed to the ‘Actioned By’ Position, and are also displayed in the My Summary | Current Tasks tab, when a Task is generated.
The Schedule tab
The Schedule tab contains the schedule, the frequency, the Actioned By(s) and the Escalate Position.
Note: If custom fields have be configured for the Process Controls, the tabs name will be named Schedule/Custom Fields.
The ‘Process Controls Schedule’ tab
The Schedule tab elements
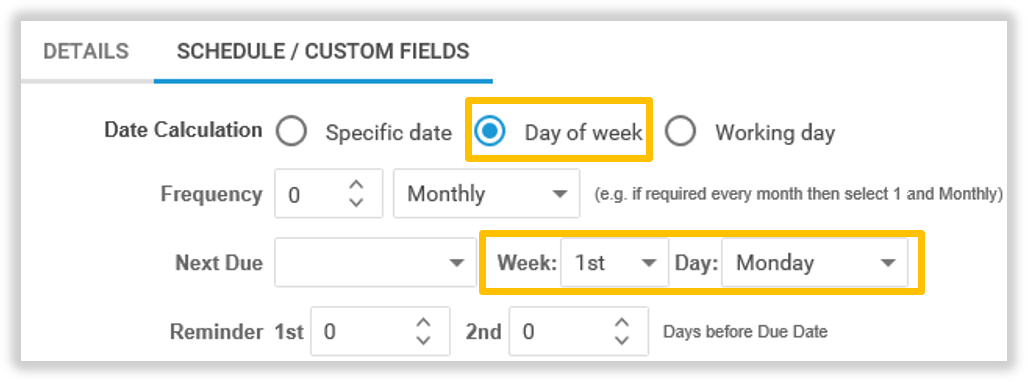
13 Date Calculation selection
Note: Date Calculation only available when Frequency Monthly is selected.
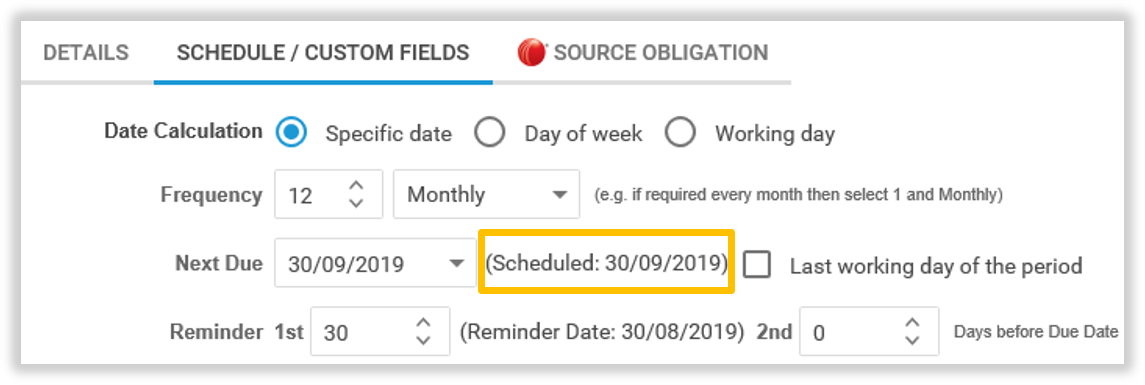
Specific Date selected. Select the exact Date for the schedule to start. Selection Last working day of the period will, if the Next Due is not this date, change to the Next Due to this date, for that month, when Save is clicked.
Day of Week selected. Select the Week and the Day for the schedule to run on. Then select Next Due for the first date (month/year) this task will be scheduled. Clicking Save will adjust Next Due to match the selected Week and Day.
Working day selected. Select how many business working days into a month the schedule is to run on. Then select Next Due for the first date (month/year) this task will be scheduled. Clicking Save will adjust Next Due to match the Working day.
<
14 Frequency selection
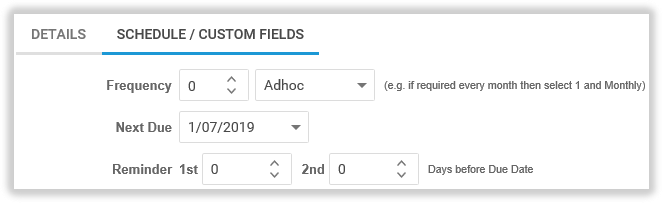
Use these fields to set how often the Process Control should be performed (e.g. every 3 months). Your Interval options include Monthly, Weekly or Adhoc.
Adhoc: The cycle number is ignored as it is a once off Task. Leave this as zero
Weekly: Type or select a number, e.g. ‘2’ for fortnightly.
Monthly: Type or select a number, e.g. ‘3’ for quarterly, ‘12’ for annual.
Note: Selecting Frequency ‘Adhoc’ or ‘Weekly’ will remove the Date Calculation selections.
<
15 Next Due date picker
Use the Date/Time Selector to set the date on which the Process Control must first be completed.
(Scheduled) date field
After saving the schedule, a (Scheduled) date is then displayed to the right of the ‘Next Due’ field. This field displays the actual date that the next Task will be due. Quite often, the ‘Next Due’ and ‘Scheduled’ dates will be the same, but when the ‘Next Due’ date falls on a non-business day (e.g. weekend or public holiday) the ‘Scheduled’ date is set to the preceding business day; making the task due slightly earlier.
Tip: If you leave the ‘Next Due’ field blank, the record will be created, but a Task will never be generated. This can be useful if your organisation is not yet ready to start the Task and wants to specify the ‘Next Due’ date at a later time.
16 Last working day of the period selector
Select this checkbox to override the Next Due date to always be the last day of that month.
17 ‘Reminder 1st’ field
Is the number of days before the Process Control due date that the Task will be generated and each ‘Actioned By’ Position notified. If the day the Task is be be generated falls on a non-business day, the task will instead be generated on the first prior business day. This is the day the task will appear in each ‘Actioned By’ Current Tasks list. This is also the day each ‘Actioned By’ position will receive a notification email containing the Task details and when the Task is Due.
(Reminder Date) field
After saving the schedule, a (Reminder Date) is then displayed to the right of the ‘Reminder 1st’ field. This field displays the actual date (business day) that the next Task will be generated.
<
18 ‘Reminder 2nd’ field
For Process Controls with a long lead time (i.e. 1st Reminder is set to a high number of days), set a lower number of days in the ‘2nd Reminder’ field so that an additional email notification is sent to each ‘Actioned By’ Position before the due date. The same non-working day principle as 1st Reminder applies to this 2nd Reminder.
Tip: Set this field to zero if you don’t want a 2nd Reminder sent for this Process Control.
19 Task Responsibility position selector
Select the Position that is ultimately responsible for the Process Control. This Position selected for this role can be different from the Compliance Process Responsible Office. This position is required to be a member of a Security Group that has at least View access to the owning Compliance Process record.
20 Escalate To position selector
Select the Position who will receive a notification email if the Process Control becomes overdue.
This Position receives ONE cc email: of the overdue email sent to any of the ‘Actioned By’ Position’s the day the Task becomes overdue (plus configured Escalation days).
If the ‘Escalate To’ field is left blank then the value will automatically default to the ‘Escalate To’ Position defined in the Security Centre Position’s settings.
If this Process Control Task Responsibility position should be receiving the overdue notification, select their position for this field also.
21 Actioned By
The list of Positions and Task Teams that this task will be generated for on the 1st Reminder date.
22 Click here to select Actioned By
Select one or more Positions in the Positions List to assign as ‘Actioned By’ Positions for the Process Control, then click Close to add those Positions to the ‘Actioned By’ field.
Tip: Instead of selecting multiple Positions in the list, consider using Task Teams. Task Teams are indicated by the (TT) symbol.
23 Custom Fields
Enter Custom Fields as required as they appear for you.
Note: If displayed, Custom Fields on your system will be different from this displayed example.
Procedures Process Controls
Add a Process Control
Add Process Control tasks to maintain Compliance items. Process Controls can be scheduled cyclic, or on a Adhoc manual schedule.
Click on a Compliance Process record in the list to open the The ‘Compliance Process’ page. Click the Process Controls tab. Click the New Process icon 1.
The New Task window displays. Enter the required fields on the Details tab. (See The Details tab elements for more information on each field.) Then click the Schedule tab. Enter the required fields on the Schedule tab. (See The Schedule tab elements for more information on each field.) Click the Save icon 1 to save this new Task. (Or, click the Cancel icon 2 to stop adding the new Task.)
Click on a Compliance Process record in the list to open the The ‘Compliance Process’ page. Click the Process Controls tab. Click the Process Control record 1 to be edited.
The Edit Task window displays. Update the required fields on the Details and Schedule tabs (see The Details tab elements) for more information on each field). Click the Save icon 1 to save the editing. (Or, click the Cancel icon 2 to abandon the editing.)
Note: If you paste content, please review Paste From WordNote: Whenever you change the Due Date, new current tasks will be generate on the new 1st reminder date to the Actioned By list, period.
A record saved confirming message will display.
Copy (Duplicate) a Process Control
Use the Process Control Copy functionality to duplicate an existing Process Control.
Click on a Compliance Process record in the list to open the The ‘Compliance Process’ page. Click the Process Controls tab. Click the Create a copy of this Process Control icon 1 of the record to be copied.
The Copy Task window displays. Add a unique Sequence Identifier in the Sequence field 1. Optionally, update the fields on the Details and Schedule tabs (see The Details tab elements) for more information on each field). Click the Save icon 2 to save the copy. (Or, click the Cancel icon 3 to abandon the copy.)
A confirming message will display and the copied record 1 will display in the Process Control list.
Transfer (Move) a Process Control
You can transfer a Process Control (and its associated history if it exists) to another Compliance Process to save time, or to restructure your data.
Note: Before transferring a Process Control, check that the ‘Actioned By’ Position(s) has at least ‘View’ Record Security Rights to the target Compliance Process. Otherwise, you will need to assign another ‘Actioned By’ Position who has these rights.
Click on a Compliance Process record in the list to open the The ‘Compliance Process’ page. Click the Process Controls tab. Click the Transfer this Process Control icon 1 of the record to be moved.
The Transfer Process Control window displays. Select the target Compliance Process from the ‘To’ 1 drop-down list.
A preview list of the existing Process Controls for that Compliance Process is displayed. This allows you see all existing Sequence numbers. Using this information, enter a unique New Seq1. Click the Transfer icon 2 to complete the move. (Or, click the Cancel icon 3 to abandon the move.)
Note: If you type a Sequence Identifier in the ‘New Seq’ field that already exists amongst the Process Controls in the target Compliance Process, an error message is displayed and you will be prompted to change your entry to a unique Sequence Identifier.
The transferred Process Control will no longer appear in this Process Control list. The target Compliance Process Process Control List contains the Process Control at the entered sequence number.
View Task Completion History
The ‘Show the Task Completion History’ icon only appears for those Process Controls that have completed task(s).
Note: Only Positions allocated to a Security Group with ‘View’ or ‘Edit’ Record Security Rights can view a Process Control’s Task Completion History.
Click on a Compliance Process record in the list to open the The ‘Compliance Process’ page. Click the Process Controls tab. Click the Show the Task Completion History icon 1 of the record to be viewed.
The ‘Task Completion History’ window displays. The most recent completed task history record is displayed. If the ‘Due Date/Actioned By’ 1 field appears, it indicates that more one task completion history record exists for this Process Control. Click the ‘Due Date/Actioned By’ dropdown 1 to select the other Completed Task History records. Also click the Comments tab and the Attachments tab 2 to see that information for this History Record. If you have the correct security access, further comments can be added and removed, and attachments can be added or removed. Click the Close icon 3 when viewing is completed to close this window.
Update Task Completion History
Note: Only Positions that completed this task, or have been allocated to a Security Group with ‘Edit’ Record Security Rights can update a Process Control’s Completed Task History record.
The ‘Update Task Completion History’ window displays. Enter a Reason 1 for the update in the Reason field. Change the ‘Actioned On’ 2 date if required. If the Outcome 3 for this task can be set to ‘Yes/No’ or ‘Pass/Fail’, this will display and you will be able to change the choice. Click the Save 4 icon to Update. Click the Cancel 5 icon to cancel the Update and close this window. Saved Updates will appear on the Comments tab. (Note:Depending on your system configuration, ‘Completed’ options may appear. Serious consideration needs to be given to ever changing this answer to ‘No’, as ‘No’ means this task will not ever be completed; it will be ‘Not Completed’.)
If required, Click the Comments tab. Click Add Comments 1 icon to add new comments.
The Add New Comment window displays. Enter a new Comment 1. Click the Save 2 icon to save this comment. (Click the Cancel 3 to cancel the save and close this window.)
To edit a Comment, click the Edit icon 1.
The Edit Comment window displays. Update the comment 1. Click the Click the Save 2 icon to save this comment.
To delete a Comment, Click the Delete 1 icon. Click OK to confirm the delete.
If required, click the Attachments tab. Drop the attachment files, or use Browse. The file(s) will remain displayed in the field before disappearing and reappearing in the Attachments list.
Click the View 1 icon to view the attachment. Click the Delete 2 to delete the attachment.
Delete a Process Control
If the Process Control to be delete has task completion history that you would like to retain for audit or reporting purposes, it is recommend to instead change its Status to Inactive. Deleting a Process Control, along with it task completion history, is instant.
Click on a Compliance Process record in the list to open the The ‘Compliance Process’ page. Click the Process Control tab. Click the Delete icon 1 of the record to be deleted.
The clearly worded last chance Confirm window is displayed. Click OK to delete, or click Cancel.
Completing a Compliance Process Control Current Task
My Current Tasks
To see which tasks have been generated for you to complete, from the main menu, click the My Summary option.
If the Current Tasks tab appears, you have Current tasks you are required to complete. If this tab does not appear, you do not.
Look for, or filter by, TypeCompliance Task in the Current Tasks list.
Completion Options
Depend on the task configuration and requirements, and the system configuration, you may have the option to Express complete 1 the task. The pencil icon complete option 2 will always be available. Click one of these icons to complete the task. The Express complete icon will not appear if the task requires a comment and/or an attachment.
Express Complete One Click
If you system is configured for single click express completion, clicking the Express Complete 1 icon, will complete. Hovering over the Express complete icon will display the information the task will complete with. If this information requires amendments, do not click this icon; click the pencil icon instead, to complete the task.
Express Complete Two Clicks
If you system is not configured for single click express completion, clicking the Express Complete 1 icon, will display a confirming window with the information complete the task will complete with. Hovering over the Express complete icon will displays a different message to the single click hover message. If the information in the displayed confirming window is correct, click Yes2. Otherwise click No; the confirming window will close and the Complete the task window will open.
Complete the task
Click the Complete the Task1 icon to display the Complete Process Control window.
Changing the Actioned On date
If you wish to change the Actioned On date from today to another date, select the new Actioned On1 date.
Selecting an Outcome
If the task has been setup as an Outcome task, select Yes/No or Pass/Fail1 as required.
Adding a Comment
To add a comment, click the Add Comment 1 icon.
The Add Comment window displays. Enter in your text 1, then click the Save 2 icon; or click the Cancel icon to stop adding a comment.
Adding an Attachment
To add an attachment, click the Attachments1 tab. Drop file(s) in the Browse field, or click Browse 2 to locate and select the file(s) you wish to attach. Files can be also be attached one at a time. After a few seconds the files will re-appear into the File attachment list 3.
Completing the task
To complete the Current Task, click the Complete Task 1 icon.
If all required information is entered correctly, the task will complete and the window will close. If an error message appears, correct the error, then reattempt clicking the Complete Task 1 icon. Repeat until all errors no longer occur.