Modules have at least one Topic. Topics have at least one Obligation. Obligations have none or more Sub Obligations. Owners are setup at each of these levels.
A Compliance Process can be created from and an Obligation. A Process Controls can be created from a Obligation or a Sub Obligation. LexisNexis updates can be applied to each created Compliance Process and Process Control from the Source Obligation or Sub Obligation.
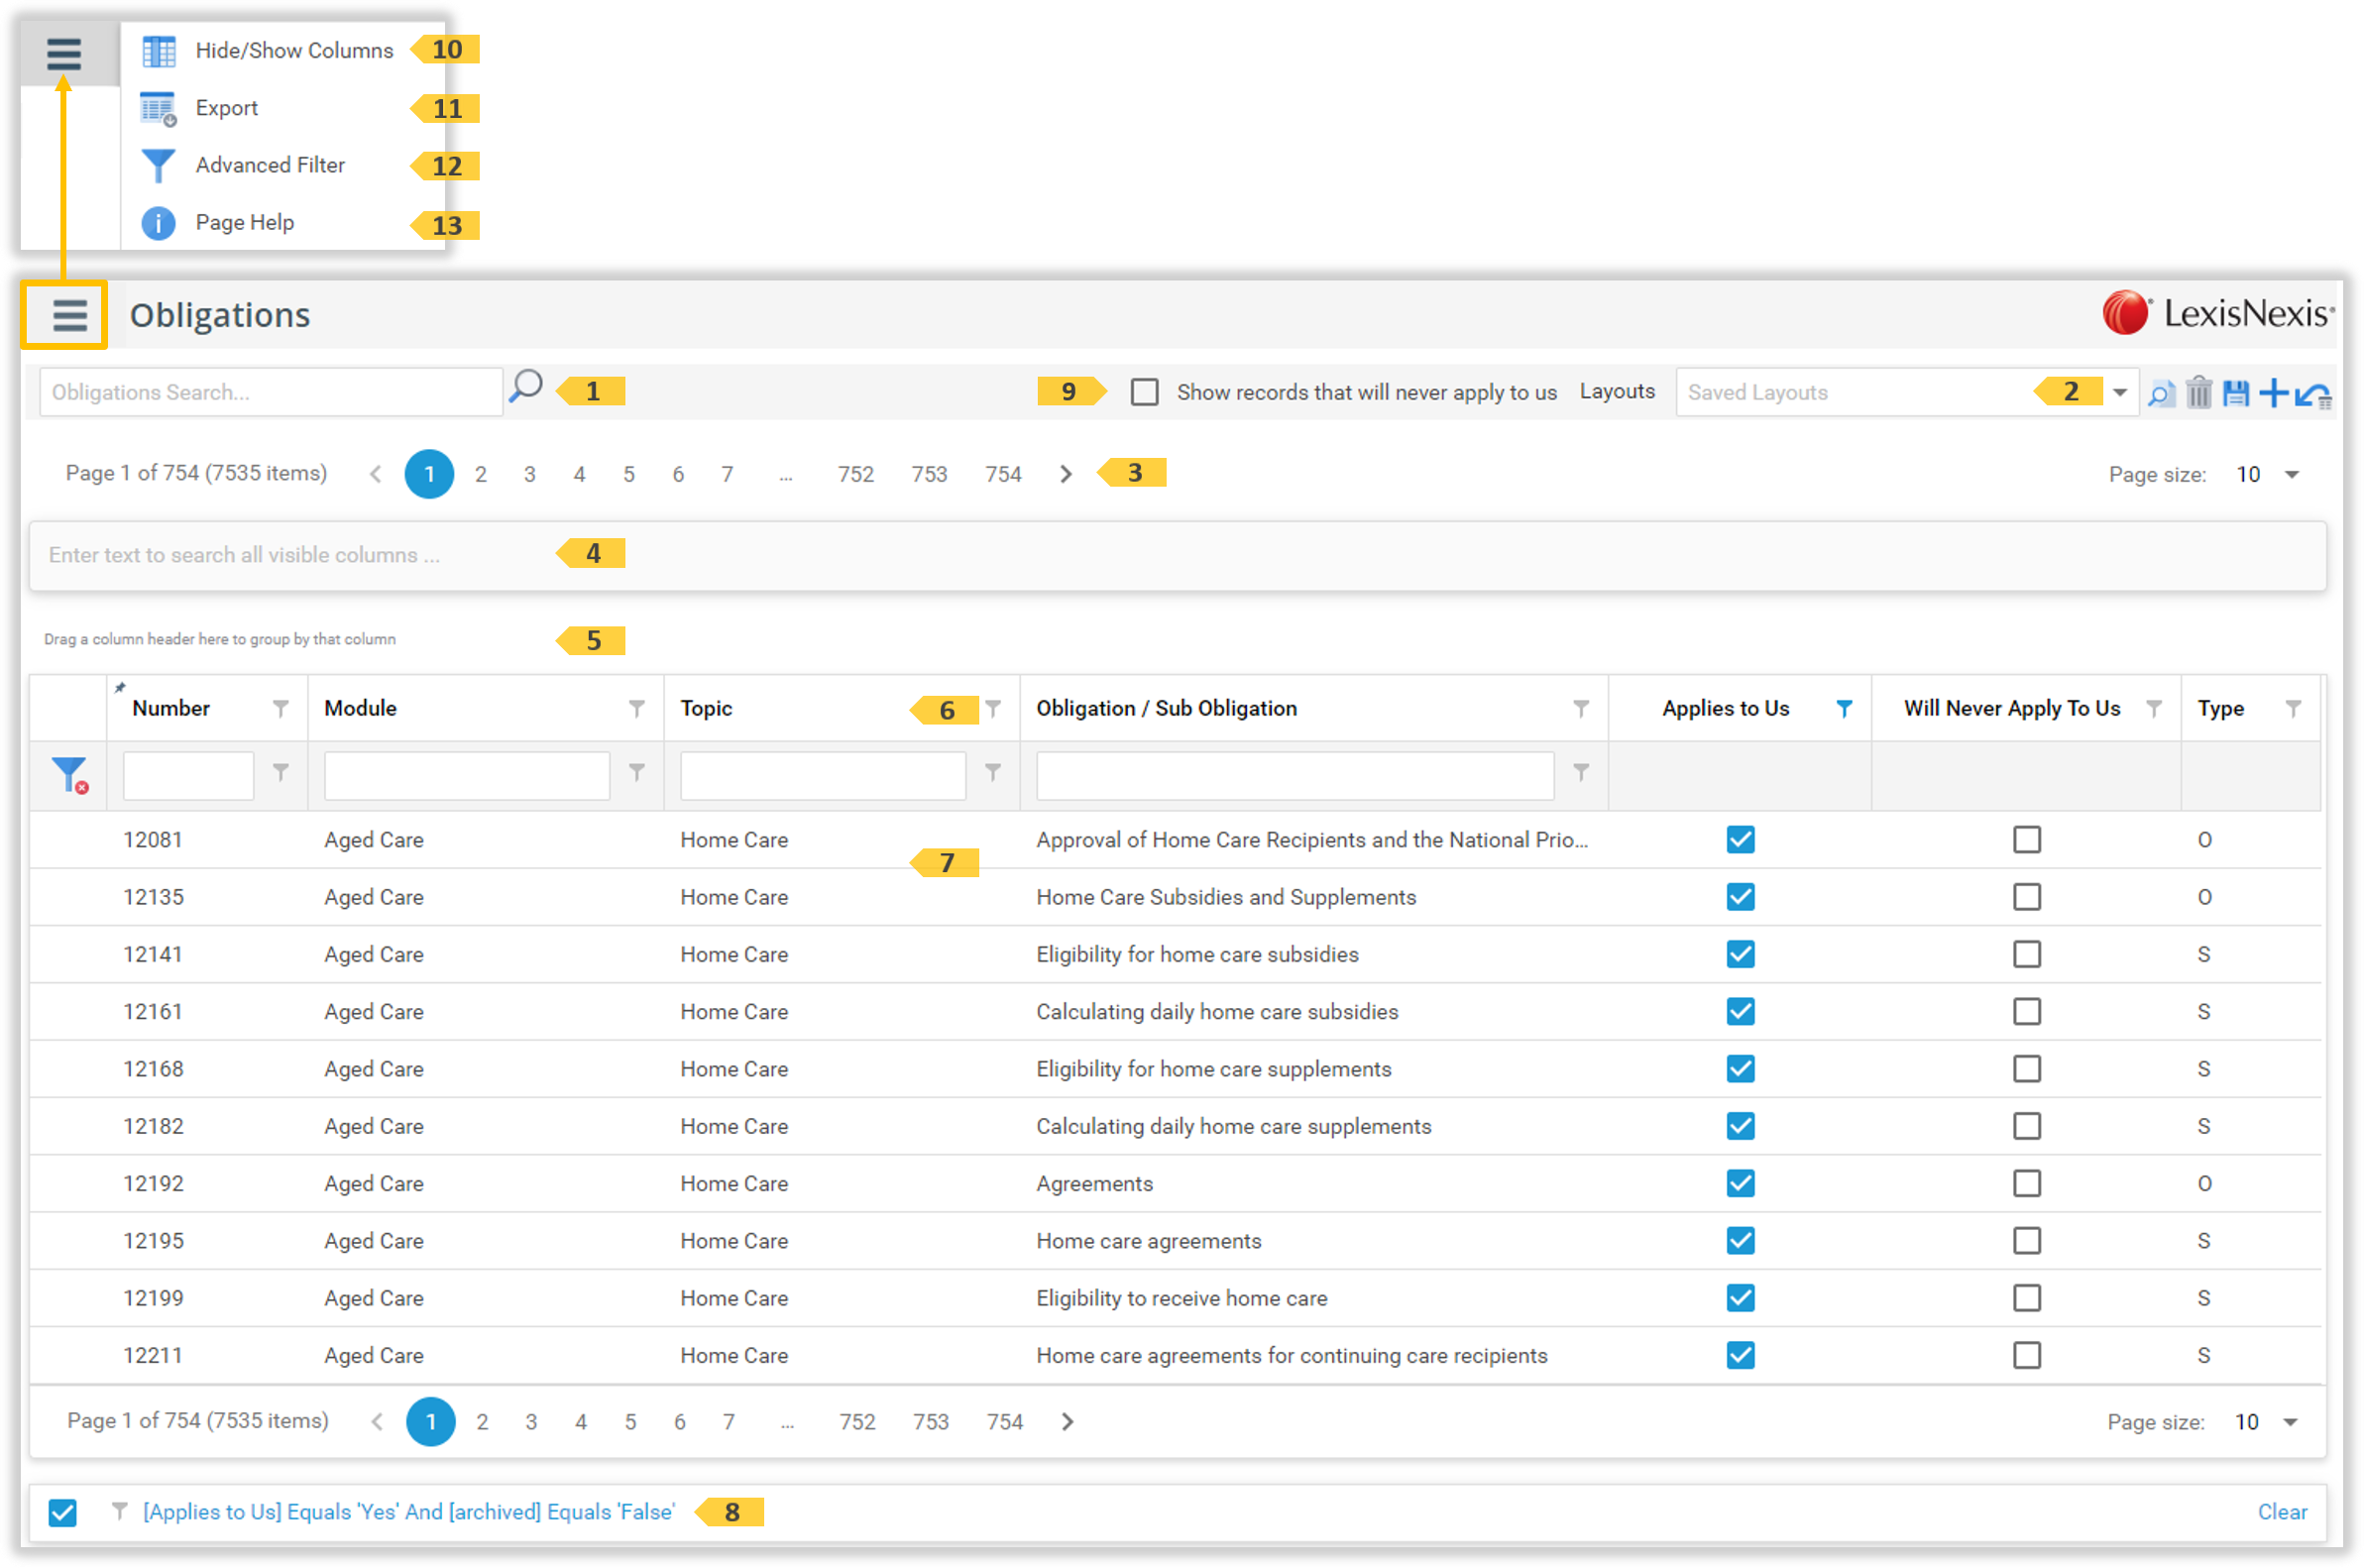
The Obligations List Page
The Obligation List page displays all the LexisNexis Obligations you are currently subscribed to.
The Obligations List Page
Obligations List Page elements
Obligations List Page elements
ID
Element
Description
1
‘Obligations Search…’ field
Use this field to search all Obligations and Sub Obligations Records. Only records matching the text will be displayed.
Use the controls in the column headers to filter the Records. Perform advanced filtering of the List to find particular Records.
7
Obligations List
Displays the Obligations Records. Click on a row to open the selected Obligations for viewing and to see it’s Sub Obligations. See the Obligations page.
Click this option to filter the Obligations List using the Filter builder.
13
Page Help option
Click this option to view basic information for working with the Obligations List Page.
The Obligations Page
The Obligation Page contains details about the Obligation and a list of all its Sub Obligations. The details of the Sub Obligations can be further accessed here
The Obligations Page Obligation tab
Obligations Page elements
Obligations Page elements
ID
Element
Description
1
Obligation Number navigator
Displays the current Obligation number and allows navigation to prior and next or the selected Obligation from the dropdown list.
2
Obligation identifier
This title displays the Module, Topic and Obligation for which details are currently being displayed.
3
‘Obligation’ tab
This tab displays all LexisNexis and associated TriLine GRC information of the current Obligation.
4
‘Sub Obligation’ tab
This tab displays a list of all Sub Obligation of the current Obligation.
5
‘Print Preview’ option
Click this option to print the current Obligation.
6
‘Page Help’ option
Click this option to display more information about this page.
The Obligation tab - Alerts tab
The Alerts tab will only display if LexisNexis has sent an alert for this Obligation since this Module was installed in TriLine GRC. This tab displays the list of alerts received for this Obligation. Clicking the chevron for each alert will reveal the details of the alert.
The Obligation tab - Alerts tab
The Obligation tab - Alerts tab elements
The ‘Alerts’ tab elements
ID
Element
Description
1
‘Alerts’ tab
If visible, click this tab to view the Alerts Records.
Use the controls in the column headers to filter the Records.
6
Alerts Record List
This list displays all Alerts Records of the currently selected Obligation.
7
Chevron Icon
Click this icon to display (or re-hide) the Alert record details.
The Obligation tab - Integration tab
The Obligation tab contains two sections of information:
The gray tabs 1 contain LexisNexis Obligation information.
The very light blue tabs 2 contain the TriLine GRC’s relationships to this LexisNexis Obligation.
This Integration tab allows:
The changing of which position is responsible (Owner) for the alerts LexisNexis send as required for this Obligation.
The selecting of additional Notify positions to be notified of alerts, updates and changes to this Obligation.
Selecting if this Obligation applies to our organisation. ‘Will Never apply to us’ will never send LexisNexis notification to the Owner and Notify Positions.
The creation of a Compliance Process with this Obligation’s content.
The creation of Process Controls with content from the Questional tab.
The TriLine GRC Links tab displays all links this Obligation has to TriLine GRC entities such as Compliance, Process Controls, Risks, Treatments, KRIs, Events, Registers and the other modules.
Any TriLine GRC updates including Completed Alert Tasks, is displayed on the TriLine GRC History tab.
If LexisNexis update this Obligation in any way, TriLine will first Archive the Obligation. This allows you may reference any prior version of the Obligation for difference from the current version.
The Obligation tab - Integration tab
The Obligation tab - Featuring Integration elements
The Obligation tab - Featuring Integration elements
ID
Element
Description
1
Grey tabs
These tabs contain all the Obligation Information.
2
Blue tabs
These tabs contain TriLine GRC’s relation to the Obligation. The Integration tab is featured.
3
‘Owner’ field
Select a different position from this dropdown to become the new owner.
Note: Only Position’s in Security System Groups Administrators, Administrators - Compliance and Create Compliance Process are authorised to appear in this list.
4
‘Notify’ field
Positions, in addition to the Owner, which are notified of any alerts, changes or updates to this Obligation.
5
Notify Positions
Displays Positions already being notified of alerts, updates and changes to this Obligation.
6
‘Tags’ field
Select which tags you wish to tag to this Obligation.
7
‘Applies to us’ buttons
Select the applicable choice. ‘Applies to us’ and ‘Does not apply to us’ will send notifications about this Obligation to the Owner and Notify Positions. ‘Will Never apply to us’ will never send LexisNexis notification to the Owner and Notify Positions. Optionally select ‘Change Sub Obligations as well’ to have the change cascade through to the Sub Obligations.
8
‘Reason’ field
A reason can be recorded to the Audit with any Save 11 here.
9
‘Create Compliance Process from Obligation’ button
Click this button to create a Compliance Process. Once created, the Compliance will automatically be linked to this Obligation and appear on the TriLine GRC Links Compliance tab.
10
‘Create a Process Control’ button
Click this button to create a Process Control. Once created, the both Process Control and it’s Compliance Process will be automatically linked to this Obligation and appear on the respective tabs within the TriLine GRC Links.
11
Save icon
Click this icon to Save any updates from fields 3 to 8.
The Obligation tab - TriLine GRC Links tab
All links from the Obligation to TriLine GRC records are displayed here. The links to each module are displayed on a different tabs. Compliance’s created from this Obligation will also appear on the Compliance tab. Process Controls created from this Obligation will appear on the Process Controls tab; additionally, the created Process Control’s Compliance record will appear on the Compliance tab.
The Obligation tab - TriLine GRC Links tab
The ‘TriLine GRC Links’ tab elements
The ‘TriLine GRC Links’ tab elements
ID
Element
Description
1
‘TriLine GRC Links’ tab
Click this tab to view the links for that Record Type. The available tabs are dependent on the modules you have enable.
2
Linked Record tabs
Click the appropriate tab to view, and if you have Edit access security, create and remove links for that Record Type. The available tabs are dependent on the modules you have enable.
3
Record Selector field
Each of the Linked Record tabs 2 has a Record Selector field. Click the Record Selector dropdown to view a list of available records that you can link to this Obligation record. Select the record you wish to link then click the Add Link icon 4. Note: The drop-down list only displays Records to which you have security access.
4
‘Add Link’ icon
Once you have selected a Record 2, click the ‘Add Link’ icon to create a link from that record to the Obligation record. The linked Record is displayed in the Linked Record List 8.
Use the controls in the column headers to filter the Records.
8
Linked Record List
This list displays all linked Records of the currently selected Module Record Type 2. Click a Record in this list to open the Record in its own page for viewing or editing depending on your Security access.
9
‘Remove Link’ icon
Each Record in the list has its own ‘Remove Link’ icon that will display for Edit access security. Click this icon to remove the link to the Record. A Confirm Delete dialog is displayed. Once you confirm the link’s removal, the Record is no longer displayed in the Linked Record List 8.
The Obligation tab - Archives tab
As legislation changes, LexisNexis will provide updates to the affected Obligations. TriLine GRC will create a copy of an Obligation in the Archive, before it is updated. This facility allows referral back to prior information.
Use the controls in the column headers to filter the Records.
5
Archived Record List
This list displays all Archive Records of the currently selected Obligation. Click a Record in this list to open the Record in its own window for viewing.
The Obligation tab - Archives Window
The Archived Obligation window displays the information the obligation contained prior to being updated on Archived date.
The Obligation tab - Archives tab
The ‘Archived Obligation’ window elements
The ‘Archived Obligation’ window elements
ID
Element
Description
1
Obligation Identifier
The Obligation’s module, Topic, number and title are displayed.
2
Information tabs
Click each tab to view each information element of the Obligation.
3
Information details
Each tabs information will be displayed here.
4
Export icon
Use this icon to export this information.
5
‘Close’ icon
Click this icon to close this window.
The Sub Obligation tab - List
The Sub Obligation tab lists all Sub Obligations under the presented Obligation.
The Obligations tab - Featuring Integration elements
Drag columns here to group the List 4. Column Headers Use the controls in the column headers to filter the Records. Perform advanced filtering of the List to find particular Records.
Click this icon to filter the Obligations List using the Filter builder.
7
‘Hide/Show Column’ icon
Click this icon to hide/show Obligations List columns using the Field Chooser.
8
'Reset ' icon
Click this icon to reset the Sub Obligation list to default column settings.
9
‘Export’ icon
Click this icon to export the List in Microsoft Excel or Word format.
The Sub Obligation Window
Click on a Sub Obligation in the Sub Obligation list to open the Sub Obligation Window.
The Sub Obligation tab - List elements
Obligations Page elements
ID
Element
Description
1
Obligation identifier
This title displays the Module, Topic, Obligation and Sub Obligation for which details are currently being displayed.
2
‘Print Preview’ icon
Click this icon to print the current Sub Obligation.
3
Grey tabs
These tabs contain all the Sub Obligation Information.
4
Tab Contents
Displays the current selected tabs contents.
5
Blue tabs
These tabs contain TriLine GRC’s relation to the Sub Obligation. The Integration tab is featured below.
6
‘Close’ icon
Click this icon to close this window.
The sub Obligation tab - Featuring Integration tab
The Obligation tab contains two sections of information:
The gray tabs (3 above) contain LexisNexis Obligation information.
The very light blue tabs (5 above) contain the TriLine GRC’s relation to this LexisNexis Obligation.
The Integration tab allows:
The changing of which position is responsible (Owner) for the alerts LexisNexis send as required for this Sub Obligation.
The selecting of additional Notify positions to be notified of alerts, updates and changes to this Obligation.
Selecting if this Sub Obligation applies to our organisation. ‘Will Never apply to us’ will never send LexisNexis notification to the Owner and Notify Positions.
The creation of Process Controls with content from the Questional.
The TriLine GRC Links tab displays all links this Sub Obligation has to TriLine GRC entities such as Compliance, Process Controls, Risks, Treatments, KRIs, Events, Registers and the other modules.
Any TriLine GRC updates including Completed Alert Tasks, is displayed on the TriLine GRC History tab.
If LexisNexis updates this sub Obligation in any way, TriLine will first Archive the sub Obligation. This allows you may reference any prior version of the Sub Obligation for difference from the current version.
The Sub Obligation Window elements
The Obligation tab - Featuring Integration elements
ID
Element
Description
1
‘Integration’ tab
Click this tab to view the Integration information.
2
‘Owner’ field
Select a different position from this dropdown to become the new owner.
Note: Only Position’s in Security System Groups Administrators, Administrators - Compliance and Create Compliance Process are authorised to appear in this list.
3
‘Notify’ field
Positions, in addition to the Owner, which are notified of any alerts, changes or updates to this Obligation.
4
Notify Positions
Displays Positions already being notified of alerts, updates and changes to this Obligation.
5
‘Tags’ field
Select which tags you wish to tag to this Sub Obligation.
6
‘Applies to us’ buttons
Select the applicable choice. ‘Applies to us’ and ‘Does not apply to us’ will send notifications about this Obligation to the Owner. ‘Will Never apply to us’ will never send LexisNexis notification to the Owner.
7
‘Reason’ field
A reason can be recorded to the Audit with any Save 8 here.
8
Save icon
Click this icon to Save any updates from fields 2 to 7.
9
‘Create_a_Process_Control’ button
Click this button to create a Process Control. Once created, the both Process Control and it’s Compliance Process will be automatically linked to this Sub Obligation and appear on the respective tabs within the TriLine GRC Links.
The Obligation Modules and Topics page
The Obligation Modules and Topics page display the high level groupings of firstly the Modules and secondly the Modules with their Topics. This page allows updating of the Owner and a cascade or ‘Trickle’ update to the sub records of the same Owner value,
Modules tab
This tab displays the LexisNexis Modules to which your organisation is subscribed.
Obligation Modules and Topics - Modules tab elements
Obligation Modules and Topics - Modules tab elements
Obligation Modules and Topics - Modules tab elements
Use the controls in the column headers to filter the Records.
3
Modules List
Displays the list of LexisNexis Modules to which your organisation is subscribed.
4
‘Owner’ field
Displays the Owner of this Module Record. Clicking this field will display a list of Owner’s this Module ownership can be change to. Click ‘Save changes’ 7 to save your changes.
5
‘Notify’ field
Positions, in addition to the Owner, which are notified of any alerts, changes or updates to this Obligation Module.
6
‘Trickle’ checkbox
Click this checkbox to trickle changes in Owner 4 and Notify 5 to all Topics, Obligations and Sub Obligations to the same Position. Different Owner and Notify Positions in the trickle path will not be changed. Click the ‘Save changes’ 8 button to save your changes.
7
‘History’ icon
The History icon will appear for records that have had a change of Owner or Notify. Click this icon to display the History of Owner and Notify changes for this Module
8
‘Save changes’ button
Click this button to save changes applied in Owner 4 and Notify 5 .
9
‘Cancel changes’ button
Click this button to cancel unapplied changes.
Topics tab
Displays the Topics for the LexisNexis Modules.
Obligation Modules and Topics - Topics tab elements
Obligation Modules and Topics - Topics tab elements
Obligation Modules and Topics - Topics tab elements
Use the controls in the column headers to filter the Records.
3
Modules and Topics List
Displays the list of Topics for the LexisNexis Modules to which your organisation is subscribed.
4
‘Owner’ field
Displays the Owner of this Topics Record. Clicking this field will display a list of Owner’s this Topics ownership can be change to. Click ‘Save changes’ 7 to save your changes.
5
‘Notify’ field
Positions, in addition to the Owner, which are notified of any alerts, changes or updates to this Obligation Topic.
6
‘Will Never Apply’ checkbox
‘Will Never apply to us’ will never send LexisNexis notification to the Owner or Notify Positions. Selecting this will automatically mark all Obligations and Sub Obligations as ‘Will Never Apply to Us’.
7
‘Trickle’ checkbox
Click this checkbox to trickle changes in Owner 4 and Notify 5 to all Topics, Obligations and Sub Obligations to the same Position. Different Owner and Notify Positions in the trickle path will not be changed. Click ‘Save changes’ 9 to save your changes.
‘History’ icon (Not_Shown)
The History icon will appear for records that have had a change of owner. Click this icon to display the History of Owners and Notify Positions for this Topics.
8
‘Preview changes’ button
Click this button to exclusive see the change of Owner to be changed. Click ‘Hide Preview’ to return to the normal view.
9
‘Save changes’ button
Click this button to save changes applied to Owner 4, Notifly 5 and Will Never Apply 6.
10
‘Cancel changes’ button
Click this button to cancel unapplied changes.
The Obligation Alerts Page
The Obligation Alerts page displays the LexisNexis Alerts filtered by a date range (of when alerts where received on your site).
The Obligation Alerts Page
Obligation Alerts page elements
Obligation Alerts page elements
ID
Element
Description
1
‘From’ field ‘To’ field filter
Use these date range fields to hone in on Alerts of interest.
2
Search' icon
Click this icon to activate the search based on the date range 1 .
Use the controls in the column headers to filter the Records.
6
List of Alerts
The list of Alerts for the selected date range 1. The 'Alert’pink section lists the Alert Number, Title, Type, Effective and LexisNexis Archived indicator. The ‘Parent’ blue section shows which Obligation, or Sub Obligation to which each Alert applies.
7
Applied Advance Filter settings
This is the current Advanced filter settings applied to the List. The filter can be turned off, cleared, or clicked to open the Advance Filter window to change the filter further.
8
‘Export to Excel’ option
Click this option to export the List in Microsoft Excel format.
9
‘Get Alert List from LexisNexis’ option
Click this option to download a list of audit Alerts received from LexisNexis, in CSV format. The downloaded file will be named ‘alerts.csv’.
Note: The list could also include Alerts that have not been processed into TriLine GRC because these are gathered daily as part of the TriLine GRC Overnight processing.
The Unresolved Obligations Updates Page
The Unresolved Obligations Updates pages display Compliance Processes and Control Process that are Sourced from an Obligation or Sub Obligation that have new Updates waiting to be applied to said Compliance Process or Control Process.
Click through to applicable record is available for each record displayed.
The Historical Note displayed under each record displays information about each Update.
Drag columns here to group the List 5. Column Headers Use the controls in the column headers to filter the Records. Perform advanced filtering of the List to find particular Records.
Use the controls in the column headers to filter the Records.
5
Unresolved Obligations Updates list
The list of Alerts Unresolved Obligations Updates. Click on a record to display that Compliance Process.
6
Historical Note
Information about each Update.
7
‘Export to Excel’ option
Click this option to export the List in Microsoft Excel format.
8
‘Page Help’ option
Click this option to view basic information this page.
The Obligations Gap Analysis Page
The Obligations Gap Analysis page displays which Obligations are not Linked to, or Sourced to, a Compliance Process.
Obligations which will never be relevant to your Organisation can be indicated as such by using the ‘Will Never Apply’ checkbox.
The Graph on the right side shows a measure of the Percentage Complete.
This grid has row level updates to ‘Applies to Us’ and ‘Will Never Apply’ to us. ‘Will Never Apply’ set on will prevent notifications being sent about this Obligation; otherwise the notification is always sent.
Each Link to a Compliance, or Compliance created from an Obligation, from an Obligation in this list reduces the Gap.
Note: Sub Obligations are not included in this list.
Drag columns here to group the List 5. Column Headers Use the controls in the column headers to filter the Records. Perform advanced filtering of the List to find particular Records.
Use the controls in the column headers to filter the Records.
5
Obligations Gap Analysis list
The list of Obligations are not ‘covered’ by a Compliance Process or Process Control.
6
‘Applies to Us’
Checkbox to indicate if the Obligation is applicable to our organisation. Either way any alert or update notification are still sent unless ‘Will Never Apply’ 7 is set on.
7
‘Will Never Apply’
Checkbox if set on will prevent alert or update notification from being sent.
8
‘Create a Link’ icon
Click this icon to create a link from this obligation to a Compliance.
9
‘Create a Compliance’ icon
Click this icon to create a Compliance Process from this ‘Source’ obligation.
10
‘Preview changes’ button
Click this button to exclusively see the Records waiting for changes to be Saved. Click ‘Hide Preview’ to return to the normal view.
11
‘Save changes’ button
Click this button to save changes applied to ‘Applied to Us’ 6 and ‘Will Never Apply’ 7.
12
‘Cancel changes’ button
Click this button to cancel unapplied changes.
13
‘Export to Excel’ option
Click this option to export the List in Microsoft Excel format.
14
‘Page Help’ option
Click this option to view basic information this page.
Procedures
Accessing Obligation Modules and Topics
Access Obligation Modules and Topics via the Main Menu:
From the Main Menu, select Obligations | Work with Obligation Modules and Topics.
The ‘Obligation Modules and Topics’ list Page is displayed.
Accessing Obligations
Access Obligations via the Main Menu:
From the Main Menu, select Obligations | Work with Obligations records.
The Obligations Menu
Note:
The Obligations Module must be installed for this menu option to appear.
The ‘Obligations’ list Page is displayed.
Accessing Obligation Alerts
Access Obligation Alerts via the Main Menu:
From the Main Menu, select Obligations | Work with Alerts.
The Obligation Alerts Menu
The ‘Obligation Alerts’ Page is displayed.
Update the Owner and Notify
Each Module has at least one Topic. Each Topic has at least one Obligation. Each Obligation has zero or more Sub Obligations. This Module family will always start with the same Owner at every level. TriLine GRC provides a cascading or trickle facility to update the Owner at the level Module or Topic level, and have ONLY that Owner replaced in that entire family.
This Trickle facility also applies to Notify.
Module Trickle Update
This update will change the old Owner to the new Owner all the way from this Module down through to all it’s Sub Obligations, where the old Owner’s name is the same. So the Trickle update is like for like, and leaves other Owners in this family unchanged. Ditto Notify.
Click on the Modules tab. Click the Owner 1 of the Module to be changed.
Select and click on the new Owner 1 from the dropdown list. If required, repeat for any or just the Notify 2 fields.
The changed cells will be lightly shaded. Click the Trickle checkbox 1. Click the Preview Changes2 button to only shows rows which have changes to be Saved. Click the Save Changes3 button to complete the updates, or click the Cancel Changes4 button to cancel the updates. Note: Not clicking the Trickle checkbox will result in only the Module Owner being updated.
A message will be displayed informing the update was successful.
Topic Trickle Update
This update will change the old Owner to the new Owner all the way from this Topic down through to all it’s Sub Obligations, where the old Owner’s name is the same. So the Trickle update is like for like, and leaves other Owners in this family unchanged. Ditto Notify.
Click on the Topics tab. Click the Owner 1 of the Topic to be changed.
Select and click on the new Owner 1 from the dropdown list. If required, repeat for any or just the Notify 2 fields.
The changed cells will be lightly shaded. Click the Trickle1 checkbox. Click the Preview Changes2 button to only shows rows which have changes to be Saved. Click the Save Changes3 button to complete the updates, or click the Cancel Changes4 button to cancel the updates. Note: Not clicking the Trickle checkbox will result in only the Topic Owner being updated.
A message will be displayed saying the update was successful.
Topic Will Never Apply Update
Use this feature to stop all notifications from this Topic, and all underlying Obligations and Sub Obligations.
The following is applicable to all Modules Link except Process Controls.
Open the Obligation or Sub Obligation. Click the TriLine GRC Links tab 1. Click the Module tab 2 to Link from. Click the Link dropdown field 3. Select and click the record 4 to link.
Click the New Link 1 icon.
The new linked record 1 is displayed.
Delete Link from Obligation or Sub Obligation
The following is applicable to all Modules Link including Process Controls.
Open the Obligation or Sub Obligation. Click the TriLine GRC Links tab 1. Click the Module tab 2 to Link from. Click the Delete Link icon 3 of the record to be de-linked.
Click the OK to complete the delete, or Cancel.
The record will no-longer be displayed in the list.
Link from Obligation or Sub Obligation to Process Control
Open the Obligation or Sub Obligation. Click the TriLine GRC Links tab 1. Click the Process Control tab 2. Click the Link dropdown field 3. Select and click the Compliance Process 4 to link.
All Process Controls for this is Compliance Process will be listed. Select the Process Control’s 1 to be linked.
Click the Save icon 1.
The new linked Process Control records 1 are displayed.
Also the Process Control’s Compliance Process record 1 is linked.