Use Key Risk Indicators (KRIs) to schedule and record measurements. Action can then be taken if the indicator shows a deterioration in the trend or rating.
The KRI list Page
The KRI list page is accessed from the main menu and displays all KRI records your logged in Position has security access to view, less any filters you may have additional applied.
‘History’ tab: Recent history of changes applied to this KRI.
The KRI Page
KRI Page elements
The KRI page elements
ID
Element
Description
1
Current Record selector
Use this selector to change to another KRI record.
2
KRI tabs
Click on each tab to display each titled information.
3
‘Save’ icon
Click this icon to save all updates to Details, Measurement, Task and Security tab field changes.
4
‘New’ icon
Click this icon to open The ‘New KRI’ window.
Note: Only a Position allocated to System Security Group ‘Create KRI’, Administrators - KRI, or Administrators, can create a KRI.
5
‘Print Preview’ icon
Click this icon to open a preview window of the printed layout page.
6
‘Delete’ icon
Click this icon to delete the KRI record.
Note: Deleting a KRI also removes its history and related measurement data. Consider making a KRI ‘Inactive’ (see the ‘Status’ field 2 on the ‘Details’ tab) instead.
7
‘Create a Template’ icon
Click this icon to create a new Template of this KRI record.
The Details tab
The Details tabs displays the main fields of the KRI record.
The Details tab
KRI Details tab elements
The KRI Details tab elements
ID
Element
Description
1
‘KRI Number’ field
The KRI Number uniquely identifies this measure and is set when the KRI is created. The KRI Number can be changed by typing a new value into this field.
Note: If if the KRI Number is changed to that of an existing KRI Record, an error message is displayed when saving.
This field contains a description of the KRI. Describe what the measurement. The text in this field can be formatted, and you can also add lists, hyperlinks, simple table data and images using the Formatting Toolbar.
5
‘Risk Category’ Selector
This field associates the KRI with a Risk Category.
6
‘Owner’ Selector
This field Displays the Position that is the ‘Owner’ of this KRI. This Position is responsible for ensuring that the KRI is completed / kept within tolerance. This position will be notified if a measure is recorded outside of the ‘Green zone’.
Use this field to set Tags to group this KRI with related Records.
The Measurement tab
Note: The terminology and colours used in the examples in this section are based on the default settings. Your system may use different terminology and/or colours.
The Measurement tab displays the type of Measurement indicator information. The measurement history and chart can also be accessed here.
The Lower Limit Measurement
The Lower Limit Measurement tab
The Upper Limit Measurement
The Upper Limit Measurement tab
The Range Measurement
The Range Measurement tab
The Manual Measurement
The Manual Measurement tab
KRI Measurement tab elements
KRI Measurement tab elements
ID
Element
Description
1
‘Indicator’ selector
There are four indicators, Lower Limit, Upper Limit, Range and Manual. Choosing an Indicator determines which measure fields are displayed in this tab.
2
‘Type’ selector
There are four Types, Number, Currency, Percentage, and Text. Choosing a Type determines the type of values that may be entered into the measure fields.
3
‘Trend’ selector
This field indicates whether the KRI is improving, worsening or not changing. See Calculating KRI Trend for more information.
Note: You can override the displayed Trend by clicking the Selector and choosing another Trend from the drop-down list.
3a
Trend and Rating Help icon
If this icon appears, click it to see your company Definitions for different levels of Trend and Rating.
4
Rating' Selector
This field highlights whether the measured value is placed within the three levels. See Calculating KRI Rating for more information.
Note: You can override the displayed Rating by clicking the Selector and choosing another Rating from the drop-down list.
5
‘Current Value’ Field
Displays the current value of the KRI. It is the Measure of the Current Period.
Note: Once a KRI is being measured regularly via a scheduled task or spreadsheet, and history records now exist. If you edit and change this current Measure, be sure to duplicate this change in the most recent history record.
7
‘Forecast’ indicator
An Optional field to indicator whether a Forecast value for the next period is recorded when the current measure is recorded for this KRI.
8
‘Forecast’ Field
This field will be blank if the Forecast indicator 7 not selected. Otherwise it will contain the next predicted value to recorded for this KRI during the next period.
9
‘Last Updated’ Field
The date when the KRI measure was last updated, either by a scheduled task (normal) or by editing the Current Value 6 (adhoc).
10
‘Period’ field
The Period to which this measurement applies.
11
The tri-coloured band
This displays the three colours selected on your site to represent the Ratings.
12
‘Target’ field
This is the idea value this KRI would hit each it is measured. For Lower and Upper Indicator Measurement, the Target is normally in the green zone, but if required can be placed in the warning zone. The target cannot cross the Threshold value. For Range Indicator Measurement, The Target is always in the green zone.
13
‘Warning Start’ field
This field is the start of the zone which is marked as a warning. The owner of the KRI will be notified of any measurements recorded in the warning zone.
14
‘Warning End’ field
This field is the end of the warning zone and the start of the ‘intolerable’ zone. The owner of the KRI will be notified of any measurements recorded in the ‘intolerable’ zone.
15
‘Threshold’ field
This value is proverbial ‘line in the sand’ that should never be crossed. This value is normally in the red zone, but if required can be placed in the warning zone.
16
Range diagram
This diagram is a summary of the measurement Rating zones. The value colour match the zones they represent.
17
‘Show Task History’ icon
Click this icon to view the KRI’s measurement history. See Viewing KRI History.
Note: This icon is only displayed for KRIs with a recorded Task Completion History.
18
‘Show Chart History’ icon
Click this icon to view a chart of the recorded measures for this KRI. The date range of this chart can be adjusted.
19
‘Upper Limit’ field
In a Range Indicator Measurement this value is the start of the upper ‘intolerable’ zone. The owner of the KRI will be notified of any measurements recorded in the ‘intolerable’ zone.
20
‘Warning Top’ field
In a Range Indicator Measurement this value is the start of the upper warning zone. The owner of the KRI will be notified of any measurements recorded in the warning zone.
Note: The green zone exists between the Warning Top and the Warning Lower
21
‘Warning Lower’ field
In a Range Indicator Measurement this value is the start of the lower warning zone. The owner of the KRI will be notified of any measurements recorded in the warning zone.
22
‘Lower Limit’ field
In a Range Indicator Measurement this value is the start of the lower ‘intolerable’ zone. The owner of the KRI will be notified of any measurements recorded in the ‘intolerable’ zone.
The Task tab
Use the ‘Tasks’ tab to set information used for each occurrence of a scheduled Measurement for the selected KRI.
The Task tab
KRI Task tab elements
1 ‘Load values using a spreadsheet’ option
Check this option to use the spreadsheet measurement loader. Uncheck this indicator use a Current Task to record each scheduled measurement.
Select this option to load values using a spreadsheet only. Reminder emails are generated as normal, but no task is generated to be completed. And, hence no second reminder. The Actioned By receives this one reminder email only, that the values must be loaded via the spreadsheet.
Type the description or instructions required to complete the measurement. These details are emailed to the ‘Actioned By’ Position when a Task is generated.
3 ‘Date Calculation’ options
Choose between: specifying a date or the last working day; or specifying a day of the week (e.g. 2nd Tuesday).
Selecting ‘Specific date or Last working day’ displays the ‘Last Working Day’ checkbox as shown beside to the ‘Next Due’ field.
Selecting ‘Specific day of the week’ displays specific day controls (see 13 below) in place of the ‘Last Working Day’ checkbox.
4 ‘Frequency’ field
Use this fields to set how often the Task should be performed (e.g. every 3 months). Your interval option are multiples of Monthly only, e.g. ‘3’ for quarterly, ‘12’ for annually.
5 ‘Critical Task’ option
Tick this checkbox to set the Task as a Critical Task. If selected, an additional reminder notification will be sent if the task is not completed at the configured critical time on the Scheduled Due Date.
6 ‘(Next) Due Date’ field
Use the Date/Time Selector to set the date on which the Task must next be completed.
(Scheduled) date field
A (Scheduled) date field is now displayed to the right of the ‘Next Due’ field. This field displays the actual date that the next Task will be generated.
Normally, the ‘(Next) Due Date’ and ‘Scheduled’ dates will be the same, but when the ‘(Next) Due Date’ falls on a non-working day (e.g. weekend or public holiday) the ‘Scheduled’ date is set to the preceding working day.
Tip: If you leave the ‘Next Due’ field blank, the record will be created, but a Task will never be generated. This can be useful if your organisation is not yet ready to start the Task and wants to specify the ‘Next Due’ date at a later time.
7 ‘Last working day of the period’ option
Optionally select this checkbox to override the (Next) Due Date to always be the last day of the month.
8 ‘1st Reminder’ field
Displays the number of days before the Task due date that the Task will be generated for the ‘Actioned By’ 11 Position notified. If the day the Task is be be generated falls on a non-working day, the task will instead be generated on the first prior working day. This is the day the task will appear in the ‘Actioned By’ Current Tasks list. This is also the day the ‘Actioned By’ position will receive a notification email containing the Task description and when the Task is Due.
9 ‘2nd Reminder’ field
For Tasks with a long lead time (i.e. 1st Reminder is set to a high number of days), set a lower number of days in the ‘2nd Reminder’ field so that an additional email notification is sent to the ‘Actioned By’ Position before the due date. The same non-working day principle as 1st Reminder applies to this 2nd Reminder.
Tip: Set this field to zero if you don’t want a 2nd Reminder sent for this Task.
10 Escalate To selector
Select the Position who will receive a notification email if the Task becomes overdue.
This Position receives ONE cc email: of the overdue email sent to the ‘Actioned By’ Position’s the day the Task becomes overdue (plus configured Escalation days).
If the ‘Escalate To’ field is left blank then the value will automatically default to the ‘Escalate To’ Position defined in the Security Centre Position’s settings.
If the KRI owner should be receiving the overdue notification, select their position here.
11 Actioned By selector
Click this Selector and choose a Position from the drop-down list. This is the Position responsible for performing the actions specified in the Task description Field 2 and reporting the Task as complete.
12 Mandatory Attachment option
This option is useful for those Tasks requiring documentary evidence. Check this option to prevent the KRI Task from being reported as complete without having the required documents attached.
13 Date Calculation
Choose ‘Specific day of the week (e.g. 2nd Tuesday)’ changes 7 to 14.
14 Week and Day options
Choose the Day and the Week of the month to schedule each task.
The Notes tab
The Notes tab displays a list of Notes that have been added to this KRI record. This tab can be used to add any relevant information relating to the KRI record as required. Positions with View or Edit access are permitted to add Notes. Positions with Edit access can also update or delete the Notes.
Use the controls in the Column Headers to filter the Notes in the list.
3
Notes list
Each Note in the list consists of two parts: the top part is the Note itself, and the bottom part (shaded) displays the Name of the person who created the Note plus a date of when the Note was created.
4
‘Edit Note’ icon
Click this icon to Edit a Note. The ‘Edit Note’ window is displayed. Note: This icon only displays if you have ‘Edit’ security access.
5
‘Delete Note’ icon
Click this icon to Delete a Note. A ‘Confirm Delete’ dialog is displayed to remind you that deleting this Record will result in loss of data. Note: This icon only displays if you have ‘Edit’ security access.
Use the KRI Page ‘Links’ tab to link related Records to this KRI.
The Links tab
The Links tab elements
The ‘Links’ tab elements
ID
Element
Description
1
Linked Record tabs
Click the appropriate tab to view, and if you have Edit access security, create and remove links for that Record Type. The available tabs are dependent on the modules installed on your site.
2
Record Selector field
Each of the Linked Record tabs 1 has a Record Selector field. Click the Record Selector dropdown to view a list of available records that you can link to this KRI record. Select the record you wish to link then click the Add Link icon 3. Note: The drop-down list only displays available Records to which you have security access.
3
‘Add Link’ icon
Once you have selected a Record 2, click the ‘Add Link’ icon to create a link from that record to the KRI record. The linked Record is displayed in the Linked Record List 6.
Use the controls in the Column Headers to filter the Records in the Links List (item 7).
7
Linked Record List
This list displays all linked Records of the currently selected Module 1. Click a Record in this list to open the Record in its own page for viewing or editing depending on your Security access.
8
‘Remove Link’ icon
Each Record in the list has its own ‘Remove Link’ icon that will display for Edit access security. Click this icon to remove the link to the Record. A Confirm Delete dialog is displayed. Once you confirm the link’s removal, the Record is no longer displayed in the Linked Record List 7. Note: The KRI record link will also be removed from the Links tab of the corresponding record.
9
‘Show Closed’ Event option (Not Shown)
This option only appears on the Event tab. Select this option to include Closed Events in the Record Selector 2.
The Security tab
The Security tabs displays the Security access to this KRI record. The Security tab is used to update the security access of each Security Group to this KRI record. Edit access means Positions in this Security Group can update all values in this KRI record. View access means Positions in this Security Group can see, but not update, all values in this KRI record. Not Used access means Positions in this Security Group cannot see this KRI record.
Select a Record Security Rights level for the Security Group. Note: The Security Group containing the KRI Owner must be given ‘Edit’ Rights to the KRI Record.
4
Security Group Membership icon
Click this icon to display the related Security Group Membership List (see item 5 below).
5
Security Group Membership List
This list is displayed when you click the Security Group Membership icon (see item 4 above) for a Security Group. This function is useful if you need to confirm which Security Group a Position is a member of before assigning Record Security Rights to that group.
Notes:
Positions in the ‘Administrators’ Security Group are automatically assigned ‘Edit’ Rights.
Positions in the ‘Super Users’ Security group are automatically assigned ‘View’ Rights.
If a user is a member of multiple Security Groups with conflicting Security Rights, the higher level of access is granted.
The ‘History’ tab
View this KRI record’s updates, and task completion updates within the Configured (Item 5) Audit days period.
Audit records must exist for this tab to appear.
Procedures
Access the KRIs list page
View the list of KRIs via the Main Menu:
From the Main Menu, select KRI | Work with KRI records.
Either click the New KRI 1 icon from this page, or click a KRI record, and then from the KRI page, click the New KRI 2.
The ‘New KRI’ window displays. Complete the required details (see the ‘New KRI’ window elements for details about each field).
Note: If you paste content into Title, Description or Risk, please review Paste From Word
Click the Save 12 icon to complete adding the new KRI record. The KRI page will display with this new record and you can continue editing this record. Clicking the cancel 13 icon will close the ‘New KRI’ window without saving the record.
‘New KRI’ window elements
‘New KRI’ window elements
ID
Element
Description
1
‘Select Template’ selector
Click this field and select a KRI Template from the drop-down list. The default fields will be populated with values from this Template.
2
‘Clear Template selection’ icon
Click this icon to reset the values for all fields in this window.
3
‘KRI Number’ field
Type a number that uniquely identifies this Key Risk Indicator record.
4
‘Record Status’ selector
Select whether the status is Active or Inactive (see Record Status).
5
‘Title’ field
Type the title of this Key Risk Indicator record.
6
‘Category’ selector
Select the Category of this Key Risk Indicator record (see Risk Categories).
7
‘Owner’ field
Select the Position that is responsible for the Key Risk Indicator record. This position must be a member of a Security Group, or System Group with Edit access to this record. This Position is responsible for ensuring that the KRI is completed / kept within tolerance. This position will be notified if a measure is recorded outside of the ‘Green zone’.
8
‘Indicator’ selector
There are four indicators, Lower Limit, Upper Limit, Range and Manual. Choosing an Indicator determines which measure fields are displayed.
9
‘Type’ selector
There are four Types, Number, Currency, Percentage, and Text. Choosing a Type determines the type of values that may be entered into the measure fields.
If shown, click this icon for information on creating a Key Risk Indicator record.
12
‘Save’ icon
Click this icon to save this new Key Risk Indicator record. The ‘New KRI’ window will close and the KRI record will display with a successfully created message.
13
‘Cancel’ icon
Click this icon to cancel creating this new Key Risk Indicator record and close the ‘New KRI’ window.
Click on a KRI record in the list to open the The ‘KRI’ page. Click each tab to view the details on that tab.
Note: If you paste content into Title or Description, please review Paste From Word
If the Save icon is display, you have security access to update the values on this KRI record. The Save icon applies to Details, Measurement, Task and Security tabs. Update values as required and click the Save icon.
Delete a KRI
Deleting a KRI is NOT recommended if you wish to retain the history of the KRI and its Measures. Instead consider changing the KRI Status to Inactive.
Note: Only Positions allocated to a Security Group that has been assigned ‘Edit’ Record Security Rights can delete a KRI Record.
Note: Deleting a KRI record also deletes its History records. This may have auditing implications. Consider instead changing the Status to Inactive (see Change the Status of a Record).
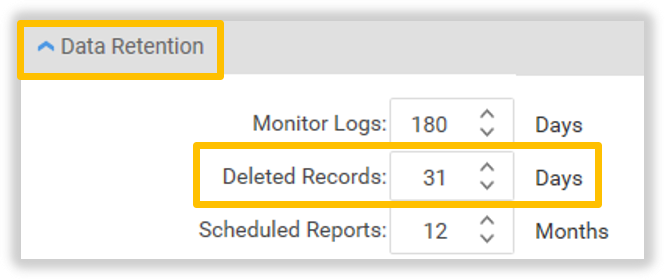
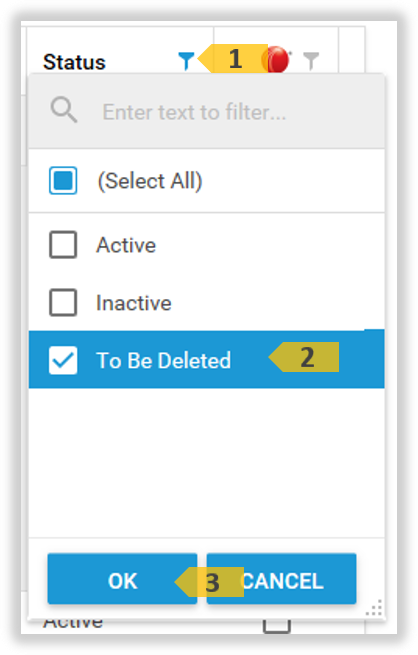
Undelete a KRI
The KRI record is not deleted immediately, but rather it’s status is changed to ‘To Be Deleted’ for a limited time determined by your configuration settings. Hence the record can still be view and the record can also be recovered from this to be deleted status.
The Record will be destroyed on its scheduled date by the overnight Monitor and cannot be recovered/undeleted after this time.
The days delay until the deletion of a record is permanent, is configured by the Administrator on the General Configuration tab. For example, this setting is 31 days:
Click on a KRI record in the list to open the The ‘KRI’ page. Click the Print icon 1.
A Preview Page opens showing a Report for the KRI. Navigate, search, print and/or save the Report using the Preview Page Toolbar. Click the Close icon 1 to close this window.
Manage Notes
The Notes tab displays a list of Notes that have been added to this KRI record. This tab can be used to add any relevant information relating to the KRI record as required. Positions with View or Edit access are permitted to add Notes. Positions with Edit access can also update or delete the Notes.
Click on a KRI record in the list to open the The ‘KRI’ page. Click the Notes tab. Click the Delete Note icon 1 on the Note to be deleted.
The ‘Note’ tab Delete icon
The ‘Confirm’ window appears. Click OK to delete, or click Cancel.
Manage Links
KRI records can be linked to other relevant records from other Modules in the TriLine GRC system. For instants, where a KRI is created to measure a Risk, link the KRI and the Risk together. Linking a KRI to a Risk is a two-way process—a KRI linked to a Risk will also be displayed on the Risk Record’s ‘Linked KRI’ tab.
Click on a KRI record in the list to open the The ‘KRI’ page. Click the Links tab. Click on the required module tab 1. Type ahead in, or click, the record selector 2 to display the list of records (your security access allows). Click the record 3 to link.
The ‘Link’ tab
The selected record number displays in the linking field. Click the Link icon 1.
The ‘Link’ selected
Note: The Links Events and Registers tabs will only appear if a records have been linked to this Compliance record from a record in those modules. The linking is one way in this sense, but will appear on both record’s Link tabs.
The linked record 1 displays in the Linked list.
The ‘Link’ list
Delete a Link
Note: If you have edit access and the Delete icon does not display, click the record to Delete the link from the other module.
Click on a KRI record in the list to open the The ‘KRI’ page. Click the Links tab. Click on the required module tab 1. Click the Delete Link icon of the record to be de-linked 2.
Click on a KRI record in the list to open the The ‘KRI’ page. Click the Security tab. Update the Security Group accesses as required 1. Click the Save icon 2 to save the updates.
The ‘Security’ tab
Notes:
Positions in the ‘Administrators’ and ‘KRI Adminstrators’ System Group are automatically assigned ‘Edit’ Rights.
Positions in the ‘Super Users’ Security group are automatically assigned ‘View’ Rights.
If a user is a member of multiple Security Groups with conflicting Security Rights, the higher level of access is granted.
Measure Procedures
Adding (Scheduling) the KRI Task
The KRI’s purpose is to record each measure as required. So, unlike a Compliance Processes which can have multiple Process Control tasks, the KRI only has one task, record the measurement. Hence, the Task tab only allows the scheduling of a single task, the task to record this measurement.
Historical measures can be loaded via spreadsheet (regardless of the Load values 1 setting). Or, Historical measures can be loaded manually by setting the scheduling 3 to first date you have a measure for. The Monitor will generate all preceding task for measurements to recorded into. Please contact your administrator (first), or TriLine GRC support if you require further information.
Create or Edit the KRI you wish to schedule. Click the Task tab.
Decide if the measurement is to be recorded via a Current task, or to be loaded from a spreadsheet 1. Choosing the spreadsheet option means only the first reminder email is generated and the values must be loaded via spreadsheet. Since there is no task, there is no Overdue concept, nor second reminder with this option. Not choosing this option means that as per normal, the task is generated on the reminder date, can have a second reminder, and can become overdue, and the measurement must be entered in this generated current task.
Enter the description or instructions 2 required to complete the measurement. These details are emailed to the ‘Actioned By’ Position on the first reminder date.
Enter the scheduling details 3. The frequency is measured in months; e.g. use 12 for yearly.
Select the ‘Owner’ as the ‘Escalate To’ 4 to ensure the ‘Owner’ is notified if the measure is not recorded by the Due date.
To appear in ‘Actioned By’ a Position must belong to a Security Group that has View or Edit access to this KRI record. Only one Position can record a measurement. Select the Position to record this measurement 5.
Click the Save6 icon to save your changes. The Monitor will generate notifications at the scheduled times.
Change a KRIs Current Value and Forecast
Use the ‘Current Value’ and ‘Forecast’ value when in the initial stages of setting up the KRI Measurement and you want to set an initial value, or change the initial value. That is, use this feature before history records exist for this KRI.
If History records do exist for this KRI, ONLY use this feature to to mirror a change, or correction to that you are making to most recent history record, so that visually the Measurement tab value matches the most recent History record value. Otherwise, do not use this feature once history records exist.
Open the KRI you wish to change. Click the Measurement tab.
*Note: This History icon 2 indicates that History records exist.
Click the ‘Change Value/Forecast’ pencil icon 1 to display the Change Value/Forecast window.
Enter a New Value 1.
If the KRI uses forecast, enter a Forecast 2.
Enter the Reason 3 for this value change.
Click the Save icon 4 to apply the new value, or click Cancel 5. The window will close.
Note: This feature does not create, nor update history records for this KRI.
Viewing KRI History
If KRI Measurements have been loaded via spreadsheet, or if KRI Tasks have been completed for the selected KRI, history records will exist for the this KRI and the Show Task History icon will display in the Measurement tab.
Open the KRI you wish to view History. Click the Measurement tab.
*Note: This History icon 1 indicates that History records exist.
Click the ‘Show Task History’ icon 1 to display the KRI History window.
This window is divided into two functional sections. The first section 1 contains the Details, Comments and Attachments of most recent history record, as shown by the ‘Due Date’ field. The Due Date field is used to change to another History record. The second section 2 contains a summary of all the measurement history for this KRI. The grid is ordered in displaying most recently measurement first, hence the first record matches the record displayed in section one. Clicking or double clicking a record in this grid has no action, and no effect changing the record in section one. Section one records can only be changed by selecting a different Due Date from the Due Date field.
Viewing a different History record
In this example, we will be viewing the measurement from January 2018. Review the Summary grid to find the Due Date 2 for the January 2018 1 measurement.
Click the Due Date1 field to find the matching Due Date (5/02/2018), and then click this date 2.
Section one loads with the selected measurement.
View an Attachment
Click the Attachments tab. Click the Open the Attachment 2 icon.
Follow the Browser instructions on opening the downloaded Attachment.
Update KRI History
To update a KRI History record, a Position must be a member of a Security Group with Edit access to that record. The updating of the History record is done separately on each of the tabs.
An update to the Measurement Value 4 will prompt you to review Trend and Rating message. Change these as required.
Click Save 6. The window will close and a confirmation message will appear. (Or, click Cancel 7 to cancel the update.)
‘Update KRI History’ window elements
‘Update KRI History’ window elements
ID
Element
Description
1
‘Reason’ Field
Enter the reason for the update to the KRI History.
1a
‘Completed’ options
Not Shown. Depending on your system configuration, ‘Completed’ options may appear. Serious consideration needs to be given to ever changing this answer to ‘No’, as ‘No’ means this task will not ever be completed; it will be ‘Not Completed’.
2
‘Actioned On’ date selector
Change the ‘Actioned On’ date if required.
3
‘Period End’ selector
If required Update to the Period End date.
5
‘Value’ Field
If required Update to the Value field.
Note: Changing the Trend value will have no automatic update effect on Trend and Rating. Trend and Rating must be manually update as required.
5a
'Forecast Field
Not Shown. If required Update to the Forecast field.
6
‘Trend’ selector
If required Update to the Trend value.
7
‘Rating’ selector
If required Update to the Rating value.
8
‘Save’ icon
Click this icon to Save all updates.
9
‘Close’ icon
Click this icon to close the popup window and cancel the update.
Add a Comment
Click the Comments tab. Click the Add Comment 1 icon.
Enter the Comment text in the edit area 1. Click the Save icon 2 to save this Comment.
Or, click the Cancel icon 3 to stop adding the Comment.
Edit a Comment
Click the Comments tab. Click the Edit Comment 1 icon.
Change the Comment text in the edit area 1. Click the Save icon 2 to save this Comment.
Or, click the Cancel icon 3 to stop editing the Comment.
Delete a Comment
Click the Comments tab. Click the Delete Comment 1 icon.
Click OK to confirm this Delete, or click Cancel.
Add an Attachment
Click the Attachments tab. Drop files 2 or Click Browse...3 icon.
After a few seconds in files upload and appear in the Attachments list 1. Load as many files as required.
Delete an Attachment
Click the Attachments tab. Click the Open the Attachment 2 icon.
Select the position that performed the Task. The task can be Actioned By a delegate who is not the original ‘Actioned By’ Position.
3 ‘Comments’ icon
Add a comment relating to completion of the Task. (See Add Comment popup window in the Glossary for information on adding a comment.)
‘Measurement’ tab
Fill in the details on the ‘Measurement’ tab.
The Complete KRI Task ‘Measurement’ tab
‘Measurement’ tab fields
1 ‘Period Ending’ selector
Shows the Period Ending for the Measurement you are completing. (See Date/Time Selector in the Glossary).
2 ‘New Value’ field
Type the new value of the KRI Measurement.
When you enter the New Value, the ‘Trend’ and ‘Rating’ (see below) are automatically calculated and their values filled. This feature is provided as a guide;you can override these values and select different values if you desire.
3 ‘Trend’ selector
This value will be automatically updated when a New Value 2 is entered. However this automatic value is only a guide and you may override this selection with your own value.
Select the Trend (e.g. is the KRI worsening, staying the same or improving?).
Click the Help icon to the left of the Trend field to see definitions for each available Trend.
4 ‘Rating’ selector
This value will be automatically updated when a New Value 2 is entered. However this automatic value is only a guide and you may override this selection with your own value.
Select the Rating (e.g. is the KRI at an unacceptable or acceptable level, or in the warning zone?).
Click the Help icon to the left of the Rating field to see definitions for each available Rating.
5 ‘Forecast’ field (Not Shown)
If this field is displayed, type the predicted value of the KRI during the next period.
‘Attachments’ tab
Attach any supporting documents relating to Task completion.
The Complete KRI Task ‘Attachments’ tab
To attach documents, see Attachments in the Glossary.
Complete a Task
On your ‘My Tasks’ Page, select the ‘Current Tasks’ tab.
Click the ‘Task Completed’ icon () to complete the Task.
Note: Depending on your system configuration settings, a ‘Task Not Completed’ icon may also be displayed: See ‘Task Not Completed’ icon in the Glossary for more information.
Click the ‘Task Completed’ icon to complete the Task.
Note: Depending on your system configuration settings, a ‘Task Not Completed’ icon may also be displayed: See ‘Task Not Completed’ icon in the Glossary for more information.
Loading values using a spreadsheet
To load values from a spreadsheet into a KRI, that KRI must have Load values using a spreadsheet option selected (see item 11 above).
Note: Spreadsheet column headings must match exactly as shown in the following images.
Format all Spreadsheet cells (including Value and Forecast) to be General. General format cells have no specific number format.
You can use the KRI spreadsheet load for historical measurements for a single KRI:
Load KRI Historical Measurements
You can use KRI spreadsheet load for cyclic measurements of many different KRIs:
Load KRI Cyclic Measurements
To access Loading values using a spreadsheet:
From the Main Menu, select KRI | Load KRI History.
Load KRI History
Note:
This menu option will not appear if you do not have the correct functional, or Record rights security.
This menu option will also prevent you from loading records you do not have the correct security rights too.
The Load KRI History Page is displayed.
Load KRI History file loader
Drag and drop, or Browse to your History spreadsheet which you have prepared with the data to be loaded. The ‘Click here to upload the data’ button will appear. Click ‘Click here to upload the data’.
Load button
The data is loaded and display on screen. At this point you may modify the Rating and the Trend if required.
Load button
Modify records as required.
Load button
Click ‘Save changes’. A confirmation message is display.
Click Finish. The KRI History Loaded window will close.
If there was a problem with any records in the spreadsheet, those records will not appear in Step 4 above. An information message will appear after Finish is clicked for problem records.
Load button
From the KRI Measurement tab, click the History icon to see all loaded records and in this example with the modified trend colours.
Load button
KRI Template Procedures
Create a Template from a KRI
Coming soon.
Access the KRI Templates list page
Coming soon.
Create a KRI Template
From the Main Menu, select KRI | Work with KRI records.
The KRIs List is displayed.
Click the KRI in the List on which you want to base the new KRI Template.