Note: Your site may be configured to display a different title for Events.
Recording Event entries and management of progress
Are you a new user? Read this first.
If you’re unfamiliar with the Recording Event entries and their management process, please read the following two sections in the topic TriLine GRC and Event before referring to the material in this topic:
via TriLine GRC, if the person has a TriLine GRC account and Position, or
via the TriLine Portal, with this person being a self added, or, an admin added, TriLine GRC Portal User.
The Owner(s) for that Event Type will receive a notification advising that an Event has been recorded. The first default Owner, or optionally, the Nominated Position, will Manage this Event record (and is called the ‘Managed By’). Managed By can be delegate as required. The person creating an Event record can choose to receive a confirmation email of the creation of their Event record.
The Managed By Position:
reviews the Event Record,
adds relevant information, or links to the Event entry,
assigns Tasks, as required, to Positions within TriLine GRC to take any required action,
responds to TriLine GRC alerts regarding any Task progress, and
changes the entry’s status as required by that Events processing procedures, till the record is progressed to a ‘Closed’ status.
Accessing an Event List
Note: To see an Events List, the logged in Position must have the correct Security Group membership.
Positions which are members of Security Groups with ‘View’ and ‘Edit’ access to Event Records, can review those Event records via the ‘Events List’ Page:
From the Main Menu, select Events, and then click the Work with Event records1 option.
Note: The Events display here will be different in your system.
This page displays all Event entries recorded to which you have security record access of ‘View’ or ‘Edit’. Records displayed may have default Event Status filtering 3 applied. Records may also have record filtering 12 applied.
Use the controls in this panel to save and load different grid layouts.
3
Show Closed selector
When you first open the Event List, only Event Records with a non-closed Status are listed. Use this selector to include Event record with a ‘Closed’ status in the Event List. The list is updated immediately.
4
Show Archived selector
Use this selector to include ‘Archived’ Event records in the Event List. The list is updated immediately.
Use the controls in the Column Headers to filter the Records in Event 8 List. These filters will be displayed in the Filters applied 15.
8
Event Record list
Displays the List of Event Records according to the search filter you have applied (if any). Click on an Event Record to display the ‘Event’ Page and view/edit the Event record details.
9
‘Add Note’ icon
Click this icon to add a new Note to this Event record. The ‘Add Note’ window is displayed.
10
‘Add Attachment’ icon
Click this icon to add a new Attachment to this Event record. The ‘Add Attachment’ window is displayed.
Use the controls in this panel to move between List Pages and set the number of Event Records to get next.
13
‘Filters Applied’ icon
Not shown. Click this icon to remove the current applied filters.
13
‘Hide/Show Columns’ option
Click this icon to hide or display list columns using the Field Chooser.
14
‘Export’ option
Click this icon to export the listed Event Records as a Microsoft Excel, or Word file.
15
‘Show Advanced Filter’ option
Click this icon to filter the Event List using the Filter builder.
16
Page Help option
Click this icon to display basic information for working with the Events List.
The ‘Event’ Page
The Event page contains all information on the selected Event entry and allows updating to all fields by Positions with membership of a Security Group that has ‘Edit’ access to this record.
The ‘Event’ Page
The ‘Event’ Page elements
ID
Element
Description
1
Event_Number_selector
This field displays the current Event number record and can be used to open other Event records. This selector is filtered by the Event List.
2
Event record Title label
This is value as displayed event Title field in the Details tab.
3
Event record tabs
The information in an Event Record is split into tabs. Click on a tab to view related Event information.
4
‘Save’ option
Click the Save option to update this Event Record. Note: This icon only displays if your Position’s Security Group has ‘Edit’ security access to this record.
Click this icon to delete this Event Record. A ‘Confirm Delete’ dialog is displayed to remind you that deleting this Record will result in loss of data. Note: This icon only displays if your Position’s Security Group has ‘Edit’ security access to this record. When an Event Record is deleted, it is not instantly destroyed—it is flagged for deletion, and is retained in the database for a set period of time configured by the Administrator. Once the delete retention period has elapsed, TriLine GRC will permanently delete this record. Records can be recovered (undeleted) before the Deletion Date by changing the Record Status back to ‘Active’.
8
‘Links’ option
Click this icon to view and update all records linked to this Event.
9
‘Record History’ option
Click this icon to view all audit records associated with this Event record.
The ‘Details’ tab
This tab displays the Event Details including the Number, ‘Title’, who’s Managing, the Status, who created the record and when, and specific fields related to managing and reporting on the Event record.
The ‘Details’ tab
The Event ‘Details’ tab elements
The Event ‘Information’ tab elements
ID
Element
Description
1
‘Type’ field
This is the Type of Event recorded, and hence determines the Form for this Event. The Type can be changed, but all contents of the current Form will be condensed into a Note entry, and the new Type’s Form will be displayed with no content. Also consider changing the Number 3 to match the new Type’s prefix.
2
‘Breach’ field
This field indicates if this recorded Event is a Breach.
3
‘Number’ field
Displays the unique Event number. The Administrator can set different prefix letters for each Event Type. Numbers are allocated sequentially from the last highest number of the Event Type’s prefix.
4
‘Occurred’ date
This field records the date the Event occurred. This can be different from the recorded date 6 the Event.
5
Event ‘Title’ field
This is title or very short summary description of the Event.
6
Reporter_information
This is the Event record’s reported date, reporters name and Title. The ‘Keep Reporter Updated’ selection initially displays the Reporters selection; this selection can be changed.
7
‘Status’ field
This is current Status of this Event Record. Click the field to change the Event Status as the Event progresses through the management cycle. The system will notify the person who reported the Event, if the ‘Keep Reporter Updated’ 6 option is selected. The final Status is the ‘Closed’ Status.
8
‘Priority’ field
This the Priority placed on this Event Record. Initially it is set to ‘Low’. Click this field to set the Priority that best conveys the urgency in which the Event needs to be managed.
9
‘Cause’ field
This is a mandatory field. Click this field to select the Event Cause that best indicates what caused the Event to occur.
10
‘Category’ field
This is a mandatory field. Click this field to select a Category that groups this Event with similar or related Events.
11
‘Sub Category’ field
This is a mandatory field. The values selectable here are determined by the Category selected. Click this field to select a Sub Category that groups this Event with similar or related Events.
12
‘Managed By’ field
Displays the Position Managing this Event record. By default, this field displays the Position of the first Event Type Manager, or the Position selected in the optional Nomination field when the Event is created. A Managed By Position must belong to a Security Group that has ‘Edit’ access to this record. If you change the Managed By Position, the system will notify this person advising that they are now responsible for managing this event.
13
‘Rating’ field
This field indicates the significance or importance of the Event, based on values from the Risk Matrix. The field’s text and colour matches the display names and colour settings for each Risk Matrix Rating. You can choose one of five possible Risk Matrix Ratings. By default, these are: Low (green), Moderate (yellow), High (orange), Extreme (red) and Catastrophic (bright pink). Your system may display different rating names and colours.
14
‘Loss Amount’ field
If the Event has caused, or will cause, a financial loss to your organisation, type the amount of that loss into this field.
15
‘Remedial Cost’ field
Estimate the cost to minimise or prevent recurrence of the Event and enter this amount into the field.
16
‘Tags’ pane
Use Tags to group this Event Record with other Records in TriLine GRC of a related or similar nature. Note: If you want a Tag that isn’t available when you click the field, contact your Administrator to add that Tag to the selection list.
The Custom Fields tab
The ‘Custom Fields’ tab is only displayed if Custom Fields have been created for Events (see Configuring Event Custom Fields).
Custom Fields are additional data collection fields. Custom fields can used in Reporting and some filtering options.
The ‘Custom Fields’ tab
Custom Fields tab elements
ID
Element
Description
1
Custom fields
The Custom fields display for all Event Types. The information you want recorded across all Event Types can be recorded here.
2
Information icon
Click the icon next to a Custom Field to view information about how to complete that field.
2
Example fields
Fields displayed here are examples and may not be the same on your system.
The ‘Form Fields’ tab
This tab displays all the information recorded in this Event form. It may contain addition (backend only) fields that where not accessible to the original event creator, but are required information post Event creation, and before the Event can be closed.
Note: The contents of this tab will appear different on your system, and for each Event type.
The ‘Form Fields’ tab
The ‘Form Fields’ tab elements
ID
Element
Description
1
Form
All Event Form Fields for this Event Type are contained in this area. Depending on the Form Fields configured, some of the Fields may have been completed by the Event record creator, while others may be incomplete. In the example shown, many of the fields serve as a list of information collected and actions performed when a gift is received into the organisation. These fields can be edited as required, by this Event Record Managed By Position, or any other Position with membership in Security Group with ‘Edit’ access to this Event Record.
2
Section_Header_field
This shaded field provides a visual divider between sections of the Event Form.
3
Example Event Form field
An example Event Form field consisting of the label 3 (Note the mandatory red asterisks indicator), the field 4 and optional, a Field Help icon 6.
4
Event Form Field
An Event Form Field can be one of several types. Note: Form Fields with a red asterisk * are Required Fields that must be completed before the record can be saved.
5
Field Help icon
Each Event Form Field may include a Field Help icon. Click the icon to display basic information to help you fill in the field.
6
Warning
Not Shown This warning will only appear as required. Fields this warning apply to are easily identified by the yellow shading.
The Other Information tab
The Other Information field is an optional field for adding addition information of the Event.
The ‘Other Information’ tab
Other Information tab elements
ID
Element
Description
1
Other Information field
This option field can contain the Other Information of the Event which can be provided by the reporter when the Event was created, or later by someone editing this Event.
The ‘Notes’ tab
The Notes tab can be used to add further relevant information pertaining to this Event record, as required. Positions with membership of Security Groups with ‘View’ or ‘Edit’ access are permitted to add Notes. Positions with ‘Edit’ access can also Update or Delete existing Notes.
Use the controls in the Column Headers to filter the Notes in the list.
5
Notes list
Each Note in the list consists of two parts: the top part is the Note itself, and the bottom part (shaded) displays the Name of the person who created the Note plus a date of when the Note was created.
6
‘Edit Note’ icon
Click this icon to Edit a Note. The ‘Edit Note’ window is displayed. Note: This icon only displays if you have ‘Edit’ security access to this Event record.
7
‘Delete Note’ icon
Click this icon to Delete a Note. A ‘Confirm Delete’ dialog is displayed to remind you that deleting this Record will result in loss of data. Note: This icon only displays if you have ‘Edit’ security access to this Event record.
The ‘Tasks’ tab
The Tasks tab displays task created for this Event record. An Event task strictly a ‘one off’ task (unlike, adhoc tasks these can never be scheduled again). Once the task is generated into a Current Task, it can no longer be edited. While the Event is not status ‘Closed’ as many ‘one off’ tasks as required can be created. Outstanding Current Task will be deleted if the Event is ‘Closed’ because the closer is indicating that nothing else is required to be done on the Event. All Completed Task history is accessible via the History 2 icon.
The ‘Tasks’ tab
The ‘Tasks’ tab elements
ID
Element
Description
1
‘Add Task’ icon
Click this icon to add a new Task. The ‘New Task’ window is displayed.
2
‘Tasks History’ icon
Click this icon to see History for All Tasks. The ‘Tasks History’ window is displayed. Note: This icon will appear when a task has been generated, but the window will not open until a Current Task is completed.
3
‘Hide/Show Column’ icon
Click this icon to hide or display list columns using the Field Chooser.
Use the controls in the Column Headers to filter the Tasks in the Tasks 7 list.
7
Tasks list
All Tasks created for the Event record are listed here. Click on a Task to view or edit it in the ‘Edit Task’ window before the Task is generated. Once the Task is generated, it will no longer be editable and will appear as the shaded (orange pinkish) row.
8
‘Copy Task’ icon
Click this icon to create a another copy of the Task. The ‘Copy Task’ window is displayed. (This window is similar to the ‘New Task’ window, but it is pre-filled with information from the Task being copied.)
9
‘Delete Task’ icon
Click the icon to delete the Task. A ‘Confirm Delete’ dialog is displayed. Note: Deletion is instant and permanent. Do not do this if you require to retain task history for audit or reporting purposes. Once you confirm the removal, the Task is no longer displayed in the Tasks List 7.
The ‘Attachments’ tab
The Attachments tab displays all document attached to this Event record. Only Edit access security may remove these attachments. Positions with membership of Security Groups with ‘View’ or ‘Edit’ access may add additional attachments to an Event record.
The ‘Attachments’ tab
The ‘Attachments’ tab elements
ID
Element
Description
1
Attachment field
Drag one or more files here to be automatically attach and (after a few seconds pause) reappear in the Attachments 6 List.
2
‘Browse…’ button
Click this to select an attachment. A File window opens so that you can choose a file to attach. The file name is displayed momentarily in the Attachment 1 Field, and (after a few seconds pause) reappear in the Attachments 6 List.
Use the controls in the column headers to filter the Records.
6
Attachment List
Any files that have been attached (uploaded to TriLine GRC and attached to this Record) are displayed in this list.
7
Delete icon
Click this icon to remove that attachment. A ‘Confirm Delete’ dialog is displayed.
8
View icon
Click the icon to download and open the attachment.
The ‘Security’ tab
The Security tab is only shown Positions in Security Groups with Edit access security to this record.
Each Event record is create with the Default security setting of the Event Type. The security of each record can then be changed, if required, to have a different security setting. The Event Record Managed By must also be in a Security Group that has ‘Edit’ access.
Select a Record Security Rights level for the Security Group. Note: The Security Group containing the Event Managed By must be given ‘Edit’ Rights to the Event Record. Tip: Create an Event Security Group (or similar) for each Event Type and assign the Event Manage By Positions to that group.
4
Security_Group_Membership icon
Click this icon to display the related Security Group Membership List (see item 6 below).
5
Security Group Membership List
This list is displayed when you click the Security Group Membership icon (see item 5 above) for a Security Group. This function is useful if you need to confirm which Security Group a Position is a member of before assigning Record Security Rights to that group.
6
‘Security Access Summary’ icon
Click this icon to display all Positions that have access to this record, the type of access, and from which Security Group this access was granted from (including Task Teams).
The ‘Links’ window
The Links tab displays all connections to other records in TriLine GRC.
The ‘Links’ window
The ‘Links’ window elements
ID
Element
Description
1
Module tabs
Click the appropriate tab to view, and if you have Edit access security, create and remove links for that Module’s Records. The tabs displayed are dependent on the modules your site has Licenced.
2
Record Selector field
Each of the Module tabs 1 has a Record Selector field. Click the Record Selector dropdown to view a list of available records that you can link to this Event record. Select the record you wish to link then click the Add Link icon 3. Note: The drop-down list only displays available Records to which you have security access.
3
‘Add Link’ icon
Once you have selected a Record 2, click the ‘Add Link’ icon to create a link from that record to the Event record. The linked Record is displayed in the Linked Record List 7.
Use the controls in the column headers to filter the Records.
7
Linked Record List
This list displays all linked Records of the currently selected Module Record Type 1. Click a Record in this list to open the Record in its own page for viewing or editing depending on your Security access.
7
‘Remove Link’ icon
Each Record in the list has its own ‘Remove Link’ icon that will display for Edit access security. Click this icon to remove the link to the Record. A Confirm Delete dialog is displayed. Once you confirm the link’s removal, the Record is no longer displayed in the Linked Record List 6. Note: The record link will also be removed from the Links Module tab of the corresponding record.
9
‘Close’ button
Click this button to close the Links window.
The ‘Record History’ window
Use this window to view all changes to this Event record and its task record(s) within the audit days period.
TriLine GRC users can record an Entry in an Event via the Main Menu. The different types of events that you may record entries for are displayed when you click the Click here to create Event chevron 1 icon.
From the Main Menu, select Events | click the Click here to create Event chevron 1 icon
Then click the Event 2 you wish to record.
Note: The Event Types listed here are for example purposes.
The ‘New Event record’ window is displayed.
Create a New Event record by completing the following three to five of the following steps:
Enter the Title, or a very short description, of the Event 8.
Select if you would like to be kept informed 9 of status changes to the Event.
Select if you require an email confirming 10 the creation of this Event.
Depending on the configuration of your system, you maybe required to enter additional information 11 in the Custom fields.
Click the Next icon 6 to proceed to Step 2.
Create New Event Step 1
Create New Event Step 1 page elements
Create New Event Step 1 page elements
ID
Element
Description
1
‘New Event’ Type
This is the Type of New Event you are reporting.
2
‘Click here for more information’ button
This button will only appear if this Event Type has further instruction for you to follow. Click this button to display those further instructions for creating this Event.
3
‘Step’ indicator
Displays the current Step and the Step’s sequential position (e.g. ‘Step 1 of 5’, ‘Step 2 of 5’ and so on).
4
Page information icon
Click this icon to display basic instructions for creating a new Event.
5
‘Previous’ step icon
This icon is disabled at the first Step and re-enabled on all following steps. Click the Previous icon to display the prior Step.
6
‘Next’ step icon
Click the Next icon to display the next Step of the creating a new Event process. This icon is disabled at the last Step.
7
‘Occurred’ field
This is a mandatory field and is the Date and time the Event being records occurred. To type the date & time directly in the field: - Type all or part of the date & time that the Event occurred in the format dd/mm/yyyy h:mm AM/PM, then press Tab on your computer keyboard. If you don’t type the full date & time, TriLine GRC completes the entry with placeholder information that you can edit. For example, if you type 12/03 and Tab, TriLine GRC auto-fills the field as 12/03/2017 12:00 AM.) To specify the date & time using the Date/Time Selector: - Click the field’s dropdown. - Select the date and time.
8
‘Title’ field
Enter a title, or a very short description, of the Event into this field.
9
‘Keep Me Informed’ checkbox
Tick this checkbox if you, the recorder of this Event, want to receive an email notification whenever the Status of the Event changes.
10
‘Send me a confirmation email’ checkbox
Tick this checkbox if you, the recorder of this Event, want to receive an email at the completion of recording this event.
11
Custom Field area
Depending on the configuration of your system, none to five additional (custom) fields maybe displayed in this area. Enter the mandatory fields, and optional fields as required. Hover over the information icon for each Custom Field for additional help on this the custom field.
12
‘Close’ icon
Click this icon to cancel creating this new Event.
Step 2 - ‘Form’ Details
The Form page appears (step 2 of 5). Enter information in each field of the Form 13 as required. Note: Any field marked with a red asterisk *14 is a mandatory field and is required to have a value.
After completing the Form, click the Next icon 6 to proceed to Step 3.
Create New Event Step 2
Create New Event Step 2 page elements
Create New Event Step 2 page elements
ID
Element
Description
13
Event Form area
This area contains the Event Form Fields. The fields displayed in this area are unique to each Event Type. Section Headers are shaded and visually divide the form into logical sections. Enter the mandatory fields, and optional fields as required.
14
‘Required Field’ indicator
Any field marked with a red asterisk * is mandatory and must have a value.
15
Field ‘Help’ icon
Hover over this icon for information to help you fill in the field.
16
Scroll bar
If the form is larger than the display window, use the scroll bar to see up and down the form.
Step 3 - ‘Other Information’
The Other Information page appears (step 3 of 5). If instructed, use this optional step to further describe or add other information about the Event. If information is displayed in this field, follow these instructions provided in this field 18.
Click the Next icon 6 to proceed to Step 4.
Note this field is strictly a text field. If required, screen shots and other images can now be added as attachments on the next page, step 4.
Create New Event Step 3
Create New Event Step 3 page elements
Create New Event Step 3 page elements
ID
Element
Description
17
Formatting Toolbar
Use these tools to format the Other Information text that you type in the ‘Other Information’ field 8. Note: This toolbar only displays a subset of the regular Formatting Toolbar to provide basic formatting.
18
‘Other Information’ field
Enter a description or other information of the Event in this field, then use the Formatting Toolbar 7 to format the text, make list items and add hyperlinks. Note: The Administrator can configure this field to contain default text. This default text can be instructions on how to use this field. If unsure, seek Administrator on the correct way to use this field.
Step 4 - ‘Attachments and Images’
The Attachments page appears (step 4 of 5). To add attachments to your Event, click the Browse... button 20 to browse for an attachment. A File window will open, navigate and choose a file to attach. The file name is displayed in the field 19.
Add more attachments by clicking the Add File link 22 and repeating the previous instruction (1).
Use the Paste images below... field 23 to add images and screen shots as required. Text may be entered around the images. The contents of this field will automatically be added as an attachment on the creation for this event.
Click the Next icon 6 to proceed to Step 5.
Create New Event Step 4
Create New Event Step 4 page elements
Create New Event Step 4 page elements
ID
Element
Description
19
Attachment File field
Displays the file that will be uploaded and attached to this Event when it is created.
20
‘Browse’ button
Click this button to display and select a file to be attached to this Event when it is created. The selected file will appear in the Attachment File field 7. See ‘Attachments’ items 2 to 8 in the Glossary for more detail on how to select files for attachment.
21
‘Remove’ button
Click this button to remove the file displayed in the Attachment File field 7.
22
‘Add File’ button
Click this button for each addition attachment you require to added to this Event.
23
‘Paste images below’ field
Paste images and screen shots as required. Text may be entered around the images.
Step 5 - ‘Finish’
The final page appears (step 5 of 5). If required, click the Previous icons 5 to review your Event information prior to finishing. Use the Next icons 6 to return to this step.
Click the CLICK HERE To FINISH24 button to create the new Event.
If there are no errors, the window will close and you will be returned to your previous location with a message that your Event was successfully created. If there are errors, the window will remain open and the errors will be displayed in a list at the bottom of the page. Use the Previous icon 5 to return to the fields that need correcting. Each error field will be highlighted and the errors may be spread over the first 4 pages. Once corrected, click Next icons 6 to return here to Step 5 and re-attempt to finish creating the Event. Repeat as necessary until all errors are corrected and the Event is recorded successfully.
Create New Event Step 5
Create New Event Step 5 page elements
Create New Event Step 5 page elements
ID
Element
Description
5
‘Previous’ step icon
This icon is disabled at the last Step.
6
‘Next’ step icon
Click the Next icon to display the next Step of the creating a new Event process.
24
‘Click Here To Finish’ button
Click this button to create the Event. When you click this button, TriLine GRC checks to make sure that all Required Fields necessary for Event creation have been completed. Any outstanding or incomplete fields are highlighted with either a red message box or a icon. Check each page for a highlighted error field.
12
‘Close’ icon
Click this icon to cancel creating this new Event.
Managing Events
Managing a recorded Event entry
Once an Event entry has been recorded, a notification, if configured by the administrator, is sent to all of this Event’s, Event Type Owners. If the Nomination field is being used on the form, this selected Position will be assigned to be the ‘Managed By’ Position of this Event record and will also receive a notification alerting to the Event creation. Otherwise, the first listed Event Type Owner will be assigned to be the ‘Managed By’ Position of this Event record.
The Event Record ‘Managed By’ Position reviews and manages their Event Records by:
reviewing the Event Information and Details
reading the existing Event Notes and adding any relevant Notes as required,
linking to any additional Module or Event records that have not already been cover by the default linking,
creating and assigning Tasks that are required to be completed in order to get the Event to a ‘Closed’ status,
attaching any supporting documents such as Policies, Regulations and Procedures, and
checking that all Positions involved in this Event Record have the appropriate Security Rights (which can be changed at anytime) to the Event Record.
And finally, when all requirements and conditions are met, resolving the Event Status to a ‘Closed’ Status.
Assigning Tasks to resolve the Event
In order to resolve the Event to a ‘Closed’ Status, the Event Owner may require the creation of Tasks to be Actioned By various Positions.
To standardise some of these tasks, your Administrator (or Event Designer) can configure Predefined Tasks for those actions that are always performed when a particular Type of Event is recorded.
Click the My Summary menu option to display the My Summary page. If there are ‘Open’ Event records which you are the Managed By Position, the ‘My Events’ tab will appear. Click the My Events tab.
Click on an Event record to open that record on the Event page. Update the Event as required.
Accessing an Event List
From the main menu, mouse hover over, or click, the Event menu, then click the Work with Event records1 option.
The Event Type List is displayed. Use the Column Headers1 to Filter, search and navigate the Event List. To show the closed and archived Event records, Select and Un-select the Show Closed and Show Archived2 options (these records, if they exist, will display into the Event List as soon as an option is chosen).
Add a new Note on List
Click the Add Note icon on the Event record in the Event List.
Enter the Note text in the edit area 1, and click the Save 2 icon to save this note. (Or, click the Cancel 3 icon to stop adding the Note.)
The Note is added to the Notes list. Open the Event record to view the Notes list on the Notes tab.
Add a new Attachment on List
Click the Add Attachment icon on the Event record in the Event List.
The Add Attachment window displays. click the Browse 1 button and select your Attachment, or directly drop Attachment in the Drop files 2 field. (Or, click the Cancel 3 icon to stop adding the Attachment.)
After a few moments, the Attachment will load from this field into the Attachments list in a sequence shown above. Open the record to view the Attachment list on the Attachment tab.
Click on an Event record in the list to open The ‘Event’ page. Click the Details tab, Custom Fields tab, Form Fields tab, Other Information tab, and or the Security tab. Update the field values on each of these tabs 1 as required.
Hover over, or click the Menu Options icon, then click the Save 1 option. Note You will be required to updated the mandatory fields (including Category, Sub Category and Cause) the first time the Event is Saved. If the Save option does not displayed, you do not have security access to update the values on this Event record. The Save action applies fields on the Details, Custom Fields, Form Fields, Other Information and Security tabs.
Notes, Tasks and Attachments can be viewed, added, updated, and saved on each of those tabs independently of this Save function.
The ‘Event List’ page is displayed. Click on the Event record to display its details.
The ‘Event’ page is displayed with that record. Hover over, or click the Menu Options icon, then click the Print Preview 1 Option.
A Preview Page opens showing a Report for the Event. Navigate, search, print and/or save the Report using the Preview Page Toolbar. Click the Close icon 1 to close this window.
Deleting an Event
Notes:
Only Positions allocated to a Security Group that has been assigned ‘Edit’ Record Security Rights can delete an Event Record.
Deleting an Event also deletes the associated Tasks, Attachments and History. This may have auditing implications.
The ‘Event List’ page is displayed. Click on the Event record to display its details.
The ‘Event’ page is displayed with that record. Hover over, or click the Menu Options icon, then click the Delete 1 option.
The ‘Confirm’ delete window appears. Click OK to delete, or click Cancel.
Note:
The Event record is not immediately deleted, instead the record’s system status is changed from ‘Active’ to ‘To Be Deleted’. The Record will be really deleted after the number of days set in the ‘Deletion Days’ field of the Configuration Page. In the mean time, the record can still be view by changing the Status filter. The record can then be recovered (undeleted).
Undelete an Event
The Event record is not deleted immediately, but rather the record’s system status is changed from ‘Active’ to ‘To Be Deleted’ for a limited time determined by your configuration settings. Hence the record can still be view and the record can also be recovered from this ‘to be deleted’ state.
The Record will be really deleted on its scheduled date by the overnight Monitor and cannot be recovered/undeleted after this time.
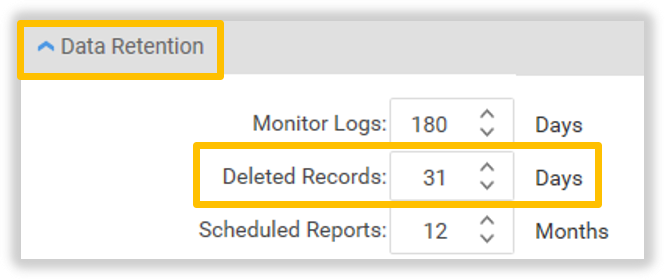
The number of days delay, until the deletion of a record is permanent, is configured by the Administrator on the General Configuration tab. For example, this setting is 31 days:
Click the Show To Be Deleted1 option. (If this option does not display, either there are no deleted records, or there are no records that your security access can see.)
Hover over, or click the Menu Options (hamburger) icon, then click the ‘Hide/Show Columns’ 1 option.
Drag the ‘Record Status’ 1 column into the Event List grid.
Click the Filter 1 icon of the ‘Record Status’ column. Un-select Active2 option, and select To be deleted3 option. Click the OK4 button.
‘To Be Deleted’ records will be highlight displayed in the list (if they exist). Click the record of interest to open it’s Details page.
The Event Record displays with it’s ‘real’ deletion date. Click the make active 1 icon.
The Event Record deletion date is removed and it will no longer be deleted. Edit the record as required.
Note: When returning to the Event List, click the ‘Reset grid’ icon in the Events List to return the list to the default columns and filtering.
Manage Notes
Notes can be added by Positions with either View or Edit access to the Event Record.
The ‘Event List’ page is displayed. is displayed. Click on the Event record to display its details.
The ‘Event’ page is displayed with that record. Click the Notes tab. The Notes tab is displayed.
All positions that can view this Event record can add notes to the record. However only position’s with ‘Edit’ access to an Event record can edit and delete notes on that record.
Add a new Note
Click the Add Note icon.
Enter the Note text in the edit area 1, and click the Save 2 icon to save this note.
Or, click the Cancel 3 icon to stop adding the Note.
Edit a Note
Click the Edit Note icon on the Note to update.
Update the Note text in the edit area 1, click the Save 2 icon to save these changes.
Or, click the Cancel 3 icon to stop updating the Note.
Delete a Note
Click the Delete Note icon on the Note to delete.
The ‘Confirm’ window appears. Click OK to delete, or click Cancel.
Manage Attachments
Attachments relating to this Event record can be added here.
The ‘Event List’ page is displayed. is displayed. Click on the Event record to display its details.
The ‘Event’ page is displayed with that record. Hover over, or click the Menu Options icon, then click the Links 1 option.
Click on a module tab to view that modules record’s that are linked to this Event record.
Add a new Link
Click the Links field 1.
Click on the record 2 to be linked.
This record will appear in the Links field 3. Click the Link 4 icon to link the record.
The Linked record will appear in the linked list.
Delete a Link
Click the Delete Link icon of the record to be delinked.
The ‘Confirm’ window appears. Click OK to delinked, or click Cancel.
Archive Event Records
This function provides a further filtering of Closed records, from the Event List. The records remain Closed, but will not display in the Event List unless specifically selected to show (see item 4 on The 'Event List page).
From the main menu, mouse hover over, or click, the Events menu, then click the Archive Event records1 option.
The Archive Event page is displayed. Select the Event Type 1 of records to be Archived. Select the Date range From 2 and To 3. Click the Show Records 4 icon.
Records matching your selection criteria will display. Either, select All 1 records, or individual records 2 to be Archived.
Click, or hover over the Menu (hamburger) icon, click, the Archive selected records1 option.
A count of the number of records Archived will displayed, and all Archived records no longer display in the list. Repeat Steps 1 through 4 to Archive more records for the different Events Types.