Note: The Documents Library Module is an optional module that can be licensed to your TriLine GRC system.
The Document Library is a Library of your Organisations final ‘published’ editions of each Document. The viewing of each Document can be restricted to selected Positions, or can be opened up to the entire organisation via your site’s TriLine GRC Portal. The viewing (opening) and downloading (if allowed) of each document is recorded for the Document owner to review.
Next versions of a Document can be ‘published’ to the Library ahead of time, with an future Effective date for it to become the ‘Current’ document at that time.
Document Review’s can be scheduled regularly, with the Review allowing the loading of an updated Document version. Document Updates can also do anytime as required. In both update case, there is the option to Supersede the Current version, or not (as a supersede may not be required in the case with a ‘typo’ correction version). Only one Document Review task will be generated at a time per Document Record, so if a Document Review task is not completed by the time the next Document Review task is due to be generated, that next Document Review task will not generate until the day after that uncompleted Document Review task is completed.
Read and Certify Tasks of the Document can be schedule regularly, or only when a new version of the document come out, or both. Read and Certify tasks are issued to Position with View or Edit access on the Security tab of the Document Record.
The Document Record acts as both the catalogue and container of the Document, in it’s current version, prior versions, and also it’s effective next version.
This Overview Section describes the details of each element of the Document Record. The Procedures Section describes how to use the Document Library functionality.
The Documents List page
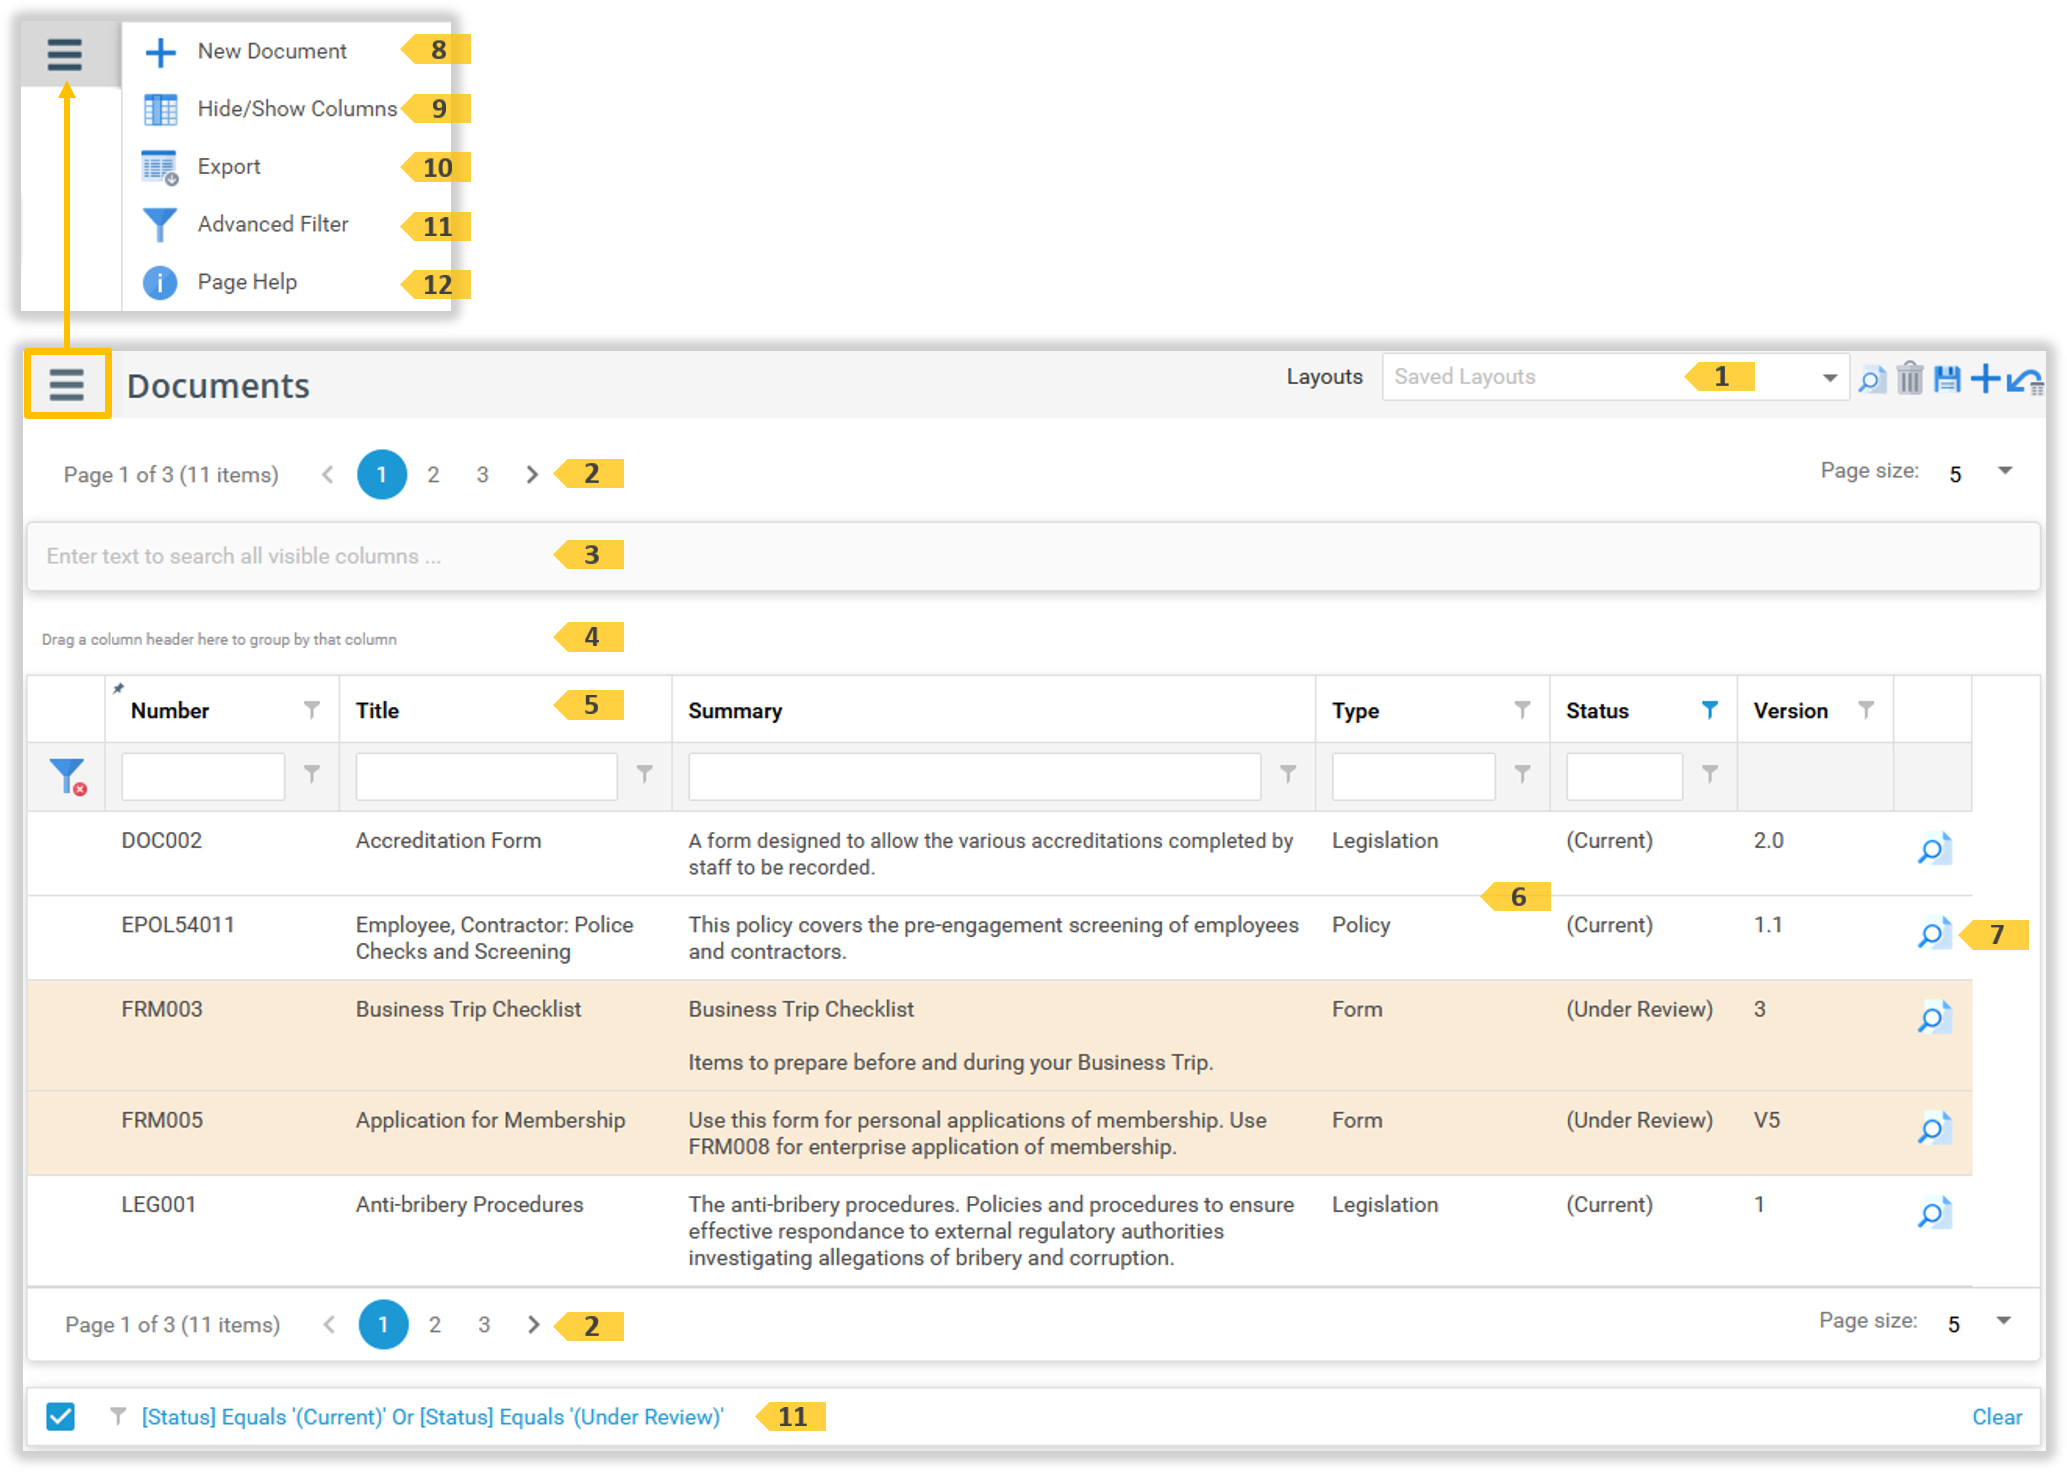
The Documents list page displays all Document Records your security access allows you to view, less any filters you may have applied. Click on a Document record to see its details.
By Default Document Records with Status ‘Current’ or ‘Under Review’ (shaded) will display. Remove the Status filter to show ‘Obsolete’ Documents.
Click this icon to view and update all records linked to this Document.
10
‘Record History’ icon
Click this icon to view all audit records associated with this Document record. This includes who and when viewed each Document.
The Document Details tab
The Details tabs displays the main details of the Document, including the Document Version number and Status.
The ‘Document Details’ tab
The ‘Document Details’ tab elements
The ‘Document Details’ tab elements
ID
Element
Description
1
‘Number’ field
This field displays the unique number of this Document record.
2
‘Effective Date’ field
This field display the date this Document version became, or will become, ‘Effective’. That is, if the date is a future date, this version will not be effective till this arrives. If a prior version exists, it is in effect till then.
Note: ‘Date Added’ is an information field that displays the date the Document was added to this Document record.
3
Record ‘Status’ info
Displays the status of this Document (either ‘Current’, ‘Under Review’, or ‘Obsolete’).
4
‘Make Obsolete’/ ‘Make Current’ checkbox
Neither option is shown when the Document Record is in a ‘Under Review’ status. The ‘Make Obsolete’ option is only shown when the Document Record is in a ‘Current’ status. The ‘Make Current’ option is only shown when the Document Record is in a ‘Obsolete’ status.
5
‘Title’ field
Displays the title of this Document record. This may, or may not, be exactly the same as the Title of the Document.
6
‘File Name’ info
This field displays the physical file name of the Document.
7
‘Summary’ field
This field displays the summary details of the Document.
8
Summary field edit icon
Click this icon to edit the details of the summary field 7.
9
‘Type’ selector
Click this field to display the Types of Documents. Click a Type to select it for this Document.
10
‘Category’ selector
Click this field to display the Categories of Documents. Click a Category to select it for this Document.
11
‘Version’ field
This text field display the Version of this Document. Numbers and letters may be used.
12
‘Owner’ selector
Click this field to display the Position’s which can be the Owner of this Document. Click a Position to select them to be the Owner of this Document Record.
13
‘Display In Portal’ checkbox
Check this box to display this Document in the TriLine GRC Portal. This option effectively gives all TriLine GRC and Portals user the access to read this document.
14
‘Allow_Download’_checkbox
Check this box to allow downloads of the Document for all users who can read this Document.
15
‘Tags’ field
Apply one or more Tags to the Document record to associate id with other Records of similar application. See Tags in the Glossary for more information.
16
‘Show Records linked by Tags’ icon
Click this icon to display all records linked to the selected tags 15.
17
‘Under Review’ info
This field only displays when this Document has a Current Document Review Task outstanding.
The Custom Fields tab
Document Custom Fields are optional. This tab will only display if Custom Fields have been defined by Administrator.
The ‘Custom Fields’ tab
The ‘Custom Fields’ tab elements
The ‘Custom Fields’ tab elements
ID
Element
Description
1
Custom Fields
All Document Custom Fields configured for your site be displayed. Complete the fields as required.
2
Information icon
If displayed, click this icon for more information about this field.
The Document tab
The Document tab displays the most recent Document uploaded. If this is not the current effective document, a button will display to allow you to view this document also.
The Current Document
When the Current Document and there is no pending new effective Document, no other buttons display.
The ‘Document’ tab
The ‘Document’ tab elements
The ‘Document’ tab elements
ID
Element
Description
1
The Document
A read-only display of the most recent Document uploaded.
2
‘Download’ document icon
This icon will display if set to do so on the Details tab. Click this icon to download a local copy of the document.
The Next version of the Document that will become Effective in the future.
When a new version of the document has been uploaded and will become effective 1 in the future, this new Document version will display on this tab. A ‘Show Current Version’ button is displayed 1 and when clicked, will show the current document in a new window.
The ‘Document’ tab
The Tasks tab
Note: The Read and Certify feature can be configured off or on by your TriLine GRC Administrator.
There are two types of document tasks:.
A ‘Document Review’ task' is an optional task and can be on a scheduled regularly.
‘Read and Certify Tasks’ are also optional and if scheduled will be generated to all Positions that are members of Security Groups with View and Edit access on the Document Record’s Security tab.
The history of completed ‘Document Review’ tasks is available on this tab by clicking the History 6 icon.
The ‘Read and Certify Tasks’ section will only display if tasks have been generated. ‘Read and Certify Tasks’ can be selected to be generated from:
the Update Document menu option,
the Create Read and Certify Tasks menu option,
or they can be selected to be generated when completing a ‘Document Review’ task.
‘Read and Certify Tasks’ are generated for all Positions that are members of Security Groups with ‘Edit’ or ‘View’ access to this Document Record, but excluding those Positions with ‘Display in Lists’ turned off. Owners of each Document record need to study closely the members of each View and Edit Security group (on the Security tab) to ensure these Read and Certify tasks go to all necessary Positions.
Note: The Read and Certify Task menu option has the option to individually select each positions to generate Read and Certify tasks for, instead defaulting to the the whole access group getting these tasks.
The history of completed ‘Read and Certify Tasks’ is available in the Read and Certify Section. This Section only displays after Read and Certify Tasks are generated. Tasks not completed do not have a Completed date.
The ‘Tasks’ tab
The Document Review section elements
1 Date Calculation
Choose between: specifying a date or the last working day; or specifying a day of the week (e.g. 2nd Tuesday).
Selecting ‘Specific date or Last working day’ displays the ‘Last Working Day’ checkbox as shown beside to the ‘Next Due’ field.
Selecting ‘Specific day of the week’ displays specific day controls (see below) in place of the ‘Last Working Day’ checkbox.
2 Frequency
Use these fields to set how often the Contract Task should be performed (e.g. every 3 months). Your Interval options include Monthly, or Weekly.
Weekly:
Type or select a number, e.g. ‘2’ for fortnightly.
Monthly:
Type or select a number, e.g. ‘3’ for quarterly, ‘12’ for annual.
3 Next Due
Use the Date/Time Selector to set the date on which the generated Task must next be completed.
Note: If you leave the ‘Next Due’ field blank, a Task will never be generated.
(Scheduled) date field
A (Scheduled) date field is now displayed to the right of the ‘Next Due’ field. This field displays the actual date that the next Task will be generated.
Normally, the ‘Next Due’ and ‘Scheduled’ dates will be the same, but when the ‘Next Due’ date falls on a non-working day (e.g. weekend or public holiday) the ‘Scheduled’ date is set to the preceding working day.
Displays the number of days before the Task due date that the Task will be generated and ‘Reviewed By’ Position notified. The ‘Reviewed By’ position notification email will contain the Task details and the Due Date.
For a Task with a long lead time (i.e. 1st Reminder is set to a high number of days), set a lower number of days in the ‘2nd Reminder’ field so that an additional email notification is sent to ‘Reviewed By’ Position before the due date.
Tip: Set this field to zero if you don’t want a 2nd Reminder sent for this Task.
5 Reviewed By
CLick and Select one Position in the Reviewed By List to assign the Position as the ‘Reviewer’ of the Current Document version.
Note: Escalate To is defaulted to the Owner of the Document Record and cannot be changed.
6 ‘History’ icon
Click this icon to display the History of all Document Review Tasks.
Note: This icon will not show if a Review task has never been completed.
The ‘Read & Certify Tasks’ section elements
The ‘Read & Certify Tasks’ section elements
ID
Element
Description
7
‘Reset grid’ icon
Click this icon to reset the columns in the grid to a default state.
Use the controls in the Column Headers to filter the Tasks in the list.
12
Tasks list
All Read and Certify Tasks generated are listed here. Completed Tasks will have a Completed date.
13
‘Export to Excel’ icon
Click this icon to export the List in Microsoft Excel format.
The Notes tab
The Notes tab allows adding and managing of Notes relating to the selected Document Record.
Notes can be added by any View access user, but may only be edited and deleted by an Edit access user.
The ‘Notes’ tab
Notes tab elements
ID
Element
Description
1
‘Add Note’ icon
Click this icon to add a new Note. The ‘Add Note’ window is displayed.
Use the controls in the Column Headers to filter the Records in the Superseded Version List (item 4).
4
Superseded Version list
Displays the Superseded Versions of Documents. Click a record in the list to view that Document with further details and a download feature.
The Security tab
The security access of each Document record is individually controlled. The Security tab is used to adjust the security access of each Security Group to this Document record. Edit access means Positions in this Security Group can update all values in this Document record and upload new versions of the Document itself. View access means Positions in this Security Group can see, but not update, all values in this Document record, and view the Document itself. Not Used access means Positions in these Security Groups cannot see this Document record.
Documents set as View in Portal can be viewed by all TriLine GRC users and by all Portal users in the Portal, but the Document record itself will still only be accessible to Security accesses View and Edit.
Read and Certify Tasks, if generated, will, by default, go to all Positions that are members of Security Groups with ‘Edit’ or ‘View’ access to this record, but excluding those individual Positions in these groups with ‘Display in Lists’ off. Owners of each Document record need to review closely the members of each View and Edit Security group to ensure these tasks go to all required Positions.
Select a Record Security Rights level for the Security Group. Note: The Security Group containing the Document Owner must be given ‘Edit’ Rights to the Document Record.
4
Security Group Membership icon
Click this icon to display the related Security Group Membership List (see item 5 below).
5
Security Group Membership List
This list is displayed when you click the Security Group Membership icon (see item 4 above) for a Security Group. This function is useful if you need to confirm which Security Group a Position is a member of before assigning Record Security Rights to that group.
6
‘Security_Access_Summary’ icon
Click this icon to display all Positions that have access to this record, the type of access, and from which Security Group this access was granted from (including Task Teams).
Notes:
Positions in the ‘Administrators’ Security Group are automatically assigned ‘Edit’ access Rights.
Positions in the ‘Super Users’ Security group are automatically assigned ‘View’ access Rights.
If a user is a member of multiple Security Groups with conflicting Security Rights, the higher level of access is granted.
Positions with ‘Display in Lists’ selected off, will not receive Read and Certify Tasks even when they have "View' or ‘Edit’ access.
The Links window
The Links Window displays the module records that are linked to this Document. Tabs 2 display here will depend on which Modules are installed on your site.
New Links can be added, and existing links can be removed.
The ‘Links’ tab
The ‘Links’ tab elements
The ‘Links’ tab elements
ID
Element
Description
1
Document
The Document Number and Title for these links.
2
Linked Record tabs
Click the appropriate tab to view, and if you have Edit access security, create and remove links for that Record Type. The available tabs are dependent on the modules you have enable.
3
Record Selector field
Each of the Linked Record tabs 2 has a Record Selector field. Click the Record Selector dropdown to view a list of available records that you can link to this Document record. Select the record you wish to link then click the Add Link 4 icon. Note: The drop-down list only displays Records to which you have security access.
4
‘Add Link’ icon
Once you have selected a Record 3, click this icon to create a link from that record to this Document record. The linked Record is displayed in the Linked Record 8 List.
Use the controls in the Column Headers to filter the Records in the List 8.
8
Linked Record List
This list displays all linked Records of the currently selected Document 1 Record. Click a Record in this list to open the Record in its own page for viewing or editing depending on your Security access.
9
‘Remove Link’ icon
Each Record in the list has its own ‘Remove Link’ icon that will display for Edit access security. Click this icon to remove the link to the Record. A Confirm Delete dialog is displayed. Once you confirm the link’s removal, the Record is no longer displayed in the Linked Record List 8. Note: The Document record link will also be removed from the Links tab of the corresponding record.
10
‘Close’ button
Click this button to Close this window.
The Record History window - Document Views tab
On the Document Views tab, view first time, last time and number of times a position has view each version of this Document.
On the Record tab, view this Document record’s updates and all task completion history records within the audit days period.
The ‘Links’ tab
The ‘Document Views’ tab elements
The ‘Links’ tab elements
ID
Element
Description
1
Document
The Document Number and Title for these History Records.
The Documents List provides the facility to view all current published documents the user has access to, from this list without requiring the opening of that Document record.
If there is no future effective document uploaded, the ‘Current Document’ will display. The Document can be read in this window. If the ‘Download’ button (item 1) appears, click it to download and view the document locally.
The ‘Current Document’ window
If there is a future effective document uploaded, the Current, yet to be superseded Document will display, together with a button to view the new version. Click this button to open the new version of the document in a new window. Take note of the Effective Date highlighted in red. If the ‘Download’ button appears, click it to download and view the document locally.
The ‘Document’ tab
Add a new Document record
Note: To create a Document, a Position must be a member of one of the following System Security Groups:
From the ‘Document’ List Page, hover over, or click the Menu Options icon, then click the ‘ New Document’ Option.
Or, from the ‘Document’ List page, click on a Document record in the list to open the ‘Document’ page. Hover over, or click the Menu Options icon, then click the ‘ New Document’ 1 option.
The ‘New Document’ window opens. Complete the Document details in the window (see New Document window elements for details on each field).
Click the Save 17 icon to complete adding the new Document record. The Document page will display with this new record. Clicking the cancel 18 icon will close the 'New Document, window without saving the record.
‘New Document’ window elements
‘New Document’ window elements
ID
Element
Description
1
‘Show Page Help’ icon
If shown, click this icon for information on creating a new Document record.
2
‘Number’ field
Enter a unique Document record number.
3
‘Version’ field
Enter a Version for this Document.
4
‘Effective Date’ field
Enter the Date the Document comes into effect. A future date means that if there is already a document in effect, it will stay in effect until this date is reach even though it will be showing in the Superseded Version tab.
5
‘Title’ field
Enter the Title of this Document record. This may or may not match the Title of the Document
6
‘Document’ field
This field displays the Document select from the Browse button (item 7).
7
‘Select Document’ button
Click this button to navigate and select the Document to be uploaded to this Document record.
8
‘Summary’ field
Enter a Summary or description of the Document.
9
‘Record Status’ field
Select one of the three status available in this dropdown.
10
‘Type’ field
Select the Type of this Document record.
11
‘Category’ field
Select the Category of this Document record.
12
‘Owner’ field
Select the Position which will own this Document record. Only Positions with ‘Edit’ access will display in the dropdown.
13
‘Display_in_Portal’_checkbox
Select if this Document is to be visible to portal users. All TriLine GRC and Portal users will be able to view this Document without requiring View Security access to this Document Record (which they will still not have access to).
14
‘Allow Download’ checkbox
Select if download button is to be available when viewing this Document.
15
Security
Assign Record Security Rights to Security Groups (see About Record Security Rights). All View and Edit Positions can receive Read and Certify tasks.
16
‘Show Members’ icon
Click this icon to display the Positions in this Security Group.
17
‘Save’ icon
Click this icon to save the Document record.
18
‘Cancel’ icon
Click this icon to Close the ‘New Document’ popup window without saving.
Click on a Document record in the list. The ‘Document’ page1 is displayed. Click each tab 2 to view the details of that tab. Update the Detail, Custom or Security values as required if you have Edit assess.
Hover over, or click the Menu Options icon, then click the Save 1 option.
Obsolete a Document
A ‘Current’ document can be obsoleted directly in Document record, or, if a Document Review task is current outstanding (the Document Record will display ‘Under Review’), a Document can only be made Obsolete from that Document Review task.
Obsolete a Document from the Document Record
To Obsolete the Document from the Document record, open the document record, click the ‘Make Obsolete’ 1 option.
Hover over, or click the Menu Options icon, then click the Save 1 option.
Obsolete a Document from the Document Review task
To Obsolete from the Document Review task, open the Document Review task from the My Summary Current Tasks tab, select Document Status ‘Obsolete’ 1 option, add a comment 2, and finally click the Complete the task 3 icon.
Un-Obsolete a Document
An obsoleted Document can be un-obseleted (returned to ‘Current’ status).
To Un-Obsolete the Document, open the document record, click the ‘Make Current’ 1 option.
Hover over, or click the Menu Options icon, then click the Save 1 option.
Print a Document record
This is how to print the document record, not the document itself.
Click on a Document record in the list. The ‘Document’ page is displayed.
Hover over, or click the Menu Options icon, then click the Delete option.
The ‘Delete’ icon
The ‘Confirm’ delete window appears. Click OK to delete, or click Cancel.
The ‘Delete’ icon
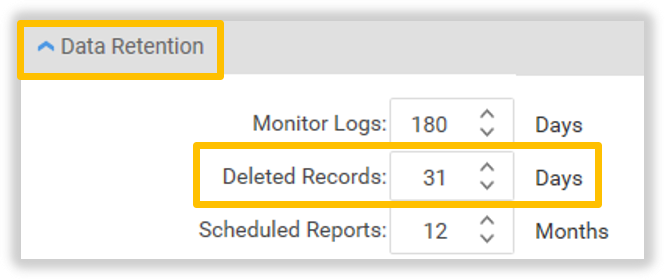
Note: The Document Record is not immediately deleted, instead the record’s status is changed to ‘To Be Deleted’. The Record will be really deleted after the number of days set in the ‘Deletion Days’ field of the Configuration Page. In the mean time, the record can still be view by changing the Status filter. The record can then be recovered (undeleted) by editing and changing the Status back to ‘Current’.
Undelete a Document record
The Document record is not deleted immediately, but rather it’s status is changed to ‘To Be Deleted’ for a limited time determined by your configuration settings. Hence the record can still be view and the record can also be recovered from this to be deleted status.
The Record will be really deleted on its scheduled date by the overnight Monitor and cannot be recovered/undeleted after this time.
The number of days delay, until the deletion of a record is permanent, is configured by the Administrator on the General Configuration tab. For example, this setting is 31 days:
Click on a Document record in the list. The ‘Document’ page1 is displayed.
Click the Notes tab. The Notes tab is displayed.
All positions that can view a Document record can add notes to the Document record. However only position’s with ‘Edit’ access to a Document record can edit notes on that Document record.
Add a Note
Click the Add Note 1 icon.
Enter the Note text in the edit area 1, and click the Save 2 icon to save this note.
Or, click the Cancel 3 icon to stop adding the Note.
Edit a Note
Click the Edit Note 1 icon on the Note to update.
Update the Note text in the edit area 1, click the Save 2 icon to save these changes.
Or, click the Cancel 3 icon to stop updating the Note.
Delete a Note
Click the Delete Note 1 icon on the Note to delete.
The ‘Confirm’ window appears. Click OK to delete, or click Cancel.
Update the Document Now
Instead of using a cyclic scheduled [Document Review task][], a new document can be uploaded to the Document Record immediately via the Update Document options.
A version number will be required. The version number is a text field, but the numbering entered should represent your internal versioning system. TriLine does not do any validation on this field. Hence, keeping the same version when you are not superseding the document for instance, is fine.
The Effective Date is when the document will come into effect. A date of today or in the past means the document will be loaded as the current effective document. A date in the future means this new document will supersede the current document at that date, so the current document will remain effective till then. The new document will become effective/current on that future effective date.
If you wish to replace, but not supersede the current document, select the Do not create a Superseded Version option.
Select the Create Read and Certify tasks option if this is required. Read and Certify tasks are created for all positions that can at least view the document record (not including ‘Display in List’ option off Positions).
Update Document
Use this option to Upload a new Document (version) immediately. This option works independently of the Document Review Tasks. Read and Certify Task can be generated from this option.
Hover over, or click the Options (Hamburger) icon and then click the ‘Update Document’ 1 option.
The Update Document window is displayed. If the ‘Read and Certify’ 6 option is selected, the Due Date 7 and Second Reminder 8 fields appear.
Update fields as required. In this example the new document is just a typo correction and hence is not Superseding the prior uploaded document, version wise. Click the ‘Save’ 1 icon to complete the Update to the Document. A message will be displayed confirming this action. The document will be uploaded immediately. If Read and Certify tasks is selected, these will also be generated immediately the Save icon is clicked.
Click the ‘Change Summary’ tab to show this update.
Create Read and Certify Tasks Now
Use this option to create Read and Certify Tasks immediately. Read and Certify tasks are created for all positions that can at least view the document record (not including ‘Display in List’ option off Positions).
Hover over, or click the Options (Hamburger) icon and then click the ‘Links’ 1 option.
The Links window displays. Click on a module tab to view current links to records in that module.
Add a new Link
Click the Links field 1.
Click on the record 2 to be linked.
This record will appear in the Links field 3. Click the Link 4 icon to link the record.
The Linked record will appear in the linked list.
Delete a Link
Click the Delete Link icon of the record to be delinked.
The ‘Confirm’ window appears. Click OK to delinked, (or click Cancel).
That record no longer appears in the linked list. Click the Close 1 button to close the Links window.
Review who has read the Document
Use the Document Views tab to see who has viewed each version of the Document, when it was viewed the first time, when it was viewed last, if it was viewed via TriLine GRC or the Portal, and the number of times a person has view each version of this Document.
In the Document Review section, click the ‘Show Document Review History’ 1 icon.
If more than one Review task has been completed, use the Review Date/Position field to select the History record you wish to review.
Comments and Attachment can be added, updated, viewed and deleted if you have the correct security access.
Click the Comments tab. Click the ‘Add Comment’ 1 icon to add another comment to this Review task. Click the Edit 2 and Delete 3 icons to perform those actions.
Click the Attachments tab. If required, drop any additional attachment file(s) into the Browse field, or use Browse 1 button to find the file(s). Each file will display and load for a few seconds in the field before disappearing and reappearing in the Attachments list after the automatic upload processing completes. Click the Delete 2 to delete the attachment. Click the View 3 icon to view the attachment.
Click the Close 4 icon to close this window.
Review the Read and Certify Tasks
Read and Certify Tasks are either create from the Update Document or [Document Reivew task][] process.
The ‘Read and Certify Tasks’ contains the list of all Read and Certify tasks generated for each version of the document. The default view is grouped by ‘Version Number’. Click a Chevron 1 icon next to Version Number to display a list of all positions assigned a Read and Certify task.
When the task is complete, the Actioned By and Complete columns 1 will have this information. Search, filter and navigate (2 & 3) as required to find the records of interest. If required, click the Export 4 icon to export this list to a spreadsheet.
When any of the tasks are not completed, the Actioned By and Complete columns 1 will be blank.