Note: The Control Inventory Module must be enabled in your system configuration for this menu option to appear.
About the Control Inventory Module
Note: The Control Inventory title can be customised. Example screen shots shown below will highlight this by bracketing like this (Control Inventory).
The Control Inventory Module is part of the fully integrated TriLine GRC solution. The Control Inventory Module allows your organisation to complete a high-level overall assessment of the controls in place to manage risk. Whilst TriLine GRC already allows you to link your risk, compliance items, events etc. together, the Control Inventory takes this process a step further by introducing the ability to rate the adequacy of the ‘whole picture’ of all of these linked controls.
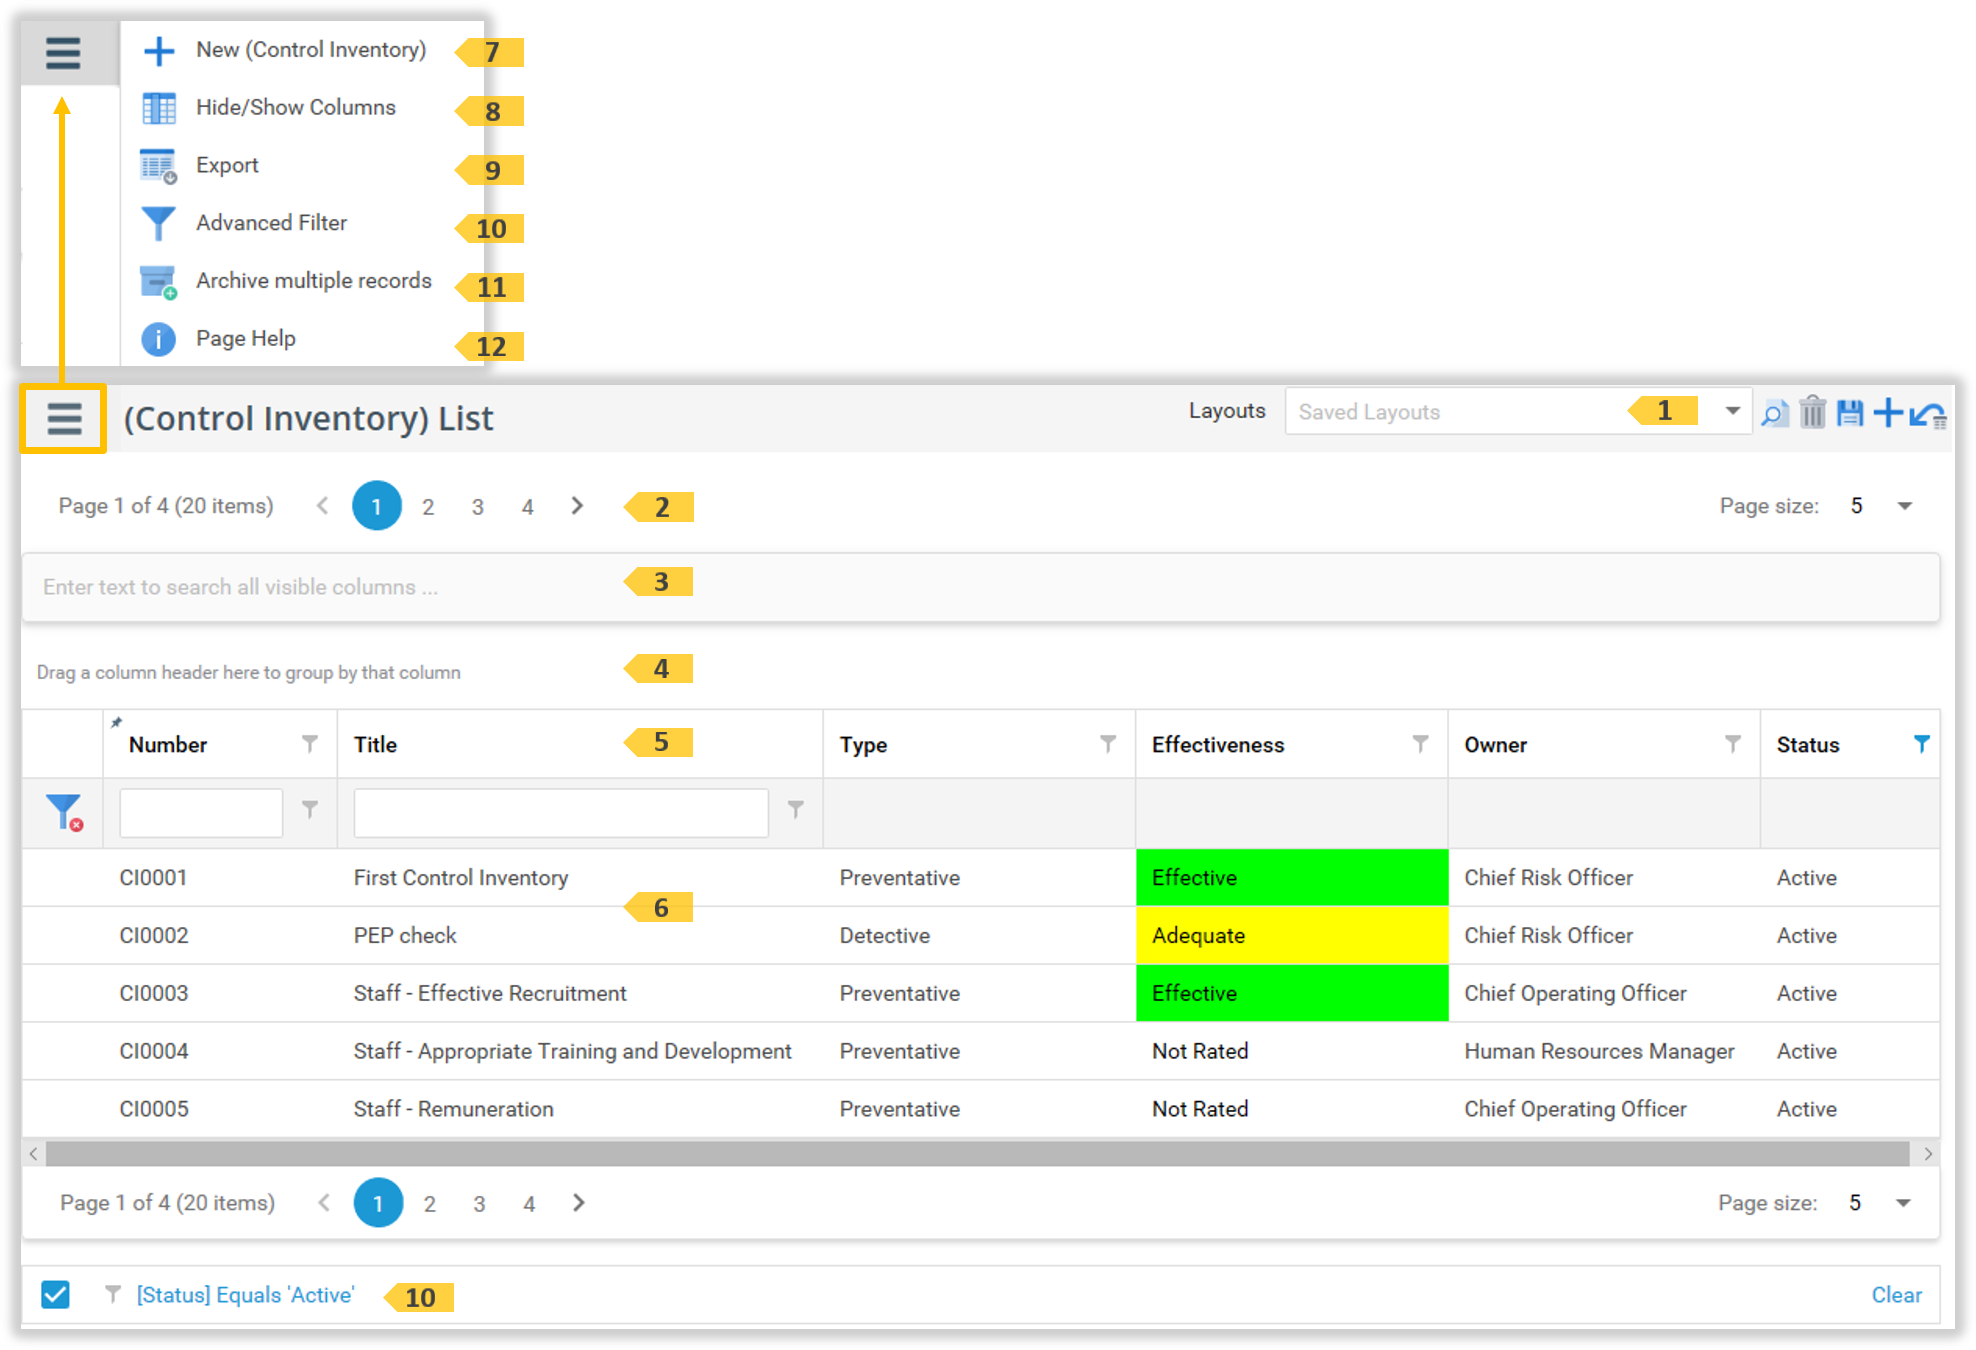
The Control Inventory List page
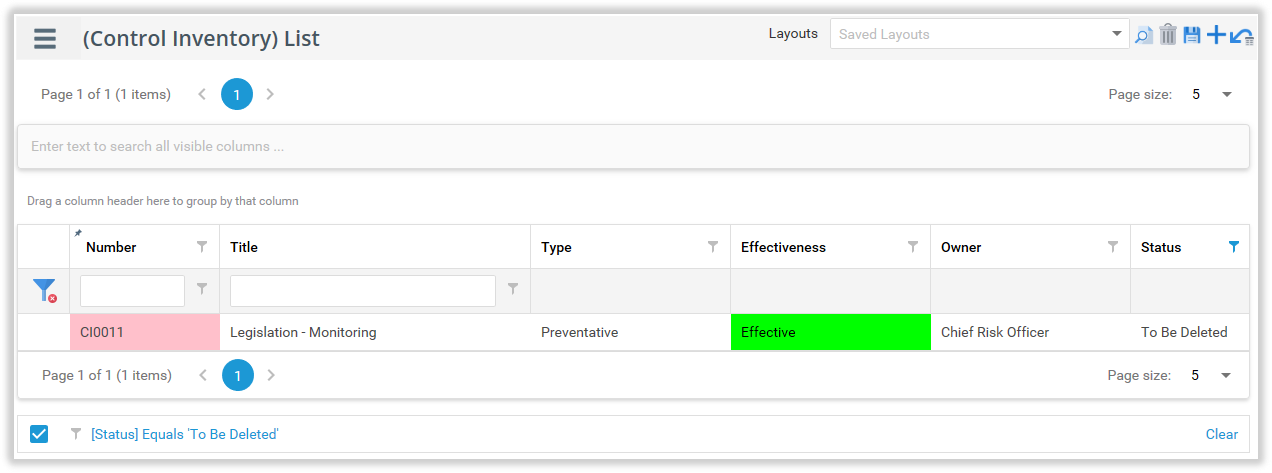
The Control Inventory List page displays all Control Inventory records your logged in Position has security access to view, less any filters you may have applied.
Click on any Control Inventory record 6 to see its details.
Click this icon to view basic information for working with the Control Inventory List page.
The Control Inventory Page
The Control Inventory page contains all details pertaining to the Control.
Actions available from this page include
View and updating fields, links, tasks, notes and security,
Adding new Control Inventory records.
Print previewing the record.
Deleting the Control Inventory record.
Making an Archive of the Control Inventory record.
Duplicating the current record.
The ‘Control Inventory’ page
The Control Inventory Page elements
‘Control Inventory’ page elements
ID
Element
Description
1
Current Record selector
Use this selector to change to another Control Inventory record.
2
Control Inventory tabs
Click on each tab to display each titled information
3
‘Save’ icon
Click this icon to save all updates to Details, Custom Fields and Security tab field changes.
4
‘New’ icon
Click this icon to open The ‘New Control Inventory’ popup window.
5
‘Print Preview’ icon
Click this icon to open a preview window of the printed layout page.
6
‘Delete’ icon
Click this icon to delete the Control Inventory record.
7
‘Archive’ icon
Click this icon to archive the Control Inventory record.
8
‘Duplicate’ icon
Click this icon to create a new Control Inventory record which is a duplicate of this one.
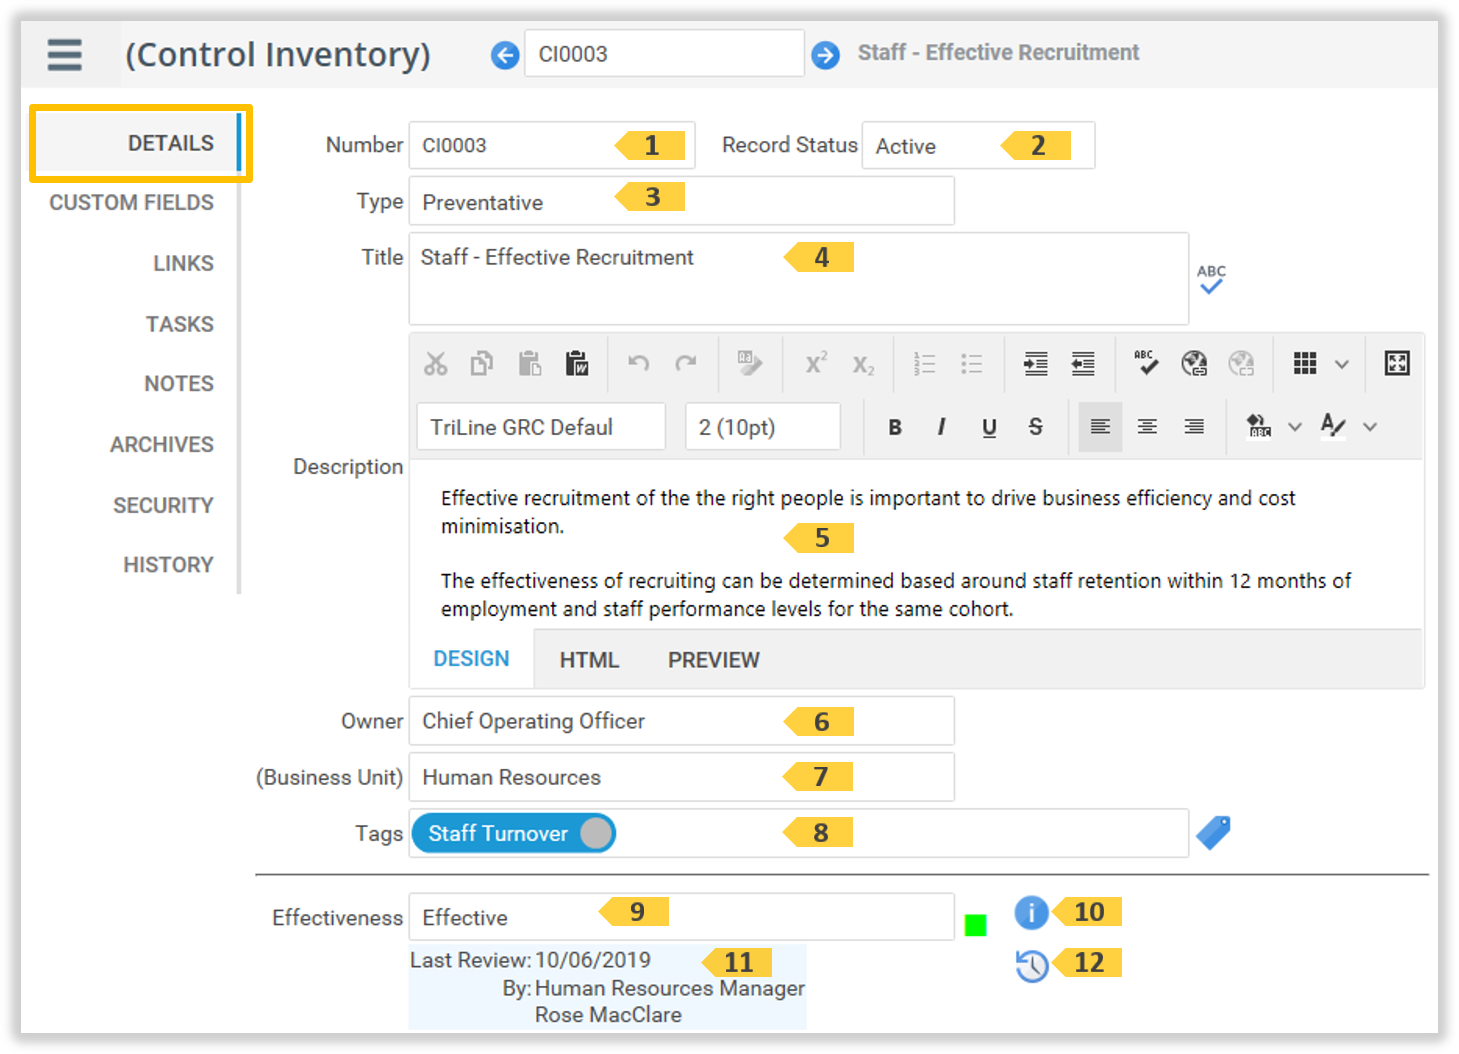
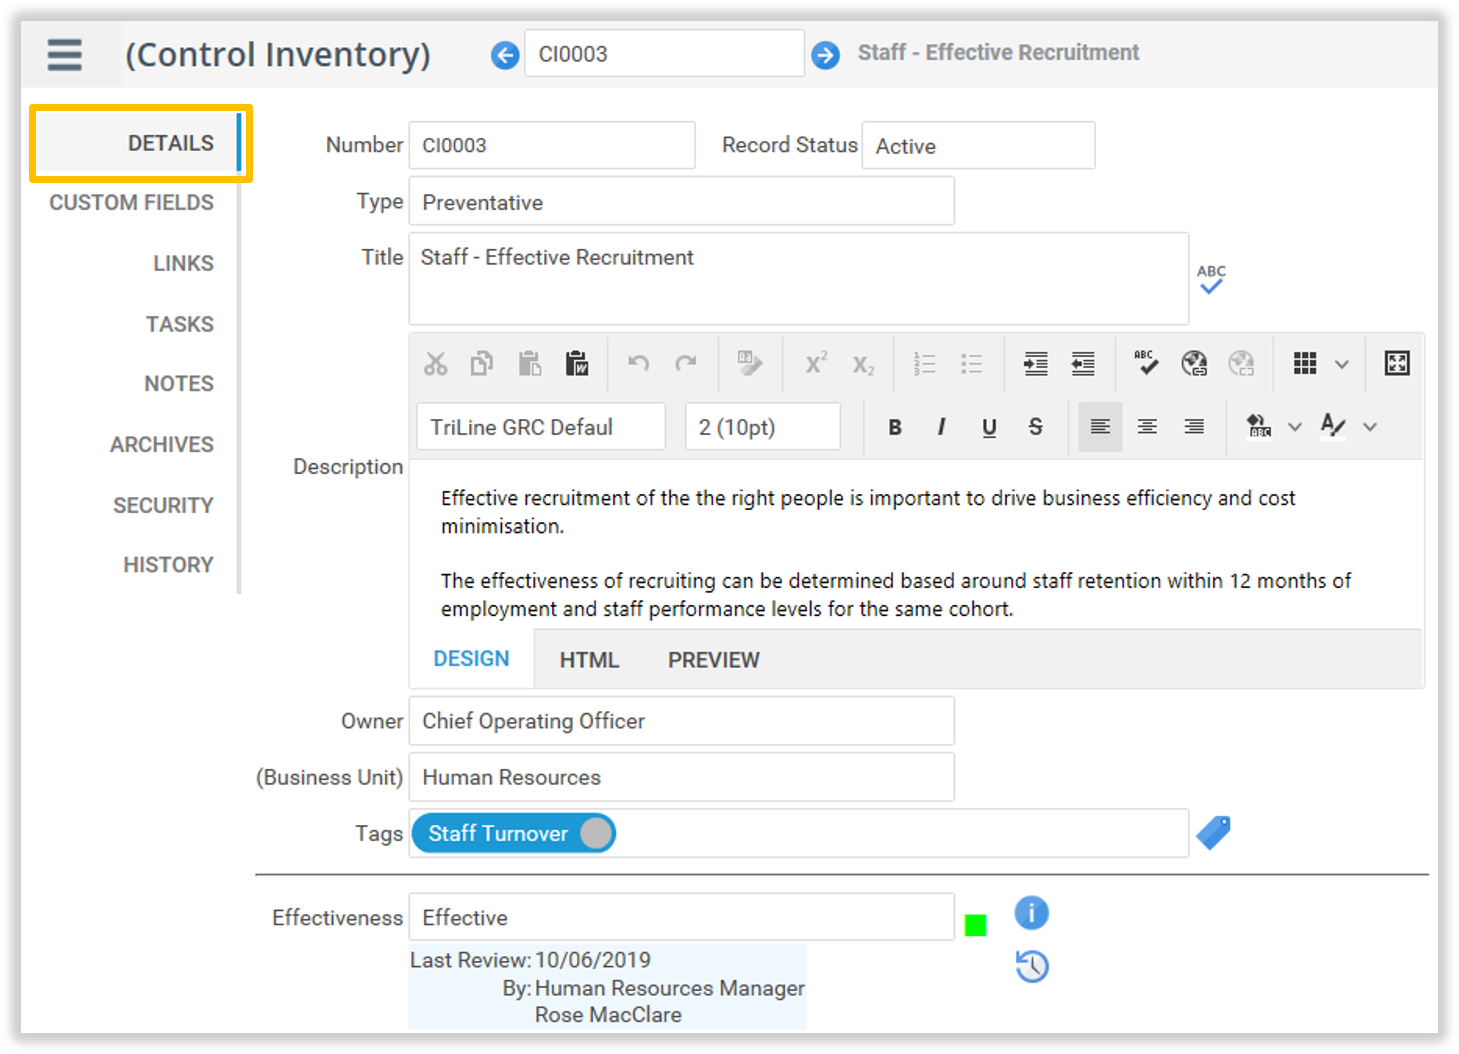
The Details tab
The Details tabs displays the main fields of the Control, including the Effectiveness of the Control.
The ‘Details’ tab
The Details tab elements
The ‘Details’ tab elements
ID
Element
Description
1
‘Number’ field
Display the unique number of this Control.
2
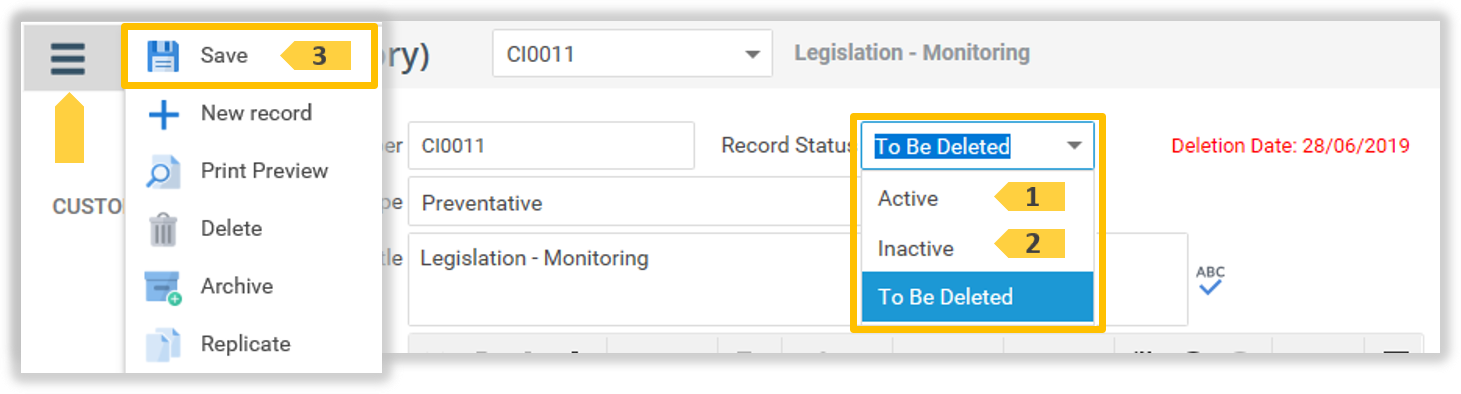
‘Record Status’ field
Displays the status of this Control (see Record Status).
3
‘Type’ selector
Displays the Type of this Control.
4
‘Title’ field
Displays the title of this Control.
5
‘Description’ field
Displays the description of the Control.
6
‘Owner’ selector
Displays the Position which owns this Control Inventory record.
7
‘Business Unit’ field
Displays the Business Unit of this Control.
8
‘Tags’ field
Displays the tags selected for this Control.
9
‘Effectiveness’ selector
Displays the current Effectiveness this Control.
10
‘Show Effectiveness Definition’ icon
Click this icon to see the definition of each Effectiveness available in 9.
11
‘Last Change’ message
Displays the date the Effectiveness change to its current rating.
12
‘Show History’ icon
Click this icon to display the History of Effectiveness of this Control.
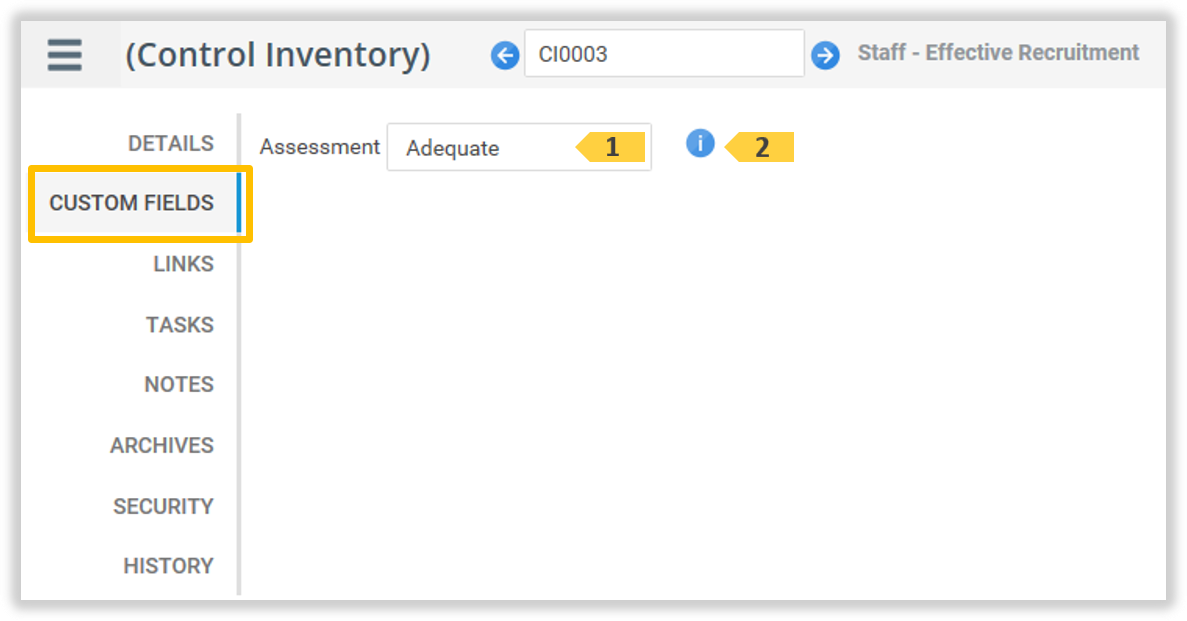
The Custom Fields tab
Note: Custom Fields will vary depending on the Control Inventory Custom Field settings. If there are no Custom Fields, this tab will not appear. The fields displayed here will be different for your site.
The Custom Fields tab display all custom fields configure for this Control Type (item 6 on the Details tab).
The ‘Custom Fields’ tab
The Custom Fields tab elements
The ‘Custom Fields’ tab elements
ID
Element
Description
1
An entry field
One or more different type custom data collection fields maybe displayed.
2
This field ‘Information’ icon
Hover over this icon to display information about the field it is next to.
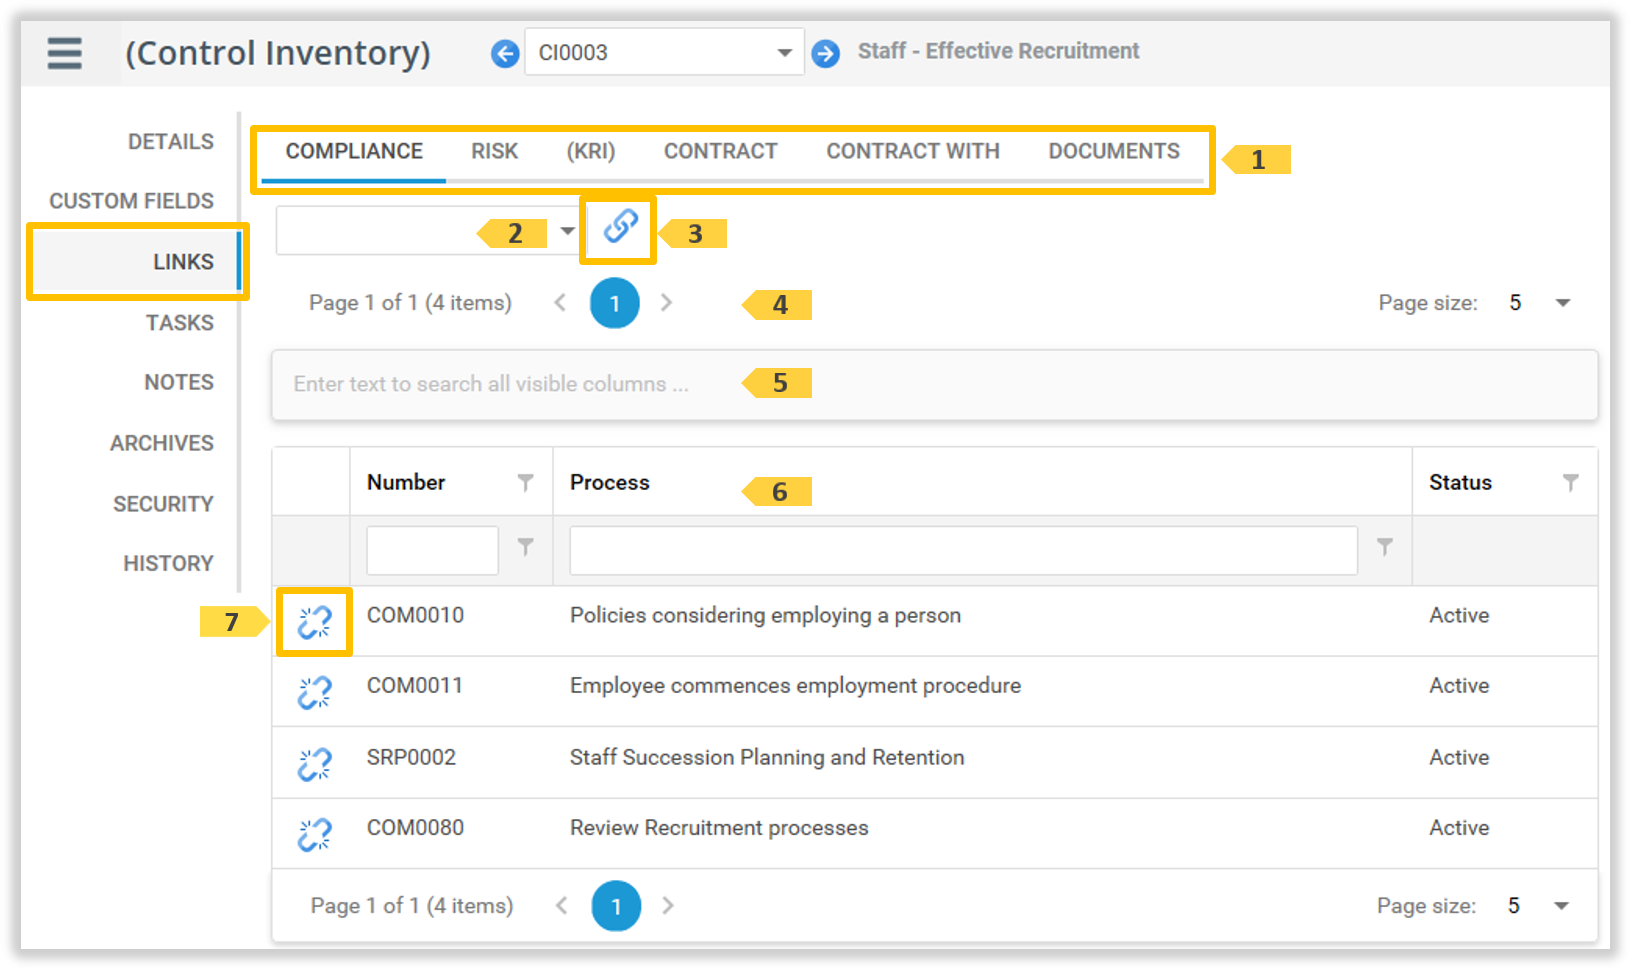
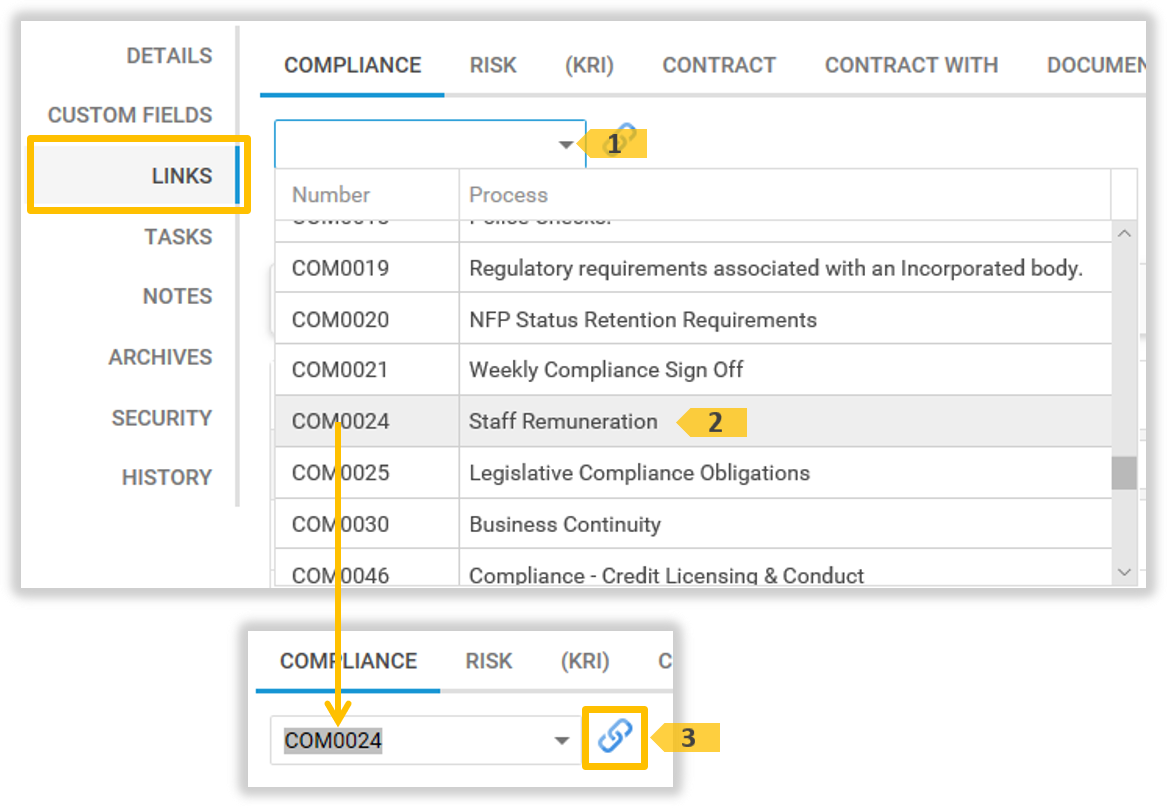
The Links tab
The Links tab displays entity records that are linked to this Control. Tabs display here will depend on which modules are installed on your site.
Each Link sub tab allows new Links can be added, and existing links can be removed, on this tab.
The ‘Links’ tab
The Links tab elements
The ‘Links’ tab elements
ID
Element
Description
1
Linked Record tabs
Click the appropriate tab to view, and if you have Edit access security, create and remove links for that Record Type. The available tabs are dependent on the modules your site has enabled.
2
Record Selector field
Each of the Linked Record tabs 1 has a Record Selector field. Click the Record Selector dropdown to view a list of available records that you can link to this Control Inventory record. Select the record you wish to link then click the Add Link icon 3Note: The drop-down list only displays available Records to which you have security access.
3
‘Add Link’ icon
Once you have selected a Record 2, click the ‘Add Link’ icon to create a link from that record to the Control Inventory record. The linked Record is displayed in the Linked Record List 6.
Enter text here to search and filter the visible columns in the List 6.
6
Linked Record List
This list displays all linked Records of the currently selected Record Type 1. Click a Record in this list to open the Record in its own page for viewing or editing depending on your Security access.
7
‘Remove Link’ icon
Each Record in the list has its own ‘Remove Link’ icon that will display for Edit access security. Click this icon to remove the link to the Record. A Confirm Delete dialog is displayed. Once you confirm the link’s removal, the Record is no longer displayed in the Linked Record List 6. Note: The Control Inventory record link will also be removed from the Links tab of the corresponding record.
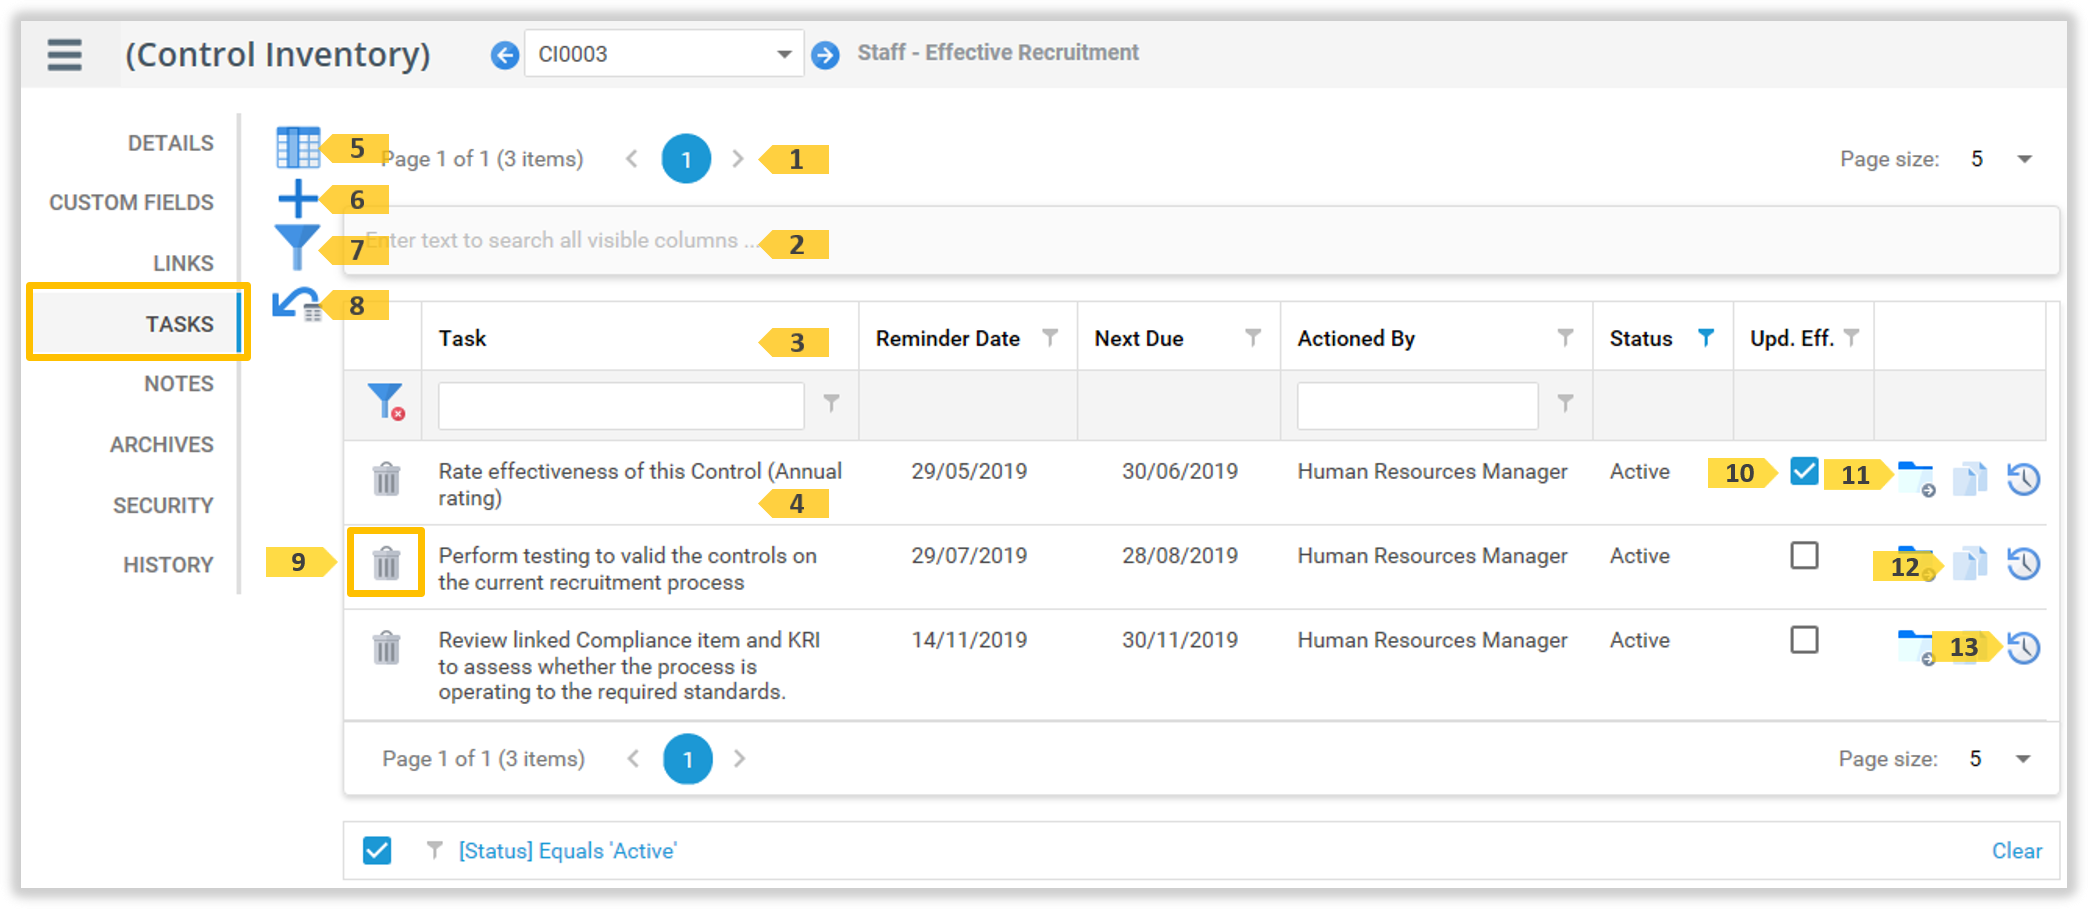
The Tasks tab
The Tasks tab displays a list of all task that have been created for this Control Inventory record.
Use the controls in the Column Headers to filter the Tasks in the list.
4
Tasks list
All Tasks created for the Control Inventory record are listed here. Click on a Task to view or edit it in the ‘Edit Task’ popup window. Once a Task is generated, it can no longer be edited and the row will change to pale shaded colour.
5
‘Hide/Show Column’ icon
Click this icon to hide or display list columns using the Field Chooser.
Click this icon to filter the Task List using the Filter builder.
8
‘Reset grid’ icon
Click this icon to reset the columns in the grid to a default state.
9
‘Delete Task’ icon
Each Task in the list has a ‘Delete task’ icon. Click the icon to remove the Task. A ‘Confirm Delete’ dialog is displayed. Once you confirm the removal, the Task is no longer displayed in the Tasks list (see item 4 above).
10
Update Effectiveness Task indicator
A tick indicates this is an Update Effectiveness task.
11
‘Transfer Task’ icon
Each Task has a ‘Transfer Task’ icon. Click this icon to move the Task to another Control Inventory record.
12
‘Copy Task’ icon
Each Task has a ‘Copy Task’ icon. Click this icon to create a copy of the Task. The ‘Copy Task’ popup window is displayed. (This window is the same as the ‘New Task’ popup window, and is pre-filled with information from the Task being copied.)
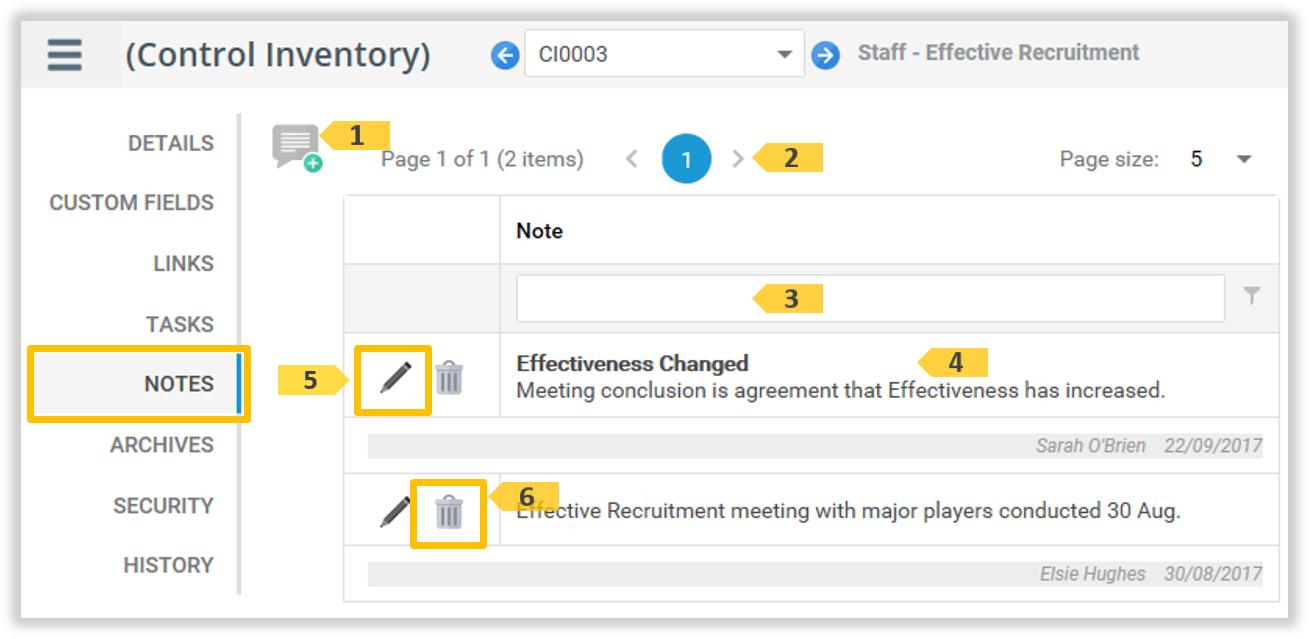
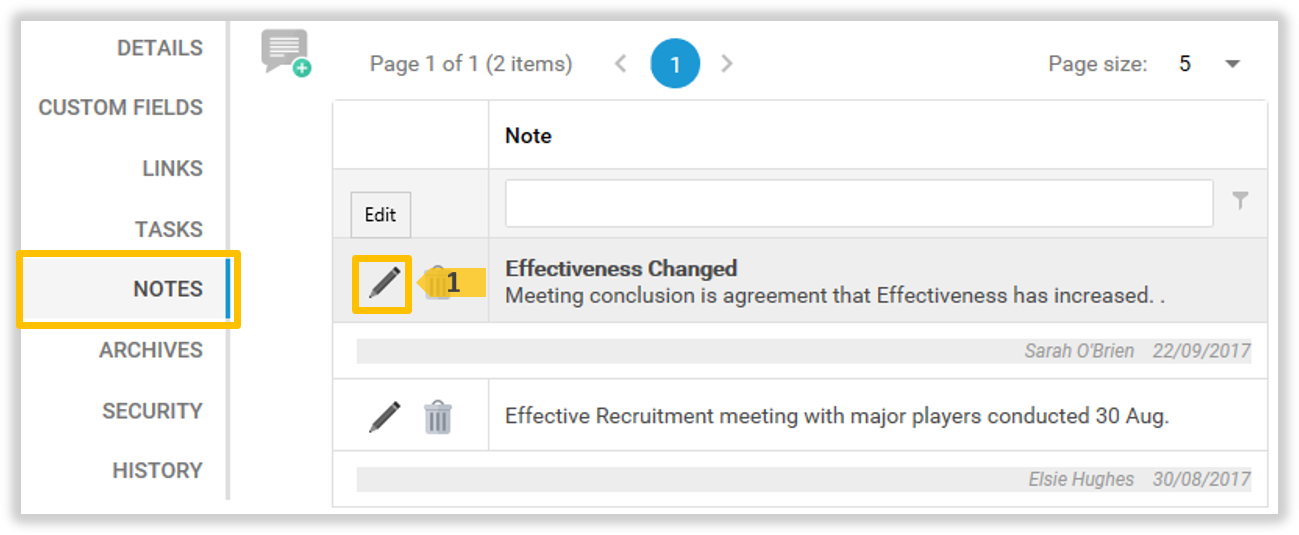
The Notes tab displays a list of all Notes that have been added to this Control Inventory record. This tab can be used to add any relevant information relating to the Control Inventory record as required. Positions with View or Edit access are permitted to add Notes. Positions with Edit access can also update or delete the Notes.
The ‘Notes’ tab
The Notes tab elements
The ‘Notes’ tab elements
ID
Element
Description
1
‘Add Note’ icon
Click this icon to a new Note. The ‘Add Note’ popup window is displayed. Note: This icon only displays if you have ‘Edit’ security access.
Use the controls in the Column Headers to filter the Notes in the list.
4
Notes list
Each Note in the list consists of two parts: the top part is the Note itself, and the bottom part (shaded) displays the Name of the person who created the Note plus a date of when the Note was created.
5
‘Edit Note’ icon
Click this icon to Edit a Note. The ‘Edit Note’ popup window is displayed. Note: This icon only displays if you have ‘Edit’ security access.
6
‘Delete Note’ icon
Click this icon to Delete a Note. A ‘Confirm Delete’ dialog is displayed to remind you that deleting this Record will result in loss of data. Note: This icon only displays if you have ‘Edit’ security access.
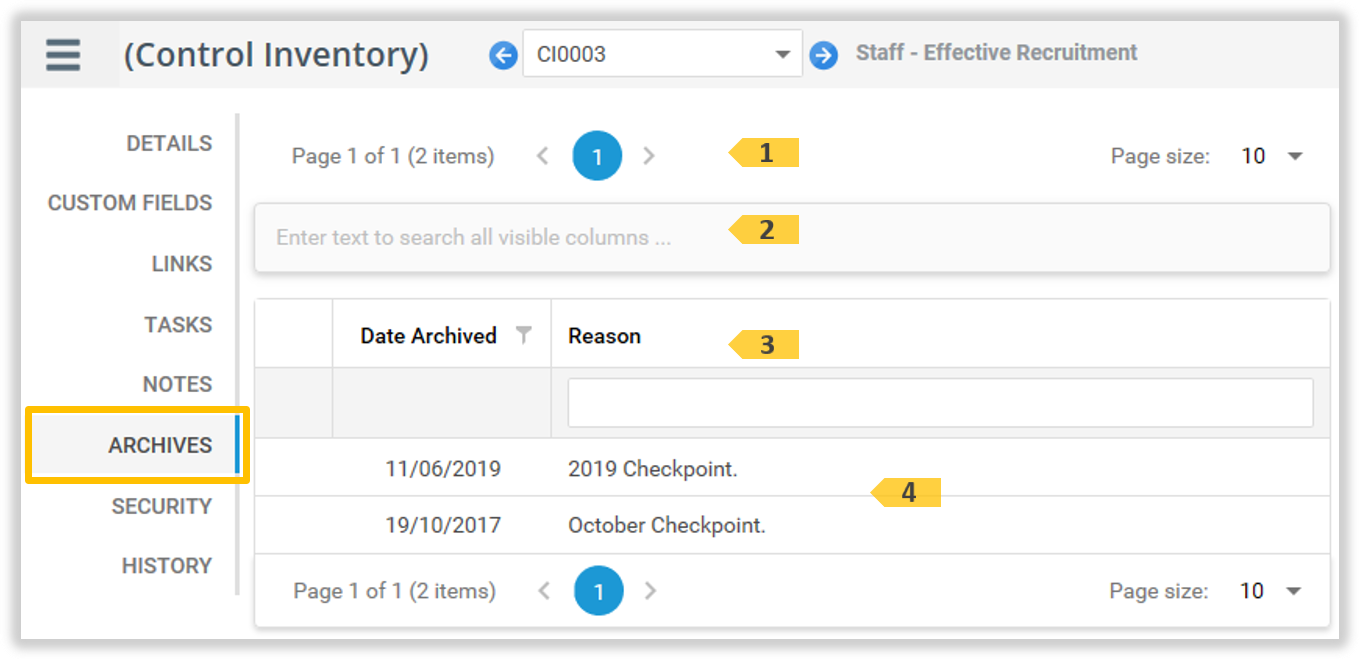
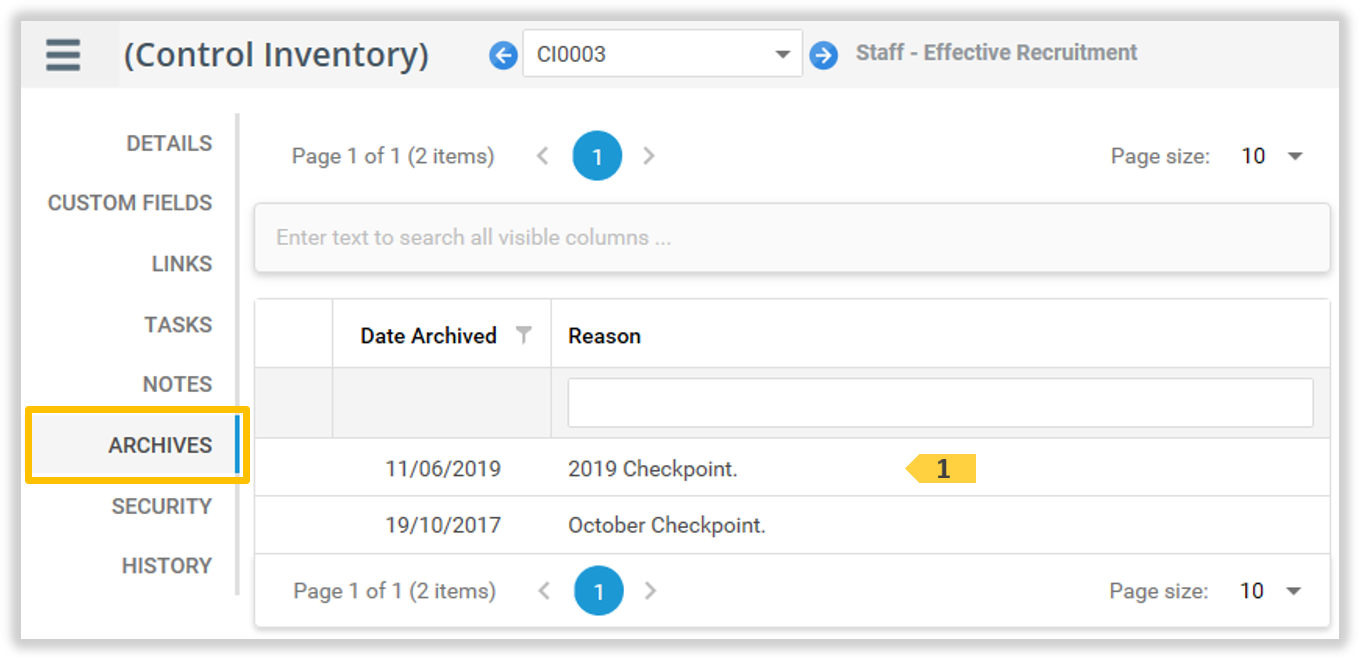
The Archives tab
The Archives tab displays a list of snapshots of the Control Inventory record as was when the archives where initiated.
Use the controls in the Column Headers to filter the Records in the Archive List (item 4).
4
Archive List
Displays the Archives taken of the current Control Inventory record. Click an Archive in the list to open and view the Archive details. Note: Archive Records cannot edited.
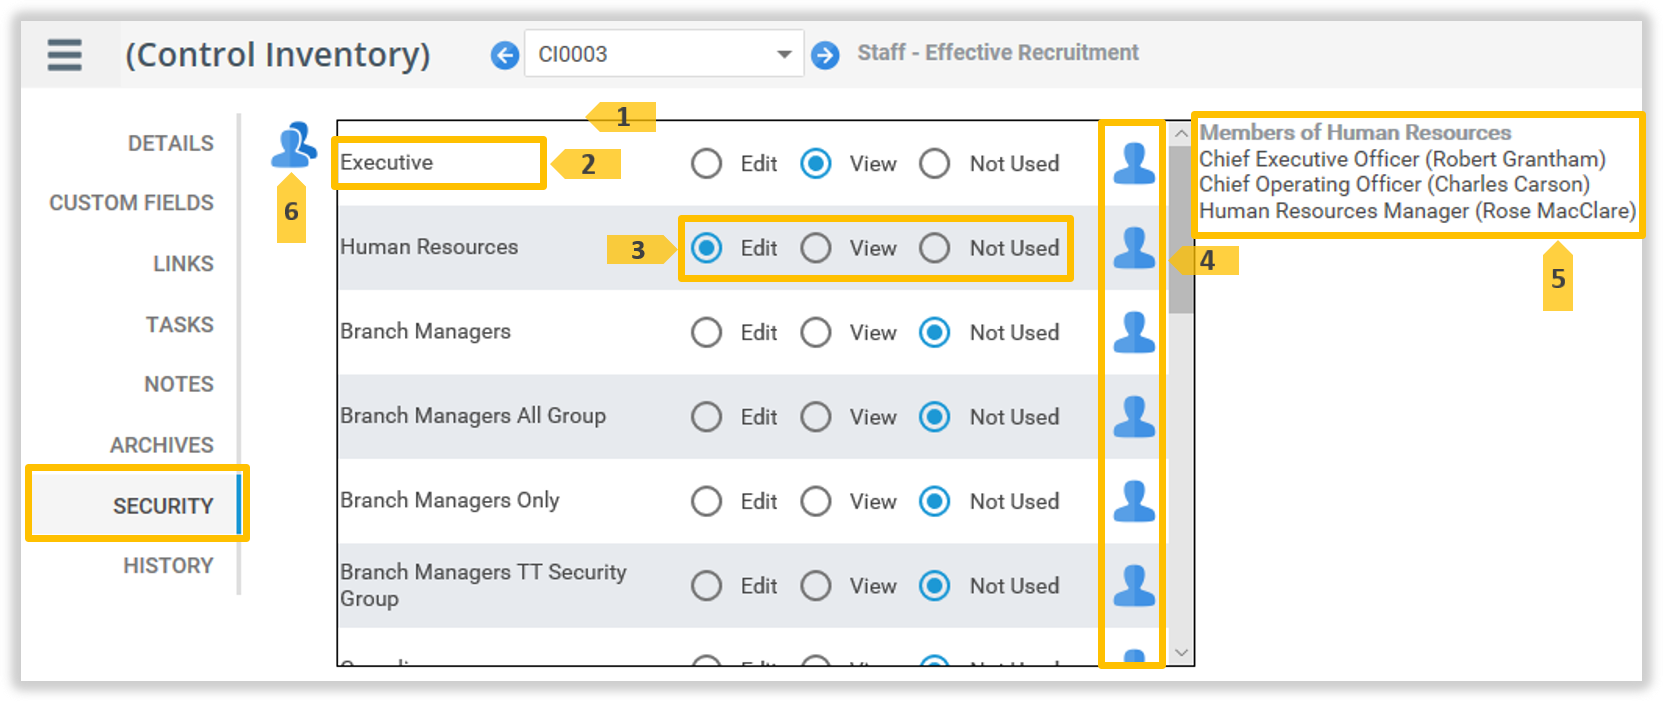
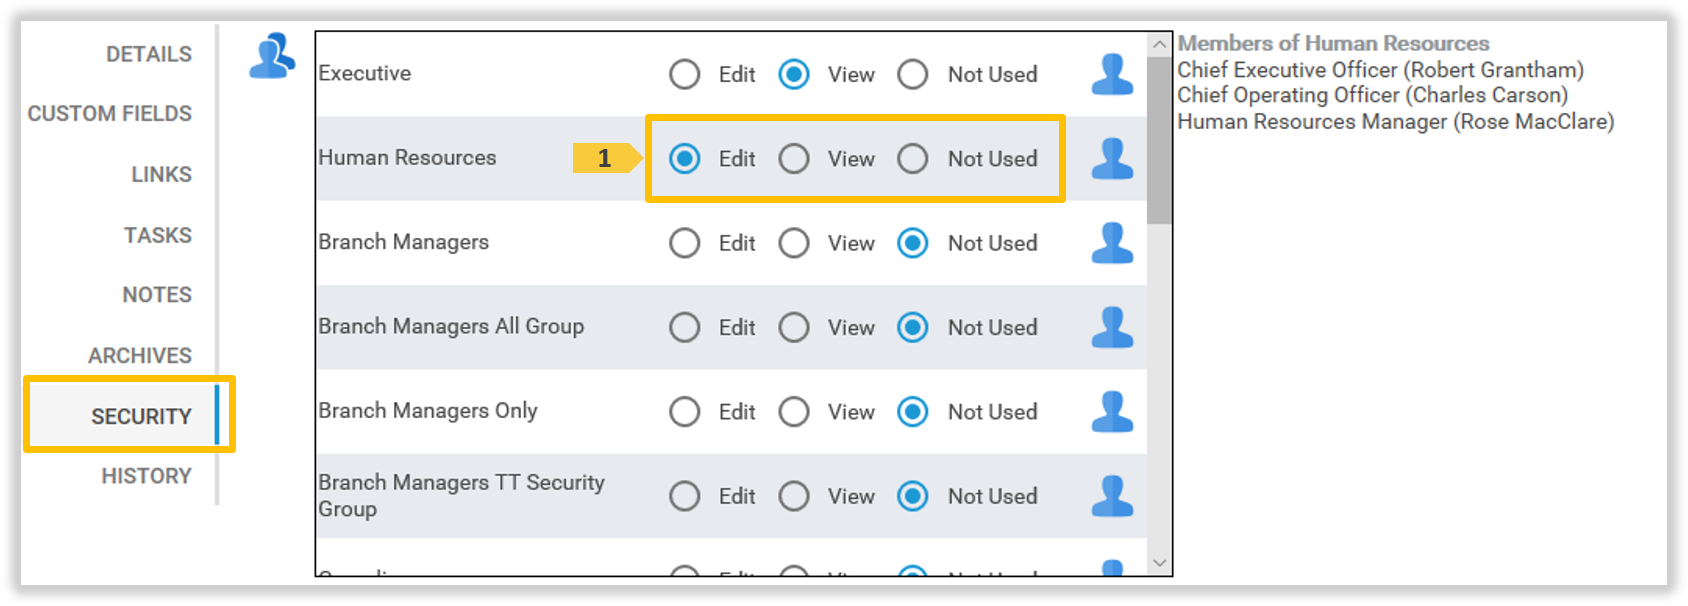
The Security tab
The security of each Control Inventory record is individually controlled. The Security tab is used to adjust the security access of each Security Group to this Control Inventory record. Edit access means Positions in this Security Group can update all values in this Control Inventory record. View access means Positions in this Security Group can see, but not update, all values in this Control Inventory record. Not Used access means Positions in this Security Group cannot see this Control Inventory record.
Select a Record Security Rights level for the Security Group. Note: The Security Group containing the Control Inventory Owner must be given ‘Edit’ Rights to the Control Inventory Record.
4
Security Group Membership icon
Click this icon to display the related Security Group Membership List (see item 5 below).
5
Security Group Membership List
This list is displayed when you click the Security Group Membership icon (see item 4 above) for a Security Group. This function is useful if you need to confirm which Security Group a Position is a member of before assigning Record Security Rights to that group.
6
‘Security Access Summary’ icon
Click this icon to display all Positions that have access to this record, the type of access, and from which Security Group this access was granted from (including Task Teams).
Procedures
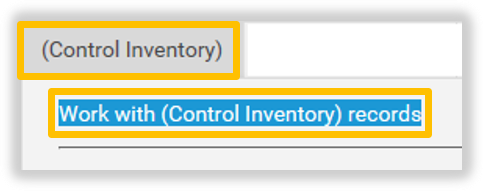
Accessing the Control Inventory records list
Note: The Control Inventory Module must be enabled and, your Position must have access to Control Inventory records, for this menu option to appear.
From the Main Menu, select Control Inventory | Work with Control Inventory records.
Note: Only a Position which is a member of one of the System Security Groups ‘Create Control Inventory’, Administrator - Control Inventory, or an Administrator, can create a Control Inventory record.
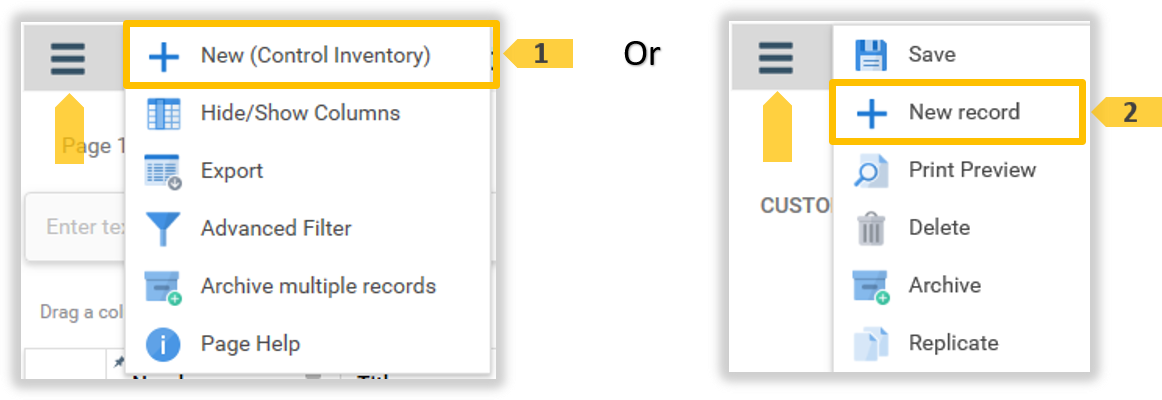
A Control Inventory record can be created either from the Control Inventory List page or the Control Inventory page.
From the ‘Control Inventory List’ page, click the New Control Inventory 1 icon. Or, from the ‘Control Inventory List’, click on a Control Inventory record in the list to open the ‘Control Inventory’ page. Click the New 2icon.
The ‘New’ icon
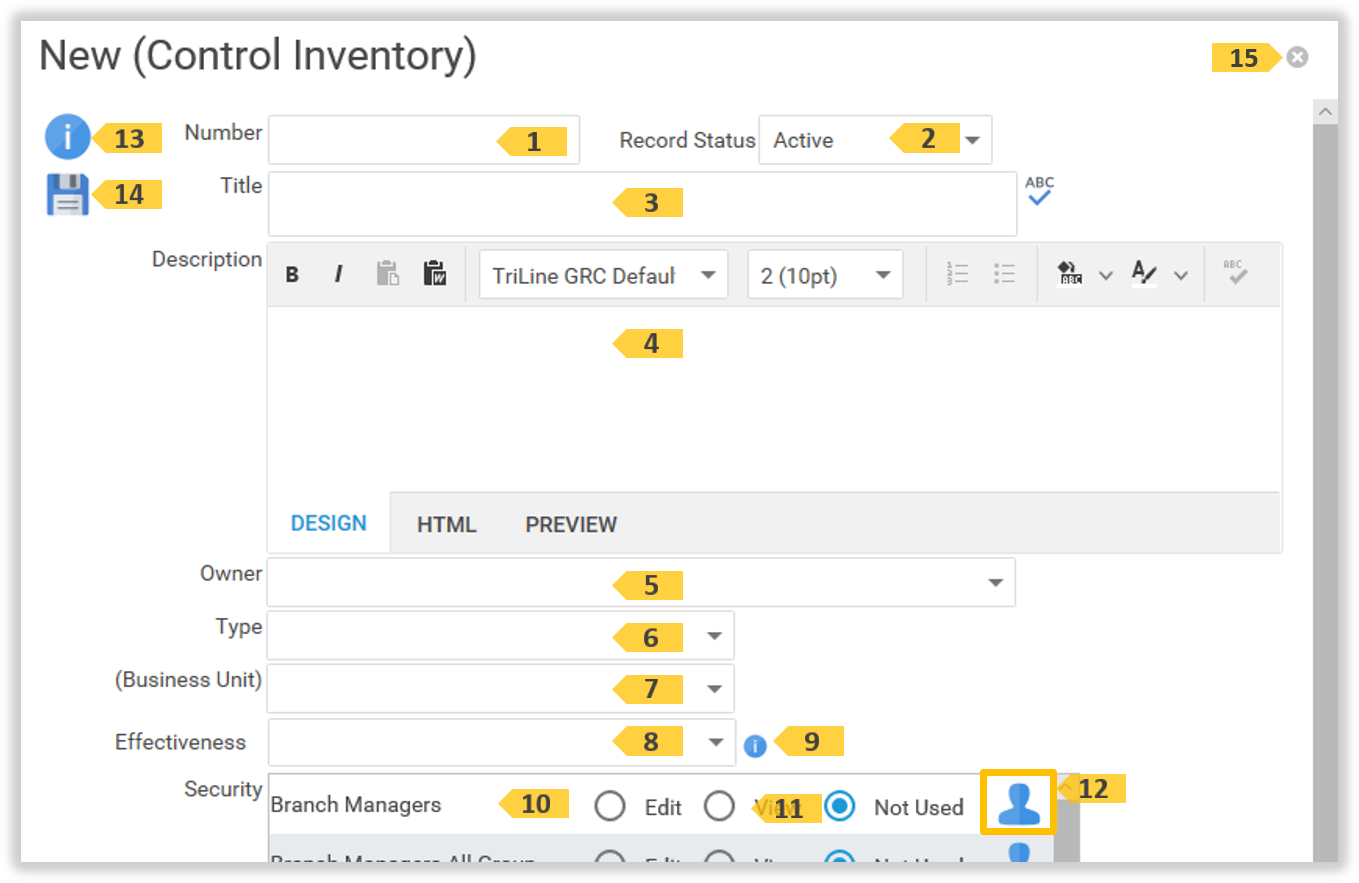
The ‘New Control Inventory’ popup window opens. Complete the Control Inventory details in the window (see New Control Inventory window elements for details on each field).
The ‘New Control Inventory’ window
Click the Save 14 icon to complete adding the new Control Inventory record. The Control Inventory page will display with this new record. Clicking the cancel 15 icon will close the ‘New Control Inventory’ window without saving the record.
‘New Control Inventory’ window elements
‘New Control Inventory’ window elements
ID
Element
Description
1
‘Number’ field
Enter a unique record number.
2
‘Record Status’ field
Select whether the status is created Active or Inactive (see Record Status).
3
‘Title’ field
Enter a unique record number.
4
‘Description’ field
Enter the Description of the Control.
5
‘Owner’ field
Select the Position which will own this Control Inventory record.
6
‘Type’ field
Select the Type of this Control Inventory record.
7
‘Business Unit’ field
Select the Business Unit of this Control.
8
‘Effectiveness’ field
Select the Effectiveness this Control Inventory record will be create with.
9
‘Show Effectiveness Definition’ icon
Click this icon to see the definition of each Effectiveness available in 8.
10
‘Business Unit’ field
Select the Business Unit to apply to this Control Inventory record.
Click on a Control Inventory record in the list to open the The ‘Control Inventory’ page. Click each tab to view the details on that tab.
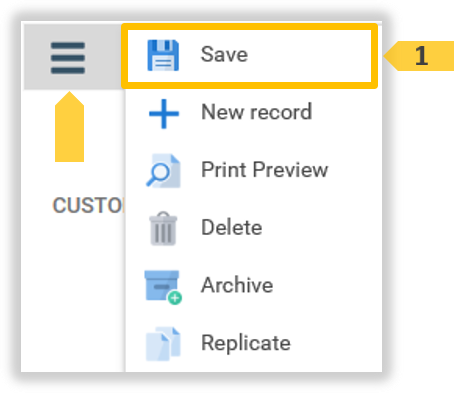
If the Save 1 icon is display (after hovering over the Options Hamburger icon), you have security access to update the values on this Control Inventory record. The Save icon applies to Details, Custom Fields and Security tabs. Update values as required and then reveal and click the Save icon.
Delete a Control Inventory record
Deleting a Control Inventory is NOT recommended if you wish to retain the history of the Control Inventory and its tasks. Instead consider changing the Control Inventory Status to Inactive.
Note: Only Positions allocated to a Security Group that has been assigned ‘Edit’ Record Security Rights can delete a Control Inventory.
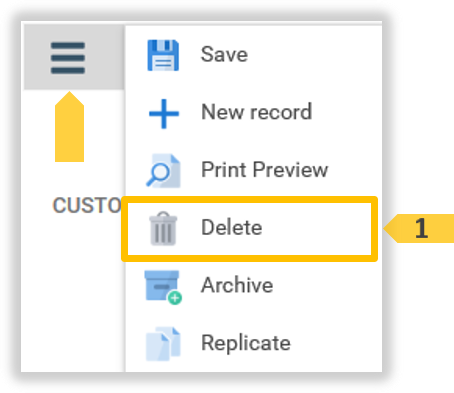
Click on a Control Inventory record in the list to open the The ‘Control Inventory List’ page. Hover over the Options Hamburger icon and then click the Delete icon 1.
A ‘Confirm Delete’ dialog is displayed. Click Yes to delete the Control Inventory, or click No to cancel.
Note: Deleting a Control Inventory record also deletes its Archives and History records. This may have auditing implications. Consider instead changing the Status to Inactive (see Change the Status of a Record).
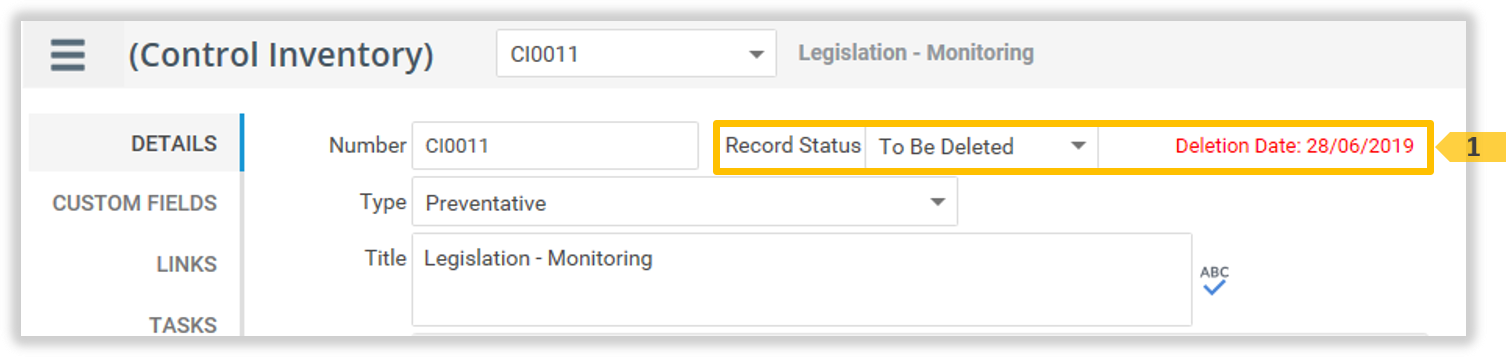
Undelete a Control Inventory record
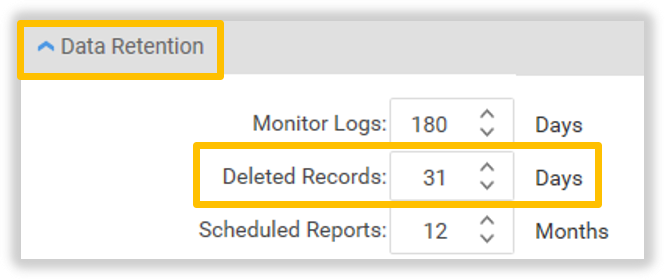
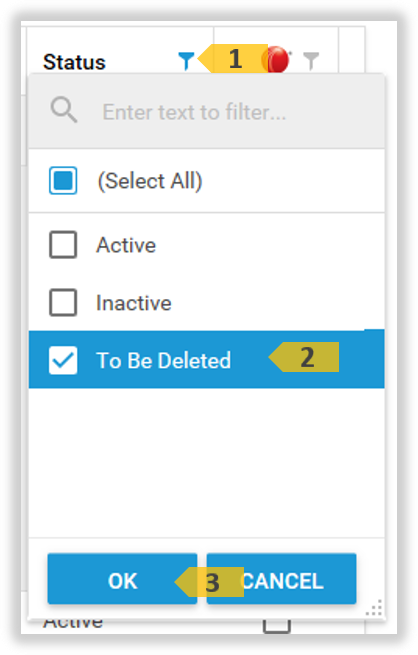
The Control Inventory record is not deleted immediately, but rather it’s status is changed to ‘To Be Deleted’ for a limited time determined by your configuration settings. Hence the record can still be view and the record can also be recovered from this to be deleted status.
The Record will be destroyed on its scheduled date by the overnight Monitor and cannot be recovered/undeleted after this time.
The days delay until the deletion of a record is permanent, is configured by the Administrator on the General Configuration tab. For example, this setting is 31 days:
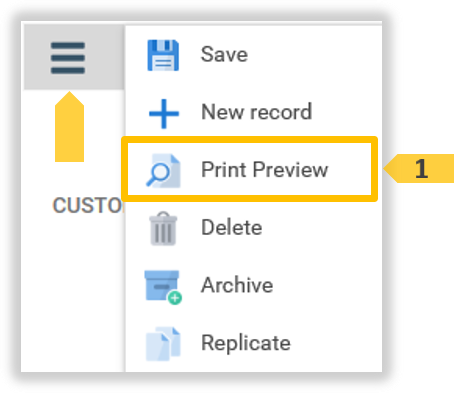
Click on a Control Inventory record in the list to open the The ‘Control Inventory’ page. Hover over the Options Hamburger icon and then click the Print 1 icon.
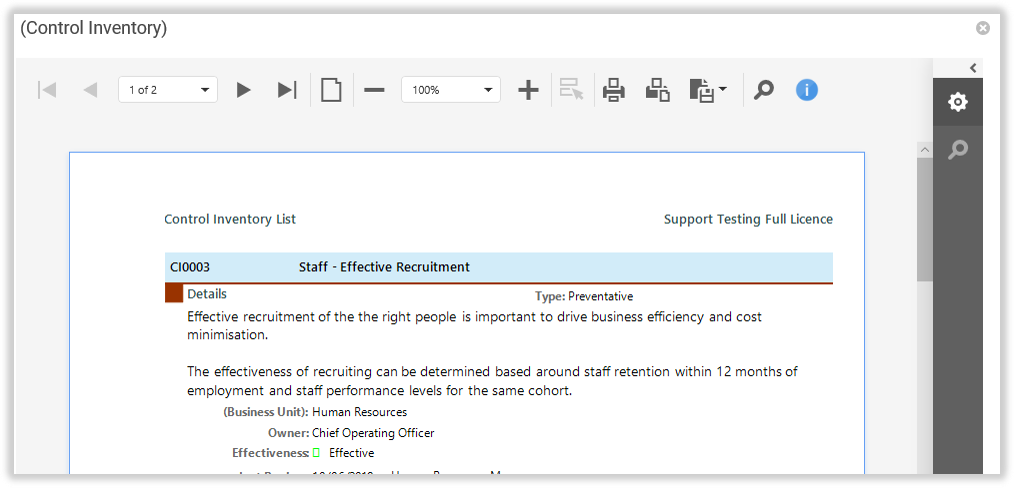
A Preview Page opens showing a Report for the Control Inventory. Navigate, search, print and/or save the Report using the Preview Page Toolbar. Click the Close icon 1 to close this window.
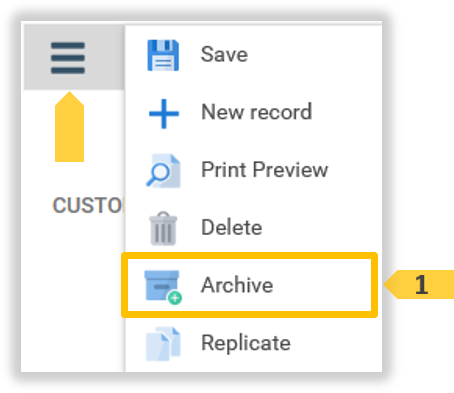
Archive Control Inventory records
Before making any editing changes to your Control Inventory record, you may wish to archive the Control Inventory for historical purposes. Each Archive record in the list is a snap shot the Control Inventory on that date. The Archive record cannot be edited. The Archives tab contains a list of dates when the Control Inventory has been archived.
Once you create a Record Archive, the Archive remains with the Record for as long as the Record exists. This makes routine archiving a good option for audit purposes.
If you delete a Control Inventory, any archives for those Records are also deleted. Consider making the Record Inactive rather than deleting the Record. This way, you can stop the Record displaying in lists (by default, inactive Records are not displayed in lists), but still retain the Record and its Archive history for future reference.
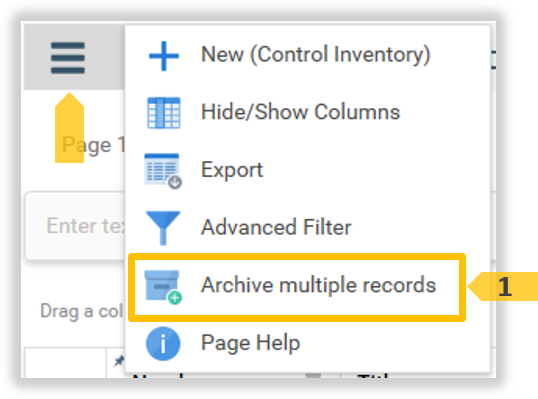
A Control Inventory record can be Archived either from the Control Inventory List page or the Control Inventory page. Archiving from the Control Inventory List page allows multiply records to be archived at once.
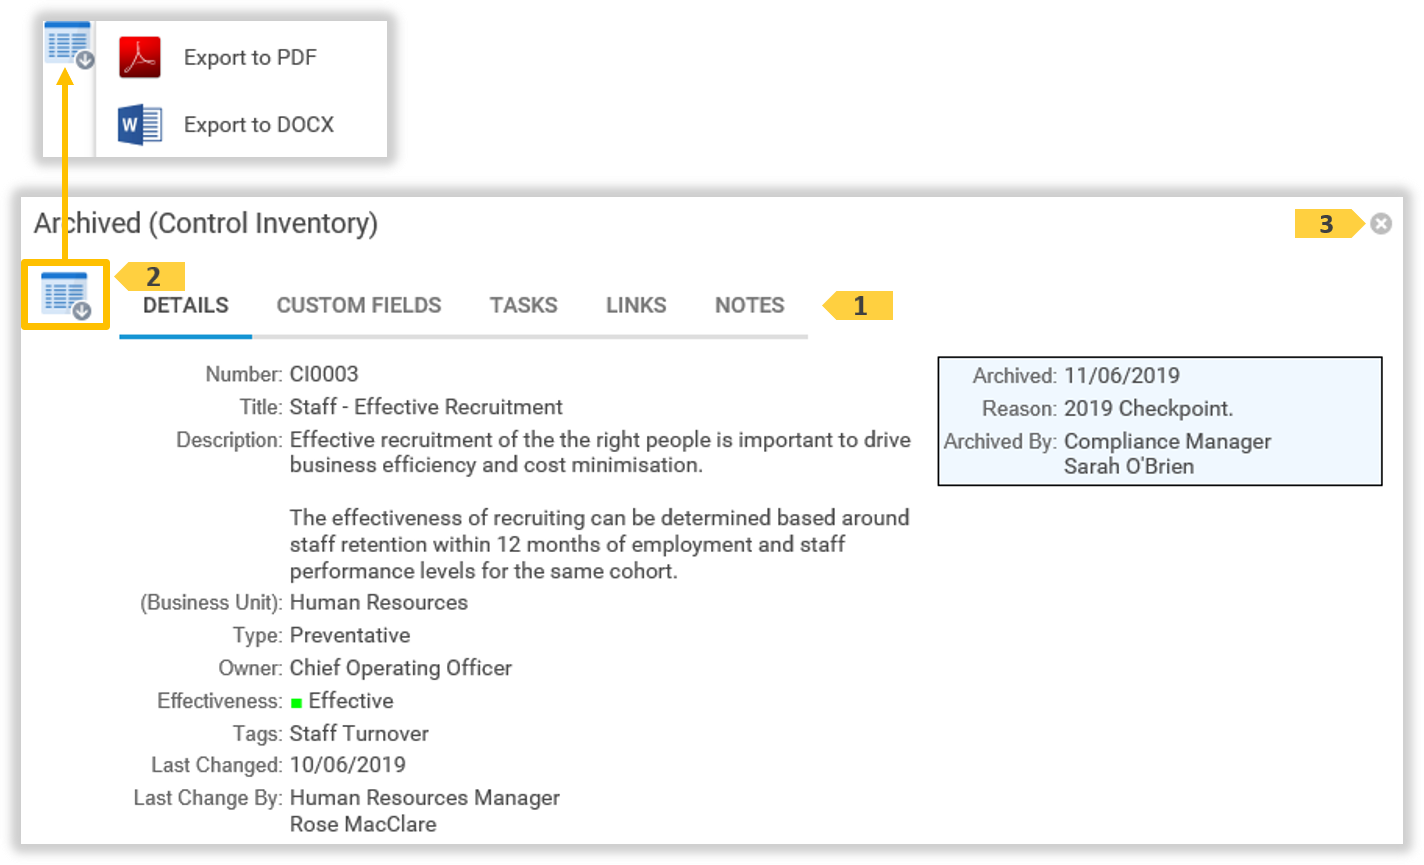
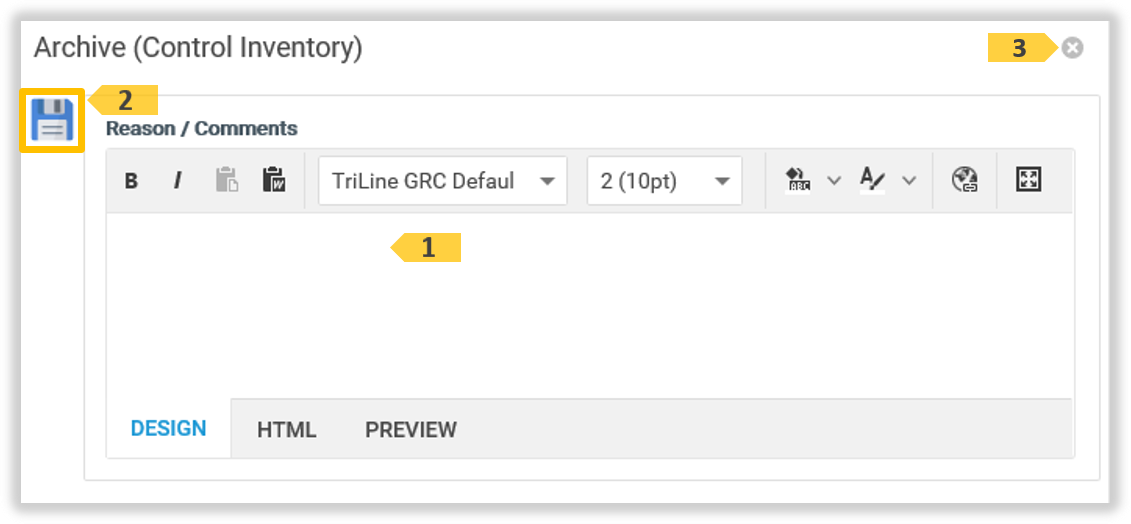
Click on a Control Inventory record in the list to open the The ‘Control Inventory’ page. Click the Archives tab. Click on an Archive record in the Archive list 1.
View details about the Archived Control Inventory record by clicking on the relevant tabs 1. Hover over the Export icon 2 and click an export file format. Open or Save this file as required.
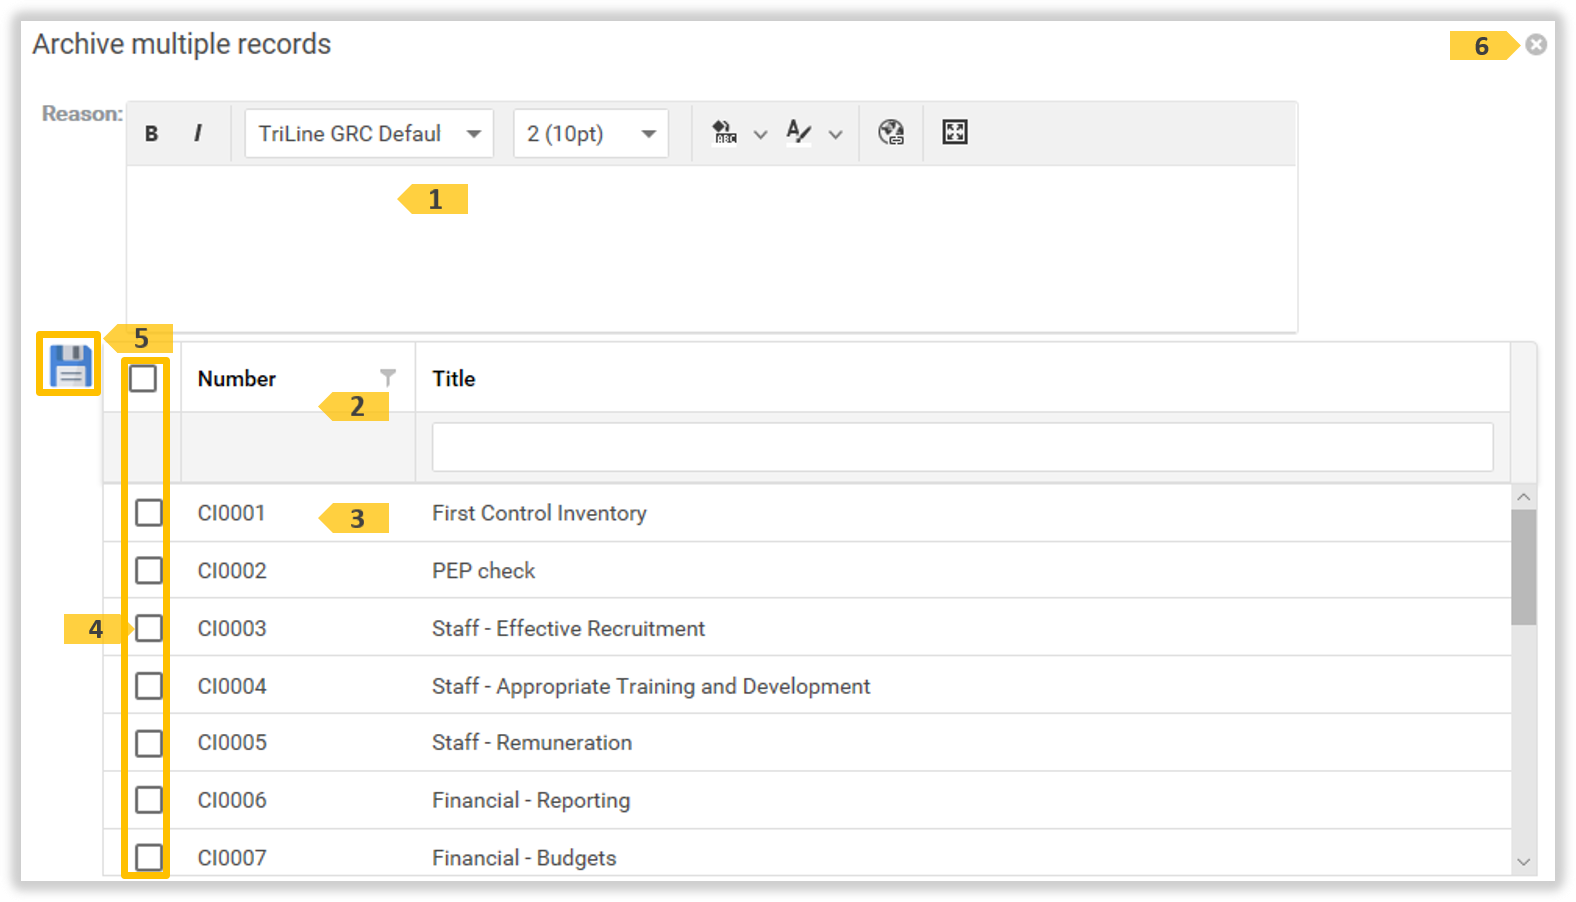
The "Archive multiple records' window appears. Enter the Reason 1 for the archiving. If required, filter or sort 2 the list of records appearing in the list 3. Select 4 records to archive.
The ‘Archive multiply records’ window
Click the Save 5 icon to archive the selected records 4. Or, click the Cancel 6 icon to stop the archive process.
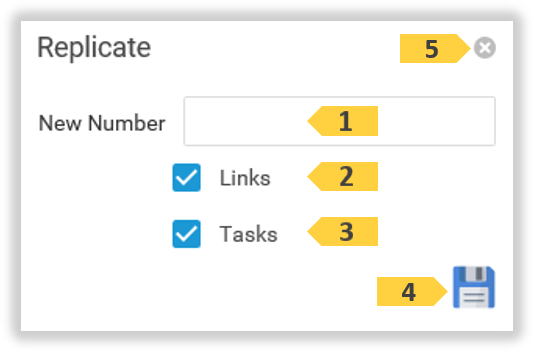
Click on a Control Inventory record in the list to open the The ‘Control Inventory’ page. Hover over the Options Hamburger icon and then click the Replicate 1 icon.
The Replicate window appears. Enter a new Control Inventory number 1, and select if Tasks 2 and Links 3 are to be replicated also. Then click the Save 4 icon to replicate this record, or click Cancel 5 to stop. Note: Custom values and Notes are not replicated.
The new Control Inventory record will display for further editing, if required.
All positions that can view a Control Inventory record can add notes to the record.
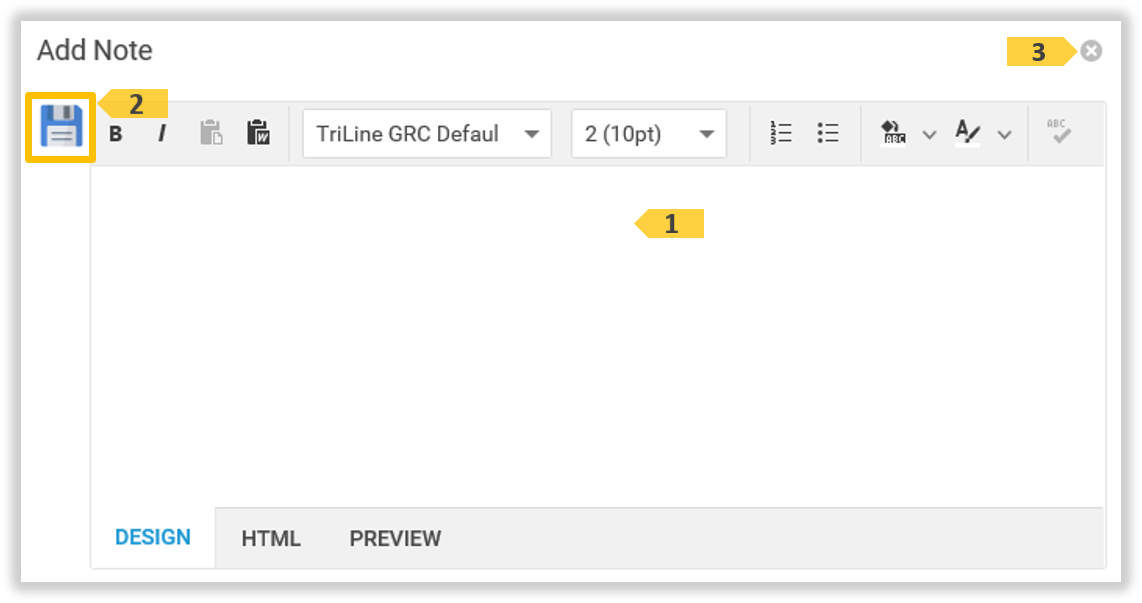
Click the Add Note 1 icon.
The ‘Add Note’ icon
Enter the Note text in the edit area 1. Then click the Save 2 icon to save this note.
The ‘Add Note’ window
Or, click the Cancel 3 icon to stop adding the Note.
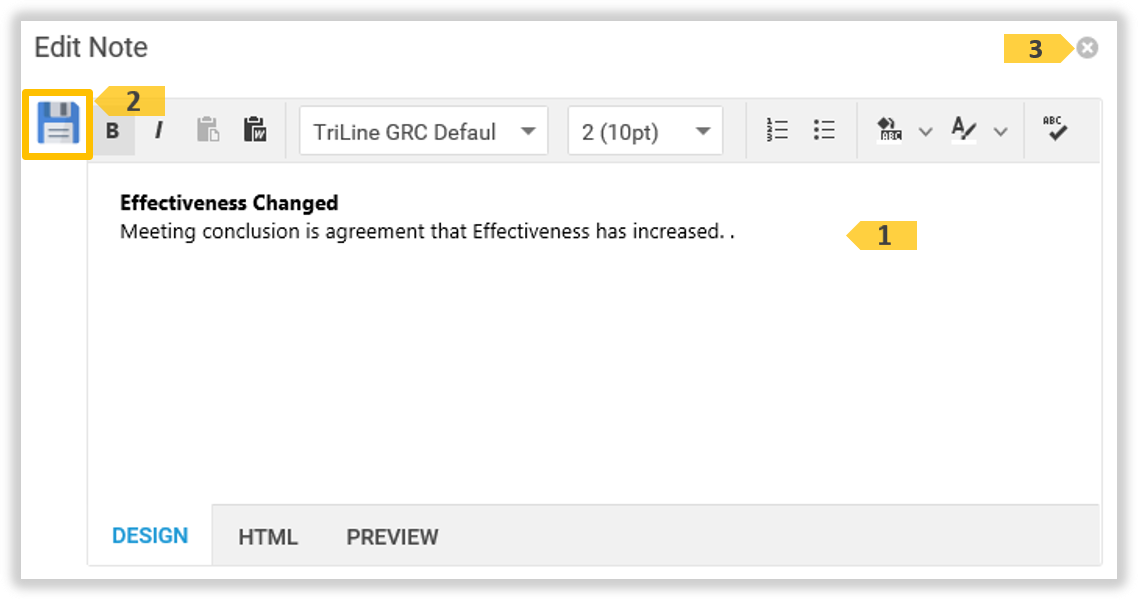
Edit a Note
Only position’s with edit access to a Control Inventory record can edit notes on that record.
Click the Edit Note 1 icon on the Note to update.
The ‘Edit Note’ icon
Update the Note text in the edit area 1. Then click the Save 2 icon to save these changes.
The ‘Edit Note’ icon
Or, click the Cancel 3 icon to stop updating the Note.
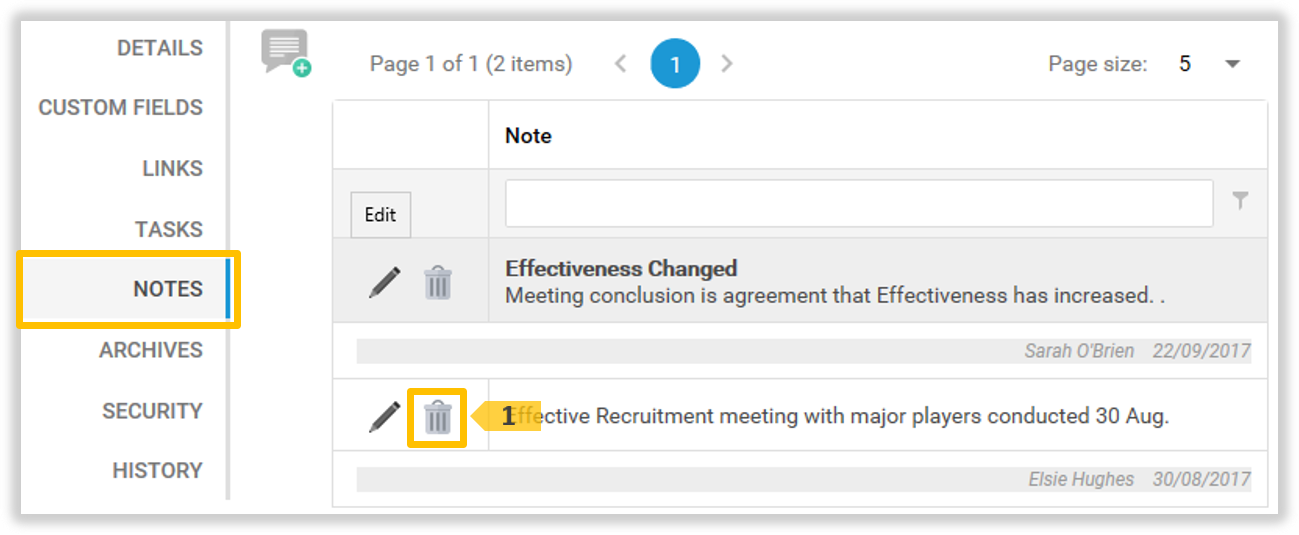
Delete a Note
Only position’s with edit access to a Control Inventory record can delete notes on that record.
Click the Delete Note 1 icon on the Note to delete.
The ‘Delete Note’ icon
The ‘Confirm’ window appears. Click OK to delete, or click Cancel.
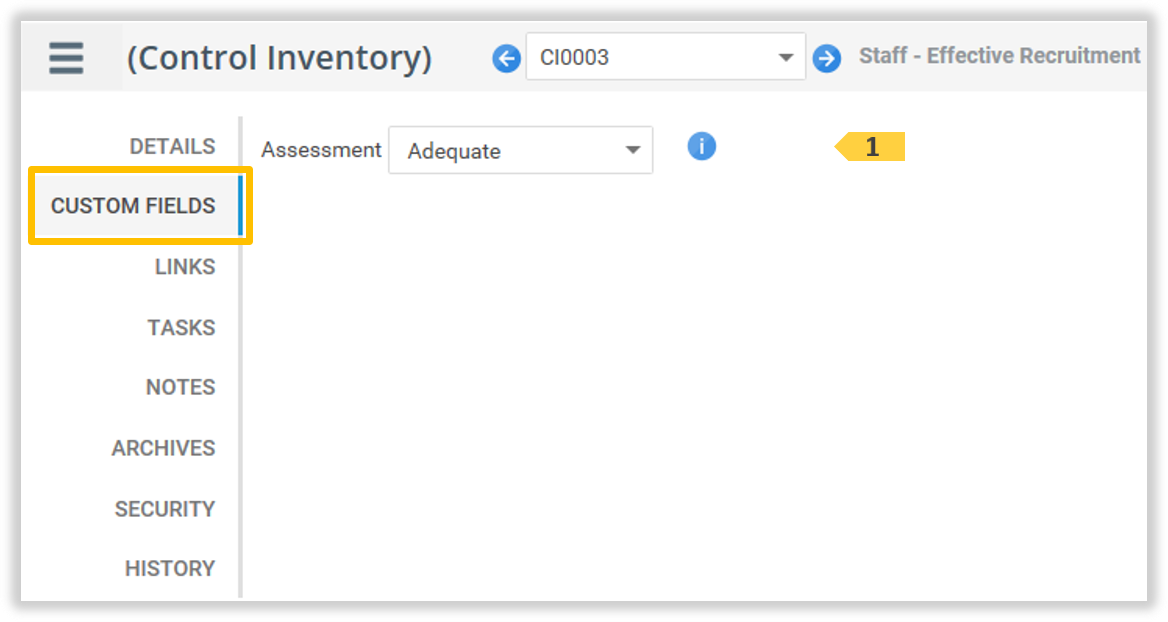
Update Custom Fields
The ‘Custom Fields’ tab is only displayed if Custom Fields have been configured by the Administrator. Custom Fields are your organisations required extra Control Inventory information extended from the Process Details tab. Custom can be uniquely configured for each Control Inventory type.
Click on a Control Inventory record in the list to open the The ‘Control Inventory’ page. Click the Custom Fields tab. Update the Custom fields that appear as required 1.
Hover over the Options Hamburger icon and then click the Save 1 icon to save the updates.
Click on a Control Inventory record in the list to open the The ‘Control Inventory’ page. Click the Security tab. Update the Security Group accesses as required 1.
Hover over the Options Hamburger icon and then click the Save 1 icon to save the updates.
Notes:
Positions in the ‘Administrators’ and ‘Control Inventory Adminstrators’ System Group are automatically assigned ‘Edit’ Rights.
Positions in the ‘Super Users’ Security group are automatically assigned ‘View’ Rights.
If a user is a member of multiple Security Groups with conflicting Security Rights, the higher level of access is granted.
 Click on any Control Inventory record