The Contracts Module is an optional module of the TriLine GRC system (See TriLine GRC and Contracts for more information).
If the Contracts menu does not appear and you require it, please contact TriLine GRC support to find how to add this module to your TriLine GRC system.
Accessing the Contracts page
From the Main Menu, select Contracts | Work with Contract records.
The Contracts Menu
Note: The Contracts Module must be licensed, and your Position must have the correct functional or Record rights security for this menu option to appear.
Click this icon to view basic information for working with the Contracts List page.
Click on any Contract record to see its details.
The Contract page
The Contract page contains all details pertaining to the Contract and a possible attachment, or link to the Contract Document itself.
Actions available from this page include
View and updating fields, links, notes and security,
Adding SLA records.
Attaching, linking the Contract Document.
creating notification and normal tasks.
Print previewing the Contract record.
Archiving the Contract record.
Deleting the Contract record.
The ‘Contract’ page
Contract page elements
ID
Element
Description
1
Contract Selector
Use this Selector to display the details for a different Contract without having to return to the Contract List. The Contract Title of the currently selected Contract is displayed.
2
Contract tabs
Click a tab to display that Contract information.
3
‘Save’ option
Click this icon to save any changes you make on the Contract Page.
4
‘New’ option
Click this icon to add a new Contract. The ‘New Contract’ window is displayed.
Click this icon to open the Preview Page to view, and then to optionally print this Contract’s details.
6
‘Delete’ option
Click this icon to flag this contract to be deleted in the configured deletion days. Note: Deleting a Contract also removes its history and related data. Consider making a Contract ‘Inactive’ (see the ‘Status’ field 2 on the ‘Details’ tab) instead.
7
‘Links’ option
Click this icon to view and update all records linked to this Contract.
8
‘Record History’ option
Click this icon to view all audit records associated with this Contract record.
Click this icon to select this Contract Record for archiving. Archiving a record takes a snapshot of the record and in no way effects the status of the Contract record.
10
‘View Archives’ option
Click this icon to view Archives (snapshots in time) of this Contract Record.
The Details tab
The Details tabs displays the main fields of the Contract, including the Renewal Term and Current End Date.
Details tab elements
ID
Element
Description
1
‘Contract Number’ field
Displays the unique number of this Contract record.
2
‘Record Status’ indicator
This field displays the Record Status of this Contract.
3
‘Title’ field
Displays the title of the Contract.
4
‘Description’ field
Displays the description of the Contract.
5
‘Description’ edit icon
Click this icon to open the Editing window of description field of the Contract.
6
‘Contract Type’ selector
Displays the Contract Type of the Contract.
7
‘Contract With’ selector
Displays the other parties the Contract is With. At least one Contract With must be selected.
8
‘Our Entity’ selector
Displays which of our Entities the contract is with.
9
‘Contract Owner’ selector
Displays the Position which is the Owner of the Contract record.
10
‘Material Contract’ checkbox
Indicates if this is a material contract.
11
‘Advised Date’ field
Displays Advised date of the Contract.
12
‘Renewal Term’ selector
Displays the Renewal Term of this contract.
13
‘For a further’ fields
This field only displays for Renewal Term ‘Automatic Rollover’. It displays how long the contract will rollover when the Current End Date is reached.
14
Renewal History icon
Click this icon to view all Renewal Task history. Note: This icon does not display if no history has been recorded yet.
15
‘Start Date’ field
Displays Starting date of the Contract.
16
‘Initial End Date’ field
Displays Initial Ending date of the Contract.
17
‘Notice Period’ fields
Displays the Notice Period of this Contract. Note: The system will send an alert (or a task 18), to the Contract Owner 9 if you set the Notice Period values. The sending of the alert (or task) is based on the Current End Date 20 minus the Notice Period 15minus the 1st Reminder 21 (less non business days). This facility removes the requirement to create an additional reminder task for this purpose if ‘Send Renewal Task’ 18 is checked..
18
‘Send Renewal Task’ checkbox
If this is unchecked, a notification is to be sent to the Contract Owner 9. If this is checked, a task is to be generated to the Contract Owner 9 to complete.
19
‘Execution Date’ field
Displays the Execution Date of the Contract.
20
‘Current End Date’ field
Displays the Current End date of the Contract. Note: Any change to this date will require a mandatory comment explaining the reason for this change.
21
‘Reminder 1st’ field
Displays the first reminder days. The ‘Reminder Date’ displays if a reminder is saved. See item 17 for more information.
22
‘Reminder 2nd’ field
Displays the second reminder days.
23
‘Reminder_Date_Calculation’_hint
Click or hover over this icon to display information on when a Renewal task or notification is sent. Also See item 17 for more information.
24
(Business Unit) field
Displays the Business Unit selected for this Contract.
Displays all Tags attached to the Contract to associate the Record with other Records of similar application. See Tags in the Glossary for more information.
Note: Labels shown in red are configurable and may be different on your system.
The SLA tab
The SLA tab allows adding and managing of Service Level Agreement’s (SLA) relating to the selected Contract.
Use the controls in the column headers to filter the Records. Perform advanced filtering of the List to find particular Records.
4
Tasks list
Displays the Tasks associated with the current Contract. Click a Task in the list to open the Task for editing. ‘Active’ Tasks are shown by default.
5
‘Show Advanced Filter’ icon
Click this icon to perform advanced Risk Record filtering using the Filter Builder.
6
‘Delete’ icon
Click this icon to delete the associated Task Record. A ‘Confirm Delete’ dialog is displayed.
7
‘Transfer Task’ icon
Click this icon to transfer the associated Task to another Contract Record.
8
‘Copy Task’ icon
Click this icon to make a copy of the selected Task. The ‘Copy Task’ window is displayed—this window has the same layout and functionality as the ‘New Task’ window.
9
‘View Task History’ icon
Click this icon to view the History for the related Contract Task. Note: This icon is only displayed if an iteration of the related Task has been previously completed.
10
‘Hide/Show Columns’ icon
Click this icon to hide or show Task List columns using the Field Chooser.
11
Add ‘New Task’ icon
Click this icon to add a new Task for the current Contract. The ‘New Task’ window is displayed (see Adding a Contract Task).
12
‘Show Advanced Filter’ icon
Click this icon to find particular Task Records using the Filter Builder.
The Notes tab allows adding and managing of Notes relating to the selected Contract.
Notes can be added by the user or automatically by the system when the user changes the Contract Type.
The ‘Notes’ tab
Notes tab elements
ID
Element
Description
1
‘Add Note’ icon
Click this icon to add a new Note. The ‘Add Note’ window is displayed.
Use the controls in the column headers to filter the Records. Perform advanced filtering of the List 4 to find particular Records.
4
Notes list
Displays the list of Notes for this Contract.
5
Notes recorder
Displays the recorder of this Note record.
6
‘Edit’ icon
Click this icon to edit this Note. The ‘Edit Note’ window is displayed.
7
‘Delete’ icon
Click this icon to delete this Note from this Contract.
The ‘Documents’ tab
The Contract Document(s) and be attached or linked to from this tab.
The Document Type can be edit in-grid and changed to different Document Type.
The ‘Documents’ tab
The ‘Documents’ tab elements
1 Document Type
Select the Document Type of the document to be attached.
2 Document path
Click Browse and then select the document to be attached. The document name will appear in this field.
3 Attach
Click ‘Attach’ to add the document selected in 2 to appear in attached documents list 7.
4 Link to Contract Document
When this icon is blue, click this icon to link to your internet stored Contract Document. A blue icon indicates this link is active, otherwise it is indicated by its default unenabled gray colour.
5 Edit Link
Click this icon to edit the link to your internet stored Contract Document. This link is not display in the attached documents list 7.
Use the controls in the Column Headers to filter the Records in the Documents attachment 7 List.
7 Documents attachment List
Displays the Documents currently associated with this Contract.
8 Delete attachment icon
Delete the attachment associated with the this Contract.
9 Open attachment icon
Open the attached Document associated with this Contract.
10 Save Changes button
After in-grid editing of a Contract Document Type, use this button to Save these changes.
11 Cancel Changes button
After in-grid editing of a Contract Document Type, use this button to Cancel these changes.
The Custom Fields tab
The ‘Custom Fields’ tab is only displayed if Custom Fields have been created for this Contract’s Contract Type (see Contracts Custom Fields).
Custom Fields displayed on this tab will vary the Contract Type of this Contract.
The ‘Custom Fields’ tab
Custom Fields tab elements
ID
Element
Description
1
Custom fields
Displays all fields specifically for this Contract’s Contract Type.
2
Information icon
Click the icon next to a Custom Field to view information about how to complete that field.
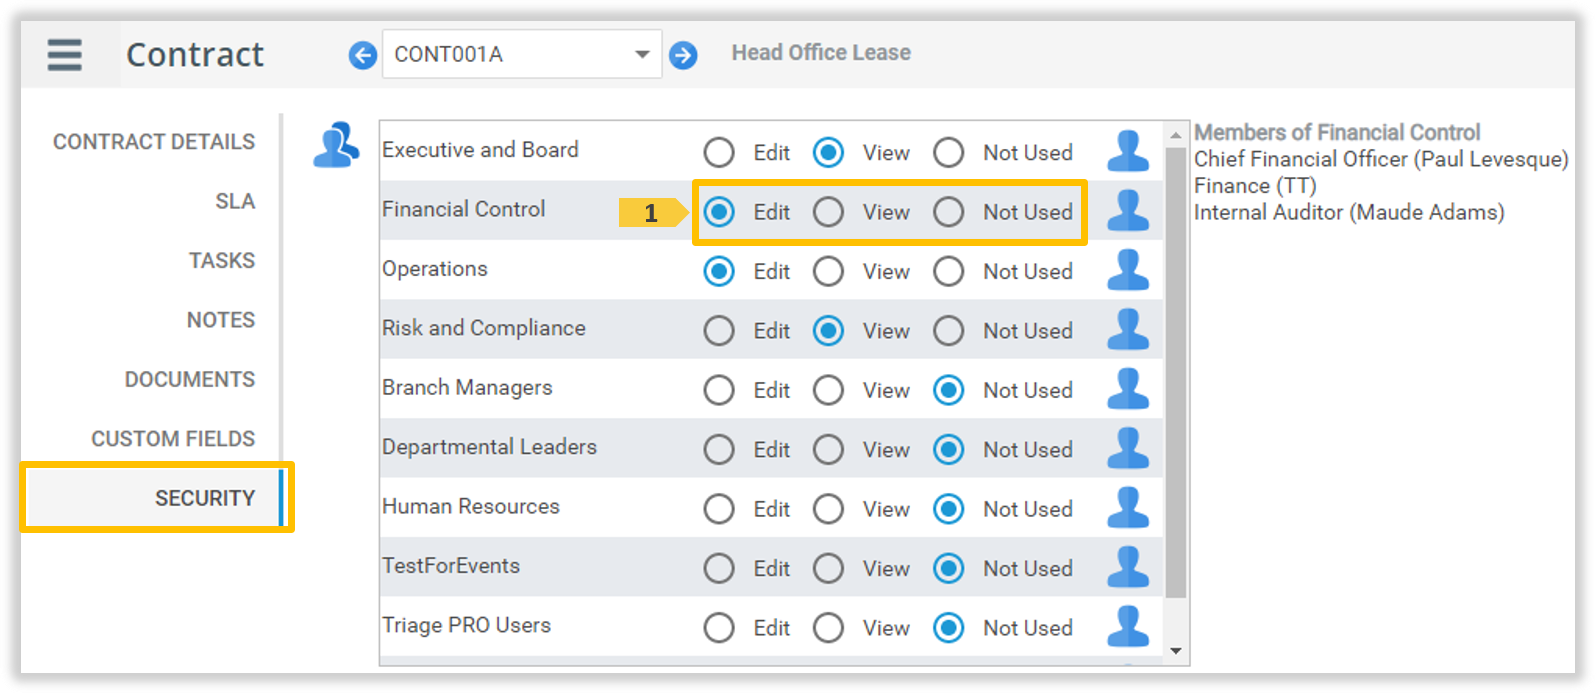
The ‘Security’ tab
The Security tabs displays the Security access to this Contract record. The Security tab is used to update the security access of each Security Group to this Contract record. Edit access means Positions in this Security Group can update all values in this Contract record. View access means Positions in this Security Group can see, but not update, all values in this Contract record. Not Used access means Positions in this Security Group cannot see this Contract record.
Select a Record Security Rights level for the Security Group. Note: The Security Group containing the Contract Owner must be given ‘Edit’ Rights to the Contract Record.
4
Security Group Membership icon
Click this icon to display the related Security Group Membership List (see item 5 below).
5
Security_Group_Membership_List
This list is displayed when you click the Security Group Membership icon (see item 4 above) for a Security Group. This function is useful if you need to confirm which Security Group a Position is a member of before assigning Record Security Rights to that group.
6
‘Security Access Summary’ icon
Click this icon to display all Positions that have access to this record, the type of access, and from which Security Group this access was granted from (including Task Teams).
Notes:
Positions in the ‘Administrators’ and ‘Administrators - Contracts’ Security Group are automatically assigned ‘Edit’ Rights to all Contract records.
Positions in the ‘Super Users’ Security group are automatically assigned ‘View’ Rights to all Contract records.
If a user is a member of multiple Security Groups with conflicting Security Rights, the higher level of access is granted on each record on a record by record case.
The ‘Links’ window
The Links Window displays the module records that are linked to this Contract.
The ‘Links’ window
The ‘Links’ window elements
ID
Element
Description
1
Module tabs
Click the appropriate tab to view, and if you have Edit access security, create and remove links to that Module’s Records. The tabs displayed are dependent on the modules your site has Licenced.
2
Record Selector field
Each of the Module tabs 1 has a Record Selector field. Click the Record Selector dropdown to view a list of available records that you can link to this Contract record. Select the record you wish to link then click the Add Link icon 3. Note: The drop-down list only displays Records to which you have security access.
3
‘Add Link’ icon
Once you have selected a Record 2, click the ‘Add Link’ icon to create a link from that record to the Contract record. The linked Record is displayed in the Linked Record List 7.
Use the controls in the column headers to filter the Records.
7
Linked Record List
This list displays all linked Records of the currently selected Module Record Type 1. Click a Record in this list to open the Record in its own page for viewing or editing depending on your Security access.
8
‘Remove Link’ icon
Each Record in the list has its own ‘Remove Link’ icon that will display for Edit access security. Click this icon to remove the link to the Record. A Confirm Delete dialog is displayed. Once you confirm the link’s removal, the Record is no longer displayed in the Linked Record List 7. Note: The record link will also be removed from the Links Module tab of the corresponding record.
9
‘Close’ button
Click this button to close the Links window.
The ‘Archives’ window
The Archives window contains a the Archive of this Contract and the dates when this Contract has been archived.
An Archive record is a snap shot of the Contract record at the time the Archive was taken. There is no limit to number of Archive snap shots that can be taken. Taking a Archive snap shot has no effect on the Contract status or Contract record whatsoever.
Archiving can occur from either the Contract List or the Contract record.
Use the controls in the column headers to filter the Records. Perform advanced filtering of the List to find particular Records.
4
Archive List
Displays the Archives associated with the current Contract. Click an Archive in the list to open and view the Archive details. Note: You cannot edit Archive Records.
The ‘History’ window
Use this window to view all changes to this Contract record and its task record(s) within the audit days period.
Procedures
Contracts
Access the Contracts page
From the Main Menu, select Contracts | Work with Contract records.
The Contracts Menu
Note: The Contracts Module must be licensed, and your Position must have the correct functional or Record rights security for this menu option to appear.
Hover over, or click the Menu Options icon, then click the ‘ New Contract’ 1 option.
Or, from the ‘Contracts’ list page, click on a Contract record in the list to open the ‘Contract’ page. Hover over, or click the Menu Options icon, then click the ‘ New Contract’ 1 option.
The ‘New Contract’ window opens. Complete the Contract details in the window (see New Contract window elements for details on each field).
Click the Save 23 icon to complete adding the new Contract record. The Contract page will display with this new record. Clicking the cancel 24 icon will close the ‘New Contract’ window without saving the record.
‘New Contract’ window elements
‘New Contract’ window elements
ID
Element
Description
1
‘Show Page Help’ icon
If shown, click this icon for information on creating a Contract record.
2
‘Number’ field
Enter a unique number for this Contract record.
3
‘Title’ field
Enter the title of this Contract.
4
‘Description’ field
Enter the description of this Contract.
5
‘Contract Type’ selector
Select the Contract Type of this Contract.
6
‘Contract With’ selector
Select the other party the Contract is With.
7
Add Contract With icon
If the Contract With is not in the Contract With selector 6, click this icon to add a new Contract With. Once added, this new Contract With can be now be selected.
8
‘Our Entity’ selector
Select which of our Entities the contract is with.
9
‘Contract Owner’ selector
Select the Position which is the Owner of the Contract record. This Position will receive a notification (or task 18) when the contract is due for renewal.
10
‘Material Contract’ checkbox
Select if this is a material contract.
11
‘Advised Date’ field
Enter or Select the Advised date of this Contract.
12
‘Business Unit’ selector
Select the Business Unit for this Contract.
13
‘Renewal Term’ selector
Select the Renewal Term of this contract.
14
‘Start Date’ field
Enter or select the Starting date of this Contract.
15
‘Execution Date’ field
Enter or select the Execution Date of the Contract.
16
‘Initial End Date’ field
Enter or select the Initial Ending date of the Contract.
17
‘Notice Period’ fields
Enter the Notice Period of this Contract. Note: The system will send an alert or a task, to the Contract Owner 9 if you set the Notice Period value above zero.
18
‘Send_Renewal_Task’_checkbox
Select this if a Renewal task is required, or un-select for just a notification, to be sent to the Contract Owner 9.
19
‘Reminder 1st’ field
Enter the first reminder days. This is the number of days before the first notification date.
20
‘Reminder 2st’ field
Enter the second reminder days. This is the number of days before the first notification date.
Click this icon to display the Positions contained in this Security Group.
23
‘Save’ icon
Click this icon to save this new Contract record.
24
‘Cancel’ icon
Click this icon to Close the ‘New Contract’ window without saving.
Set First Renewal Reminder
A reminder notification or a task will be sent to the ‘Contract Owner’ when a contract is nearing its ‘Initial End Date’ ( which will also be the ‘Current End Date’ on this first cycle). Select ‘Send Renewal Task’ 18 for a task to be generated to the Contract Owner. If another Position is required to do the renewal processing, leave this field unchecked and create a regular Contract Task to that other position.
The renewal notification/ task precedes the ‘Notice Period’17. The Date the Notice Period commences is the Due Date of the Renewal task. The reminder notification/task is sent on the first reminder 19 days before the Due Date.
First Renewal Reminder
The Reminder Date is calculated as follows:
Due Date = Initial End Date - Notice Period
Reminder Date = Due Date - First Reminder Days
Note: If a date is a holiday or weekend, the previous working day is used.
Note: *The Initial End Date will also be the Current End Date in this first cycle.
Click on a Contract record in the list. The ‘Contract’ page1 is displayed. Click each tab 2 to view the details of that tab. Update the Detail, Custom or Security values as required if you have Edit assess.
Hover over, or click the Menu Options icon, then click the Save 1 option.
Update Contract Type
Updating the Contract Type can effect Custom Fields. Make sure step 7 is completed (if required).
Click on the Contract record to display its details. The ‘Contract’ page is displayed with that record.
Click the Contract Type 1 field. The Contract Type list displays. Click the new Contract Type 2 in the list.
The ‘Change Contract Type Request’ window displays. Read the information 1 about the affect of this change. Click the ‘Continue’ 2 button to make this change. (Click ‘Cancel’ 3 to exit.
The new Contract Type is displayed.
Click the Notes tab. Observe the new Note recording this Contract Type change.
Click the Customs Fields tab. Update all mandatory * marked fields, and any other fields as required.
Update Renewal Reminder
A reminder notification or a task will be sent to the ‘Contract Owner’ when a contract is nearing its ‘Current End Date’ 20. Select ‘Send Renewal Task’ 18 for a task to be generated to the Contract Owner. If another Position is required to do the renewal processing, leave this field unchecked and create a regular Contract Task to that other position.
The renewal notification/ task precedes the ‘Notice Period’17. The Date the Notice Period commences is the Due Date of the Renewal task. The reminder notification/task is sent on the first reminder 21 days before the Due Date (‘Reminder Date’ shows this Date (after Save)).
Renewal Reminder
As shown by the Information icon, the Reminder Date is calculated as follows:
Due Date = Initial End Date - Notice Period
Reminder Date = Due Date - First Reminder Days
Note: If a date is a holiday or weekend, the previous working day is used.
In the Contracts list, click the filter 1 icon of the ‘Status’ column. Select ‘Terminated’ 2 and un-select other statuses. Click OK 3 to display all Terminated Contracts.
Click on a Contract record in the list. The ‘Contract’ page is displayed. Edit the ‘Current End Date’ 1 and change it to a date in the future from (your) today.
The ‘Reason’ field will appear. Click in the Reason field and type the reason for the re-activating of the Contract.
Hover over, or click the Menu Options icon, then click the Save 1 option.
The Record Status will change to from Terminated to Current.
Click on the Contract record to display its details. The ‘Contract’ page is displayed with that record.
Hover over, or click the Menu Options icon, then click the Print Preview 1 option.
A Preview Page opens showing a Report for this Contract. Navigate, search, print and/or save the Report using the Preview Page Toolbar.
Click the Preview Page’s ‘Close’ icon 2 when done.
Delete a Contract record
Notes:
Only Positions allocated to a Security Group that has been assigned ‘Edit’ Record Security Rights can delete a Contract Record.
Deleting a Contract also deletes the associated Archives and History. This may have auditing implications. Consider changing the Status to Inactive (see Change the Status of a Record).
Click on the Contract record to display its details. The ‘Contract’ page is displayed with that record.
Hover over, or click the Menu Options icon, then click the Delete 1 option.
The ‘Delete’ icon
The ‘Confirm’ delete window appears. Click OK to delete, or click Cancel.
Note:
The Contract is not immediately deleted, instead the record’s status is changed to ‘To Be Deleted’. The Record will be really deleted after the number of days set in the ‘Deletion Days’ field of the Configuration Page. In the mean time, the record can still be view by changing the Status filter. The record can then be recovered (undeleted) by editing and changing the Current End Date to a future date, and saving. The record status is changed to ‘Active’.
Undelete a Contract record
The Contract record is not deleted immediately, but rather it’s status is changed to ‘To Be Deleted’ for a limited time determined by your configuration settings. Hence the record can still be view and the record can also be recovered from this to be deleted status.
The Record will be really deleted on its scheduled date by the overnight Monitor and cannot be recovered/undeleted after this time.
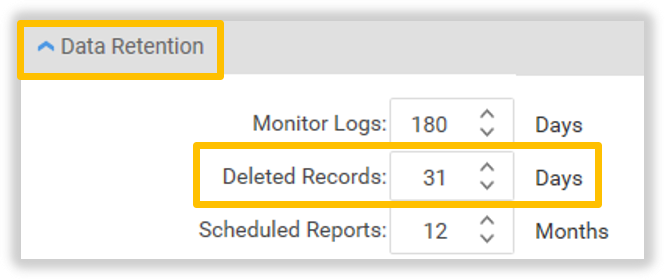
The number of days delay, until the deletion of a record is permanent, is configured by the Administrator on the General Configuration tab. For example, this setting is 31 days:
Click the Status Filter 1 icon. (If these records exist) Select To Be Deleted2 (and unselect the other Statuses). Click OK 3.
The ‘Status’ filter
‘To Be Deleted’ records will be displayed in the list (if they exist). Click the record of interest to open its Details page.
The ‘To Be Deleted’ records list
The Record displays with it’s real deletion date 1.
The ‘To Be Deleted’ record
Edit the ‘Current End Date’ 1 and change the date. The ‘Reason’ 2 field will appear. Click in the Reason 2 field and type the reason for the re-activating of the Contract.
Change the record Status
Hover over, or click the Options (Hamburger) icon and then click the Save 1 icon.
Change the record Status
The record will be Undeleted.
Manage SLA
The SLA tab allows adding and managing of Service Level Agreement’s (SLA) relating to the selected Contract.
Click on the Contract record to display its details. The ‘Contract’ page is displayed with that record.
Click the Notes tab. The Notes tab is displayed.
All positions that can view a Contract record can add notes to the record. However only position’s with ‘Edit’ access to a Contract record can edit notes on that record.
Add a Note
Click the Add Note icon.
The ‘Add Note’ icon
Enter the Note text in the edit area 1, and click the Save 2 icon to save this note.
The ‘Add Note’ window
Or, click the Cancel 3 icon to stop adding the Note.
Edit a Note
Click the Edit Note icon on the Note to update.
The ‘Edit Note’ icon
Update the Note text in the edit area 1, click the Save 2 icon to save these changes.
The ‘Edit Note’ window
Or, click the Cancel 3 icon to stop updating the Note.
Delete a Note
Click the Delete Note icon on the Note to delete.
The ‘Delete Note’ icon
The ‘Confirm’ window appears. Click OK to delete, or click Cancel.
Manage Contract Documents
The ‘Documents’ tab can be use to:
Link to, or attach additional Documents, to this Contract.
Review documents already attached to this Contract,
Change the Document Type if required.
Note: Each Attachment has a file size restriction. Use ‘Link to Contract Document’ for very large files.
Click on the Contract record to display its details. The ‘Contract’ page is displayed with that record.
Click the Documents tab. The Documents tab is displayed.
Attaching Contract Documents
Select the Document Type 1 to be attached. This is a mandatory field.
Click the Browse button 2.
From the Browse window, find and select the document that is to be attached to this Contract record. The Document will appear in 3 and the Attach button 4 will become enabled.
Click the Attach button 4.
After the loading process, the newly attached document 5 will appear in the Document list.
Viewing a Contract Document
Click the ‘Open the Attachment’ 1 icon on the document to be viewed.
The document will either open immediately, or it will download and wait for you to choose to open it (see the bottom area of your browser to see the options).
Deleting a Contract Document
Click the ‘Delete’ 1 icon on the document to removed from this contract record.
The ‘Confirm’ window appears. Click OK to delete, or click Cancel.
Link to Contract Document
Use this feature to link to an External Contract Document. This link must be accessible to TriLine GRC servers.
Click the ‘Edit external link to Contract document’ 1 icon.
Enter, or change, the ‘External Link to Contract’ 1 field. Then click the Save icon 2. (Or click the Cancel icon 3 to exit).
The ‘Link to Contract Document’ 1 icon will now be enable. Click the link to view the document. (If the document does not start to open after a few seconds, it is an indication that the link is not accessible to the TriLine GRC servers.)
Change Contract Document Type
Contract Document Type changes are made in the grid and saved.
Click the Document Type 1 field to select it. Click the Document Type 1 field a second time to open the field selector. If you have clicked correctly it will look like this image.
Click the list selector 1 icon to display the selection list. Click the replacement Document Type 2.
Click the ‘Save Changes’ 1 button to save this change.
The updated Document Type 1 is displayed.
Update Custom Fields
The ‘Custom Fields’ tab is only displayed if Custom Fields have been configured by the Administrator. Custom Fields are your organisations required extra Contract information extended from the Details tab.
Click on the Contract record to display its details. The ‘Contract’ page is displayed with that record.
Hover over, or click the Menu Options icon, then click the Links 1 option.
Click on a module tab to view that modules record’s that are linked to this contract.
Add a new Link
Click the Links field 1.
Click on the record 2 to be linked.
This record will appear in the Links field 3. Click the Link 4 icon to link the record.
The Linked record will appear in the linked list.
Delete a Link
Click the Delete Link icon of the record to be delinked.
The ‘Confirm’ window appears. Click OK to delinked, or click Cancel.
Archive Contract records
The Archives window contains a the Archive of this Contract and the dates when this Contract has been archived.
An Archive record is a snap shot of the Contract record at the time the Archive was taken. There is no limit to number of Archive snap shots that can be taken. Taking a Archive snap shot has no effect on the Contract status or Contract record whatsoever.
A Contract record can be Archived either from the Contracts list page or the Contract page. Archiving of multiple records can be done from the Contracts list page.
Click on the Contract record to display its details. The ‘Contract’ page is displayed with that record.
Hover over, or click the Menu Options icon, then click the ‘View Archives’ 1 option.
The ‘Archives’ window appears. Click the intended Archive 1 record.
The ‘Archived record’ window appears. Click each tab 1 to view that content. To Export, hover over, or click the Export 2 icon. Click the required Export 3 option.