Contract With - The third party Organisation(s) this Contract is with.
Contacts - Persons to complete the Attestation on behalf of a Contract With of this Contract.
Attestation - Form required to be completed by Contract With organisation.
Organisations may have a requirement for third parties (, the Contract With of a Contract,) to provide regular Attestations to meet internal requirements, or Standards (international and regional), and regulatory or other requirements.
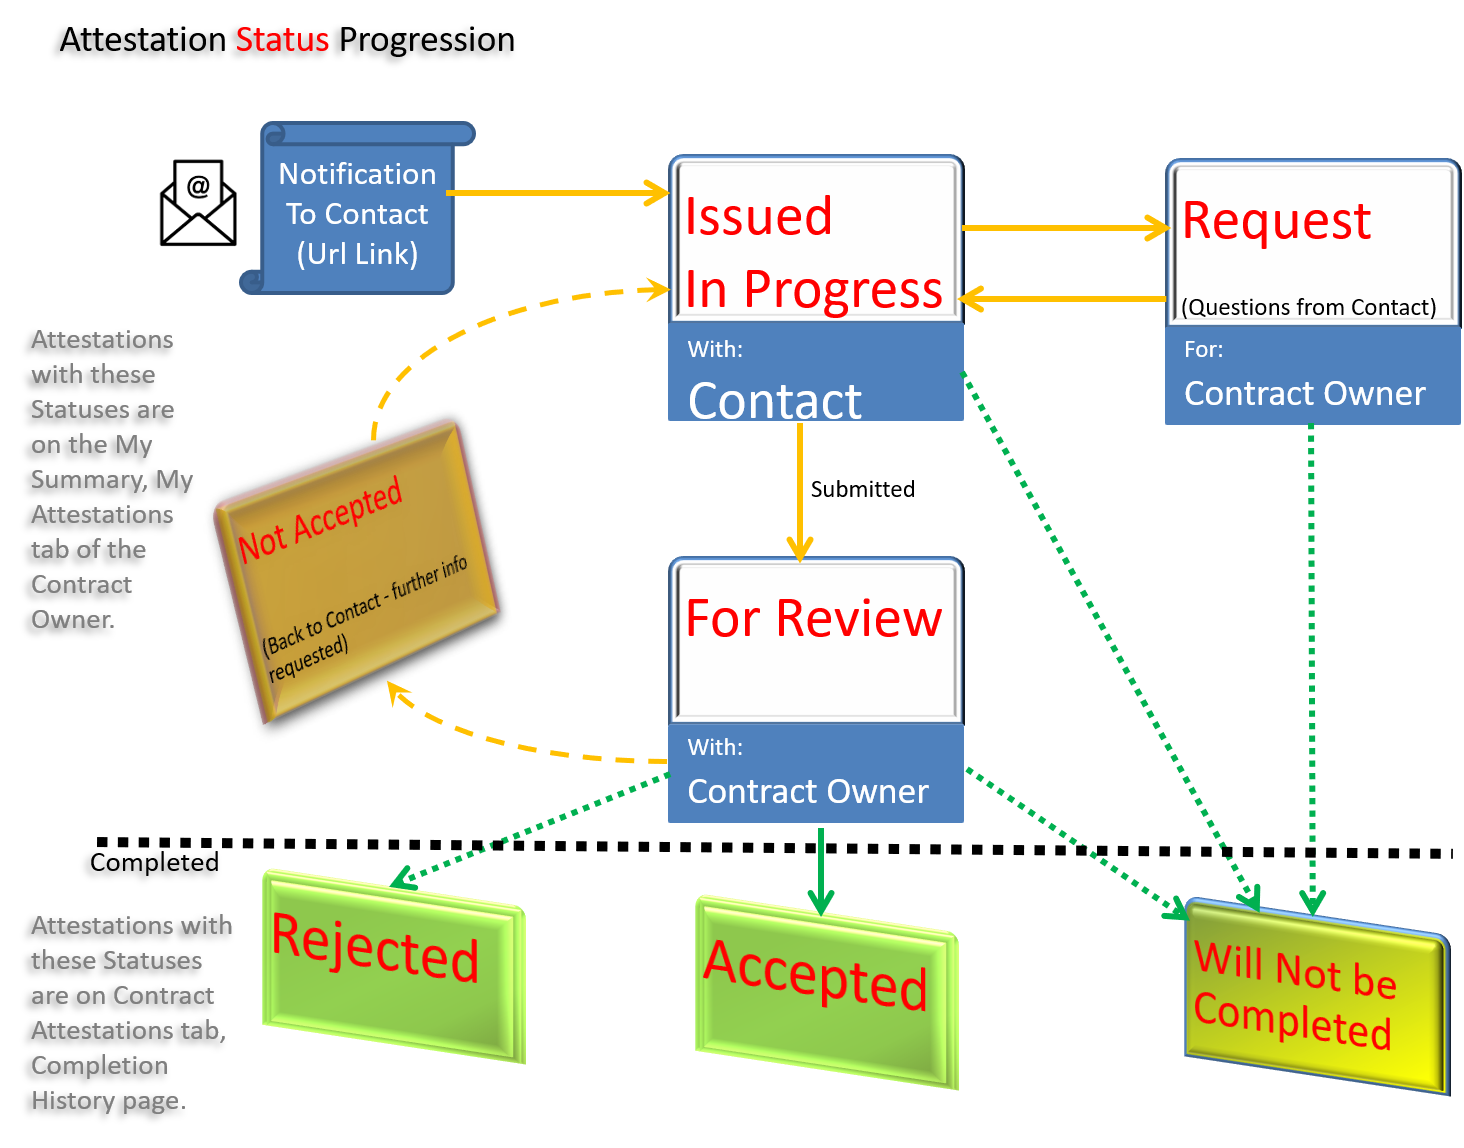
The third party Contract Attestations facility is an extension to the TriLine GRC Contracts module. The Contract Attestation functionality is similar to Contract Tasks in that they can be schedule like a task, but instead of task being sent to Position to complete, an web page Attestation Form is sent to the selected Contact(s) of the Contract With(s) to complete. This web page Attestation Form provides a facility for this Contact to ask questions, and for the Contract Owner to Respond. When a Contact submits a Completed Attestation, the Contract Owner can accept the Attestation as completed, or can choose to ‘not accept’ the Attestation and send it back to the Contact with a request for further completion details. The Contract Owner can also chose to complete the Attestation with a ‘Rejected’ or ‘Will not be Completed’ status.
Each Attestation will contain a Form comprised of informational fields, and required entry fields that need to be completed by each selected Contact of the ‘Contract With’ of a Contract, to satisfy the Attestation. The Form field types are similar to those available for a TriLine GRC Register. A new version of a Attestation Form can be built from the prior version. Each Attestation Version can be used in multiple Contracts. All Attestations sent to Contacts are kept with the Contract as History records and cannot be deleted. New Attestation Form version can be easily applied to all schedules using an older version.
For information on how to create and maintain The Attestation Type and each Attestation Form Version see Attestation Types.
The Contract Attestations facility:
allows your organisation to create multiple Versions of the Attestation forms.
Schedule Attestations cyclically or Adhoc, to the Contacts of the ‘Contracts With’ of each Contract.
Sends, via email notification to the Contact, a link to a web page to complete the required Attestation Form. This secure web page provides no reference to the URL of your Organisation TriLine GRC site. (A valid email for the Contact is required. A valid mobile number for the Contact is required if SMS 2 factor authentication is required.)
The Attestation Form does not need to be completed in one session by the Contact. The Form’s data entry progress can be saved by the Contact to allow them to come back later and continue completing the Form. The Contact decides when to submit the Form, but the Contract Owner decides whether to accept the Form, or to return the Form with a request for more data.
The Contact can request further information to aid completing the Form. This request notification goes to the Contact Owner. The Contract Owner can respond to these request via the Attestation history window on the My Summary Attestation, or via the Attestation tab on the Contract. The Contact is notified via email of these Responses.
When the Form is completed and submitted for ‘Review’ by the Contact, the Contract Owner can ‘Accept’, ‘Not Accept’, or ‘Reject’ the Form. ‘Not Accepted’ Forms go back to Contact to complete again with the requirements of the Contract Owner to complete this Form successfully. ‘Accepted’ and ‘Rejected’ are completion
To ensure integrity of the Contact submitted data, only the Contact will ever not be allowed to update the Form, up to the point they submitted it. Once submitted, the Form contents are locked. However, if the Form is ‘Not Accepted’ and ‘sent back’ to the Contact, the Contact will again be allow to update the Form, until such time as they re-submit the Form.
Access to completed Attestation Forms in TriLine GRC is be controlled by the individual Security settings of each Contract record the Attestations were generated from. Completed Forms can be viewed via the History icon on each Attestation, or via the Completed Attestation report.
What to check before adding an Attestation
First check the Attestation Type configuration:
The Attestation Type you want to use has Status ‘Active’
The Attestation Type you want to use has the Contract Type selected matching the Contract Type of this Contract Record. (This is not required if no Contract Types have be selected, as the default is all selected.)
The form layout and fields are completed in Version of the Attestation Form you want to use.
The Status of the Version of the Attestation Form you want to use has Status ‘Active’
Each Email subject and body message is configure correctly for this Attestation Type.
You know which Version of the Attestation Form you want to use.
Second check the Contacts who you want to receive the Attestation
The Contacts of the Contract With(s) of the Contract to send the Attestation, must all have an email address recorded on their Contact record (item 6), otherwise they will not appear as a selectable person for this Attestation. If SMS 2 factor authentication is also to be used, the Contact’s mobile number must be recorded (item 7).
About Attestations
An Attestation is made of these main elements:
the Attestation Type and Form Version,
the reason why this Attestation is required,
the schedule, including the frequency (adhoc or cyclic), Reminder Days and Due Date,
the Actioned By list - the Contacts who complete the Attestation Form.
When the Attestation notification is sent on the First Reminder date:
each Contact will receive a notification requesting completion of the Attestation by a specific date. This notification will contain the URL link to the Attestation Form.
after clicking on the link, each Contact can fill in the Form on a saved progressive basis till it is completed.
the Contact may communicate to the Contract Owner via the Form. The Contract Owner will receive notifications when this happens, and can then communicate back to the Contact via the My Summary Attestation page, History icon.
this Attestation may have the following Status flows with the Completion status of ‘Accept’, ‘Rejected’ or ‘Will Not be Completed’ as the end points.
The Attestation ‘Status’ flow
The ‘Will Not be Completed’ status for an Attestation means the Contract Owner has decided that the Attestation is no longer required to be completed by this Contact. The Contact will be notified that the Attestation is no-longer required and will no-longer have access to the Form via the prior provide URL. The Attestation Form will still be kept as a History record and may not be deleted.
New Attestation Notifications to Contact
A new Attestation notification is sent on the Reminder Day date to each Actioned By (Contact). If the task has a second reminder, a notification is also sent on this date. If the Attestation is not completed by the Due Date, a notification is sent on this date to remind the Contact the Attestation is requested to be completed by today.
Elements of an Attestation
Adding or Editing a Attestation reveals three tabs,
The Details tab contains the Attestation Type, it Status, and the Reason for this Attestation.
The Attestation Task ‘Details’ tab
The Details tab elements
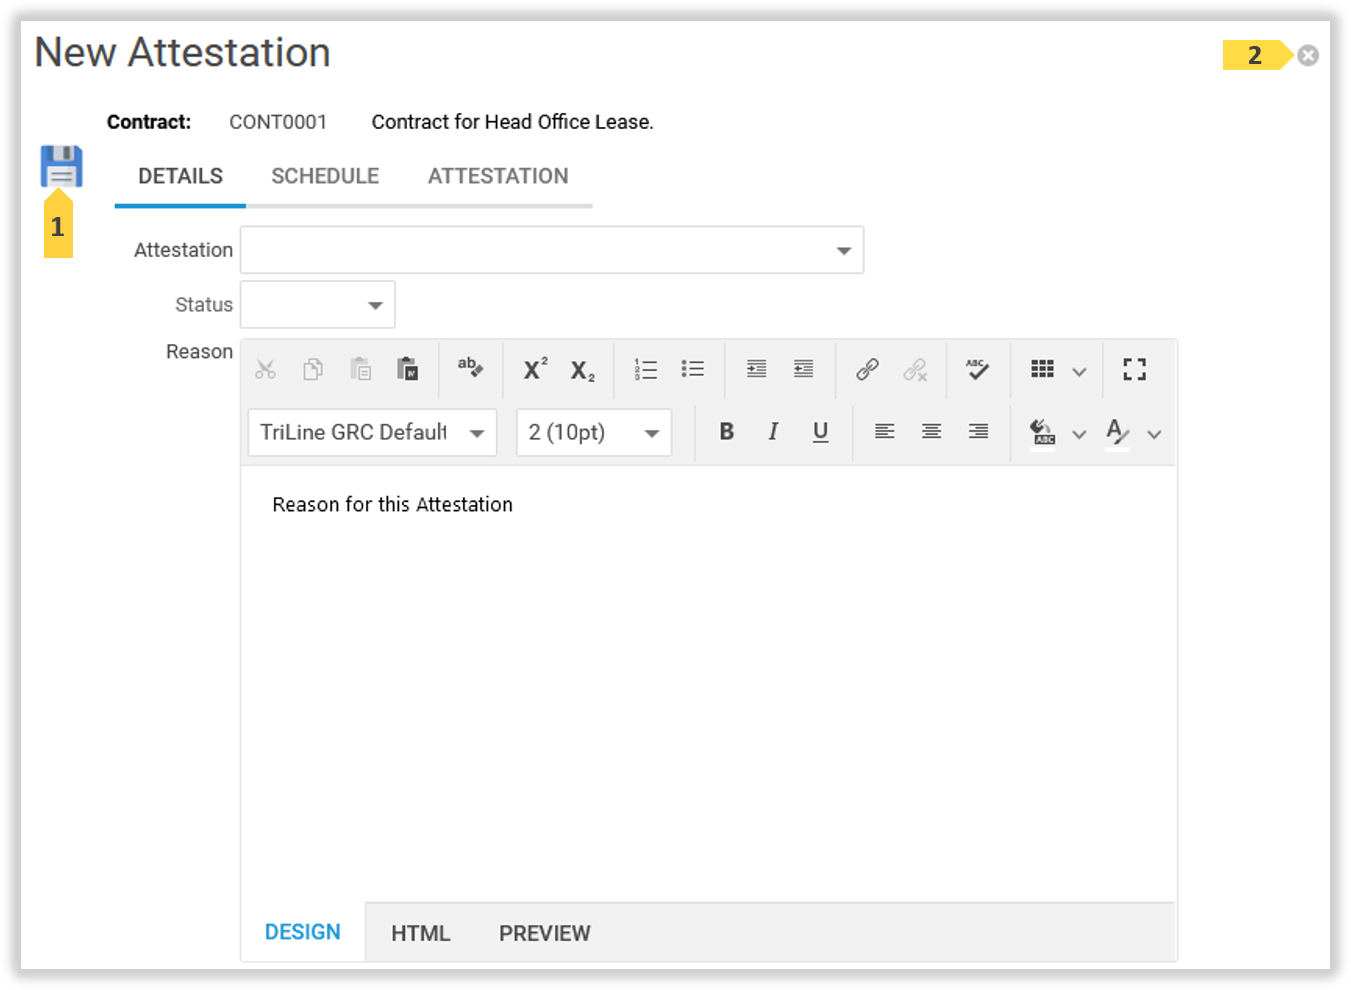
1 Contract number and Title
The Contract of this Attestation.
2 Save icon
After entering all required information on the Details and Schedule tabs, click this icon to save all updates.
3 Cancel icon
Click this icon to cancel adding, or updating this Attestation.
4 ‘Attestation’ selector field
Click this field to show all Attestation Types and their Versions available to be selected for this Contract Attestation. Click to select an Attestation. Then click the ‘Attestation’ Tab to preview that Attestation Form. Note: The Edit Attestation will only show the Versions available for the Attestation Type, as this Attestation Type cannot be changed once saved.
5 ‘Status’ selector field
Click this field to select the Status of this schedule. An Active status will be generated notifications on the 1st reminder date for each Actioned By (Contact). An Inactive status will roll over cyclic schedules on the Due Date and no notifications will be sent to the Contacts. Note: This is the schedule Status and not the status of an Attestation with a Contact as shown above in About Attestations.
6 An Attachment is mandatory for Attestation Task Completion indicator.
This label will ONLY appear if the selected Attestation 4 Type is configured to require the ‘Actioned By’ Contacts to upload an attachment in order to complete their Attestation.
7 ‘Reason’ field
Use the Text Editor to detail the Reason why this Attestation is required to be complete by each Contact on behalf of the Contract With organisation.
The Schedule tab
The Schedule tab contains the schedule, including the frequency, and the ‘Actioned By’ Contacts.
Note: The ‘Actioned By’ Contacts can only be selected from the ‘Contacts’ of the ‘Contract With(s)’ of this Contract. The Contacts must have an email address (and a mobile number if SMS 2 factor authorisation is being used) to appear in this list.
The ‘Schedule’ tab
The Schedule tab elements
8 ‘Date Calculation’ selection - ‘Specific Date or Last working day’ selected.
Note: Date Calculation only available when Frequency Monthly (10 above) is selected.
First enter a ‘Next Due’ Date for the schedule to start. Then, if required, select the ‘Last working day of the period’ option. This will update the ‘Next Due’ date, for that month, after the Save 2 icon is clicked, and then on each subsequent schedule rollover.
.
9 Date Calculation selection - ‘Specific day of week’ selected.
First enter a ‘Next Due’ Date for the schedule to start. Then, select the Week and the Day for the schedule to run on. Clicking Save will adjust ‘Next Due’ date to match the selected Week and Day.
.
10 Frequency selection
Use these fields to set how often the Task should be performed (e.g. every 3 months). The Interval options available are either Monthly or Adhoc. This allows a regular schedule with the ‘Monthly’ selection, or a one to off, to a as required manual schedule with the ‘Adhoc’ selection.
Adhoc: The task is scheduled manually. Next Due must be manually changed each time a task is required after the prior Next Due date. Frequency is ignored when Adhoc is selected, so leave this as zero.
Monthly: Type or select the number of months the Task is to be scheduled, e.g. ‘3’ for quarterly, ‘12’ for annual.
Note: Selecting Adhoc will remove the Date Calculation selections as shown below.
.
11 Next Due date selector
Use the ‘Next Due’ selector to set the date on which the Attestation must first be completed.
‘Scheduled’ date field
After saving the schedule, a bracketed ‘Scheduled’ date is then displayed to the right of the ‘Next Due’ field. This field displays the actual date that the next Attestation will be due. Quite often, the ‘Next Due’ and ‘Scheduled’ dates will be the same, but when the ‘Next Due’ date falls on a non-business day (e.g. weekend or public holiday) the ‘Scheduled’ date is set to the preceding business day; making the Attestation due slightly earlier.
Tip: If you leave the ‘Next Due’ field blank, the record will be created, but a Task will never be generated. This can be useful if your organisation is not yet ready to start the Task and wants to specify the ‘Next Due’ date at a later time.
12 Last working day of the period selector
Select this checkbox to override the Next Due date to always be the last day of that month.
13 ‘Reminder 1st’ field
Is the number of days before the Attestation ‘Next Due’ date that the Attestation notification will be generated and sent to each ‘Actioned By’ Contact. If the day the Attestation notification is be sent on falls on a non-business day, the Attestation notification will instead be sent on the first prior business day. This is the day the notification will go to each ‘Actioned By’ Contact. The notification email will contain the Attestation Form URL link, and when it is requested to be completed by Due date.
(Reminder Date) field
After saving the schedule, a (Reminder Date) is then displayed to the right of the ‘Reminder 1st’ field. This field displays the actual date (business day) that the next notification will be sent.
.
14 ‘Reminder 2nd’ field
For Attestation’s with a long lead time (i.e. 1st Reminder is set to a high number of days), set a lower number of days in the ‘2nd Reminder’ field so that an additional email notification is sent to each Contact ‘Actioned By’ before the due date. The same non-working day principle as 1st Reminder applies to this 2nd Reminder.
Tip: Set this field to zero if you don’t want a 2nd Reminder sent for this Task.
15 Actioned By
The list of Contacts that will be sent a notification containing the URL link to complete this Attestation. This will be sent for on the 1st Reminder date.
The ‘Actioned By’ Contacts can only be selected from the ‘Contacts’ of the ‘Contract With(s)’ of this Contract, that have an email address (and a mobile number if SMS 2 factor authorisation is being used).
16 Click here to select Actioned By
Select one or more Contacts in the ‘Actioned By’ list, then click Close to add those Positions to the ‘Actioned By’ 15 Contacts list.
The list of Contacts displayed here are the ‘Contacts’ of the ‘Contract With(s)’ of this Contract, that have an email address (and a phone number if SMS notification is also being used).
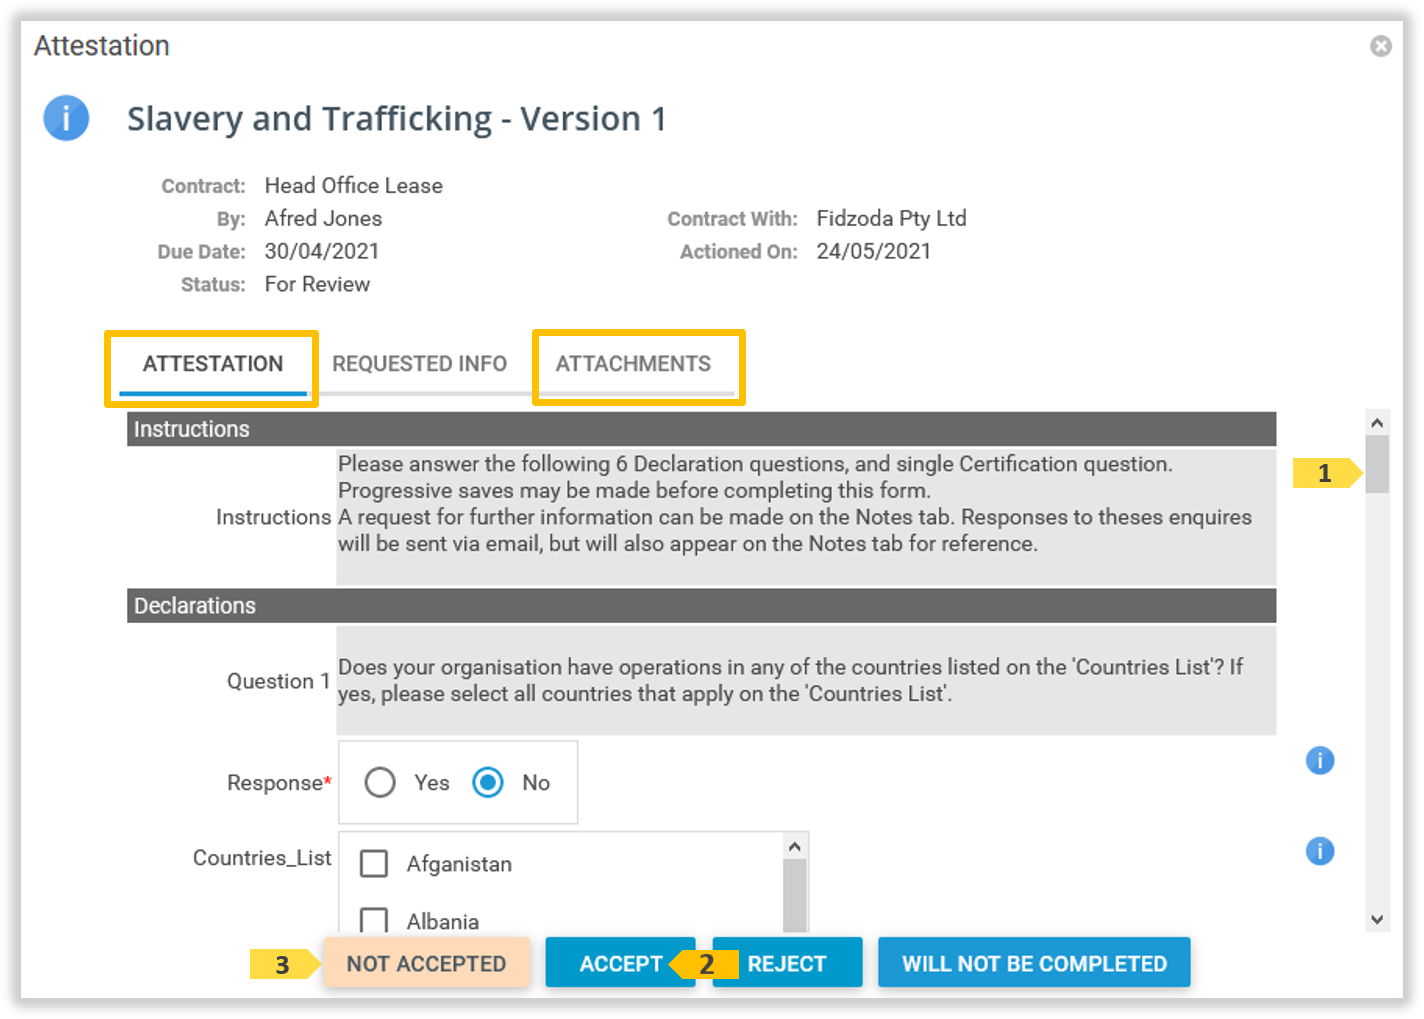
The Attestation tab
The Attestation tab displays the Attestation Form the Contacts will be required to complete.
The Attestation tab elements
17 Attestation
This is an example Attestation Form for the selected Attestation Type Version on the Details tab.
The Attestation Form displayed is the Attestation Type 4 Version selected on the Details tab.
.
Procedures Attestations
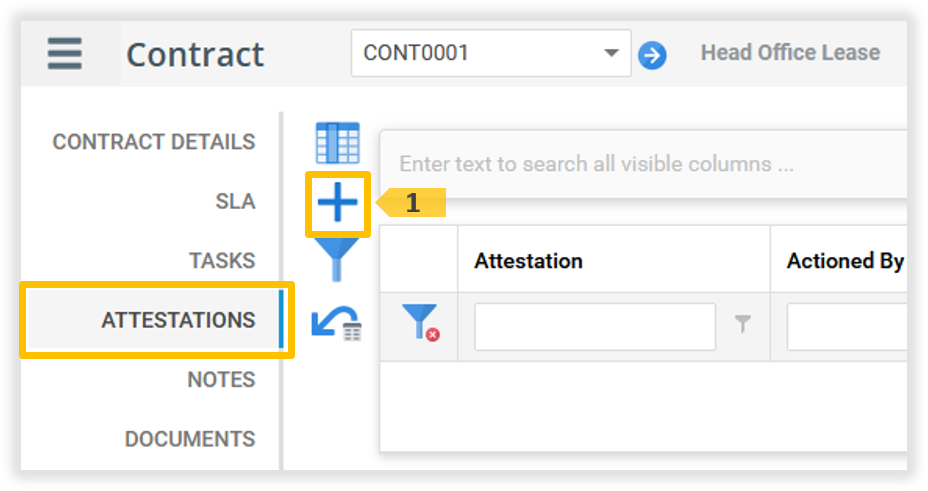
Add an Attestation
Attestations can be scheduled cyclic, or on an Adhoc one off, or Adhoc manual schedule.
Click on the Contract record to display its details. The ‘Contract’ page is displayed with that record.
Click the ‘Attestations’ tab. The Attestations list is displayed. Click the New Attestation 1 icon.
The New Attestation window displays. Enter the required fields on the Details tab. (See The Details tab elements for more information on each field.) Then click the Schedule tab. Enter the required fields on the Schedule tab. (See The Schedule tab elements for more information on each field.) Click the Save icon 1 to save this new Attestation. (Or, click the Cancel icon 2 to stop adding the new Attestation.) Note: Once the Attestation Type is Saved, only different Versions of this Attestation Form will be displayed, as this Attestation Type cannot be changed once saved.
The new Attestation is displayed in the Attestation 1 list.
Note: If the Attestation was created with an ‘Inactive’ schedule status, if the records does not show, use the status filter 2 to reveal those records.
Click on the Contract record to display its details. The ‘Contract’ page is displayed with that record.
Click the ‘Attestations’ tab. The Attestations list is displayed. Click the Attestation record 1 to be edited.
The Edit Attestation window displays. Update the required fields on the Details and Schedule tabs (see The Details tab elements) for more information on each field). Click the Save icon 1 to save the editing. (Or, click the Cancel icon 2 to abandon the editing.)
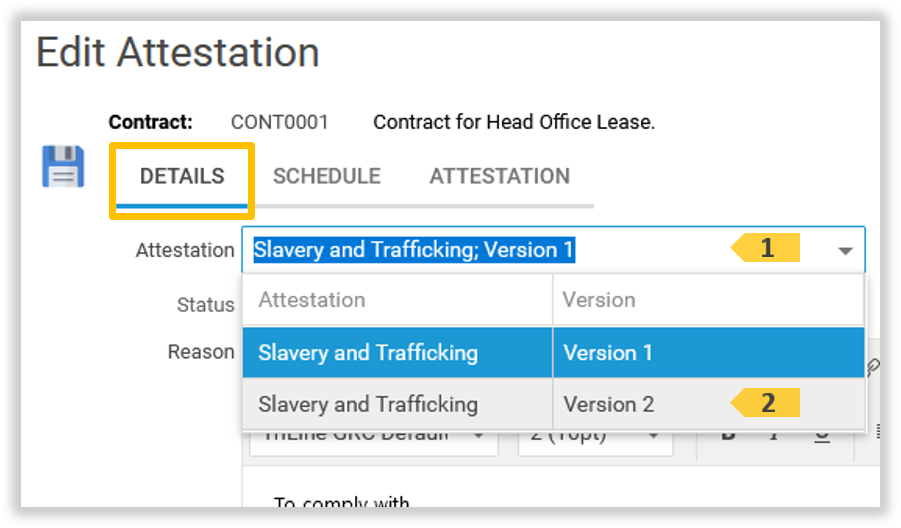
An Attestation Type may have multiple Form versions available. The following is how change all existing Attestation schedules using this Type, to another one of these Form versions of this Attestation Type.
Note: Changing an Attestation From Version does not effect any existing Attestation notification sent to Contacts; they will still see the Form Version they were originally sent. This change only effects the next Attestations scheduled notifications. Existing Attestation history records are also not effected by this change as they retain their original Form versions.
Edit the Attestation. Click the Attestation 1 field on the Details tab. Select the new Attestation Type Version 2. Note: The Attestation Type cannot be change, only the Version of the Form. Create or Copy, a new Attestation if a new Attestation Type is required.
The newly selected Attestation Type Version will display in the Attestation 1 field. The 'new ' Form Version can be viewed on the ‘Attestation’ tab. Click the Save 2 icon.
The updated Attestations list is displayed.
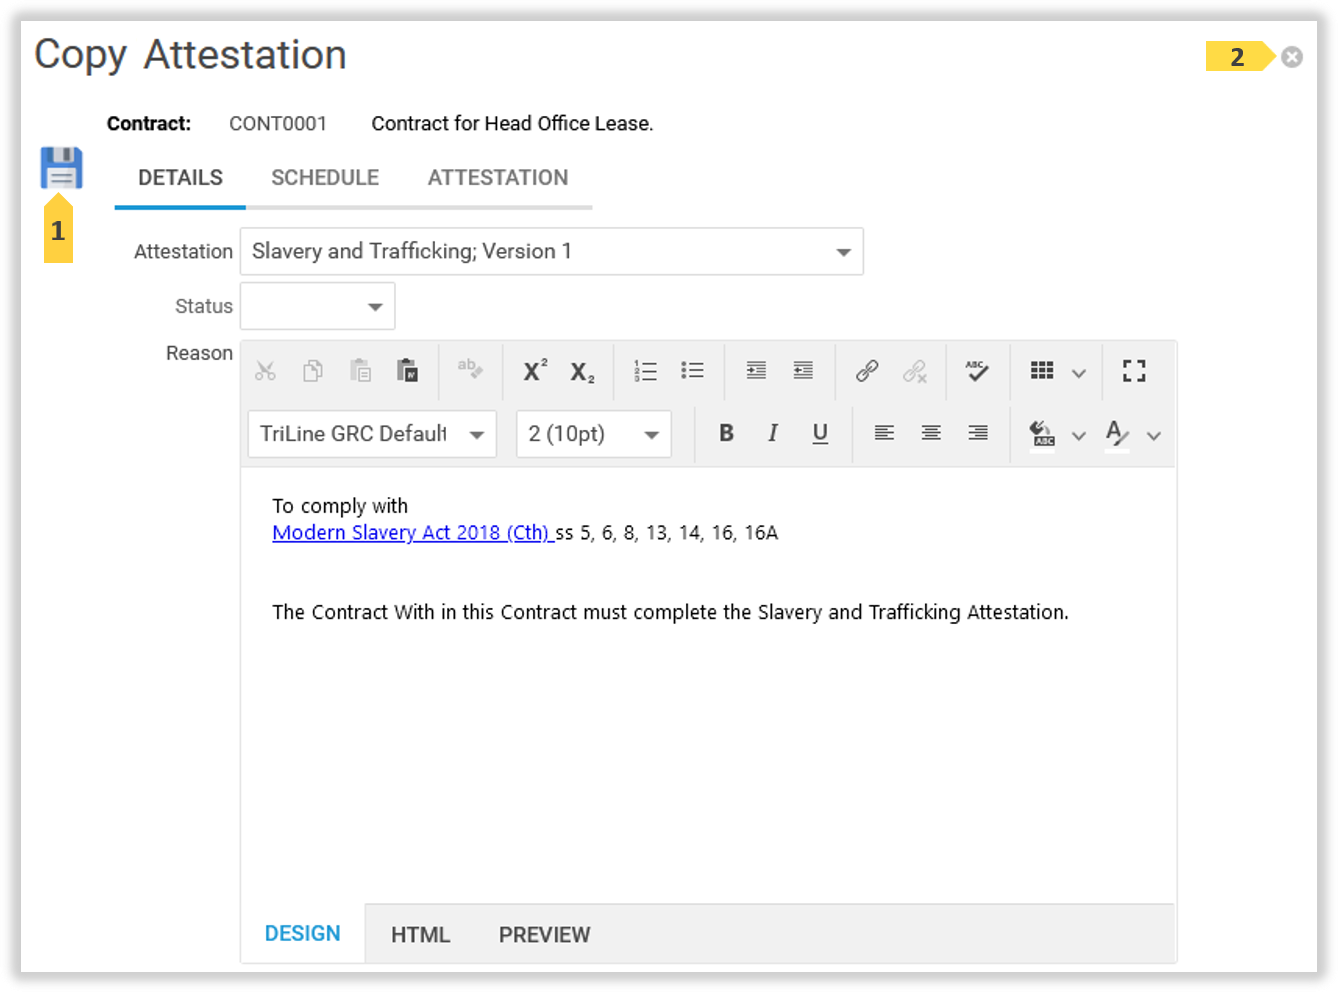
Copy (Duplicate) an Attestation
Use the Copy functionality to duplicate an existing Attestation
Click on the Contract record to display its details. The ‘Contract’ page is displayed with that record.
Click the ‘Attestations’ tab. The Attestations list is displayed. Click the Copy Attestation1 icon of the record to be copied.
The Copy Attestation window displays. Update the required fields on the Details and Schedule tabs (see The Details tab elements) for more information on each field). Click the Save icon 1 to save the editing. (Or, click the Cancel icon 2 to abandon the copy.)
A confirming message will display and the copied record will display in the Attestation list.
Delete an Attestation
Attestation’s with completion history cannot be deleted; these Attestations records will display with a History icon in the Attestation list. Attestations than can be deleted display with the Delete Attestation icon. Deleting an Attestation record is instant and the record cannot be recovered.
Click on the Contract record to display its details. The ‘Contract’ page is displayed with that record.
Click the ‘Attestations’ tab. The Attestations list is displayed. Click the Delete1 icon of the Attestation record to be deleted.
The Confirm window is displayed. Click OK to delete (or click Cancel).
A confirming message will display and the deleted record will no longer display in the Attestation list.
View Attestation Completion History
The ‘Attestation History’ icon only appears for Attestation’s that Accepted or ‘Will not be Complete’. If no Attestations have these Statuses, the History icon will not appear.
Note: Only Positions with membership to a Security Group with ‘View’ or ‘Edit’ Record Security Rights to this Contract record, can view Attestation Completion History of this Contract record.
Click on the Contract record to display its details. The ‘Contract’ page is displayed with that record.
Click the ‘Attestations’ tab. The Attestations list is displayed. Click the Attestation History1 icon of the record to be viewed.
The ‘Attestation Completion History’ window displays. The most recent Attestation history record is displayed. If there is more than one completed Attestation, the ‘Due Date/Actioned By Contact’ 1 will appear.
To view another Completed Attestations, click the ‘Due Date/Actioned By Contact’ 1 field. The currently selected Attestation will be highlighted in the list. Click the Attestation 2 of interest.
The selected Attestation displays. Use the Scroll bar 1 to review the Completed Attestation. (Note: The Attestation may not be altered.) Or, choose the Print Preview 2 option to view in a PDF format.
Click the Requested Info tab to see any interactions with the Contact during the completion of this Attestation.
Click the Attachments tab to see any attachments from this Contact for this Attestation.
Click the Close icon to close this window.
Contract Owner managing uncompleted Attestations
My Summary - Attestations
All outstanding (generated with a not completed status) Attestations are listed for each Contract Owner on the My Attestations tab of their My Summary page. On the main menu, click the My Summary option. If outstanding Attestations exist for this Position, the My Attestations tab will display. Click the My Attestations tab to see these records.
My Attestations
An Attestation’s Status can indicate if the Contact is progressing their Attestation, or if, the Contract Owner is require to respond to a request for information, or to review a submitted Attestation.
My Attestations
Some Attestations Statuses are highlighted by unique colours. Both Statuses ‘Issued’ and ‘In Progress’ are a white cell and means the Attestation is with the Contact to complete. The colour of each row indicates the action that is required of Contract Owner. A ‘Request’ Status (yellow cell) indicates the Contact is awaiting a reply from the Contract Owner for a question they have asked. A green cell indicates that the Contact has completed the Attestation and it can now be review by the Contract Owner for acceptance, or not. Accepted Attestations go into the Attestation History of that Contract record. A ‘Not Accepted’ red cell (not shown) indicates that the Contract Owner has found the submitted Attestation is lacking completion information, In this case, the Contract Owner has requested the Contact to provide more content.
Responding to a Contact
When a Contact asks a question or requests more information facility while completing the Attestation form, the Contact Owner will receive an email notification 1 of this question. The email notification shows who 2 is asking, what the question 3 is, and a link 4 to that Attestation. Click the link (and login if you have not logged in yet), to open the Attestation on the My Summary Page.
Or alternatively if already logged in, the Contract Owner can open the Attestation by clicking the ‘Show Attestation’ 1 icon on the My Summary | My Attestation tab. Note: The status is highlighted yellow to indicate action is required by the Contract Owner.
The Attestation window displays. Click the Request Info tab. The most recent question 1 is displayed at the top of the list. Click the Respond 2 icon. Note: The current completion answers on the Attestation Form by the Contact can be reviewed at anytime by clicking on the Attestation tab and scrolling through the Form.
The Add Response window displays. Type your response 1 to the question. Click the Save 2 icon. Your response is immediately emailed to this Contact.
Your Response 1 is displayed as the most recent interaction on the Requested Info tab. Click the Close window 3 icon. The Contact will also be able to review this response from their link to the Attestation in their email notification.
The Status 12 of the Attestation has changed to ‘In Progress’ as the Contacts question has now been responded to.
Accepting or Not Accepting a Submitted Attestation
When a Contact clicks the ‘Complete Now’ button on the Attestation form, the Contact Owner will receive an email notification that the Attestation Form has been submitted for review. The email notification will contain a link 2 that when clicked (and login completed) will open the Attestation on the My Summary Page.
Or alternatively if already logged in, the Contract Owner can open the Attestation by clicking the ‘Show Attestation’ 1 icon on the My Summary | My Attestation tab. Note: The status is highlighted green to indicate action is required by the Contract Owner.
The Attestation window displays. On the Attestation tab, scroll down 1 and review the filled in Attestation form. If provided, review the Attachments on the Attachments tab. To accept the Attestation as satisfactorily completed, click the Accept2 button. The Attestation window will close, the Attestation will disappear from the My Summary, My Attestations list, and will now be available in the Contract Attestation Completion History (see View Attestation Completion History). To send the Attestation back to the Contact, because the Form has insufficient content or requires further content clarification, click the Not Accepted' 3 button.
When the Not Accepted button is clicked, The More Information window displays. Type your instruction 1 to the Contact about which Attestation content on the Form you require added or clarified. Click the Save 2 icon. Your message is immediately emailed to this Contact and this window closes.
Your message is recorded as the most recent interaction on the Attestation Requested Info tab. The Attestation Status has changed to Not Accepted1 and is highlighted red.
The Contact will receive an email notification 1 informing them further information is required. The email content will contain your message 2, and a link 3 to again open and continue working on the completing the Attestation Form.
When the Contact updates and Saves the Attestation, the Status will change from Not Accepted to In Progress. When the Contract re-submits the Attestation, the Status will changed to For Review and this acceptance process will start again.
Completing a submitted Attestation ‘Rejected’
Selecting to complete an Attestation with the Rejected status means that you will not Accept the Form submitted by the Contact, and you do not wish pursue obtaining the resolving information from the Contact. Rejecting the Attestation completes the Attestation process. The Contact will immediately no longer have access to the Attestation Form. The Attestation moves to History with the Rejected status for reporting purposes.
The Attestation will not be done window displays. Read the instructions and then enter the Rejection notification 1 to be sent to the Contact. Outline or detail the reason(s) this Attestation is being rejected or not accepted. Click Yes2 to complete the Attestation with status ‘Rejected’ and to immediately send the Rejection notification with your reason to the Contact. (Or, click No3 to cancel.)
The Attestation window will close, the Attestation will disappear from the My Attestations list, and will now be available in the Contact Attestation History (see View Attestation Completion History). The Contact will immediately no longer have access to the Attestation Form and will the Rejection notification email.
Completing an Attestation ‘Will not be Completed’
If at any point a Contract Owner decides that an Attestation sent to Contact is no longer required to be competed, they can ‘mark’ that Attestation as ‘Will Not be Completed’ as a final Completion Status. The Contact will be immediately notified, and they will no-longer have access to the Attestation via the previous supplied links to the Attestation page.
On the My Summary | My Attestation tab Click the ‘Show Attestation’ 1 icon of the Attestation that is no longer required.
The Complete Attestation window displays. On the Attestation tab, click the Will not be Completed2 button.
The Attestation will not be done window displays. Read the instructions and then enter Reason 1 this Attestation is no longer required. An email notification, containing this reason will to be sent to the Contact. Click Yes2 to complete the Attestation with status ‘Will not be Completed’ and to immediately send the notification with your reason to the Contact. (Or, click No3 to cancel.)
The Contact is sent a notification email with Reason 1 why they are no longer required to Complete this Attestation. This Attestation will no longer be accessible to the Contact through prior provided links.
This Attestation will no longer display in the My Attestation list, but will be accessible via the history record of the Attestation 1 on the Contract. Any entered data on the Form will be retained in this history and can be reported on.
Contact path to Completing Attestation
The following is from the Contact point of view in Completing an Attestation Form.
On the the first reminder date of the Attestation schedule, the Contact will receive an email notification containing a link 1 to the Attestation Form to be completed by them.
When the link is clicked, a web page will display requesting a Security Code (2nd factor Authentication). The Security Code is send via the Contacts mobile number (see [New Contact window elements item 7] is recorded, or via their email address. The Contact enters the Security Code 1 and then clicks the Validate2 button.
With the correct Security code enter, the Attestation Form is displayed. This example Attestation has instructions 6 in the Form to assist and guide the Contact to complete this Form. This page also contains the ‘Request Information’ 4 button to ask questions to, and receive answers from, the Contract Owner.
When the the ‘Request Information’ button is clicked, the following window is displayed. The Contact then clicks the ‘Request Information’ 1 icon
The Add Your Question window is displayed. The Contact clicks enters 1 their question and then clicks the Save 2 icon. This question is immediately sent to Contract Owner as an email notification. The Add Your Question window closes.
The Question will now displays as a sent request. The Contact clicks the close 1 icon.
When the Contract Owner responds, the Contact will receive a notification containing the response 2 . The Contact clicks the link 1 open the Attestation Form, or if required, firstly goes through the Security Code page procedure.
The Attestation Form displays. The Request Information button has changed to the Request Information/Review Response1 button.
When the Contact clicks the Request Information/Review Response button, they can re-review the new communication 1 from the Contract Owner at the top of the list. The Contact clicks the close 1 icon and continues completing the form.
When the Contact clicks the Attachment link, or clicks the right chevron icon, the Attachment page is displayed. If an Attachment is mandatory, the mandatory message 1 is display. The Contact can return to the Attestation my clicking the Form2 link, or clicking left chevron 2icon.
When the Contact clicks the ‘Complete Later’ 1 button, all progress on the Attestation Form is saved and a message 2 is display. The contact can choose to click the Continue Working on Attestation3 button to reopen the Form and continue filling in the Form, or they can close the browser tab and come back later via their email link to continue completing the Form.
When the Contact clicks the Complete Now button, the following message 1 is displayed. The Form is submitted and the Contact can no longer access the Attestation Form.
When the Contract Owner accepts the Attestation as completed, the Contact will receive the following completion email notification 1 containing a copy of Attestation Form 2.
If the Contact Owner does not accept the Attestation Form as complete, the Contact will receive an email notification and will be able to again amend the Attestation form, and the Attestation completion process starts again.


 .
. .
. .
.
 .
. .
.