This icon is displayed on the ‘Details’ tab when completing a Task. Click the icon to open the ‘Add Comment’ popup window.
Add Comment popup window
The ‘Add Comment’ popup window is displayed when you click the ‘Add Comment’ icon in the ‘Details’ tab when completing a Task.
1 Formatting Toolbar: This toolbar contains a subset of tools from of the regular Formatting Toolbar. You can format the text you type in the Comment Editor 2 and create lists.
2 Comment Editor: Type your comment in this field, then use the Formatting Toolbar 1 to format the text and add lists.
3Paste from Word icon: When you have copied from Word, click this icon to paste that text into this editor to get correct formatting.
4 ‘Save’ icon: Click this icon to add the new Comment to the Record. The ‘Add Comment’ popup window closes.
5 ‘Close’ icon: Click this icon to close the ‘Add Comment’ popup window without adding the new comment.
Add Note icon
This icon is displayed on TriLine GRC Records ‘Notes’ tabs. Click the icon to open the ‘Add Note’ popup window.
Add Note popup window
The ‘Add Note’ popup window is displayed when you click the ‘Add Note’ icon in a Record’s ‘Notes’ tab.
1Formatting Toolbar: Use these tools to format the text you type into the Notes Editor 2.
2 Notes Editor: Type your note in this field, then use the Formatting Toolbar1 to format the text, add lists, hyperlinks, tables and more.
3Paste from Word icon: When you have copied from Word, click this icon to paste that text into this editor to get correct formatting.
4 ‘Save’ icon: Click this icon to add the new Note to the Record. The ‘Add Note’ popup window closes.
5 ‘Close’ icon: Click this icon to close the ‘Add Note’ popup window without adding the new Note.
Archive icon
This icon is displayed on Compliance Process, Risk and Contract Details pages.
Attach documents and other reference material to Records using the ‘Attachments’ tab. This tab appears on these Pages:
‘Edit (Event)’ Page,
All Pages that you use to complete a Task (e.g. complete a Process Control, Risk (Treatment) or Risk Review), and
The Attachment Panes on Task Completion History Pages.
The ‘Attachment Selection Pane’ 2 is also displayed on its own in the ‘Attachments’ Panel when you report an Event using TriLine GRC or the Portal. This allows you to select attachments which will be automatically uploaded and attached when you submit the Event.
1 ‘Attachments’ tab: Click this tab (where displayed) to manage attachments for a Record.
2 Drag files here to be automatically attach (after a few seconds pause). You can select drag files and they will also attach automatically (after a few seconds pause).
3 ‘Browse’ button: Click the Browse... button to select an attachment. A File window opens so that you can choose a file to attach. The file name is displayed momentarily in the Attachment Field 2, and then automatically attach.
4 Attachment List Page Navigation Panel: Use this panel to browse the pages of an Attachment List 6 and to set the number of Attachments to display per-page.
5 Attachment List Column Headers: Use the controls in the Column Headers to filter the Records displayed in the Attachment List 6.
6 Attachment List: Any files that have been attached (uploaded to TriLine GRC and attached to the Record) are displayed in this list.
7 ‘View Attachment’ icon: Every attachment in the list has a ‘View Attachment’ icon. Click the icon to download and open the attachment on your computer.
8 ‘Delete Attachment’ icon: Every attachment in the list has a ‘Delete Attachment’ icon. Click this icon to remove the attachment. A ‘Confirm Delete’ dialog is displayed.
B
Blind Task
Blind Tasks are used to allocate Process Controls, Risk Treatments, Event Tasks or Contract Tasks to Positions that do not have Security Rights to the Compliance Process, Risk, (Event) or Contract Record (i.e. the Parent Record).
The details of a Blind Task’s Parent Record are hidden from the Position to whom the Task is allocated.
The Captcha is a security option for accessing the Portal and provides assurance that an actual person is attempting to log in, not an automated ‘hacking’ system. It does this by displaying a series of random characters as a graphic that only a person can recognise.
When used, the person logging in to the Portal must do three things: supply the correct userid, password, interpret the displayed Captcha characters, and type those characters into a ‘Security code’ field.
Users can click the ‘Show another code’ icon if the displayed characters are hard to read.
Administrators can set the Captcha option when using the ‘Password Challenge’ feature (see configuring the Event Register).
Change Type Request dialog
When an Event Type Manager or other authorised person changes the Type of a reported Event, this dialog is displayed.
The reason for this caution is that Event Forms and Event Form Fields are unique to one Event Type. By changing to another Event Type, the new Type’s Event Form and associated Form Fields must be used.
The data collected in the old Type’s Form Fields is written to a Note that you can access via the Event Record’s ‘Notes’ tab:
Check Spelling icon
Click this icon to check the spelling of the corresponding edit field.
Check Spelling - Custom Dictionary
When Check Spelling cannot find a word you would like in the dictionary, click Add to Dictionary to add this word to the Custom Dictionary.
Clear Filters icon
Click this icon to remove any filters applied to the Column Headers in a list.
Close icon
Located at the top-right corner of popup windows. Click to close the popup window.
Column Chooser
You can display or hide columns in Risk, Compliance, KRI or Event Lists using the Column Chooser.
To show a column in a list: Drag a column title from the Column Chooser into the list’s column header area.
To hide a column in a list: Drag a column header from the list onto the Column Chooser. Be aware that you cannot hide a list column displaying a Column Pin icon in the Column Header.
Note: You can also use the Column Chooser to sort and filter lists using hidden column criteria. In the Column Chooser:
click a header title to toggle the displayed list Records between ascending and descending order, based on the hidden column’s data.
click a header title’s Set Column Search Filter icon to filter the displayed list Records based on criteria that you apply to the hidden column’s data.
Column Header
The Column Header is displayed at the top of each list column.
You can use the Column Header to filter the Records displayed in the list based on the column’s data.
1 Column Title: The Column Title is always displayed in the Column Header.
3Column Text Filter: Type some text into this field to filter the list Records based on the text, and the search condition set by the Column Text Filter icon 4. If a small down arrow is displayed in the Column Text Filter, you can click this to show a popup window with extra controls to help you refine your filter criteria (most commonly used in date/time columns).
4Column Text Filter icon: Click this icon to select the search condition that is applied to the text entered in the Column Text Filter 3.
Note: The ‘Set Column Search Filter’ icon, Column Text Filter and Column Text Filter icon may not be displayed in all Column Headers.
:
When you apply a filter, a ‘Clear Filters’ icon is displayed to the left of the Column Headers in the List. Click this icon to remove the applied filters.
Column Pin icon
You can usually hide list columns from view using the Field Chooser.
However, you cannot hide a list column displaying a Column Pin icon in the Column Header—these columns are always visible in the list.
Column Text Filter
This filter is displayed under some list column headers. Type some text into the text field and the displayed Records will be filtered according to both the text and the search condition set in the Column Text Filter icon.
Column Text Filter icon
The Column Text Filter icon is located to the right of a Column Text Filter.
Click the Column Text Filter icon to set select a search condition for text entered into the Column Text Filter:
Click to complete a Task that has not passed the Due Date.
‘Confirm Delete’ dialog
The ‘Confirm Delete’ dialog is displayed whenever you perform a delete or remove action in TriLine GRC. Click OK to confirm the delete or remove action, or click Cancel if you change your mind.
Note: The dialog on your system may look different to the example above, depending on your operating system and browser.
The dialog contains a caution about the impact of deleting the KRI (loss of all data associated with the KRI).
Contracts
A contract is a legally binding agreement between two or more parties. As an example it might be where on party is engaged to provide goods or services to another to support their business goals. i.e a leasing agreement for your rental property is a contract. So to is an agreement to pay a person a commission or retainer for introducing customers to your business.
You can register a Contract via the Contracts menu.
Contract With
Contract With is any one of the parties named in the contract that have obligations or rights under the contract or agreement.
Contract With are used to group similar or related Contract With in reports and lists.
Contract Entity
Contract Entity is the name of the entity that has entered into the contract for your business. As an example you might have a parent company and a number of subsidiary businesses. Your use the Contract Entity field to indicate which of your businesses have responsibilities or rights under the contract.
Contract Entity are used to group similar or related Entity’s in reports and lists.
Contract Renewal Terms
At the conclusion of the initial and subsequent terms of a contract or agreement, there may be options to renew for a further term or or the agreement terminates. This is a mandatory field.
Contract Renewal Terms are used to group similar or related Entity’s in reports and lists.
Contract Type
Contract Type indicates what type of agreement or contract is being recorded. As an example, it may be a ‘Real Estate Rental Agreement’ or a ‘Motor Vehicle Lease’.
This is a user defined list of contracts or agreement types.
Contract Type are used to group similar or related Types in reports and lists.
Contract With Type
Contract With Type are an indicator if the Contract With to the contract is a supplier of goods or services or a recipient of goods or services supplied by your company.
Contract With Type are used to group similar or related Contract With Types in reports and lists.
Critical Task
Where a task is identified as Critical, TriLine GRC sends an additional reminder notification to the Actioned Position if the generated Task to them is still outstanding at the specified time default setting is midday on the scheduled Due Date.
Note: Administrators must enable ‘Use Critical Tasks’ in the Configuration page ‘General’ tab, Tasks section Settings (see item 5) before you can use this feature.
Current Task
A Current Task is generated for each Actioned By on the First Reminder Date of that task schedule.
A notification is sent on the First Reminder Date to each Actioned By position in the task Actioned By list. Additional notification may be sent on the Second Reminder Date, Due Date (Critical Task only), and every overdue day.
Current Tasks are displayed on the My Summary page, ‘Current Tasks’ tab for each Actioned By Position. This list of Current Tasks may be viewed by any Position with the correct Security access.
When a Current Task is completed, it will not longer appear on the ‘Current Tasks’ tab.
Note: Each Current Task for each Actioned by is its own separate entity from all other Current Tasks and from the Task it is generated from. This means changing the Due Date of the Task will have no effect on existing each Current Task, and instead, must be changed individually.
Custom Field
Custom Fields allow you to capture information unique to your organisation’s needs.
You can create up to five Custom Fields for each of these Record Types:
Compliance Process,
Process Control,
Risk,
Risk (Treatment),
(Event),
Contract With,
Document Library.
You can create up to 99 Custom Fields for each of these Record Types:
Contracts,
Control Inventory.
Additionally, these latter Custom Field must be chosen for which type they will display for.
: Administrators can manage Custom Fields by selecting the menu for the Module types above and then selecting Custom Fields in the Maintenance section of that Module. (See Setting up and managing Custom Fields for more information.)
(Event) Custom Fields vs (Event) Form Fields:
(Event) Custom Fields display when reporting and managing any (Event) Type.
(Event) Form Fields are unique to the (Event) Type in which they are created. An AdHoc Query can be used to report these fields.
5 ‘Next Month’ icon: Click to go forward one month.
6 ‘Next Year’ icon: Click to go forward one year.
7 Calendar selector: Click on a date to select it.
8 Selected Date indicator: The selected date is highlighted by a pale orange rectangle. Today’s date (when displayed) is indicated by a hollow orange rectangle when not selected.
9 ‘Today’ button: Click this button to set the Calendar selector 6 to the current month and date.
10 ‘Clear’ button: Click this button to clear the content of the underlying Date/Time field. Note: the Date/Time Selector closes and an ‘Important’ icon is displayed to the right of the Date/Time field to let you know that the field is empty.
Access the Date/Time Selector from date and time fields within TriLine GRC. You can choose from a comprehensive set of controls to specify a date and time.
When first opened, the selector displays either:
(for date & time fields) date and time controls set to the current date and time, or
(for date-only fields) date controls set to the current date.
1 ‘Previous Year’ icon: Click to go back one year.
2 ‘Previous Month’ icon: Click to go back one month.
4 ‘Next Month’ icon: Click to go forward one month.
5 ‘Next Year’ icon: Click to go forward one year.
6 Calendar selector: Click on a date to select it.
7 Selected Date indicator: The selected date is highlighted by a pale orange rectangle. Today’s date (when displayed) is indicated by a hollow orange rectangle when not selected.
8 Time Selector: Type the time in the format h:mm AM/PM; or click either the hour, minute or AM/PM section and use the up/down controls on the right of the field to set the time.
9 Analogue Time indicator: Displays a conventional clock face representing the time set in the Time Selector 8. You cannot set the time using this indicator.
10 ‘Today’ button: Click this button to set the Calendar selector 6 to the current month and date.
11 ‘Clear’ button: Click this button to clear the content of the underlying Date/Time field. Note: the Date/Time Selector closes and an ‘Important’ icon is displayed to the right of the Date/Time field to let you know that the field is empty.
12 ‘OK’ button: Click this button to apply the Date/Time Selector’s settings to the underlying date and time field. The Date/Time selector closes once you click this button.
13 ‘Cancel’ button: Click this button to close the Date/Time Selector without applying its settings to the underlying date and time field.
A popup window that either gives you a notice or requires you to select from one or more responses.
Display in Lists Tick box
A Field part of a Position configuration. Tick this field to display the Position, depending on security access, in select-able Position lists throughout TriLine GRC.
Where this icon appears next to a Record in a list, click the icon to edit the form fields associated with the Record.
Enter text to search
Enter text in this field to search all columns displayed in the grid. Each occurrence of the text will be highlighted. Only rows containing an occurrence of the text will be displayed.
When Tasks become overdue or is flagged as ‘Not Completed’, TriLine GRC sends an email to the ‘Escalate To’ Position defined in the Task Record.
If there is no ‘Escalate To’ Position identified within the Task Record, then TriLine GRC emails:
the ‘Escalate To’ Position defined in the responsible Position’s Record, or
the Task Responsible Officer (for Process Controls and Risk Treatments), Event Manager, KRI Owner or Risk Owner.
TriLine GRC sends individual emails to each ‘Escalate To’ Position and tailors the email content to make it specific to each recipient.
Event
An Event is any incident or occurrence that needs to be recorded, actioned or reported for the organisation.
You can report an Event either within TriLine GRC, or via the Portal if you do not have a TriLine GRC user id.
Note: An Event may be configured to have a different name on your system (such as Incident).
Event Category
Event Categories are used to group similar or related Events in reports and lists (e.g. Fraud). They can be used to group incidents and to create workflows to address incidents/complaints/accidents and so on.
Event Causes indicate what caused the Event to occur. Causes can be used in reports and lists to better understand the origins of the Events within your organisation.
In use, someone reporting an Event selects the Event Cause that best describes what caused the Event to occur.
Event Form
An Event Form is a collection of Event Form Fields and Custom Fields designed to capture relevant information from someone reporting an Event.
Each Event Type has its own customisable Event Form.
A separate Form for Custom Fields is displayed where ‘Event’ Custom Fields have been created. This form is common to all Event Types.
Event Form Field
Every Event Type has its own collection of Event Form Fields that a user must complete when reporting an Event of that type.
Event Form Fields are created and managed by Administrators as part of creating or editing an Event Type.
Event Priorities indicate the urgency with which the Event needs to be managed. By default, the Event Priorities are Low, Moderate and High.
Event Register
The Event Register is the name given to the collection of TriLine GRC functions for reporting and managing Events that occur in your organisation.
Note: The Event Register may be configured to have a different name on your system (such as Incident Register).
Event Status
The Event Status indicates at what stage of the management cycle the Event is being managed (e.g. if the Event is newly created or is in the process of being dealt with). The default statuses are New, Being Managed, Tasks Allocated and Closed.
Event Sub Category
Use Event Sub Categories to group similar or related Records within a Category.
TriLine GRC only supports one level of Event Sub Category.
Each Event Type is designed to capture information related to a specific category of Event.
The Administrator creates Event Types required by the organisation during TriLine GRC configuration setup, and thereafter as needs change.
Users must select an Event Type when they report an Event using TriLine GRC. The appropriate Event Form is then displayed for the user to complete and submit.
An Event Type can be flagged as Backend Only, making the Event Type available only when reporting an Event using TriLine GRC and not through the Portal.
Event Type Manager
An Event Type Manager is responsible for handling all Events that are submitted for a particular Event Type.
Event Type Managers are notified by email when a new Event of an applicable type is submitted.
An Event Type must have at least one default Event Type Manager assigned. Each Event Type Manager may be responsible for one or more Event Types.
Event Type Managers can see the Event Types for which they are responsible by selecting the tabs Responsible For | Event Types on their ‘My Tasks’ page.
Note: An Event Type Manager must be an active Position in your TriLine GRC system.
Export Data icon
Click to export selected Records out of TriLine GRC.
Export to Excel icon
Click to export the current list as a Microsoft Excel file.
F
Filter Builder
The Filter Builder allows you to search for Records based on very specific—and complex—criteria.
The principle behind the Filter Builder is that you create one or more Conditions, grouped under an Operator. For example, a simple filter looking for all Records with a Status of ‘Active’ might look like this:
And
Status Equals Active
In the above example, ‘And’ is the Operator, which contains one Condition: ‘Status Equals Active’.
You can group multiple Conditions under an Operator. You can also add more Operator groups to build very sophisticated filters.
When the Filter Builder window first opens, one ‘And’ operator 1 is included. When you open the Filter Builder from a Record List with a ‘Status’ column, a default Condition Status Equals 'Active' is also included to display all Active records.
Building a Filter
Suppose you want to search a list for all Records where ‘Column 4’ contains the word ‘hazard’.
Start by setting the Operator. Click the default Operator 1 and select an Operator from the Operator drop-down list 2. For our example, ‘And’ will do.
Click the ‘Add Condition’ icon 3 to add a new Condition. A Condition consists of:
a Column Title 4,
an Expression6, and
a Criteria field 8.
To set up the Condition:
click the existing Column Title 4 and select ‘Column 4’ from the drop-down list 5,
click the existing Expression 6 and select ‘Contains’ from the drop-down list 7, and
in the Criteria field 8, type the word you’re looking for (in this case, ‘hazard’).
Your Filter Builder should now look like this:
And
Column 4 Contains [hazard]
Click the OK button to apply the filter.
Multiple Conditions
To add another Condition to your filter, either:
click the ‘Add Condition’ icon 3, or
click the Operator 1 and select ‘Add Condition’ from the drop-down list 2.
To remove a Condition, click the ‘Remove Condition’ icon 9 next to the Condition you want to remove.
Multiple Operator groups
To add another Operator group to your filter, click on the existing Operator 1 and select ‘Add Group’ from the drop-down list 2.
To remove an Operator group, click the Operator group you want to remove and select ‘Remove’ from the drop-down list 2.
Close the Filter Builder without applying the filter
To close the Filter Builder, click either:
the Cancel button 11, or
the ‘Close’ icon 12.
Filter Builder Operators
An Operator is a Filter Builder component that determines how a collection of Records is displayed as the result of an applied filter. Typical Operators include ‘And’ and ‘Or’. For example:
…where ‘Status’ Equals [Active] AND ‘Record Type’ Equals Risk
In the Filter Builder, the above example is structured like this:
And
Status Equals [Active]
Record Type Equals [Risk]
Available Operators
And
Status Equals [Active]
Record Type Equals [Risk]
‘And’ returns only Records that are both ‘Active’ Status and ‘Risk’ Record Type.
Or
Status Equals [Active]
Record Type Equals [Risk]
‘Or’ returns Records that:
are both ‘Active’ Status and ‘Risk’ Record Type, and
either ‘Active’ Status or ‘Risk’ Record Type.
Not And
Status Equals [Active]
Record Type Equals [Risk]
‘Not And’ returns those Records that:
are either ‘Active’ Status or ‘Risk’ Record Type (but not both), and
neither ‘Active’ Status nor ‘Risk’ Record Type.
Not Or
Status Equals [Active]
Record Type Equals [Risk]
‘Not Or’ returns only those Records that are neither ‘Active’ Status nor ‘Risk’ Record Type.
Formatting Toolbar
The Formatting Toolbar appears above rich text editing fields (e.g. Predefined Tasks) throughout TriLine GRC.
Use the tools to format your text, add tables and hyperlinks, and more.
11 Full Screen (expand text editor to fit browser window)
12 Select Font
13 Select Font Size
14 Bold/Italic/Underline/Strike through (selected text)
15 Left/Centre/Right Justify (paragraph)
16 Set Back Colour / Fore Colour (selected text)
Note: Some rich text editing fields in TriLine GRC only display a subset of the formatting tools. When you create a new Event Form Field, for example, the Formatting Toolbar 3 only shows those tools used for basic text formatting and hyper-linking.
Future Task
A Task that is scheduled for completion some time in the future but is not yet due.
Position(s) responsible for a Future Task are only notified once the Task becomes due.
The Group Column Data pane is displayed at the top of lists, above the Column Headers.
You can group list Records by the data in one or more list columns. For example, if you drag the ‘Type’ column shown in the example above into the Group Column Data pane, the list Records will be grouped by ‘Type’. See Grouped List Items.
You can drag multiple columns into the Group Column Data pane to create more complex groupings. See Grouped List Items (Multiple).
Grouped List Items
When you group list Records using the Group Column Data pane, the Records are sorted under group headers.
For example, in the screenshot above, the Records are grouped under headers for each ‘Type’.
View the Records for a particular group by clicking the Show/Hide icon (highlighted above) to the left of the group header.
When you group list Records by multiple columns, the Records are grouped in order from the left-most column in the Group Column Data pane.
For example, in the screenshot above, three columns have been dragged into the Group Column Data pane 1: ‘Type’, ‘Category’ and ‘Status’. The Records will be grouped like this:
All Records will be grouped under ‘Type’ headings, one heading for each ‘Type’.
Within each ‘Type’, matching Records will be grouped under ‘Category’ headings, one heading for each ‘Category’.
Within each ‘Category’ heading, matching Records will be grouped under ‘Status’ headings, one heading for each ‘Status’.
Groups within groups are presented in a cascading fashion, as shown at 2 in the screenshot above. In this example, you can see Records that match:
Type = ‘New Staff Appointment’ and Category = ‘Default’ and Status = ‘New’.
Other ‘Type’ groups may have their own Category = ‘Default’ and Status = ‘New’ groupings within them, if any matching Records exist.
H
Help icon
Click to display a popup window showing a description of how to use the current page, window or field.
Hide/Show Column icon
Click this icon to display a Field Chooser of available headings (columns) in Risk, Compliance, KRI or Event Record lists.
To show a column in a list: Drag a header title from the Field Chooser into the list’s column header area.
To hide a column in a list: Drag a column header from the list onto the Field Chooser.
History icon
Click to display the detailed history of a Process Control, Risk Assessment, Risk (Treatment), KRI Measurement, (Event) Task or Contract Task.
Home Page
When TriLine GRC is configure to not Return to Last Page, the Home Page is the first page displayed when you log in to TriLine GRC. Your Home Page can be either the My Tasks page (default) or the Dashboard.
To swap Home pages, click the House icon when it appears on either the My Tasks page (default) or the Dashboard.
I
Import Data icon
Click to import information into TriLine GRC.
Important icon
This icon is displayed to draw your attention to empty mandatory fields when you try to save changes to Records. It is also used to highlight important interface and help information.
J
There are currently no entries for this section.
K
KRI
Key Risk Indicators (KRIs) are metrics used to measure Risk.
L
Layouts
As you customise a grid using the Column Chooser, you can save each of these layouts for reloading at another time.
1 ‘Saved Layouts’: Select from previous saved layouts to load.
2 ‘Layout Load’ icon: After Selecting a Saved Layout 1, click this icon to load this layout
3 ‘Delete Saved Layout’ icon: Click this icon to delete layout selected in 1.
4 ‘Update Current Layout’ icon: Click this icon to save layout changes to the layout displayed in 1.
5 ‘Save Current Layout’: Click this icon and type a new layout name in the field provided. Then click the icon to add this layout to the Saved Layouts list 1
6 Reset Grids: Click this icon to reset the current grid.
Linked by Tags Page
Click the Show Records linked by Tags icon next to any Tags edit field that contains tags.
The following page is displayed:
1Column Headers: Use the controls in the Column Headers to filter the Record List 2.
2 Record List: Displays all the TriLine GRC Records (that you have security access to) that have been Tagged with one or more of the Tags in the edit field.
3 Summary band of the number of linked Records.
4 ‘Export to Excel’ icon: Click this icon to export the list of Records to disk as a Microsoft Excel file.
5 ‘Show Advanced Filter’ icon: Click this icon to display the Filter Builder, where you can create more complex Record filters.
6 ‘Close’ icon: Click this icon to close the ‘Linked by Tags’ Page.
Records with multiple Tags
When this Page displays Records with multiple Tags, each Tag name is displayed across the top of the Record list (see 7 below). You can quickly filter the Records to show just one of the Tags by clicking the Tag name.
Click to log in to TriLine GRC after supplying your username and password.
Log Out icon
Located at the top-right corner of the main TriLine GRC page. Click to log out of TriLine GRC.
Alternatively click the User Icon and select Logout.
M
Month/Year Selector
Access the Month/Year Selector by clicking the Month/Year indicator ( 3 ) in the Date/Time Selector.
The Month/Year Selector provides controls for quickly selecting a month and year up to decades in the past or future.
1 Month selector: Click on a month to select it. The selected month is highlighted by a pale orange rectangle.
2 Year selector: Click on a year to select it. The selected year is highlighted by a pale orange rectangle.
3 ‘Previous Decade’ icon: Click to show the decade of years previous to the decade displayed.
4 ‘Next Decade’ icon: Click to show the decade of years after the decade displayed.
5 ‘OK’ button: Click this button to apply the selected month and year to the underlying Date/Time Selector. the Month/Year Selector closes once you click the button.
6 ‘Cancel’ button: Click this button to close the Month/Year Selector without applying the selected month and year to the underlying Date/Time Selector.
Appears under lists on some TriLine GRC pages (e.g. the "Event Types' Page).
Select a Record in the list and then click this icon to reorder the selected Record towards the top of the list.
_My Summary page
This page that displays, if you have any, your Current Tasks, your Responsibilities, tasks which you will be required to action, and your temporary Allocated tasks. If you have none of these, the page will be blank.
A Compliance Process, which can have Process Controls, and
A Risk, which can have Risk (Treatments).
Paste from Word
Paste from Word
Use Paste from Word for all pasting of text (not just MS Word text) into TriLine GRC Text editors. This includes copying and pasting between TriLine GRC text editors.
Always select Remove font family when pasting from an external editor.
Note: Do not place any JavaScript or any other executable code in any text field.
Position
A Position identifies a role within the organisation that has responsibilities for completing tasks, managing Compliances and (Events), or owning Risks, KRIs, and Contracts.
TriLine GRC is a position driven system. The advantage of this is that as people move in and out of positions, there is minimal changes required. The user id, name and email can be changed, but the position responsibilities continue as before.
Popup window
A small window containing fields and controls for you to provide information relating to a Task or Record.
Portal
Used mainly by non-TriLine GRC users to raise Events and record Registers and view the Documents Library.
Predefined Task
A Task template that can be selected by the (Event) Type Manager when assigning Tasks relating to a reported (Event).
Predefined Tasks are a useful timesaver for assigning standard Tasks that are always carried out when a particular type of (Event) is reported.
Preview icon
Click to preview (and optionally print) the current Record.
Preview Page
The Preview Page is displayed when you click a ‘Preview’ icon in a Record or List.
On the Preview Page, you can:
view the information in the preview report,
search for a particular Record or Records,
print the entire Preview report, if multi-page,
print the current page only, and
export the Preview report in .pdf or .rtf format.
1 Preview Page title.
2Preview Page Toolbar: Use these tools to search, print, navigate and export the Preview report.
3 Page Help icon: Click this icon to view basic information about working with the Preview Page.
4 Preview Name: For example, if you preview an Event Record or Event List, the Preview Name will be ‘Event List’.
5 Your organisation’s Company Name.
6 Record Header: Each Record in the Preview report includes a Record Header to visually separate and organise the information in the Preview report.
7 Record Details area: Each Record’s details are printed below the related Record Header 6.
8 Preview Report page footer: A page footer section containing the date the Preview report was generated and the current page number.
9 ‘Close’ icon: Click this icon to close the Preview Page.
This window is displayed when you click the ‘Search Window’ icon 1.
The Preview Page Search popup window provides several controls for you to find information or specific Records within a Preview report.
2 ‘Search’ field: Type your search text into this field.
3 ‘Find Next’ or ‘Find Previous’ buttons: Click this button to find the next match in the Preview report for the text you enter in the ‘Search’ field 2.
4 ‘Match case’ checkbox: Tick this checkbox to limit the search to matches with the case of the ‘Search’ text 2.
5 ‘Match whole word only’ checkbox: Tick this checkbox to limit the search to full text matches with the content of the ‘Find what’ text 1.
6 Search Results: List of matches when you click the ‘Find Next’ button 3.
7 Search result link: Click a Search Result to display where this text appears in the Print Preview.
8 ‘Open/Collapse’ icon: Click this icon to close the Search window. Once open, this icon is the only way to Collapse the additional options panels.
Preview Page Toolbar
This toolbar is displayed on the Preview Page (report page). Use these tools to search, print, navigate and export the Preview report.
1 ‘First Page’ icon: Click to display the first page of the Preview report. This icon is disabled when the first page is displayed or there is only one page.
2 ‘Previous Page’ icon: Click to display the previous page of the Preview report. This icon is disabled when the first page is displayed or there is only one page.
3 Page Status indicator: Displays the current page number, total number of pages, and includes a drop-down list so that you can select a specific page of the Preview report.
4 ‘Next Page’ icon: Click to display the next page of the Preview report. This icon is disabled when the last page is displayed or there is only one page.
5 ‘Last Page’ icon: Click to display the last page of the Preview report. This icon is disabled when the last page is displayed or there is only one page.
6 ‘Multiple Page’ icon: Click to toggle the display multiple pages (scroll down and up) or a single page.
7 ‘Zoom’ icon: Click to adjust the amount of zoom.
8 ‘Print Report’ icon: Click to print all pages of the Preview report.
9 ‘Print Current Page’ icon: Click to print the current page only.
10 ‘Export To’ icon: Click the ‘Export To’ icon to Save a copy of the report in your preferred docuement or image type. Refine your Export To settings in item 14 ‘Export Options’.
11 ‘Search’ icon: Click the ‘Search’ icon to search the report. Click the Collapse icon 13 to close this panel.
12 ‘Show Help’ icon: Click this icon to display basic information about working with the Preview Page.
13 ‘Open/Collapse’ icon: Click this icon to close the Search window.
14 ‘Export Settings’ icon: Click this icon to change your Export settings. Once open, this icon is the only way to Collapse the additional options panels.
Print icon
Click to print the current Record.
Q
There are currently no entries for this section.
R
Record
Any Compliance Process, Risk, KRI, Event or Contract.
Register Form
An Register Form is a collection of Register Form Fields designed to capture relevant information from someone reporting a Register.
Each Register Type has its own customisable Register Form.
Register Form Field
Every Register Type has its own collection of Register Form Fields that a user must complete when recording a Register of that type.
Register Form Fields are created and managed by Administrators and selected Designers as part of creating or editing an Register Type.
Each Register Type is designed to capture information related to a specific Register.
The Administrator creates Register Types required by the organisation during TriLine GRC configuration setup, and thereafter as needs change.
Users must select an Register Type when they recording a Register using TriLine GRC. The appropriate Register Form is then displayed for the user to complete and submit.
An Register Type can be flagged as not available on the portal, making the Register Type available only when recording a Register using TriLine GRC and not through the Portal.
Register Type Owner
A Register Type Owner is responsible for handling all Register that are submitted for a particular Register Type.
Register Type Owners are notified by email when a new Register of an applicable type is submitted.
An Register Type must have at least one default Register Type Owners assigned. Each Register Type Owners may be responsible for one or more Register Types.
Register Type Owners can see the Register Types for which they are responsible by selecting the Roles & Responsibilities tab on their ‘My Summary’ page.
Note: A Register Type Owner must be an active Position in your TriLine GRC system.
Reset Grids icon
Click this icon to reset the current grid.
Required Field
A Required Field is one that must be completed before you can add/update a Record or complete an Event.
Required Fields are identified by a red asterisk *.
Risk Appetite
Most organisations tolerate a certain amount of Risk, balanced against the value gained from its activities where that Risk is a factor. For example, an aggressive Share Management organisation would likely balance a high tolerance for Risk against the potential returns on investment.
Risk Appetite indicates the level of Risk that an organisation is willing to tolerate. Every organisation has a different Risk Appetite. Influencing factors include:
The Regulatory environment in which the organisation operates,
Whether the organisational culture embraces risk or is risk-averse,
Whether the expected outcomes from the organisation’s activities outweigh the Risks involved,
Shareholders attitude to Risk, and
The level of Risk that the Board is willing to embrace.
In TriLine GRC, Risk Appetite is an optional feature that you can enable in the Risk Configuration settings. Once enabled, you can specify a Risk Appetite value for each Risk, and generate Risk Reports that show which Risks exceed your organisation’s Risk Appetite.
Risk Matrix
The Risk Matrix is accessed from the Risk Matrix icon. The Risk Matrix will highlight the Inherent and Residual Rating of the entity you are viewing the Risk Matrix from. The Legend highlights which Rating is which.
Note: All labels in (Brackets) and all colours in the Risk Matrix are configurable and may be different in your TriLine GRC system.
The Risk Matrix is a configurable 5 x 5 matrix that TriLine GRC uses to display a Risk Rating based on a Risk Assessment of Likelihood versus Consequences (or equivalent terms used by your organisation).
Example of use
Using the example Risk Matrix shown above, if you review a Risk and determine that the Risk has a Residual ‘Possible’ Likelihood of occurring with ‘Moderate’ Consequences, the Matrix returns a value of ‘Moderate’.
Configuration
The Risk Matrix is completely configurable to your organisation’s needs. You can set the colour and Rating for each combination of ‘Likelihood’ versus ‘Consequences’ by selecting Maintenance | Risk | Matrix from the Main Menu. You can also change the terms ‘Likelihood’ and ‘Consequences’ (and all labels within each,) if your organisation uses different terminology.
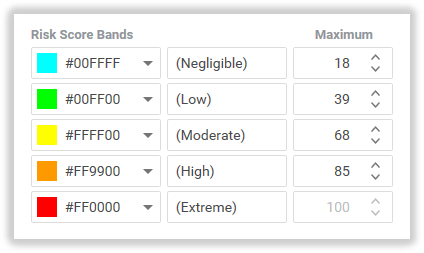
Risk Scores are classified into Risk Score Bands determined by the values and colours set by the TriLine GRC Administrator. Example Risk Score Bands shown are:
Negligible,
Low (green),
Moderate (yellow),
High (orange), and
Extreme (red).
The exmaple above shows some sample Risk Score Band settings:
Risk Scores from 0 to 18 will be classified in the ‘Negligible’ Band,
Risk Scores from 18 to 39 will be classified in the ‘Low’ Band,
Risk Scores from above 39 to 68 will be classified in the ‘Moderate’ Band,
Risk Scores from above 68 to 85 will be classified in the ‘High’ Band; and
Risk Scores above 85 will be classified in the ‘Extreme’ band.
For each Risk, TriLine GRC displays Risk Scores and Risk Score Band information (colour and Band title) on the (Assessment) | Rating tab of the Risk Page and the Complete Risk Review Page.
Risk Score Bands can be used as filters in Risk Reports and are also an optional column in Risk Lists.
Risk Score Calculation
Risk Score is related to the Risk Matrix—the ‘Likelihood’ and ‘Consequence’ components by default. TriLine GRC calculates and graphically displays the Risk Score on related Pages.
Risk Scores are calculated by following a configurable mathematical formula involving—by default—‘Likelihood’ and ‘Consequence’ values. These values are also configurable. (See the example following.)
A standard practice is to allocate a low score to the lowest Risk components (i.e. ‘Rare’ Likelihood and ‘Insignificant’ Consequences). For each subsequent higher Risk Rating, the value is increased, culminating in the highest Risk components (‘Almost Certain’ Likelihood and ‘Extreme’ Consequences) each attracting the highest score. (See the example below.)
Calculation formula Example
This exmaple calculation is set as:
Likelihood x Consequence = Risk Score
Using the example ‘Likelihood’ and ‘Consequences’ Risk Rating values above, a Risk with a ‘Possible’ Likelihood (6) and ‘Minor’ Consequences (4.5) would result in a Risk Score of 27 (6 × 4.5).
Note: Values for Adequacy and Management are also shown in the example screenshot above. In our calculation example, they will have no bearing on the Risk Score because our formula only includes ‘Likelihood’ and ‘Consequences’. However, you can edit the formula to include either or both Adequacy and Management values to refine the Risk Score.
Configuration
The example screenshot above shows values between the lowest and highest Risk Ratings in the range of 1 to 10. You can set these scores to whatever interval, or range you require.
Availability of Risk Scoring options
The Risk Scoring options must be enabled in the ‘Risk Assessment’ configuration settings in order to use the Risk Score Calculation feature.
Located at the top of the TriLine GRC main screen, next to the Site Search field. Click to search your organisation’s entire TriLine GRC database for matches to the criteria you specify in the Site Search field. (Search results may be limited by security settings.)
Security Group
A Security Group is collection of Positions. The Security Group is used to assigned Edit or Vaccess rights to Records, Main Menu options and functionality within TriLine GRC.
Security Group Membership icon
Click to add Positions to, and remove Positions from, a ‘Records’, ‘Create’ or ‘Interface’ Security Group.
‘See Own Data Only’ field
‘See Own Data Only’ is an optional setting when adding or editing a Position.
The intent of this field is to restrict the information a Position can see to that which the Position needs for a given role. Understand, however, that the more responsibility a Position has for a Compliance, Risk, KRI, (Event), Contract or associated Task, the more information will be visible to that Position in order to perform that role.
As a general rule, for Positions with ‘See Own Data Only’ selected, TriLine GRC provides scaled access to Compliance Processes, Risks and KRIs, (Events), Contracts, and associated Tasks as follows:
The Position will not see the Record or Task anywhere in TriLine GRC.
Position is set as ‘Actioned By’ (applies to Risk Treatments, Risk Reviews, Process Controls, KRI Tasks, (Event) Tasks and Contract Tasks):
The Position will have access to that Task.
The Position will not see who else is an ‘Actioned By’ Position for the Task.
The Position will not see any other Tasks associated with the Parent Compliance Process, Risk, KRI, (Event) or Contract (unless they have some responsibility in any of those Tasks).
Position is set as ‘Task Responsibility’ (Risk Treatments and Process Controls) or ‘Escalate To’ (Risk Treatments, Risk Reviews, Process Controls, KRI Tasks, (Event) Tasks and Contract Tasks):
The Position will see all other Positions who are set as ‘Actioned By’ for the Task.
The Position will not see any other Tasks associated with the Parent Compliance Process, Risk, KRI, Event or Contract (unless they have some responsibility in any of those Tasks).
Position is set as the ‘Owner’ (Risks, KRIs and Contracts), ‘Responsible Officer’ (Compliance Processes) or ‘Managed By’ (Events):
The Position will have full visibility of the:
Risk, KRIs, Risk Treatments and KRI Tasks,
Compliance Process and associated Process Controls, or
(Event) and associated (Event) Tasks, or,
Contract and associated Contract Tasks.
If the Position also has ‘Edit’ Record Security Rights to a Risk, Compliance Process, KRI, (Event) or Contract, the Position can update all information in the Record.
Click to display options for showing only specific Records based on criteria you supply.
Show Advanced Filter icon
Click to display advanced options for showing only specific Records based on criteria you supply.
Show Usage icon
Where this icon appears next to a selected Record, click the icon to display a list of Records that are linked to the selected Record.
Example: Click the icon next to a Position entry to display all Risk, Compliance Process, Event and other Records that the Position has Security Rights to, is responsible for, or has involvement with.
Site search
Search all TriLine GRC Records, using search term(s).
Located at the top of the TriLine GRC main screen. Enter search text into this field, then click the Search TriLine GRC icon.
Sub Categories icon
Click this icon to view and edit the Sub Categories of an Event Category.
T
Tags
Tags are useful for linking diverse Records relating to a task, project or research activity.
For example, you might have items related to AML (Anti Money Laundering) legislation in Compliance, Risk, KRI and Event Records. By tagging them with ‘AML’, you can then create a report listing everything in the system relating to that Tag.
Quick access to similar Records
When looking at a Record, you can also quickly view other Records with the same Tag(s) via the ‘Linked by Tags’ Page.
Use Tags as report filters
Tags are also available as filters on almost every report and chart.
For example, you could produce a report of all Compliance Process Tasks completed in the last 12 months relating to the Tag ‘AML’.
Where a ‘Tags’ panel (see 1 above) is displayed on a Record, you can click in the ‘Tags’ field (see 2 above) and select from a drop-down list of available Tags.
Selected Tags are displayed in the ‘Tags’ field (see 3 above). Click to the right of the selected Tag(s) to add more Tags as needed.
Remove a Tag by clicking the Delete icon located on the right of the Tag (see 4 above).
You can also view all other TriLine GRC Records that have the selected Tags applied to them. Click the ‘Show Records linked by Tags’ icon (see 5 above) to display the ‘Linked by Tags’ Page. (The icon is disabled if no tags are selected.)
Reports: To filter a report by Tags, select a Tag from the ‘Tags’ drop-down list in Report Filters.
A Task is an activity relating to the management of it’s owning Module record.
A Task consists of Detail or Instructions, a schedule of when the instructions are to be done, the Actioned By positions that will do the instructions, and the Positions Responsible and Escalate To (notification task was not done on Due Date)
Tasks schedules can be cyclic (automatic) at regular intervals, or adhoc (manually determined) occurrences.
(such as Process Controls, Risk Reviews, Risk Treatments, KRI measurements, Events and Contracts.
A Current Task is generated for each Actioned By on the First Reminder Date of the Task schedule. Note: Each Current Task generated from this Task schedule is it own separate entity from this Task.
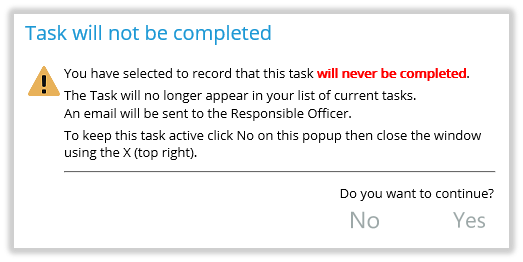
The ‘Task Not Completed’ icon is displayed on ‘Complete (Task)’ Pages and provides the option to close the Task as ‘Not Completed’ (i.e. will never be completed).
When you click the ‘Task Not Completed’ icon, the ‘Task will not be completed’ dialog is displayed as a caution. Click ‘Yes’ to proceed, or ‘No’ to leave the Task open.
When a task is submitted as ‘Not Completed’, TriLine GRC notifies either:
The ‘Escalate To’ position for the Task, or
The default ‘Escalate To’ Position for the ‘Actioned By’ user if no Task ‘Escalate To’ Position has been set, or
The Task Responsible Officer (Process Controls, Risk Treatments, Contracts), Event Manager, KRI Owner or Risk Owner if the ‘Actioned By’ Position has no ‘Escalate To’ Position recorded.
When this option is not ticked, the ‘Task Not Completed’ icon is hidden on ‘Complete (Task)’ Pages and users must close all Tasks as ‘Completed’.
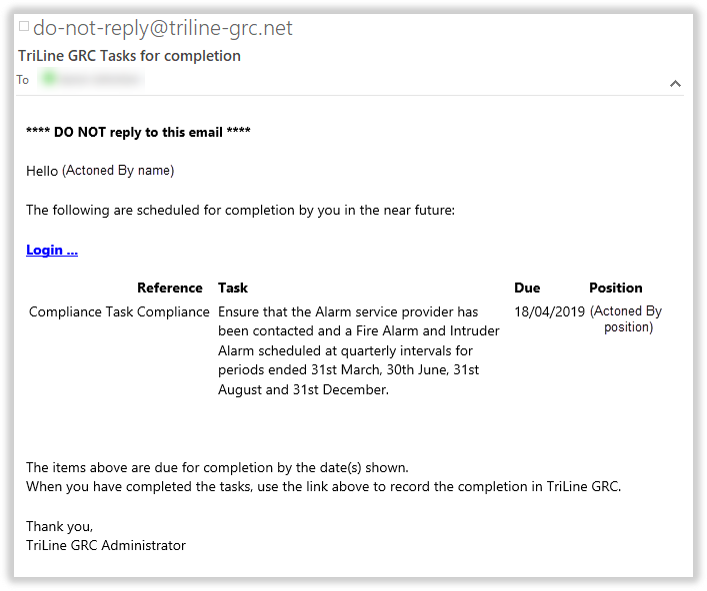
Task Reminders and Due Dates
In TriLine GRC, the process of generating a Task ( such as a Process Control, Risk Review, Register or Event Task etc) happens as follows:
On the morning of the ‘1st Reminder’ day, at the TriLine GRC Monitor ‘New Actions Check’ time (or prior working day if the Reminder day is a Saturday, Sunday or Public Holiday):
The Task is generated for each of the ‘Actioned By’ Positions (the Task appears in each Position’s ‘Current Tasks’ list), and
TriLine GRC sends a ‘Tasks for completion’ notification email containing the schedule for completion (see example below) to each of the ‘Actioned By’ Positions.
Example Notification Email
Here’s an example describing the process:
:
Example Task
A Risk Treatment has been created that must be Actioned on the last day of every month (the Due Date).
The Risk Treatment is set up so that a ‘Tasks for completion’ email will be sent to ‘Actioned By’ Positions 7 days before the Task Due Date.
How TriLine GRC processes each iteration of this Task
7 days before the Task Due Date (during the hour of the morning set in the ‘New Actions Check’ field of the the TriLine GRC Monitor configuration settings), TriLine GRC emails the ‘Tasks for completion’ email to the Task’s ‘Actioned By’ Position.
At the same time as the email is sent, the TriLine GRC Monitor generates the Task and it becomes available in the ‘Current Tasks’ List for the ‘Actioned By’ Position.
Changing the Due Date for a Current (generated) Task
:
You may want to postpone the Due Date for a Task that has been generated (because the ‘Actioned By’ Position is away, for example). Your TriLine GRC Administrator can do this for you using the ‘Change Task Due Date’ function in the Maintenance Menu (Maintenance | Change Task Due Date).
(TriLine GRC Administrators: See the procedure ‘Change a Task Due Date’ in the topic Basic Configuration and Maintenance.)
:
Changing the Due Date for a Task that has not yet been generated
:
There may be times when you want to change the Due Date only for one iteration of a Task that has not yet been generated.
A reason for doing this may be to postpone a Task that requires review by a Committee because all Committee members won’t be available until sometime after the scheduled Due Date.
If you have the appropriate Record Security Rights, you can change the Due Date via the Task Record (e.g. Risk Treatment, Process Control)—with the following caution.
:
To prevent potential problems with notifications and the TriLine GRC Monitor, only change a Task’s Due Date via the Task Record either:
Before the ‘Tasks for completion’ email is sent out for the next Task iteration, or
At least one day after the Due Date of the Task.
Tip: If you need to change the Due Date for a Task where the email has been been sent but the Due Date has not yet been reached, ask your Administrator to change the Task Due Date for you (see ‘Changing the Due Date for a Current (generated) task’ above).
Task (Scheduled) date field
In ‘Schedule’ dialogs such as the Risk Assessment ‘Review Schedule’ tab, a (Scheduled) date field is now included alongside the ‘Next Due’ field:
The purpose of the Task (Scheduled) date field is to display the actual date when the Task will be generated and is useful when the ‘Next Due’ date falls on a non-working day, such as a weekend or Public Holiday.
Example
If the due date for a Task is 04/09/2015 and the ‘First Reminder’ days is 5, the Task will normally be generated on 30/08/2015.
Because this date falls on a weekend, the Task will instead be generated on the preceding working day, Friday 28/08/2015.
Note: If the ‘Next Due’ date falls on a working day then both the ‘Next Due’ and ‘(Scheduled)’ fields display the same date.
This dialog is displayed as a caution when a user clicks the ‘Task Not Completed’ icon in a ‘Complete (Task)’ Page. Click ‘Yes’ to proceed, or ‘No’ to leave the Task open.
Temporarily Reallocate Tasks icon
Click to temporarily reallocate Future Tasks to another Position for a specified period of time (e.g. while on holidays).
Note: Use the ‘Transfer Task to Position’ function to transfer Tasks for which you have already been notified.
Text Editor
The Text Editor is used extensively throughout TriLine GRC for adding comments, configuring help information and adding information to more complex text-related fields. The Text Editor usually displays all, or some, of the tools from the Formatting Toolbar, depending on the target text field. Use these tools (where available) to format text, add lists, hyperlinks, simple tables and more.
Text in TriLine GRC is stored as HTML. If you’re familiar with HTML, you can view and edit the HTML source by clicking the ‘HTML’ tab at the bottom of the popup window.
Click the ‘Preview’ tab to see how your formatted text will display in the target field.
When you have finished editing your text, click the ‘Save’ icon.
Note: Do not place any JavaScript or any other executable code in any text field.
Transfer Task to Position icon
Click to transfer a Task for which you have been notified (i.e. A Task in your My Tasks page) to another Position.
Note: Use the ‘Temporarily Reallocate Tasks’ function to temporarily reallocate Future Tasks to another Position for a specified period of time (e.g. while on holidays).
Transfer Task to Record icon
Click to transfer a Task for which you have been notified (i.e. A Task in your My Tasks page) to another Record.
A person who has been issued a TriLine GRC account and a Position within the TriLine GRC system.
V
There are currently no entries for this section.
W
Widget
A customisable chart used with the Dashboard. Widgets provide a snapshot of information relating to Compliance, Risk, KRI or Events.
The widgets on Interactive Dashboards allow you to drill down into the data.
Windows Authentication
The practice of configuring a TriLine GRC user account with the user’s Microsoft Windows login credentials. This practice is not recommended where your organisation requires high-level security principles, such as different user names and passwords for each system.