The Future Schedule displays when Tasks will be generated for a selected date range. The Future Schedule can be viewed either from a Task Due Date perspective, or a Task generated (Reminders) Date perspective.
The Reminder date of a task is the day the task will be generated.
The Due Date is the date the task should be completed by.
The Future Schedule Date Range is the From date to the To date.
A task that occurs during the Date Range can have 3 scenarios:
a task with a Reminder Date (A) before the From date, and a Due Date (B) in the Date Range,
a task with a Reminder Date (C) and a Due Date (D) in the Date Range,
a task with a Reminder Date (E) in the Date Range, and a Due Date (F) after the Date Range,
Date Ranges diagram
Dates for Tasks that generated before the From date (A), are highlighted with a red explanation icon.
Dates for Tasks that Due after the To date (F) are highlighted with a red explanation icon.
The ‘Future Schedule’ Page
The Future Schedule displays your schedule in a Due Dates range or a Reminder Dates range. If any part of the schedule of the to be generated task takes place over your selected date range, it will be listed here.
A red explanation icon will appear next to:
Reminder Sent dates that start before your From date and,
Tasks Due dates that finish after your To date.
This list can then be exported in your preferred file format.
The ‘Future Schedule’ Page
‘Future Schedule’ Page elements
ID
Element
Description
1
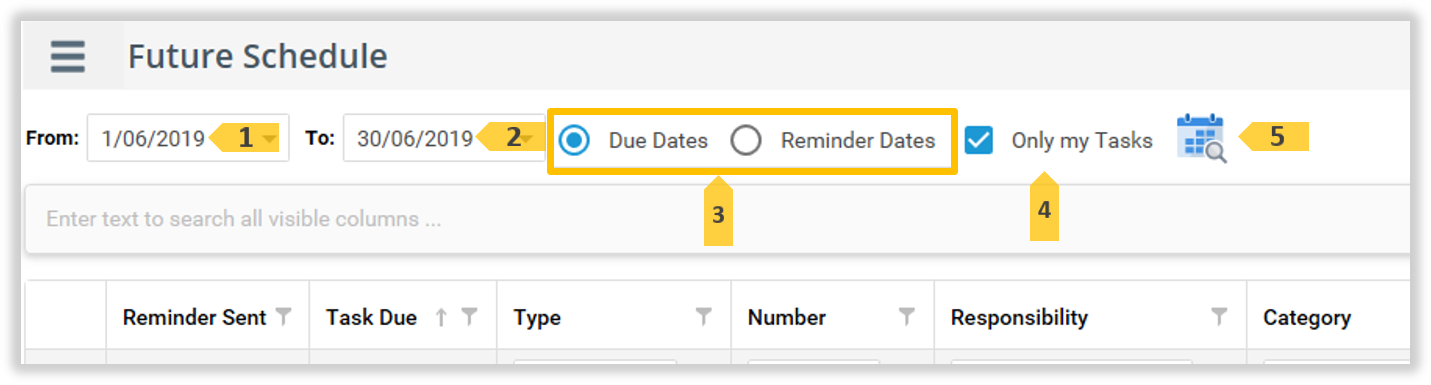
‘From’ Date Selector
Use this field to select start of your required date range.
Either type the date directly in the field using the format of the displayed date, or click the down arrow at the right of the field to select a date using the Date/Time Selector.
Note: Only the Date components of the Date/Time Selector will be displayed.
2
‘To’ Date Selector
Use this field to select the end of your required date range.
Either type the date directly in the field using the format of the displayed date, or click the down arrow at the right of the field to select a date using the Date/Time Selector.
Note: Only the Date components of the Date/Time Selector will be displayed.
3
‘Due Dates’ or ‘Reminder Dates’ Selector
Select Due Dates to see tasks that will be due in the date range.
Select Reminder Dates to see tasks that are to be generated in the date range.
Note: Tasks with dates that are generated before or are due outside the date range, but overlap the date range will be highlighted 14.
4
‘Only my Tasks’ checkbox
Click this checkbox to toggle between displaying all Future Schedule Tasks that your security access allows, or only those Tasks which are to generated to you.
This checkbox is ticked by default when the ‘Future Schedule’ Page opens.
5
‘Display Schedule’ icon
Once you have set the Date Range (1 and 2), click this icon to display the Future Schedule Tasks within the Date Range.
6
‘Show Advanced Filter’ icon
Hover over the Options icon, then click this icon to filter the Future Schedule Task List using the Filter Builder.
7
‘Export’ icon
Hover over the Options icon, then click this icon to display the export options. Click an option to export the current list of Future Schedule Tasks to that file format.
8
‘Show Help’ icon
Hover over the Options icon, then click this icon to display basic information about working with the Future Schedule Page.
Enter text here to search and filter the visible columns in the List 16.
Task Description Text Filter - Type some text into this field and TriLine GRC will filter the Future Schedule Tasks List to display only those Tasks with matching text in the Task Description.
Note: The List will be filtered a few seconds after you stop typing in this field.
Column Headers - Use the controls in the Column Headers to filter the displayed Future Schedule Tasks.
11
‘Reminder Sent’ Column
This is the date the task will be generated and a reminder will be sent.
Note: This date can be prior to the selected date range. Prior dates will be highlighted 14 as this information maybe important to you.
12
‘Task Due’ Column
This date the Task is due to be completed.
Note: This date can be after to the selected date range. After dates will be highlighted 14 as this information maybe important to you.
13
‘Frequency’ Column
This column displays how often each displayed Task is generated.
14
‘Outside date’ Icon
This icon indicates the date displayed is outside the date range. The task still occurs in your date range but we are highlighting this date is prior or after your date range as this information maybe important to you.
15
Task Record Link
Click on a Task Record Link to display that Task’s Record.
16
Future Schedule Tasks List
This is the list of Tasks that will be Due within the From and To date range inclusive.
Each Future Schedule Task in the list is displayed in two sections: the top section contains the Task Information that matches the List Columns; the lower section displays the Task Description.
About Temporarily Reallocate Future Tasks
When it is known in advance that a position won’t be available to complete their tasks during a period of time, these future tasks can be temporarily reallocated to one or more positions.
This function is extremely useful know periods of staff leave. Set the date range, choose the position, choose the tasks from the list. The date range may need to thought about in every single task’s case because Temporarily Reallocation is first about when the task is generated (more important), and second when the task is due.
Administrators can Temporarily Reallocate any Position’s future Tasks. Every other position can only Temporarily Reallocate their own future tasks. Ask your Administrator to apply Temporary Reallocation of your team members Tasks as circumstances may require.
You can select a time period and have all future tasks that are to be generated to that position, in that time period, temporarily reallocate to be generated to one or more positions. During that selected time period, the tasks that would normally generate to that position’s Current Tasks list, will instead generate to the temporarily reallocated other position’s Current Tasks list.
It is very important to note when tasks are generated (i.e. the task reminder date), because this is when the task is allocated to the Actioned By position. For all tasks that are to completed (i.e. the task due date) in the reallocation date range, look to see (use the future schedule) to see if the task is also generated (i.e. the task reminder date) in this date range. If the task reminder date is before the start of the reallocation date range, change the From date to be at least be the task reminder date.
This function is not for the tasks that are already generated and displaying in your Current Task list; use a transfer if you wish those tasks to be done by another position.
Note:
(1) This function only affects future Tasks that have not yet been generated yet.
(2) The Temporarily Reallocate task list is restricted to the security access of the Temporarily Reallocate To position.
** It is highly recommended to review the from Position’s Future Schedule for the required time period before hand. Create a Future Schedule using both Reminder Date and Due Date options.** Exporting this list and then use it as a checklist to ensure all tasks catered for. This is particularly useful for Task Team tasks.
Use the Future Schedule to determine if the Date Range needs to be from Date A to Date B rather than the actual leave period Date C to Date D.
Temporarily Reallocate Date Ranges
Using Date Range A to B, Temporarily Reallocates the first two tasks, only. Leaving the last task to be actioned by our original Position when they return as we deem they will need something to do.
Using Date Range C to D, Temporarily Reallocates the second and last task, only.
Using Date Range A to E (or D or F), Temporarily Reallocates the all three tasks.
As the Temporarily Reallocate task list is restricted to the security access of the Temporarily Reallocate To position, once again it is highly recommended to first view the Future Schedule for the dates of your selected time period. Export this list and refer back to it as you go through the Temporary Reallocate steps. All the tasks listed in this Future Schedule report will be the tasks you will want to temporarily reallocate, so be sure not to miss any tasks because of your reallocated position(s) is not having the right security access.
** A Task Temporarily Reallocates to a date range in which that task is not generated, has no cost; i.e. the task is not generated and hence not Temporarily Reallocated to the selected position.**
The ‘Temporarily Reallocate Future Tasks’ page
The ‘Temporarily Reallocate Future Tasks’ page
‘Temporarily Reallocate Future Tasks’ Page elements
ID
Element
Description
1
‘Reason’ field
Enter the reason for the Temporary reallocation.
2
‘From’ Date Selector ‘To’ Date Selector
Use these fields to select your required date range.
Either type the date directly into these fields using the format of the displayed date, or click the down arrow at the right of the field to select a date using the Date/Time Selector.
Note: Only the Date components of the Date/Time Selector will be displayed.
3
‘Reallocate To’ Selector
Select the Position to Temporarily Reallocate Future Task to.
Note: Selecting this position will cause the Task 4 tab(s) to appear. Each tab will contain for a list security restricted tasks, for this Reallocated position.
4
Task tabs
Each Task tabs contains a list security restricted tasks, for this Reallocated position can access.
Enter text here to search and filter the visible columns in the List 9.
Type some text into this field and the grid will filter the Tasks List to display only those Tasks with matching text in the text fields.
Note: The List will be filtered a few seconds after you stop typing in this field.
Column Headers - Use the controls in the Column Headers to further filter the displayed list.
6
Select All tasks
Click this to select all items in this list 9.
7
Column names and filters
Click the column filter icons to sort and filter the Task List.
8
Single task select
Click each task to select individual items in this list 9.
9
Task list
A list of security restricted tasks, for the Reallocated To 3 position.
10
Task selected counter
This counter displays how many task have been selected on this tab.
11
‘Task Reallocate’ icon
Click this icon to Temporarily Reallocate the selected future tasks.
Note: Tasks that cannot be Temporarily Reallocated will report an error. You may need to allocate these tasks to a different position.
The Task List
Selecting the Reallocate To position will trigger a list of tasks this Position has security access, to be displayed. This not a full future schedule list, but rather it is a list of only the very next task to be generated. So Reminder Date and Due Date may not be relevant to your selected date range; use a Future Schedule report to determine tasks that are important to your date range.
The purpose of the Task List is to allow selection of the tasks, for the selected Reallocate To Position.
This list is security restricted to the Reallocate To Position. You cannot allocate outside of their security access.
This displayed list of tasks (across the tabs) is not restricted to the From and To dates you just selected for the reason in the first note;** this allows you to see tasks before and after your selected period because New Tasks are generated on the Reminder Date. Reallocation starts on the specified From Date and you may need to set the From Date earlier to ensure the Task is generated to the Reallocate To Position. At the other end of the time period, task generated close the To date can have a Due Date after the To date, hence if you don’t temporarily reallocate these tasks, they will still generate to you and be waiting for you in your Current Tasks when you return and they will not be overdue yet.
The reallocating Position’s Future Tasks are displayed and organised into tabs for each module.
This is a security filtered list. Only tasks that the Reallocate To’s position has access to, are displayed. So special care must be taken (check back to the Future Schedule you created above) that all other tasks not displayed for this Reallocate To are also temporarily transferred to another position with the correct access.
Tasks are generated on the ‘Reminder’ date, hence You may need to consider moving your ‘From’ date forward if you do not want some tasks generated to you before you go.You may also consider not temporarily reallocating tasks that are generated before your ‘To’ date but are not ‘Next Due’ till after your ‘To’ date; you may wish to complete these yourself on your return.
In the displayed Task lists, tick the boxes next to the Tasks, in your time period, that you want to temporarily reallocate. Selecting Tasks outside of your time period will not have an effect on who the task is generated to; only tasks generated inside the To and From time period will be sent to the temporarily Reallocate To position(s). So it is fine to use the select all check box, knowing that only task generated inside the time period are temporarily reallocated.
Use the Task Team tab to temporarily reallocate all task to be Actioned By the your position in that task team. The temporarily reallocation must be to a position outside that task team as one positions cannot do two same tasks.
Procedures
Access Future Schedule
There are two ways to access the Future Schedule:
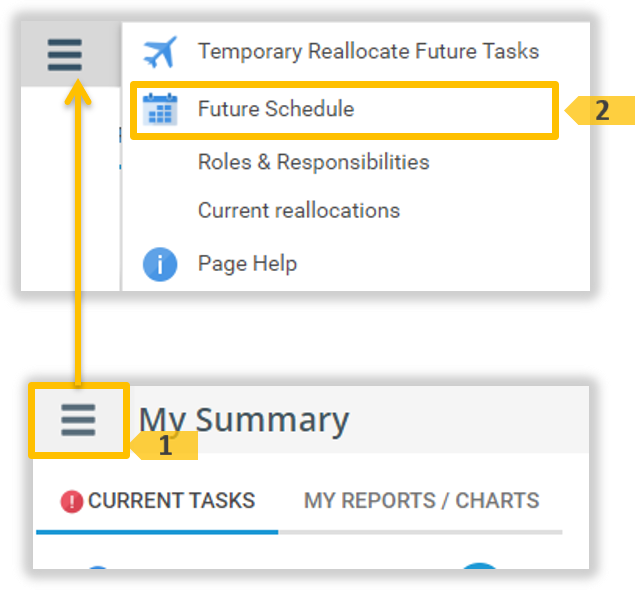
Option 1: From the main menu, click the My Summary tab. The My Summary page displays. Hover over, or click, the Options menu 1 icon. Click the Future Schedule2 option.
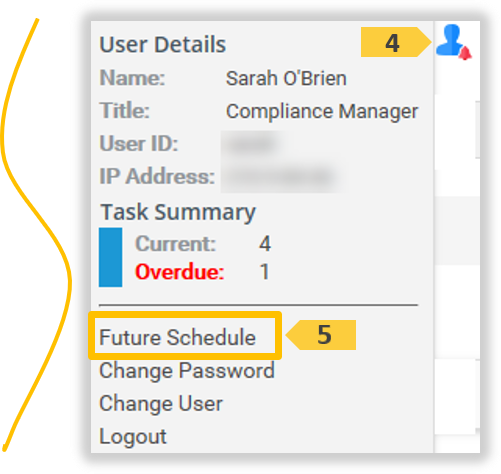
Option 2: Hover over (or click) the User Icon 4. The User window displays. Click the Future Schedule5 menu option.
The ‘Future Schedule’ Page is displayed with today as the default From and To dates.
Hover over the Options 1 icon, then click the Export 2 icon to display the export options. Click an option 3 to export the current list of Future Schedule Tasks to that file format.
Note: If you are using Internet Explorer, always use the SAVE AS option.
Access Temporarily Reallocate Future Tasks
From the main menu, click the My Summary tab. The My Summary page displays. Hover over, or click, the Options menu 1 icon. Click the Temporarily Reallocate Future Tasks2 icon.
The ‘Temporarily Reallocate Future Tasks’ window opens.
Administrators Temporarily Reallocate Future Tasks all Positions option
Administrators have the option to Temporarily Reallocate Future Tasks from any Position in the TriLine GRC system. If a staff member has gone on leave without temporarily reallocating future Tasks, contact your Administrator to complete this requirement for you. Administrators can click the ‘Select User’ field and choose the Position whose Tasks they want to temporarily reallocate.
Note: This field is only available to administrators. All other Positions can only temporarily reallocate their own future Tasks.
Use the ‘From’ and ‘To’Date/Time Selectors to set the date range for which you want to temporarily reallocate future Tasks.
Note: Only tasks generated on the Reminder day between the ‘From’ and ‘To’ are temporarily reallocated.
Click the ‘Reallocate To’ drop-down list and select the target Position to whom you want to temporarily reallocate the future Tasks.
Selecting this position will trigger Tasks tabs 1 to appear. Each Task tab will display the list of tasks the Reallocate To position can be temporarily reallocated.
Either, select the all tasks 2 option on each tab, or select individual tasks 3 as required.
Note: Only tasks generated on the Reminder day between the ‘From’ and ‘To’ are temporarily reallocated.
If the Tasks Teams 1 tab appears, either, select the all Task Team 2 option, or select individual Task Teams 3 as required. The Future Schedule created in Step 0 will indicate if this is necessary, and for which teams.
Note: Only tasks generated on the Reminder day between the ‘From’ and ‘To’ are temporarily reallocated.
The temporary reallocation must be to a position not in that task team, because one position cannot be allocated the same task twice.
Click the icon to reallocate all the selected Tasks. A Confirmation dialog is displayed. Click the OK button to proceed.
The ‘Existing Reallocations’ tab is displayed, showing all reallocated Tasks.
Repeat Steps 5 through 8 as required to cover all tasks identified in Step 0.
An email is sent to advise the Reallocate To Position of the reallocation.
From the My Summary Menu Option, click the Current Reallocations2 option.
The Current Reallocations window appears. Select the From 1 or To 1 Position to see the list of allocations. Each records displays allocation information including the period 3.
Neither, either or both the ‘From’ or ‘To’ tabs may be displayed depending on the reallocations done From or To the selected Position 1.
The ‘To’ tab (when displayed) shows Tasks that have been temporarily allocated to this Position 1From another Position.
The ‘From’ tab (when displayed) shows Tasks that this Position 1 has temporarily allocated To another Position.
Repeat this process if you want to reallocate more Tasks to different Positions, repeat this procedure but select a different Position from the ‘Reallocate To’ drop-down list.