Note:
Risk terms, text boxes and tabs that can be modified are shown in (brackets) in this section.
General Risk Settings
The TriLine GRC Configuration ‘Risk’ tab
Establishing an appropriate Risk Configuration is a crucial part of using TriLine GRC to its maximum effect. This process commences with the set-up of Risk parameters on this tab.
Changes made here will be evident when you open a Risk itself.
It is strongly recommended that you revisit your Risk and Compliance policies and measurement strategies prior to completing this tab. Particular attention should be paid to the terminology in use within your business and to whether your Board has set parameters such as a global ‘Risk Appetite’ for Risks.
TriLine GRC allows you to modify the headings of Risk fields to match your existing terminology.
Disabling Risk functions
You can disable Risk functions that are not (currently) required under your organisation’s Risk framework. See Configure General Risk Settings.
Risk Categories
Management of Risk is critical to any business. TriLine GRC is designed to assist you to both assess the potential impact of the Risk (financially, operationally, etc.) and to facilitate the completion of tasks designed to mitigate and reduce the Risk.
Risks must be classified into particular categories or groups.
Some Risks fall into commonly understood categories (e.g. ‘Financial Risk’, ‘Operational Risk’, etc.). The most frequently used categories include:
Risk Categories
Risk Category
Description
Capital
Financial management Risks including balance sheet and profit and loss statement considerations.
Conduct
Managing legislative and regulatory requirements and acting in an ethical, responsible and fair manner.
Credit
Management of credit arrangements including collection of debts owed to the business.
Environmental
Risks associated with the industry and broader economic climate and specific environmental Risks.
Governance
Management of the business in terms with requirements and obligations at Board and Senior Management level.
Insurance
Mitigating exposure to losses through appropriate insurance covers.
Liquidity
Managing cash flows and capacity to meet commitments as they fall due.
Market
Management of competitive pressures from other providers and product innovators.
Operational
Management of the operational tasks required to ensure effective and efficient ongoing control of the business.
Strategy Business Model
Business planning and strategies to ensure the ongoing success of the enterprise.
This list is only a guide and you can create as many Risk Categories as required to effectively manage your business Risks.
Risk Sub Categories
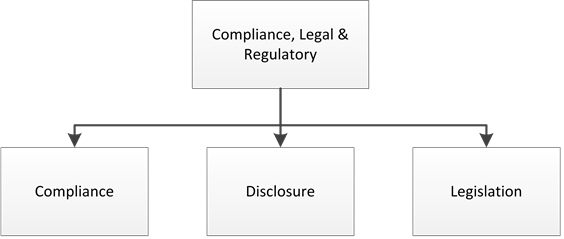
TriLine GRC allows you to establish two levels of Risk Categories, allowing for multiple Sub Categories under a main category (e.g. ‘Legislation’ as a Sub Category of the ‘Compliance, Legal & Regulatory’ category).
Examples of Risk Categories and Sub Categories
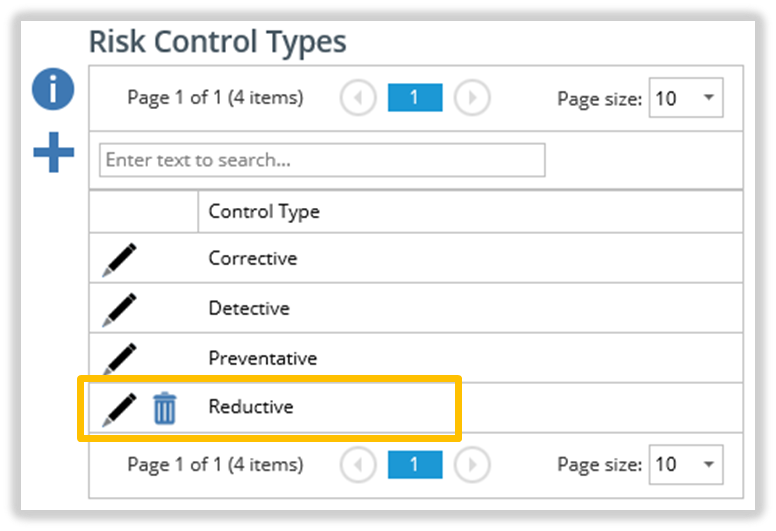
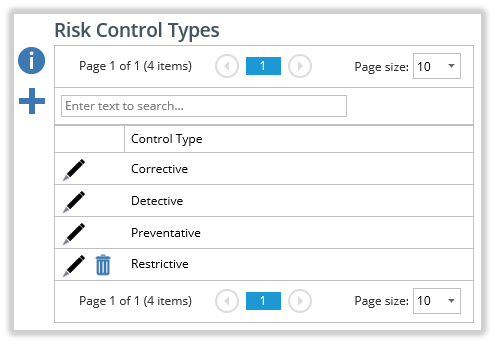
Risk Control Types
Risk Controls can be classified into different types that distinguish where they fit into the Risk cycle. By default, Risk Control Types are classified as Corrective, Detective and Preventative.
Risk Control Types
Risk Control Type
Description
Corrective
Utilised to correct the Risk once it has occurred.
Detective
Utilised to detect the Risk occurring.
Preventative
Utilised to prevent the Risk occurring.
Risk Definitions
Risk Likelihood Definitions
As part of the process of defining Risks, the likelihood of the Risk occurring must be considered. This factor integrates with the consequence rating to provide an indication as to the overall level of Risk to the organisation.
As with defining Consequences, an assessment must be made (to the best of your knowledge) of the possible frequency of the Risk occurring. These definitions are populated into TriLine GRC.
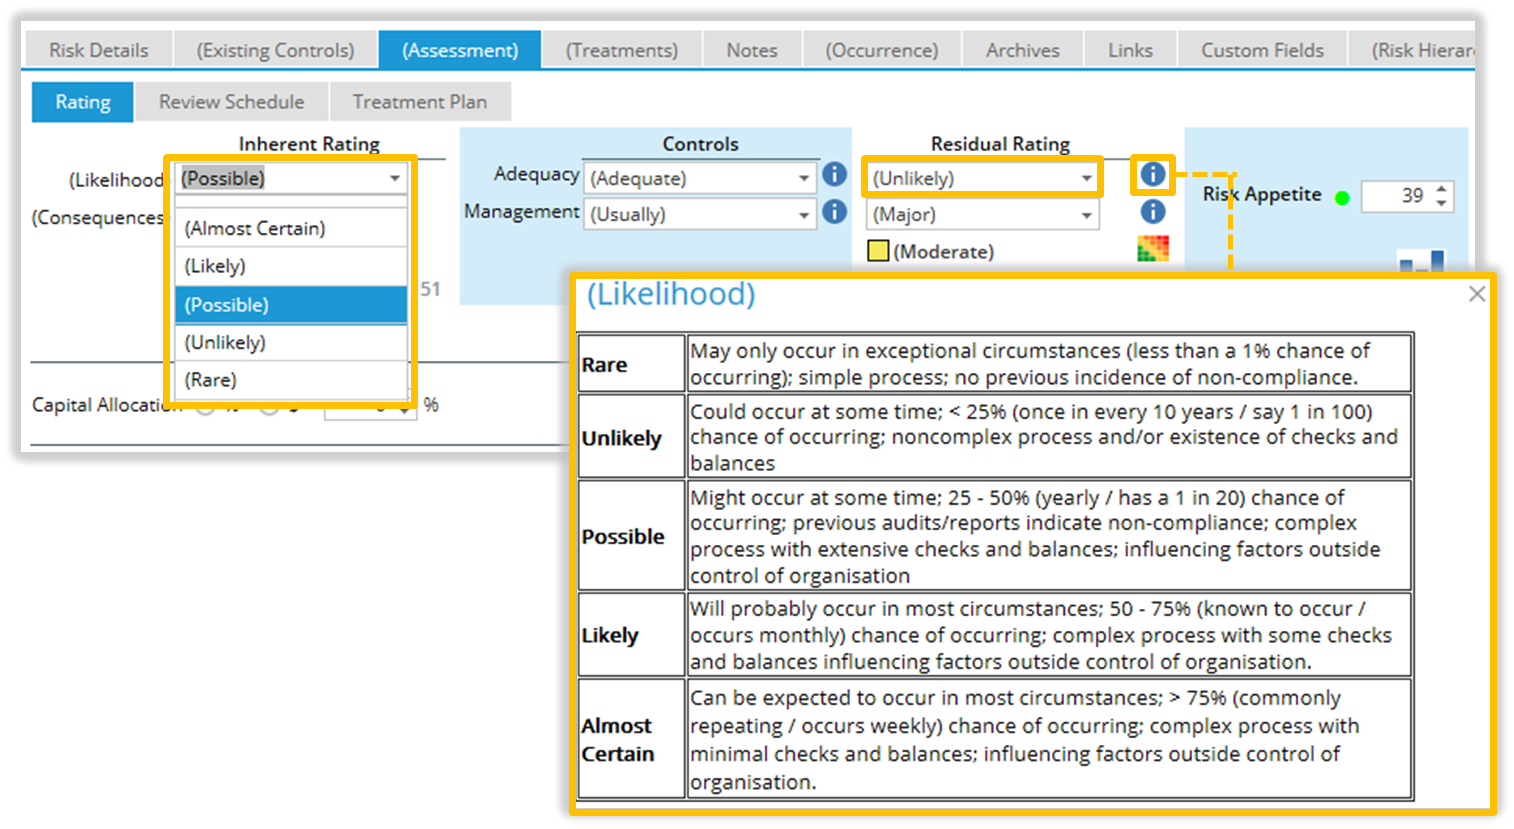
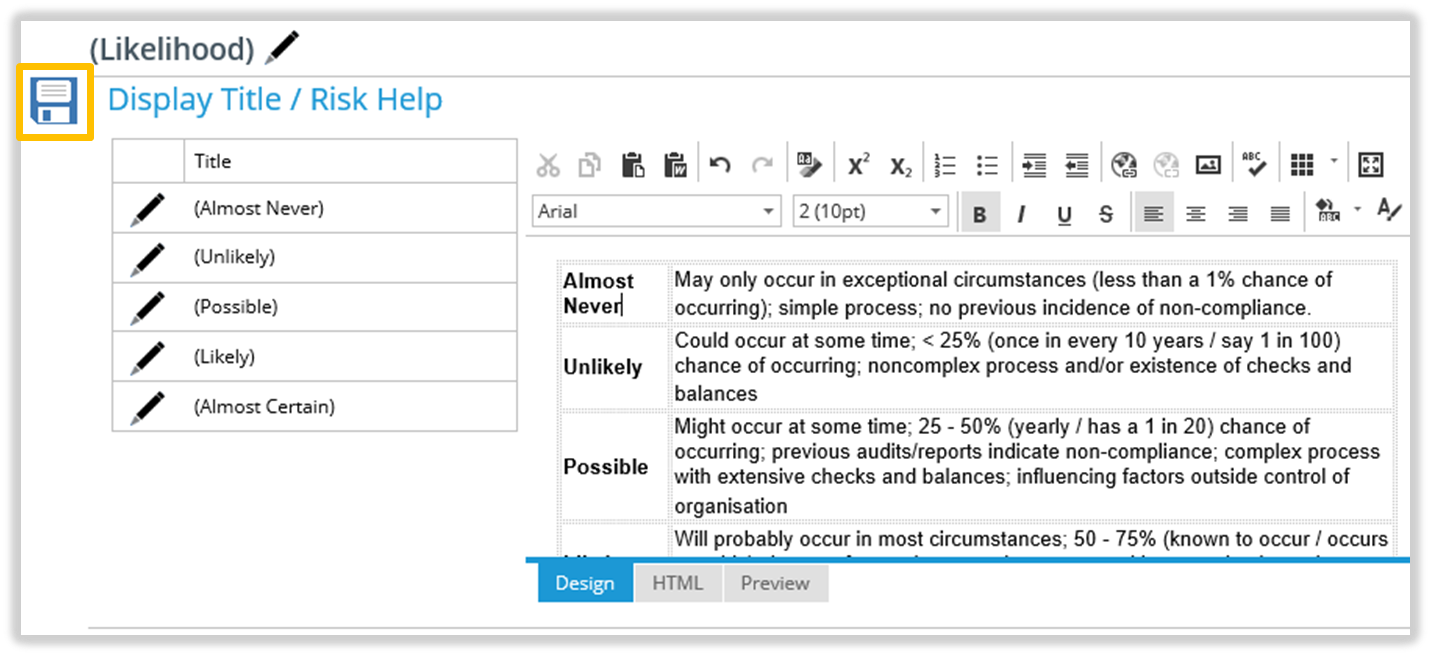
TriLine GRC provides five (5) Likelihood levels, ranging from remote through to definite.
Levels of Risk Likelihood
Limit
Likelihood
(Remote)
Rare
Unlikely
Possible
Likely
(Definite)
Almost Certain
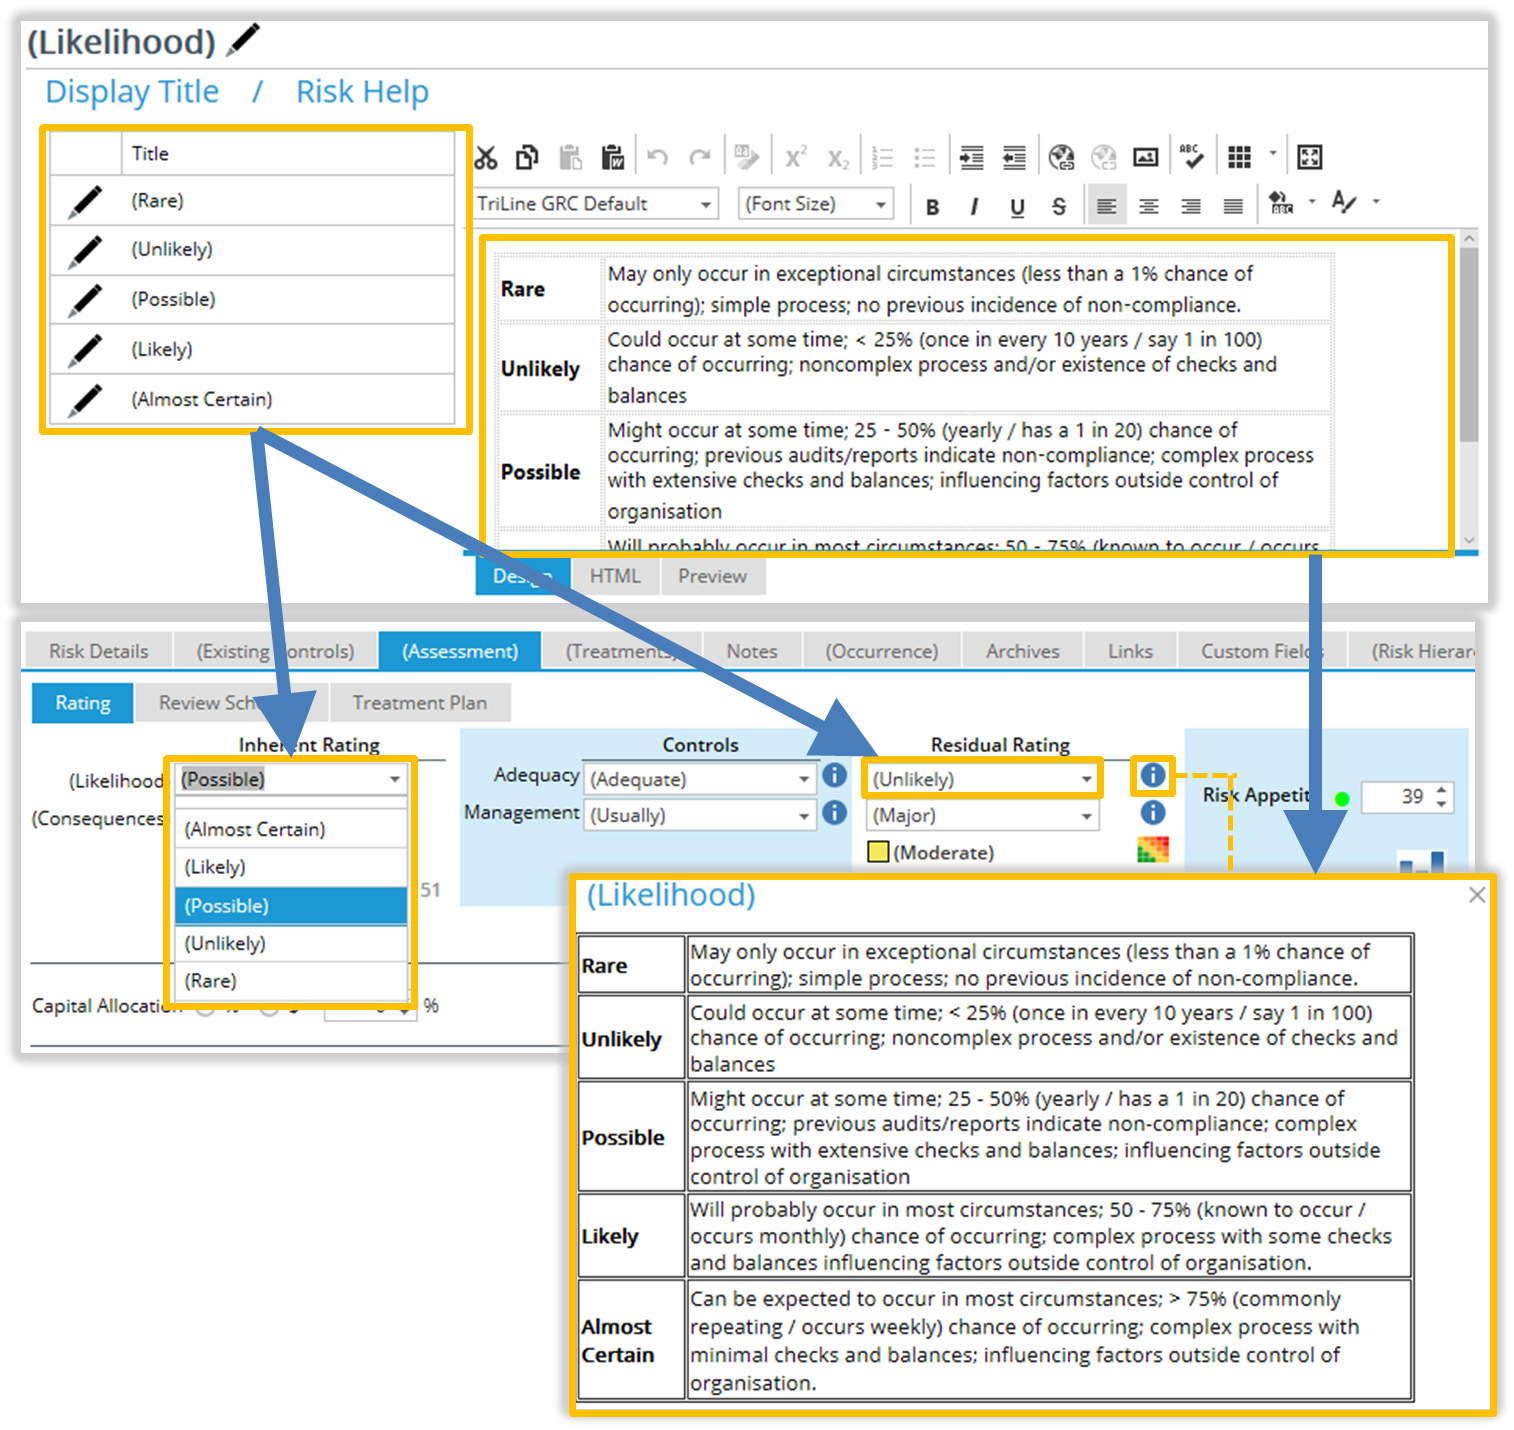
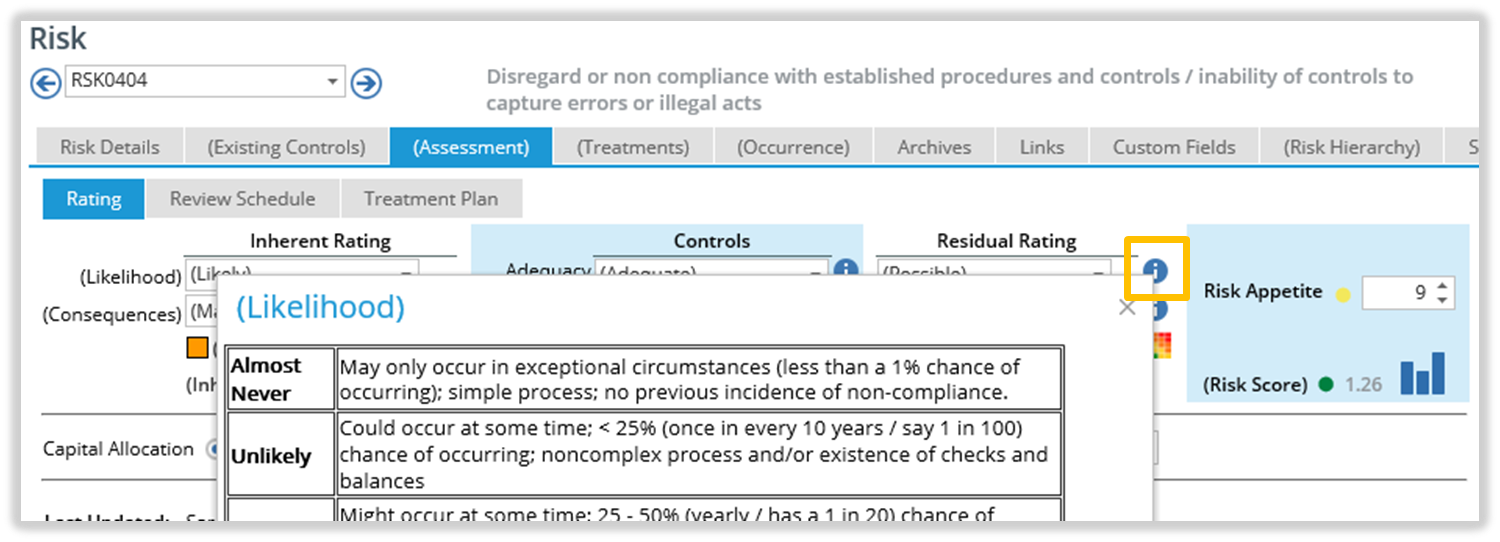
In use, Likelihood levels are selected on the ‘Risk Assessment’ Screen.
‘Likelihood’ levels on the Risk Assessment Page
During the set-up phase, you will need to determine the appropriate titles and definitions for each level of Likelihood. This is done via the ‘Likelihood’ page.
Access the Likelihood page from the Main Menu: select Risk | Likelihood.
What you edit in the Likelihood page affects what the user sees in the Risk Assessment page, as shown below.
‘Likelihood’ components of the Risk Assessment Page
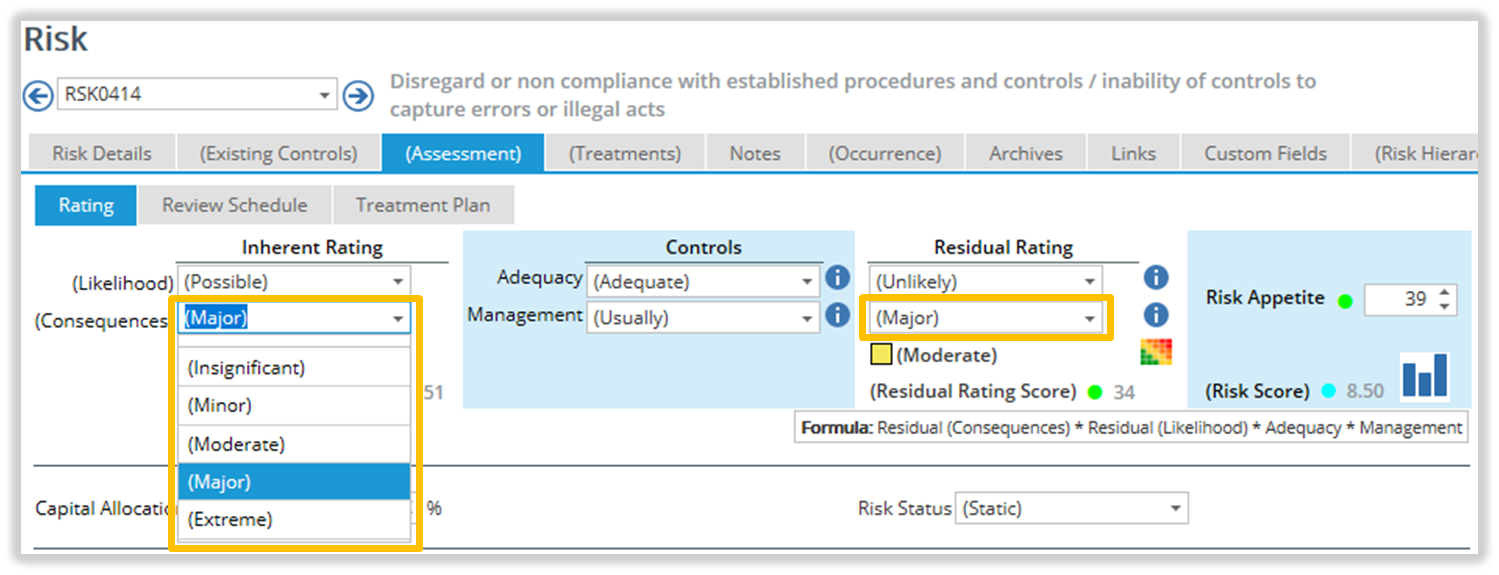
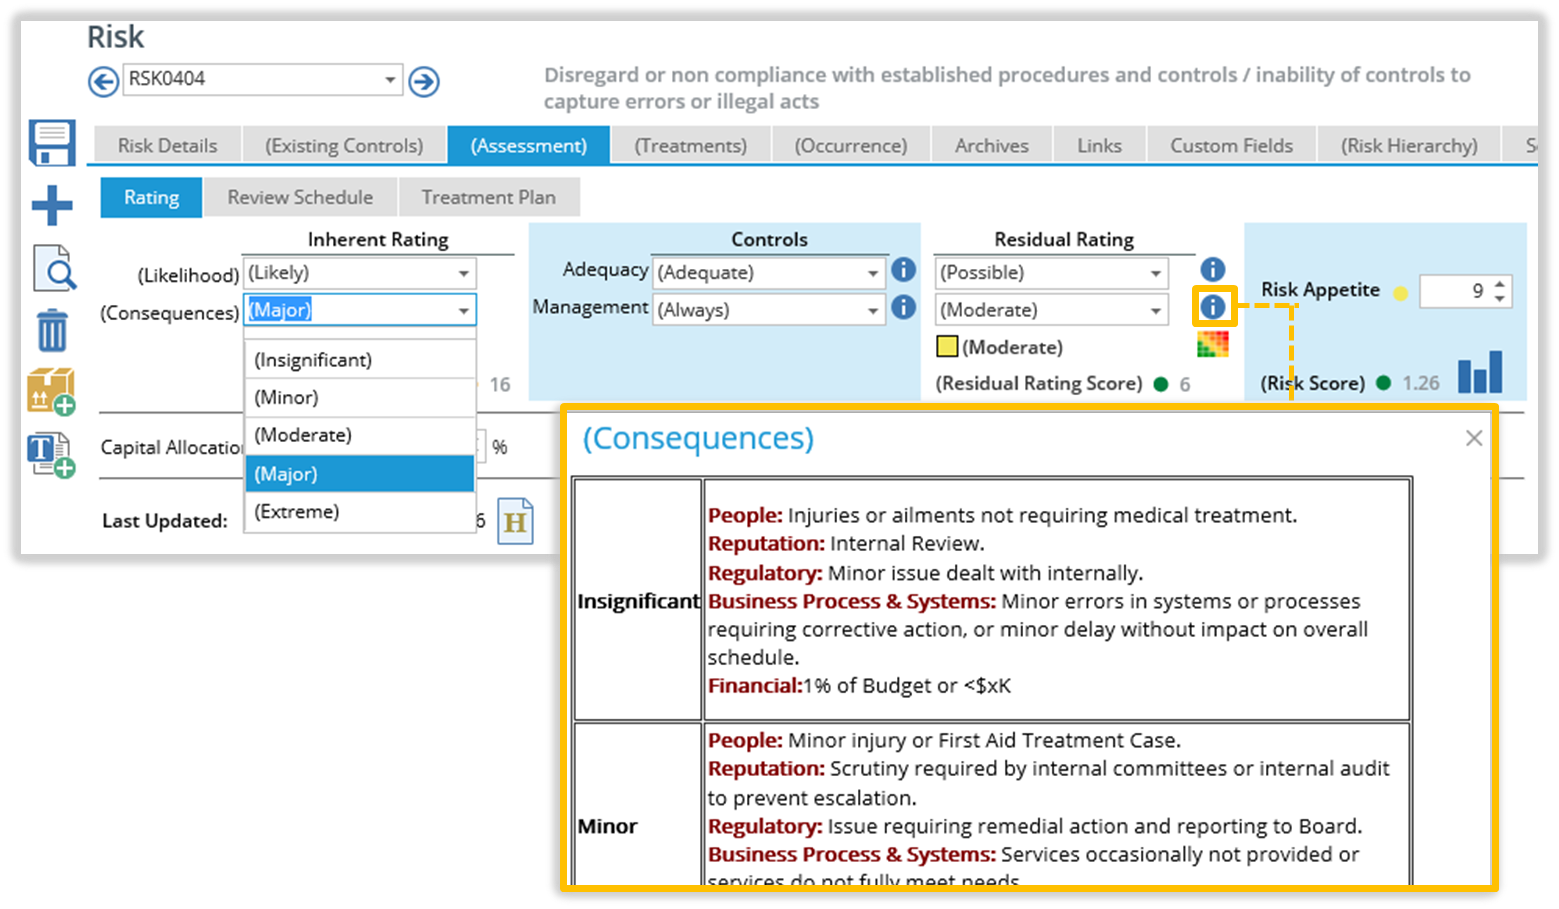
All Risks carry potential consequences and the assessment of those consequences lies at the heart of Risk Management.
Consequences can range from financial losses through to significant impacts on business operations, loss of life and damage to reputation.
A key step in Risk Management is to firstly determine what Risks your business faces and consider the consequences if the Risk occurred. Risks are then sorted into a priority order with Risk mitigation planning focusing on those Risks that carry the highest level of impact.
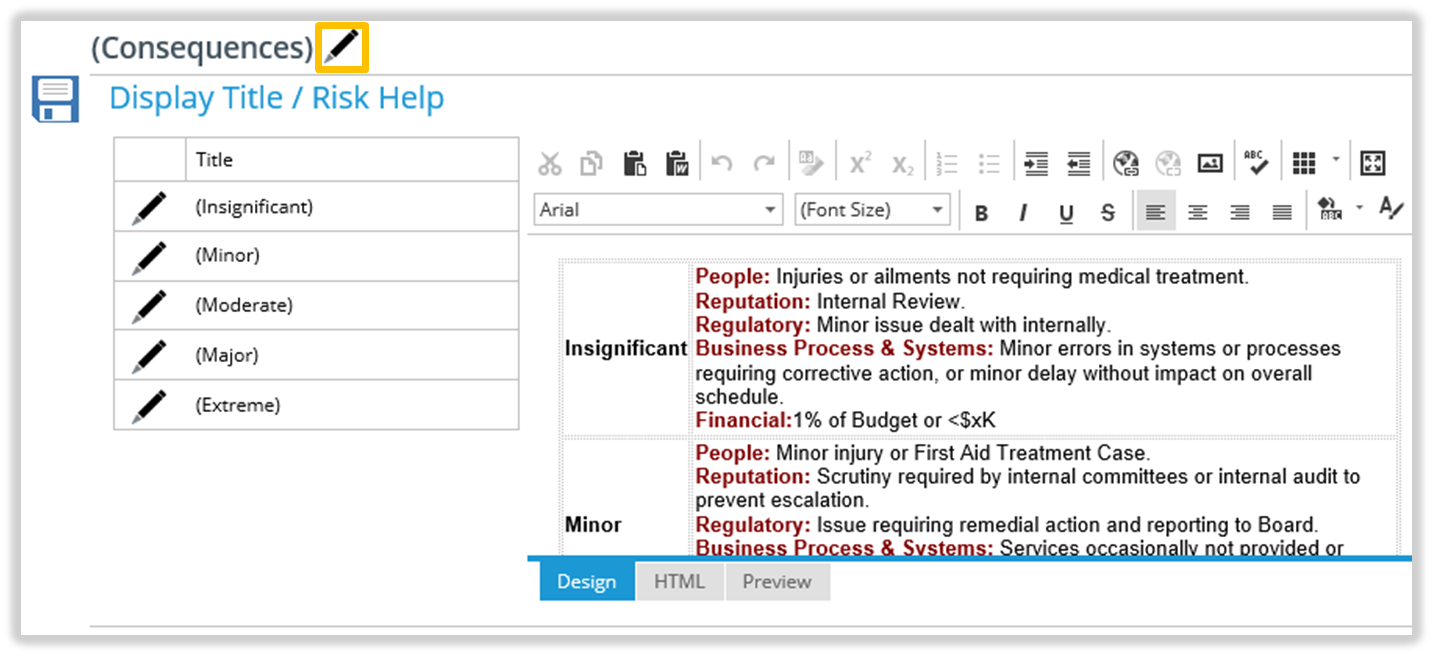
TriLine GRC includes five (5) default Consequence levels, ranging from (Insignificant) through to (Catastrophic). This terminology can be varied to suit your organisation’s preferred style. Having determined the levels, a broad definition for each is created to provide guidance to staff completing Risk reviews, thus achieving a consistent approach.
There are no standard definitions for Risk consequence; however, here are some common definitions.
Common definitions of Risk Consequence
Limit
Consequence
Definition
Lowest
(Insignificant)
The impact would be negligible.
(Minor)
Some impact, but very small.
(Moderate)
Some impact, but manageable.
(Major)
A serious problem.
Highest
(Extreme)
Insurmountable.
Once the parameters are determined, they are added into the system. This information is then visible for staff completing reviews using the Risk Assessment screen.
‘(Consequences)’ options on the Risk Assessment Page
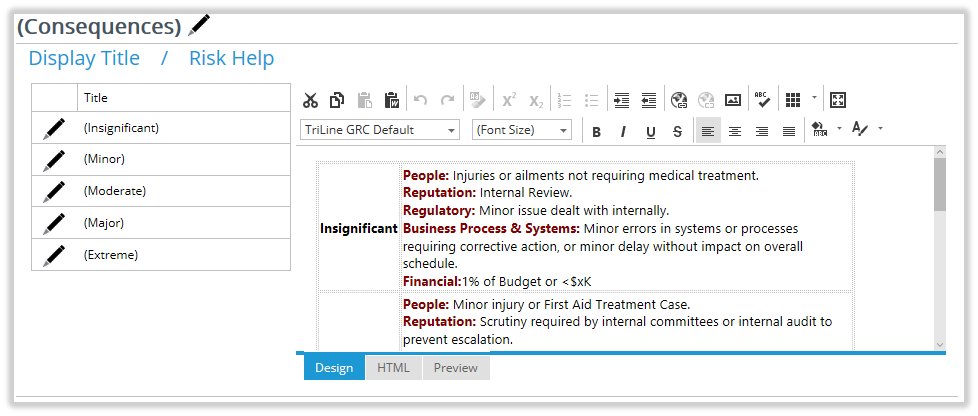
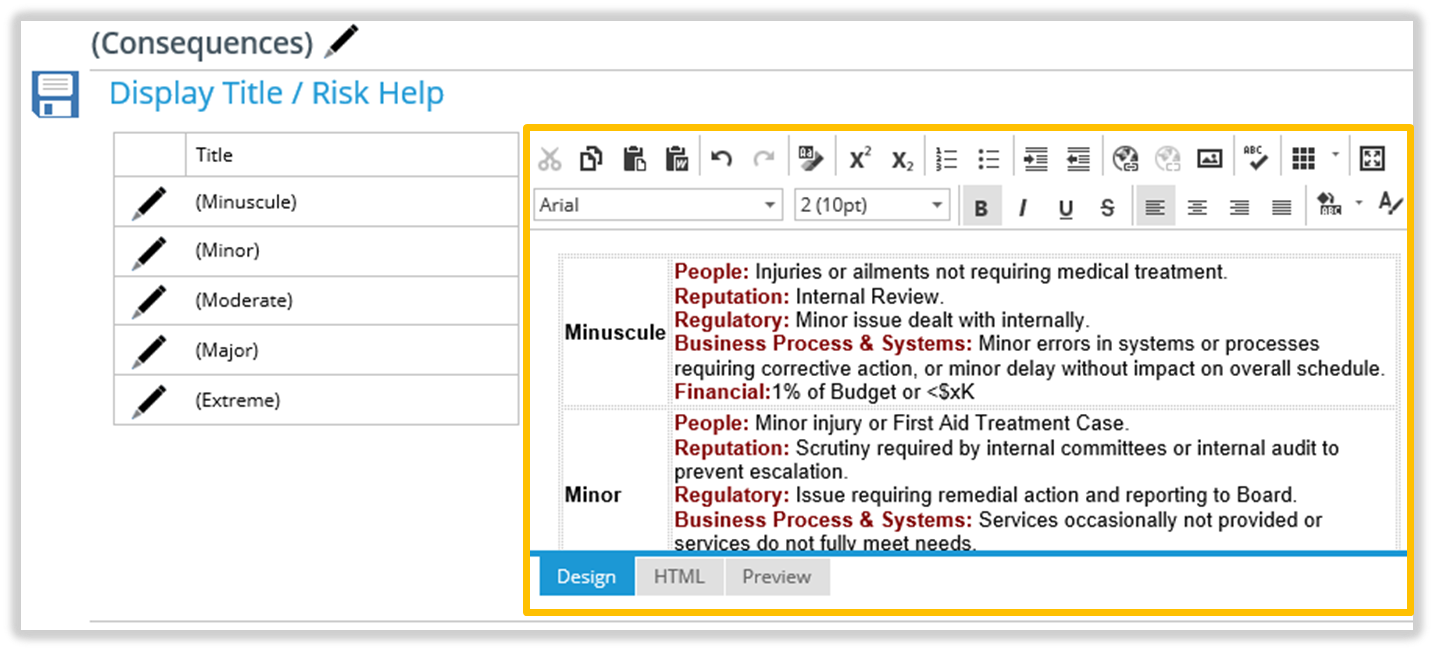
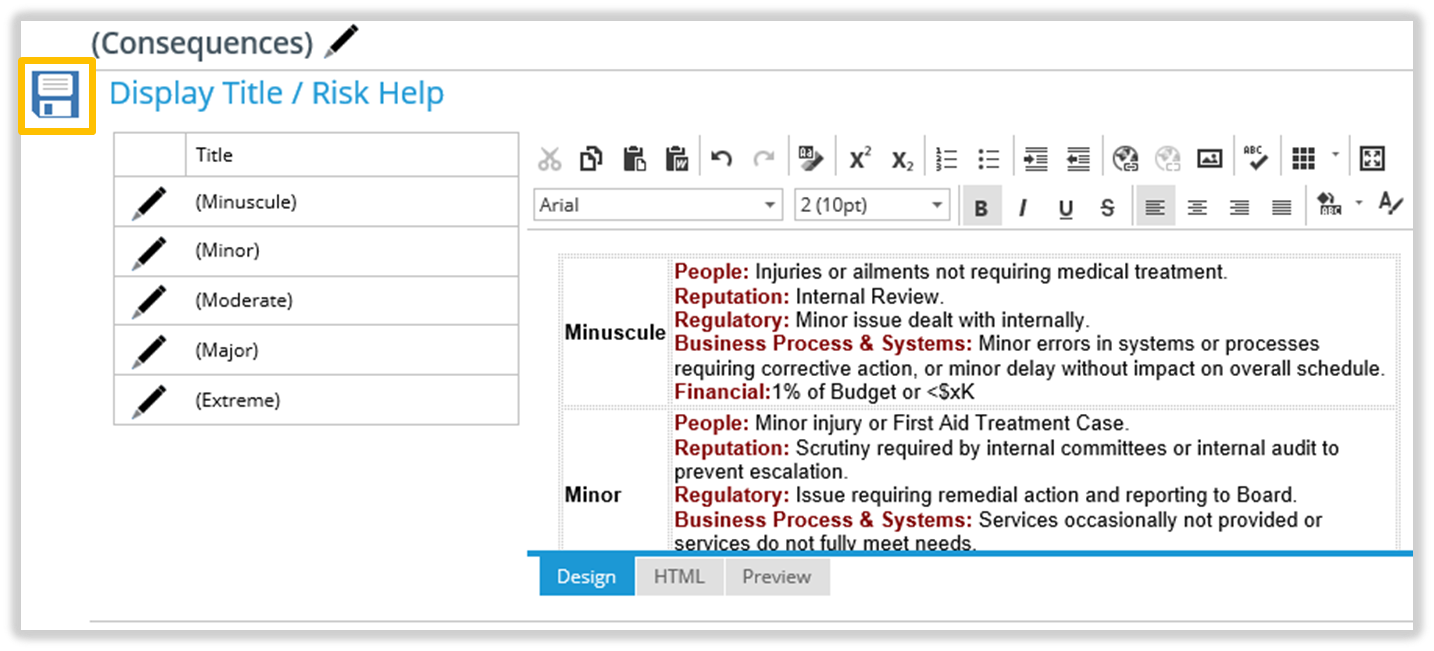
The titles and the descriptive help text for each (Consequence) Level are managed via the ‘(Consequences)’ page.
The ‘(Consequences)’ page is accessible from the Main Menu by selecting Risk | (Consequences).
The ‘(Consequences)’ Page
Risk Consequences Definition Help
You can change the Risk (Consequence) Definition Help displayed on the Risk Assessment page when the user clicks the icon.
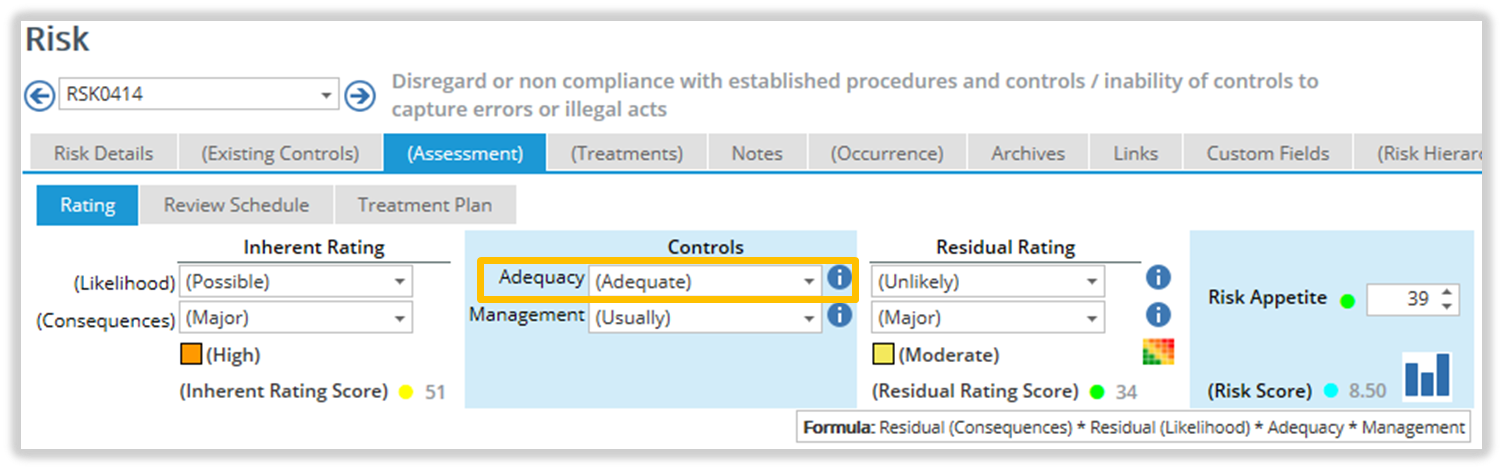
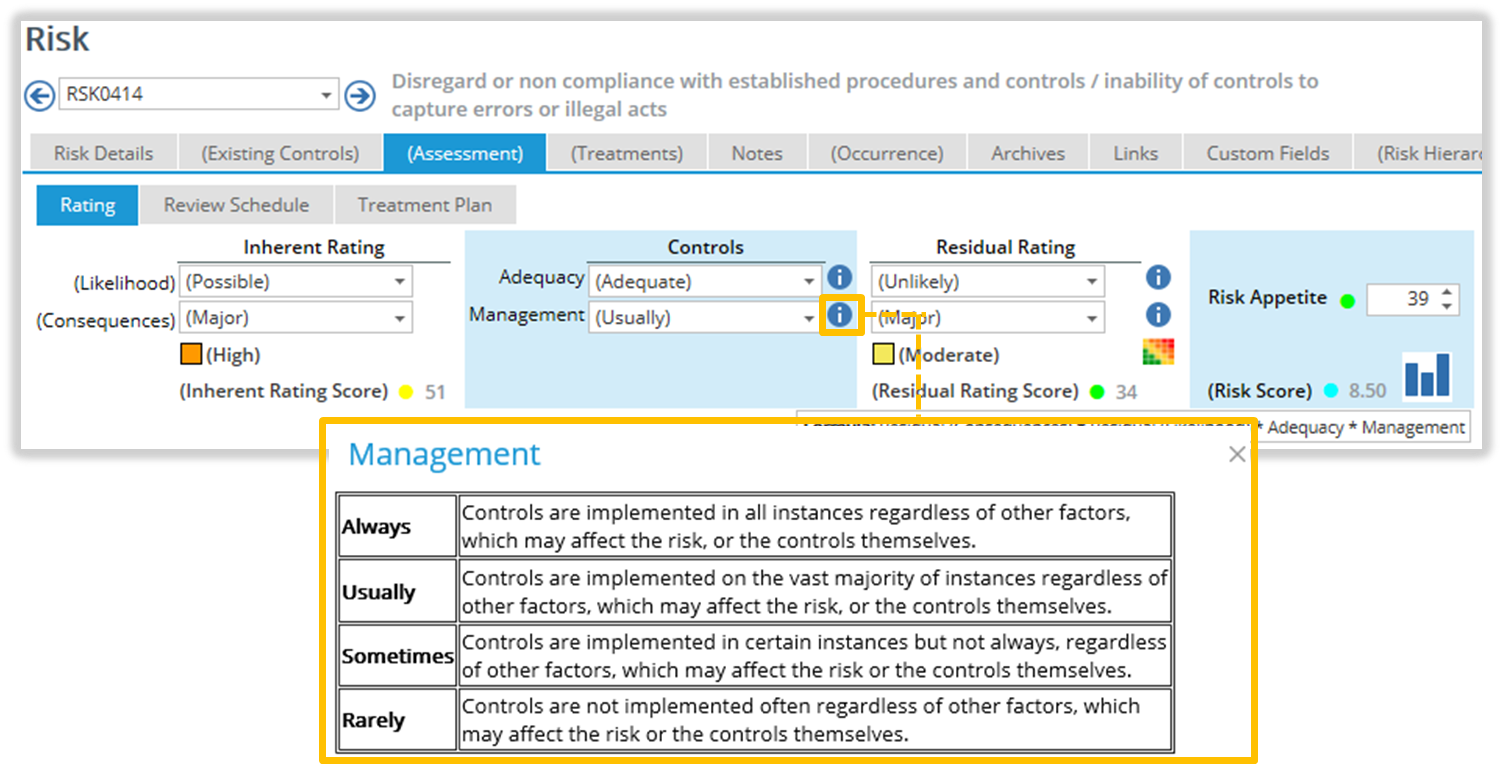
TriLine GRC allows your organisation to build on its Risk Assessment strategies by including an assessment of the Adequacy (or effectiveness) of the controls that have been implemented.
This is optional but, when implemented, the Rating is incorporated into the Risk Score model to provide a more in-depth assessment of the residual Risk position.
In use, Adequacy Ratings are included on the ‘Risk Assessment’ page.
Adequacy Rating on the ‘Risk Assessment’ Page
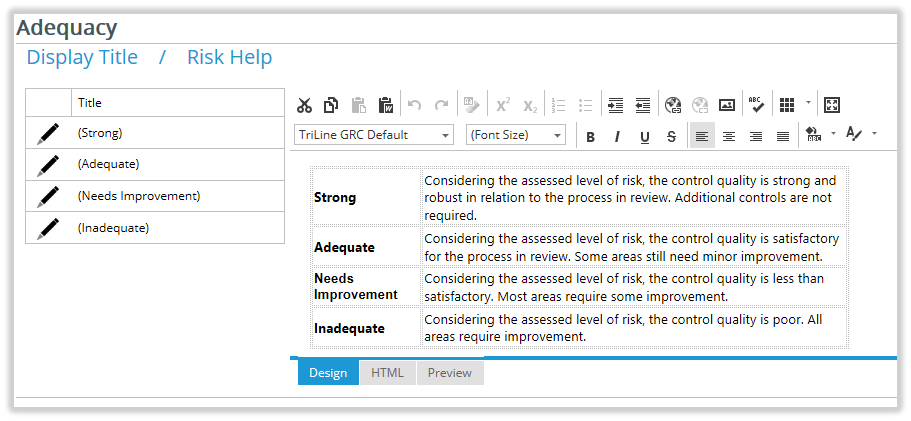
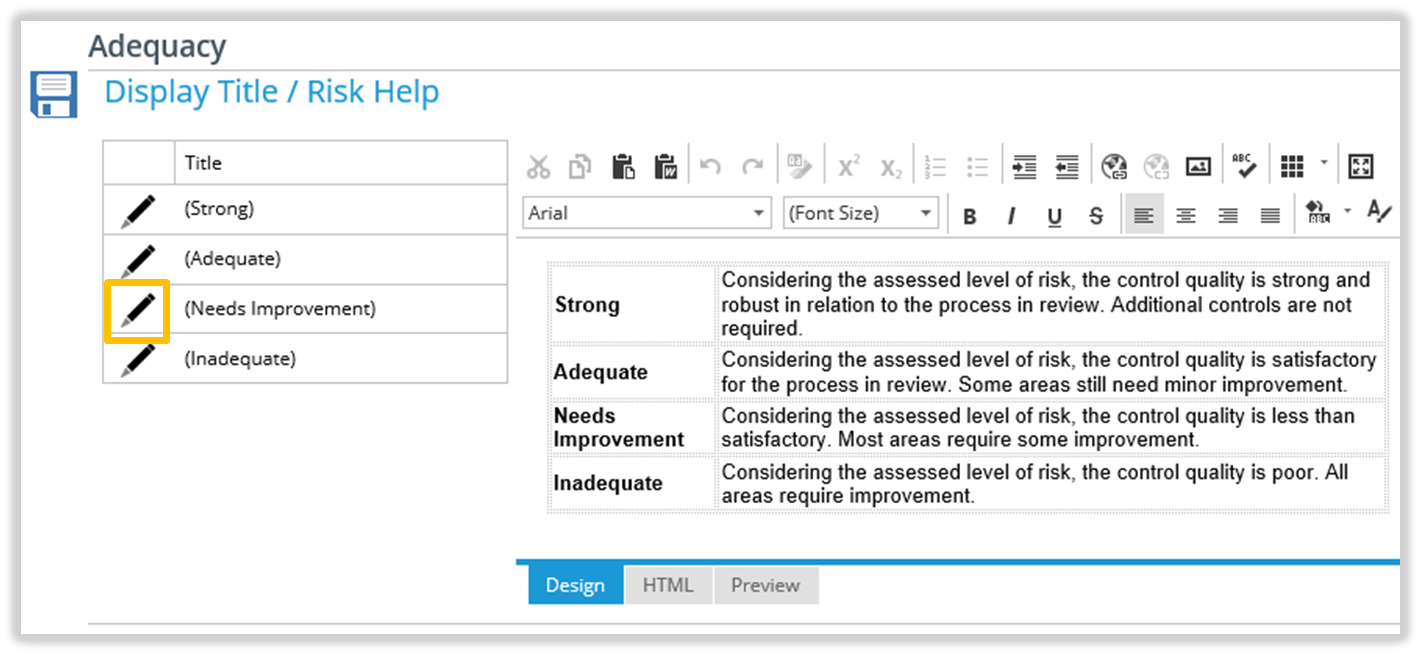
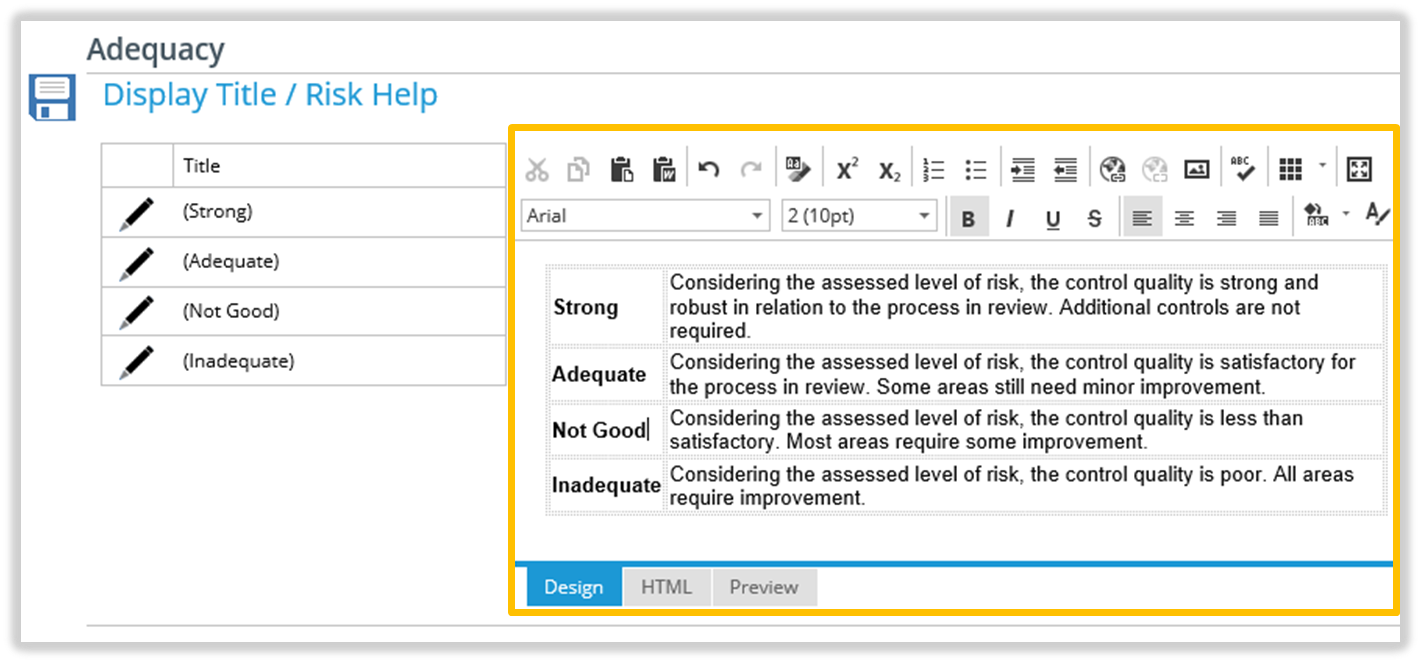
The titles displayed for each Adequacy level can be tailored for your organisation via the ‘Adequacy’ page. You can access the Adequacy page from the Main Menu by selecting Risk | Adequacy.
The ‘Adequacy’ Page
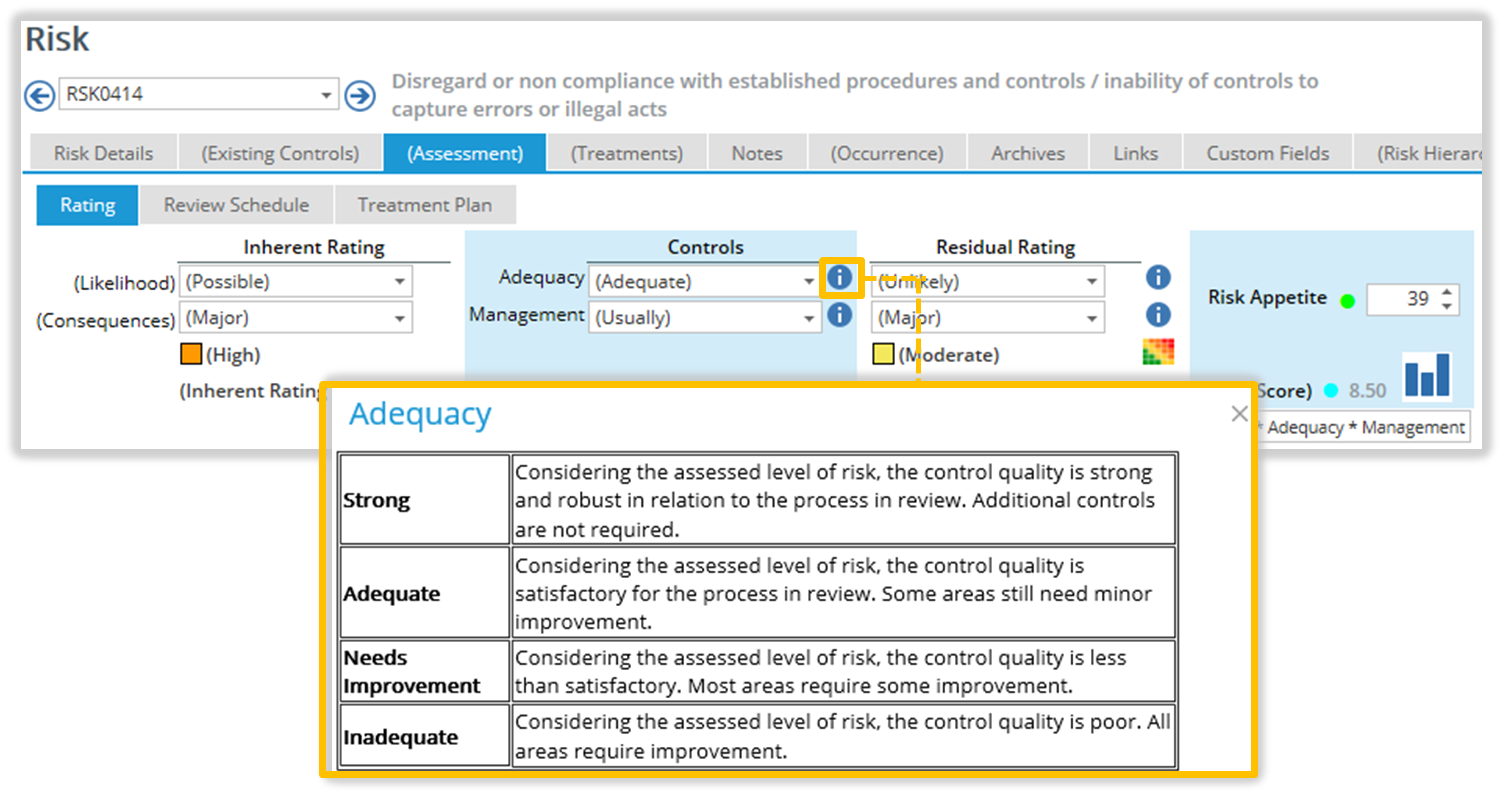
Risk Adequacy Definition Help
You can change the Risk Adequacy Definition Help displayed on the Risk Assessment page when the user clicks the icon.
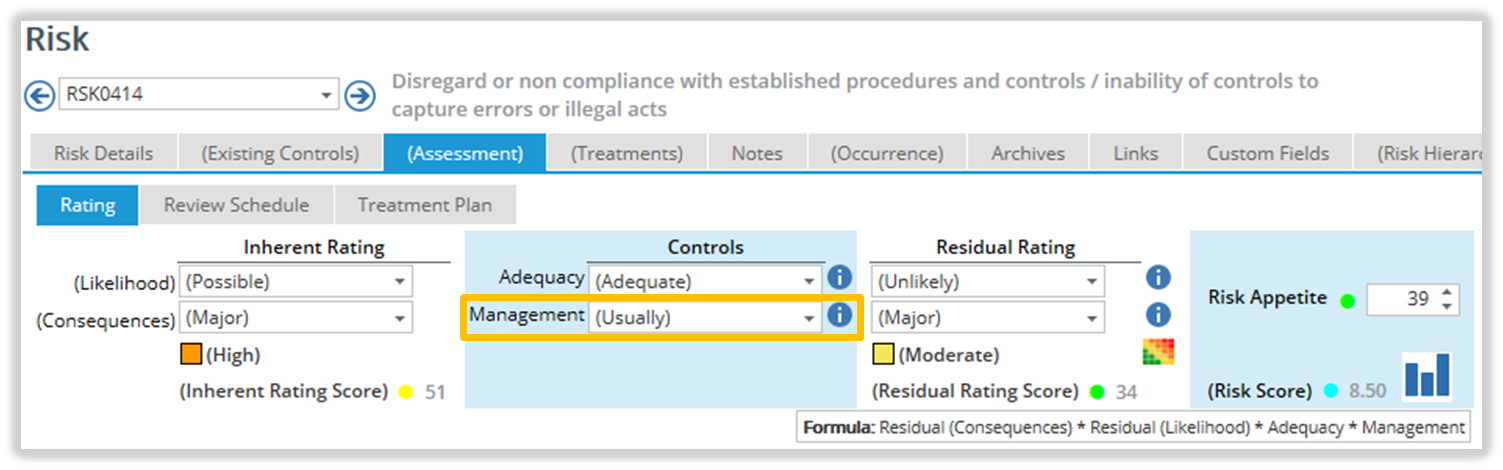
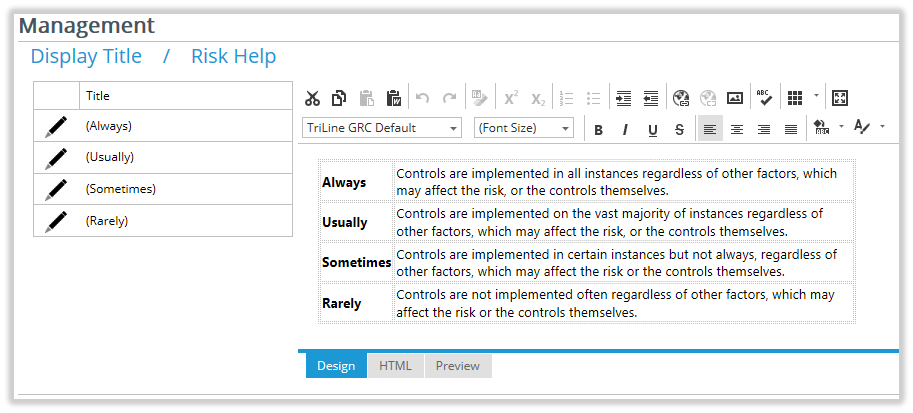
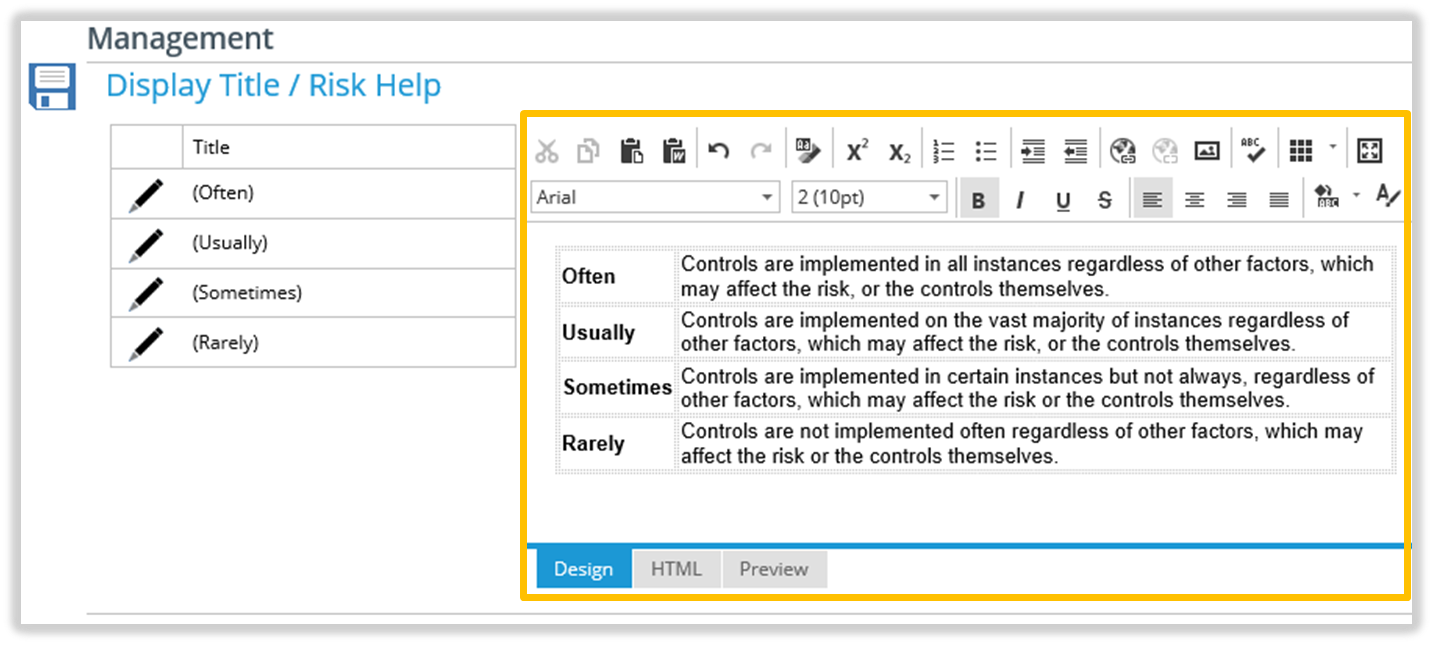
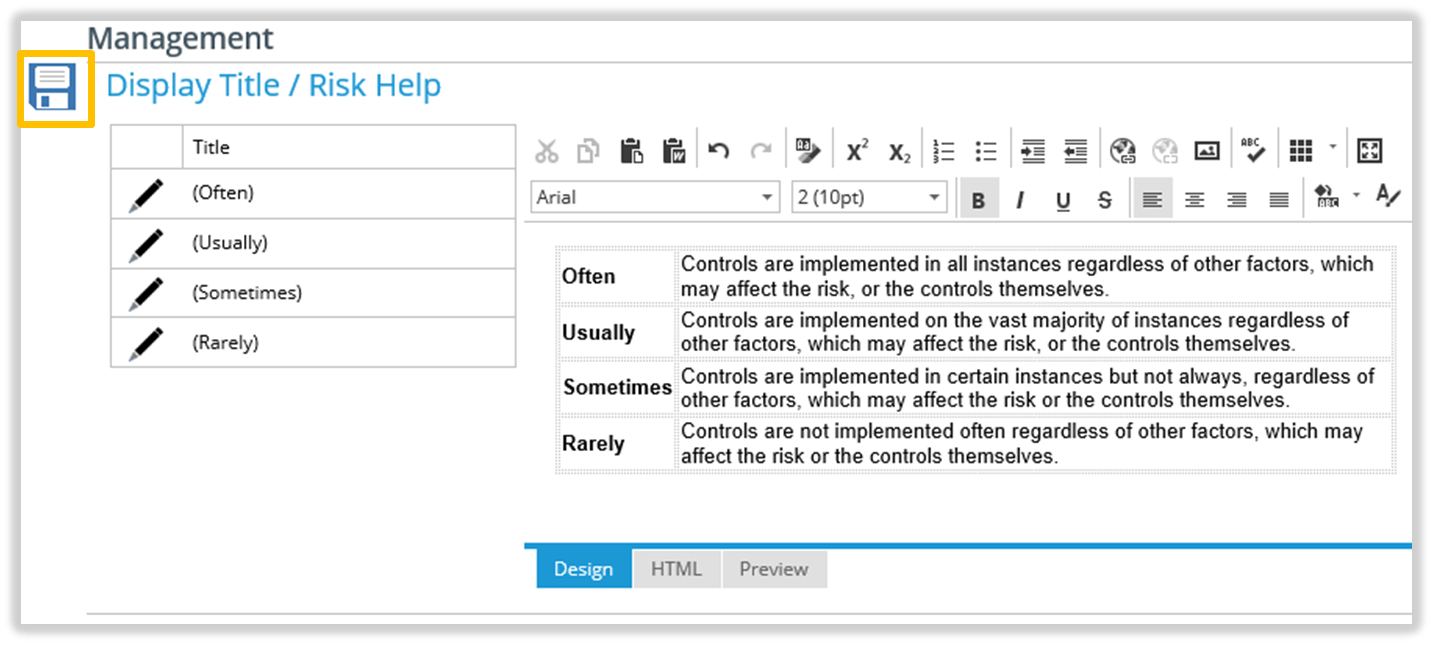
TriLine GRC allows your organisation to build on its Risk assessment strategies by including an assessment of the management (or frequency of completion) of the controls that have been implemented.
This is optional but, when implemented, four levels of Management rating are incorporated into the Risk Score model to provide a more in-depth assessment of the Residual Risk position. Here are some standard Management titles and definitions.
Common Risk Definitions (Management)
Limit
Consequence
Definition
(Desired)
Always
The controls are implemented in all instances regardless of other factors which may impact on the Risk or the controls themselves.
Usually
The controls are implemented in the vast majority of instances regardless of other factors which may impact on the Risk of the controls themselves.
Sometimes
The controls are implemented in certain circumstances, but not always, regardless of other factors which may impact on the Risk of the controls themselves.
(Undesired)
Rarely
The controls are not implemented often, regardless of other factors which may impact on the Risk of the controls themselves.
In use, a Management level is selected when compiling a Risk Assessment using the Risk Assessment page.
Management Level titles on the Risk Assessment Page
Management level Titles and Help text are set using the ‘Management’ Page.
The Management page is accessed from the Main Menu by selecting Risk | Management.
The ‘Management’ Page
Risk Management Definition Help
You can change the Risk Management Definition Help displayed on the Risk Assessment page when the user clicks the icon.
Note:
This section shows customisable title and fields in (brackets). Where you see a title or field value in brackets, be aware that your TriLine GRC system may show a different title or value, depending on your system’s configuration.
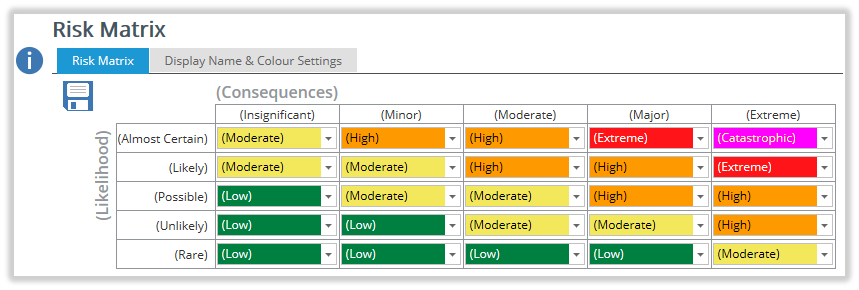
To provide the basis for assessment of Risks, a Risk Matrix is provided within TriLine GRC.
The Risk Matrix is your assessment of the overall impact of a Risk based on the likelihood of an event occurring and the significance or consequence should that event occur. TriLine GRC employs the commonly-used 5 x 5 matrix, providing for five (5) ratings each for Likelihood and Consequence.
The default Likelihood ratings range from ‘Rare’ to ‘Almost Certain’, while the default Consequence ratings range from ‘Insignificant’ to ‘Extreme’.
Creation of the Risk Matrix requires an assessment of the various combinations of Risk options and an allocation of the Ratings to each segment. There are no specific definitions for the Risk combinations—you can set these to suit your organisation. However, an example of commonly used titles and definitions is shown in the Risk matrix screen below.
Set up your Risk Matrix from the Main Menu: select Risk | Matrix.
The ‘Risk Matrix’ Page loads.
The ‘Risk Matrix’ Page
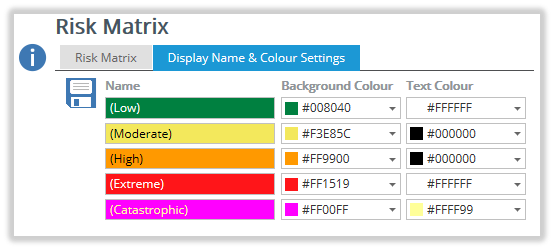
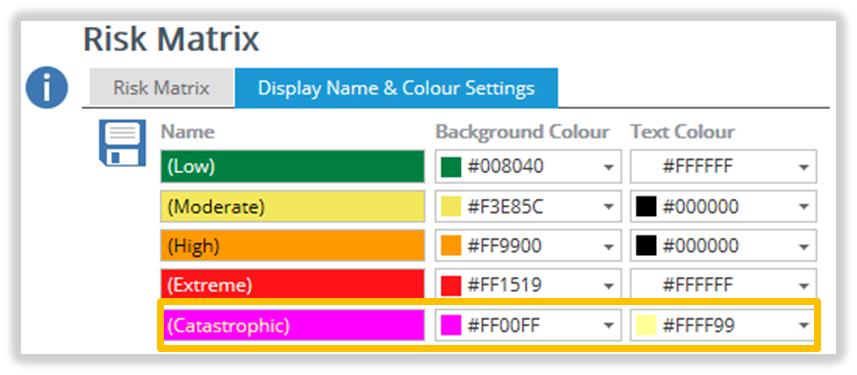
You can apply terminology and colour schemes to suit your organisation via the ‘Display Name & Colour Settings’ tab.
You can create five (5) different display name and colour settings to represent the various Risk combinations in the Risk Matrix. See Edit Risk Matrix Display Names and Colours.
The Risk Matrix ‘Display Names & Colour Settings’ tab
Risk Score Calculation
Having created your Risk Matrix, the final step is to allocate a score to each combination of Consequence and Likelihood.
Depending on your Risk Configuration settings, Risk Scoring options may be disabled and therefore ‘Manage Risk Score Calculation’ may not be available on the ‘Maintenance’ menu.
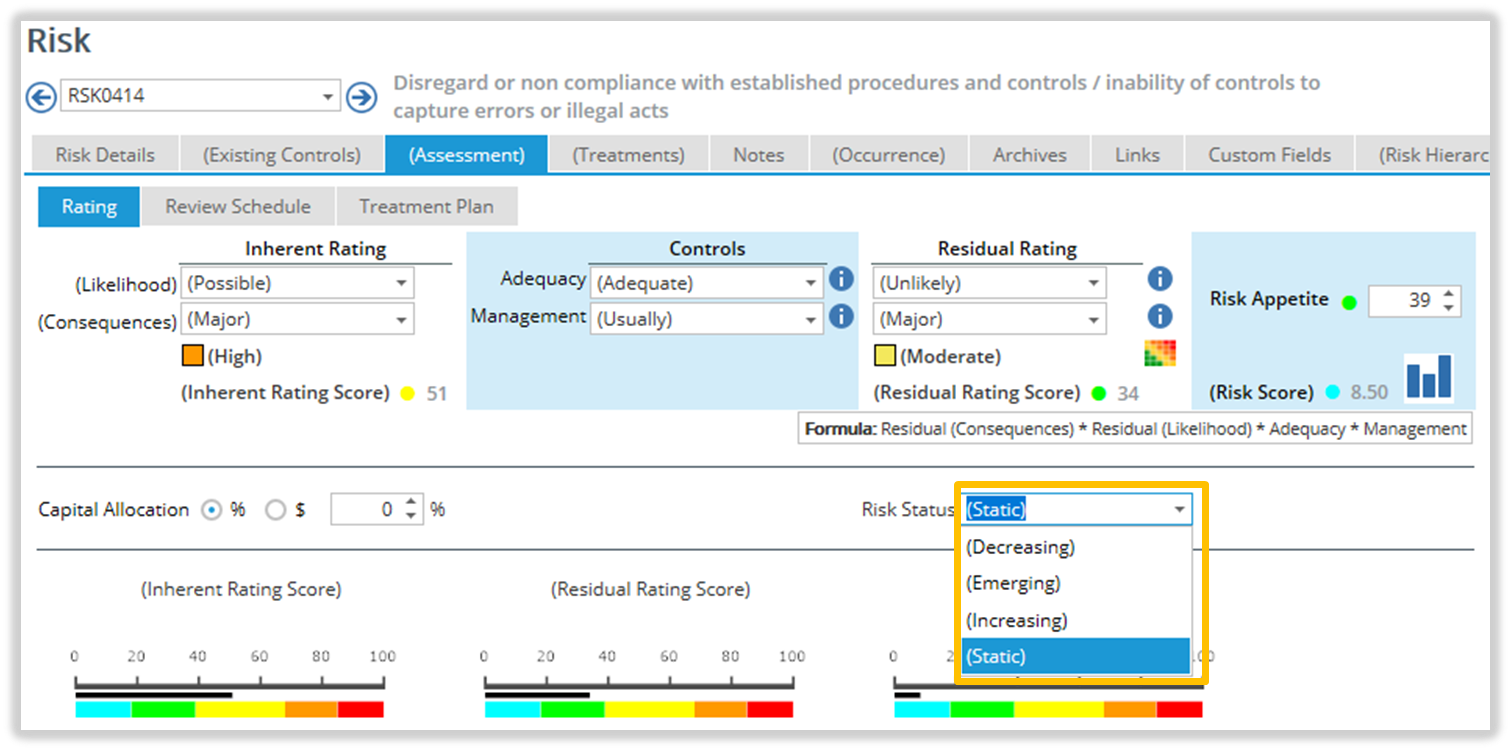
The Risk Status is a user-defined field on the Risk Assessment page that allows you to provide your own description to the status of a Risk.
‘Status’ field in the Risk Assessment Page
The inclusion of a Risk Status allows you to quickly highlight the trend of the Risk for reporting and discussion purposes.
Procedures
Note: These Procedures show customisable title and fields in (brackets). Where you see a title or field value in brackets, be aware that your TriLine GRC system may show a different title or value, depending on your system’s configuration.
Configure General Risk Settings
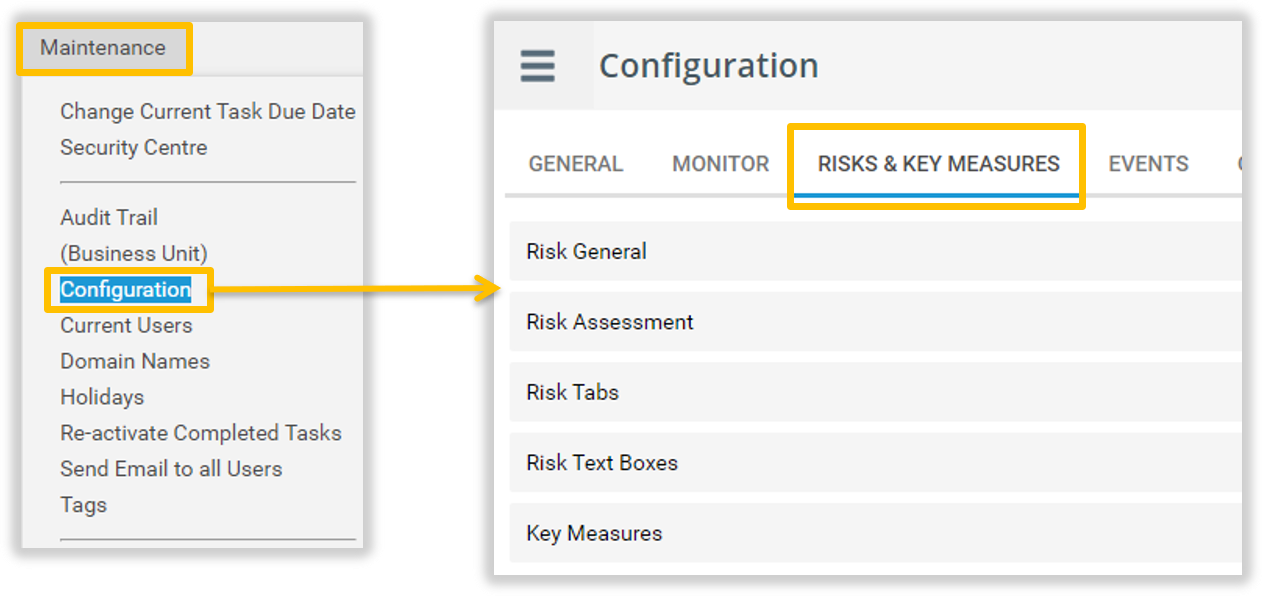
On the Main Menu, select Maintenance | Configuration.
The TriLine GRC Configuration Page is displayed.
Click the Risks & KRI's tab.
Update fields as required. See the following Edit sections for details on each section.
To Save any changes, hover over, or click the Menu Options (Hamburger) icon. Click the Save option.
Note: ‘Use Risk Title’ switch. Click this switch on if you want the Risk Title field to be used and shown and it is highly recommended this switch be set on.
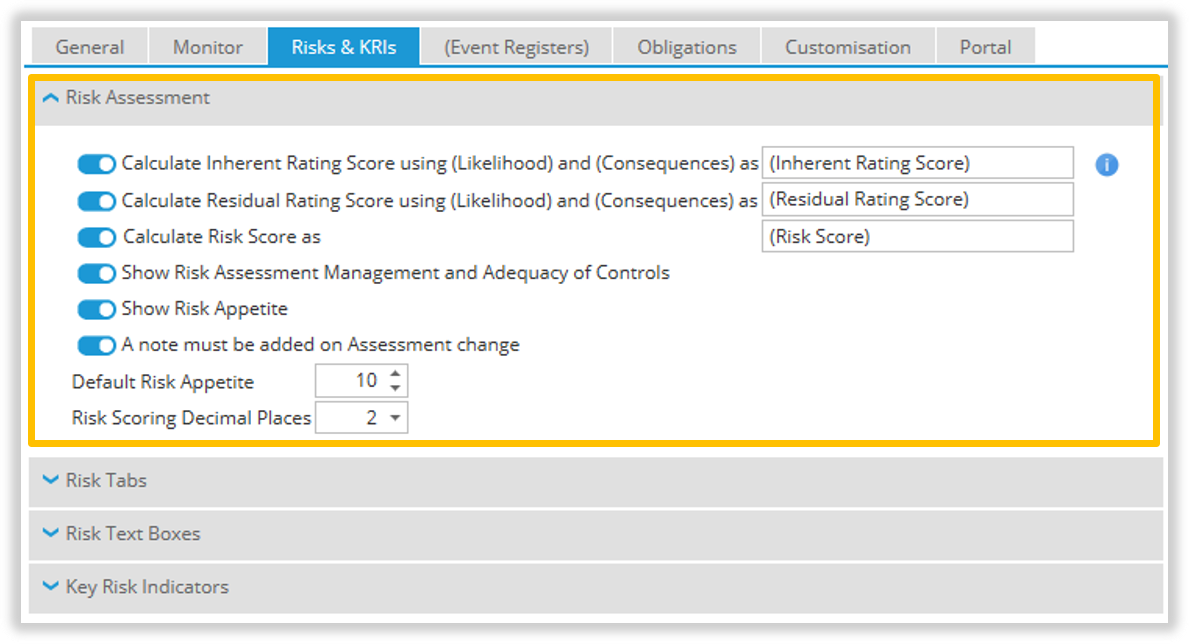
Edit Risk Assessment Functions
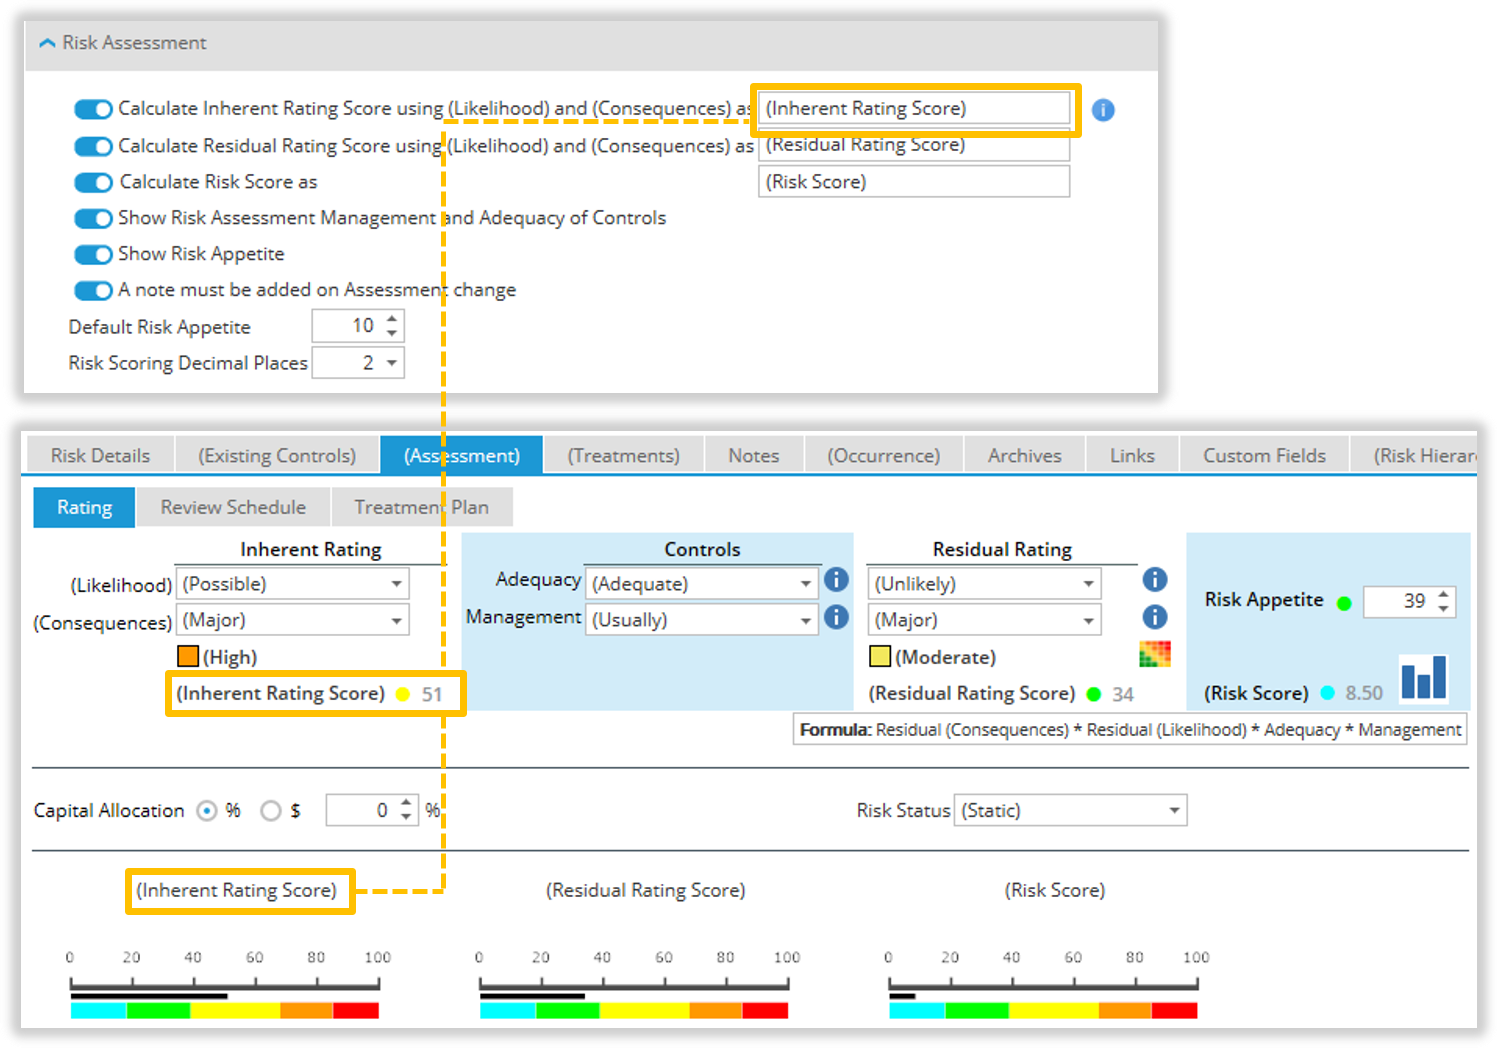
In the ‘Risk Assessment’ Panel of the Risks tab, enable a particular Risk Assessment function by ticking the corresponding box.
The settings in the Risk Assessment Panel affect what is displayed on the Risk Assessment tab for Risk Records.
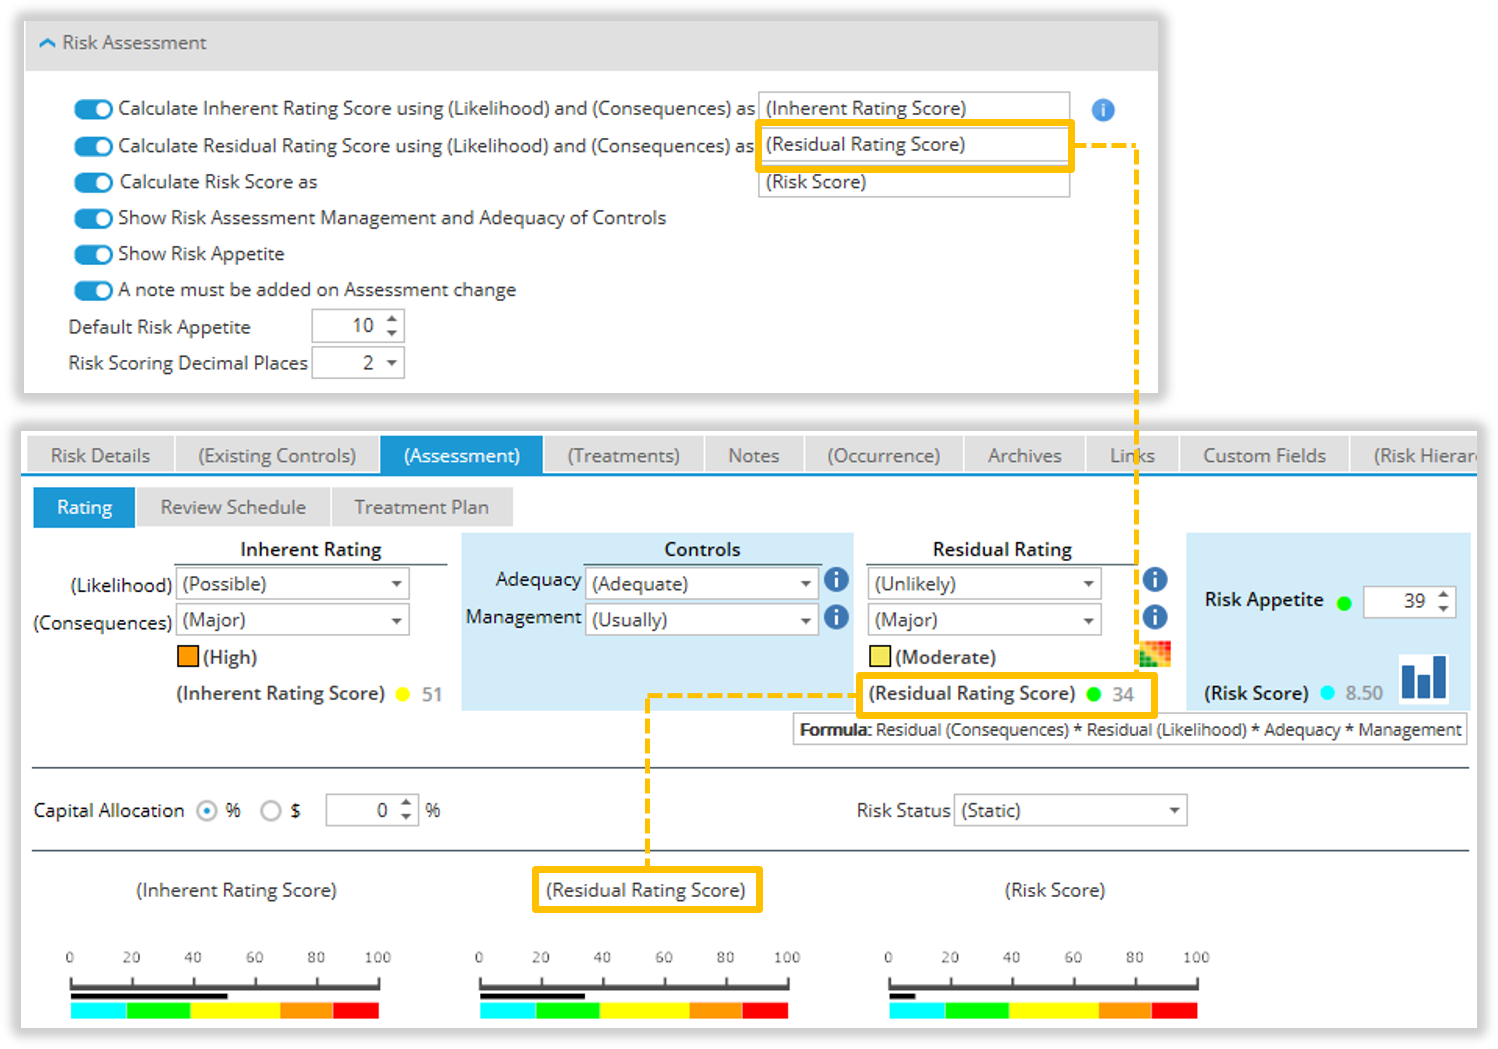
Inherent Consequences by Likelihood (Inherent Rating Score): Calculated score of the Inherent Consequences × Inherent Likelihood (see Risk Score Calculation).
Residual Consequences by Likelihood (Residual Rating Score): Calculated score of the Residual Consequences × Residual Likelihood (see Risk Score Calculation).
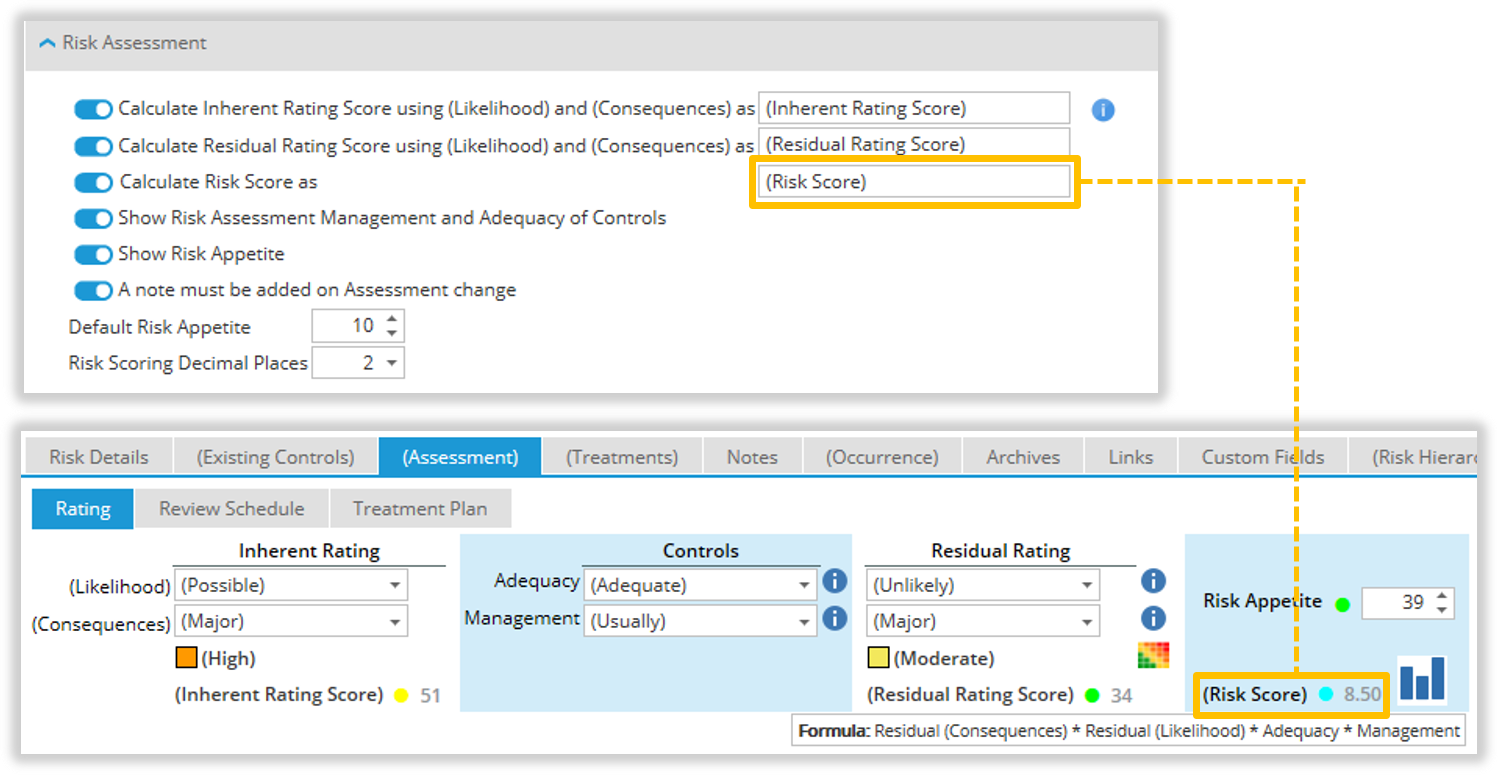
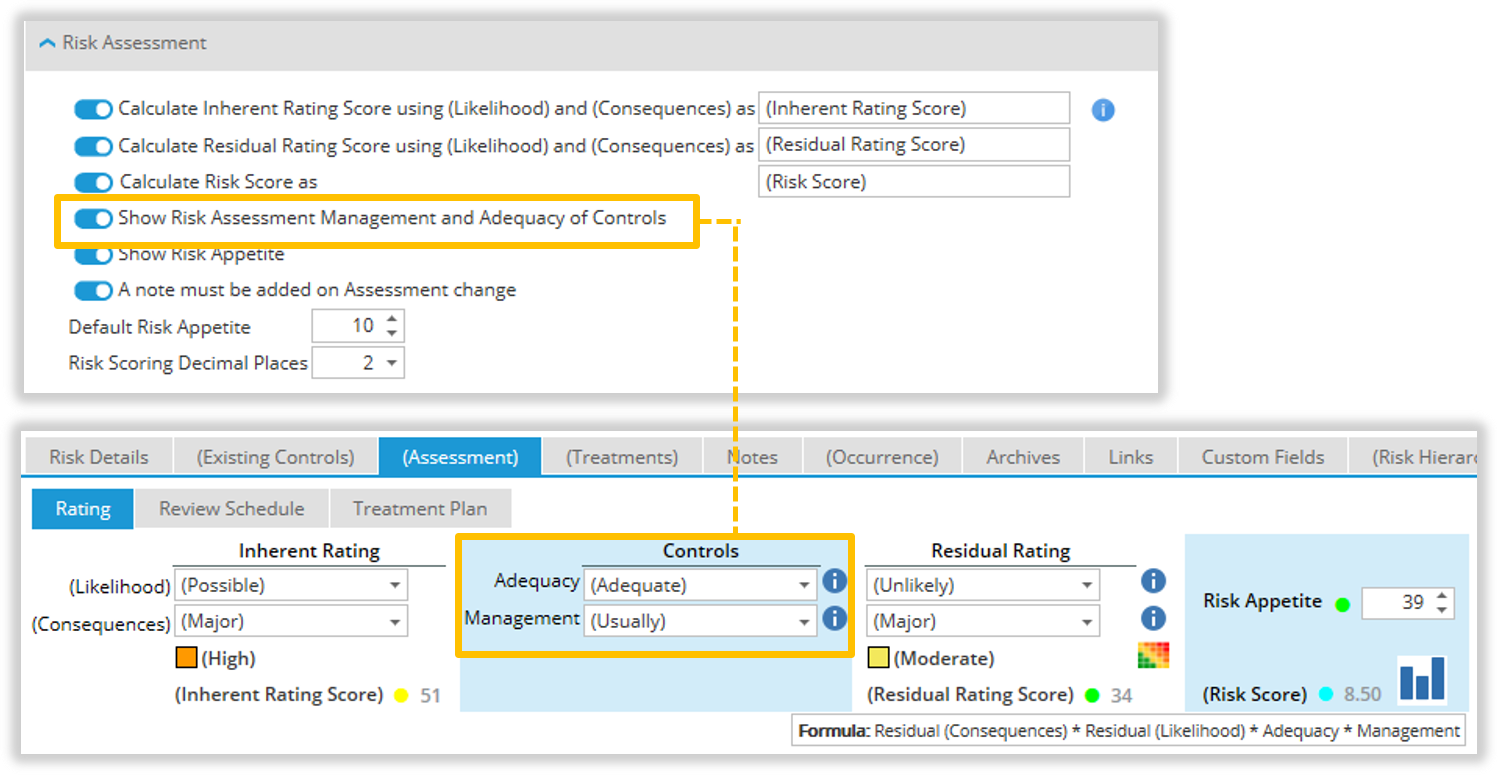
Risk Controls: Show the Risk Assessment Management and Adequacy of Controls.
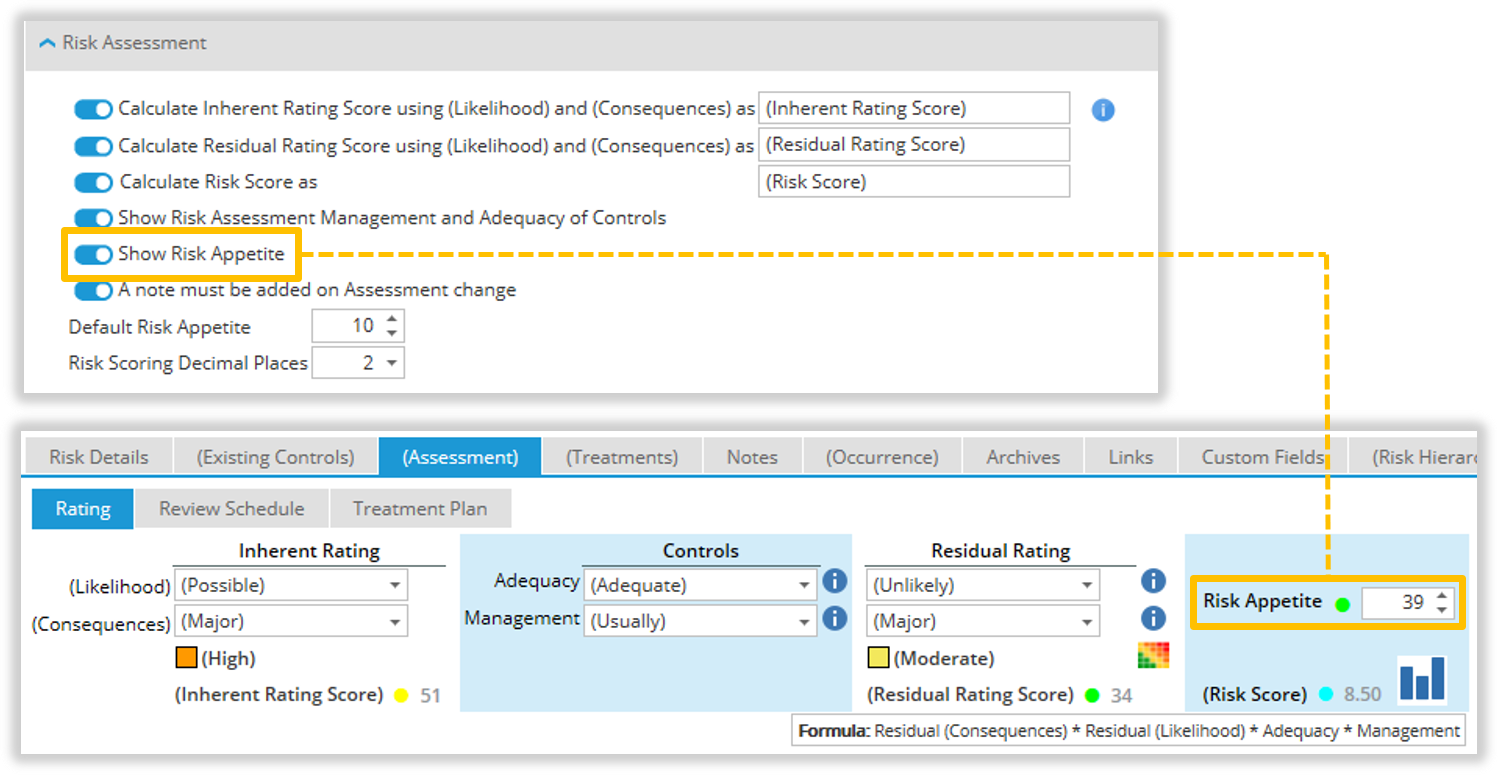
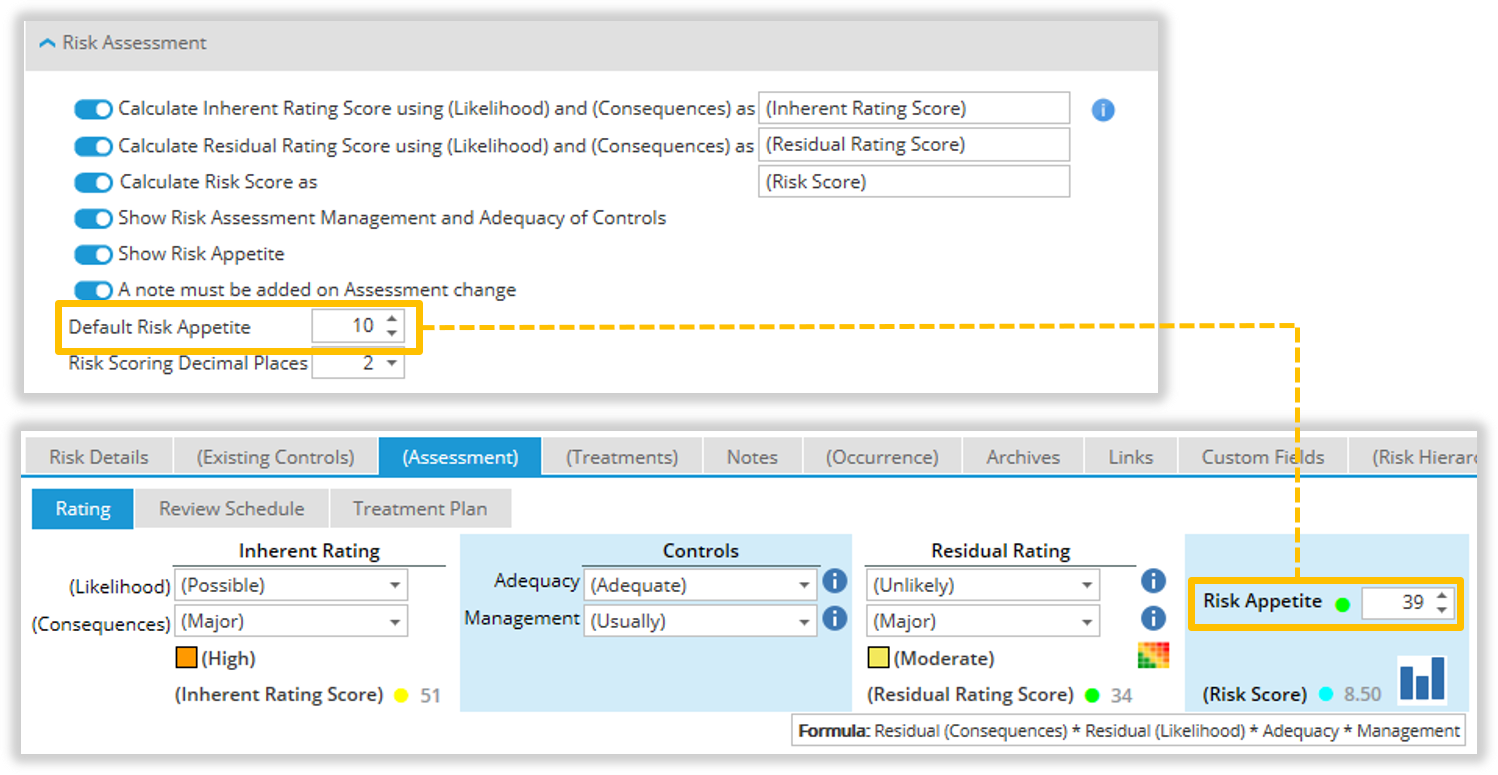
Risk Appetite: The maximum Risk Score that the organisation will tolerate for the Risk.
Default Risk Appetite: Select the default Risk Appetite to be assigned to all new Risks and later ‘tuned’ to match the risk.
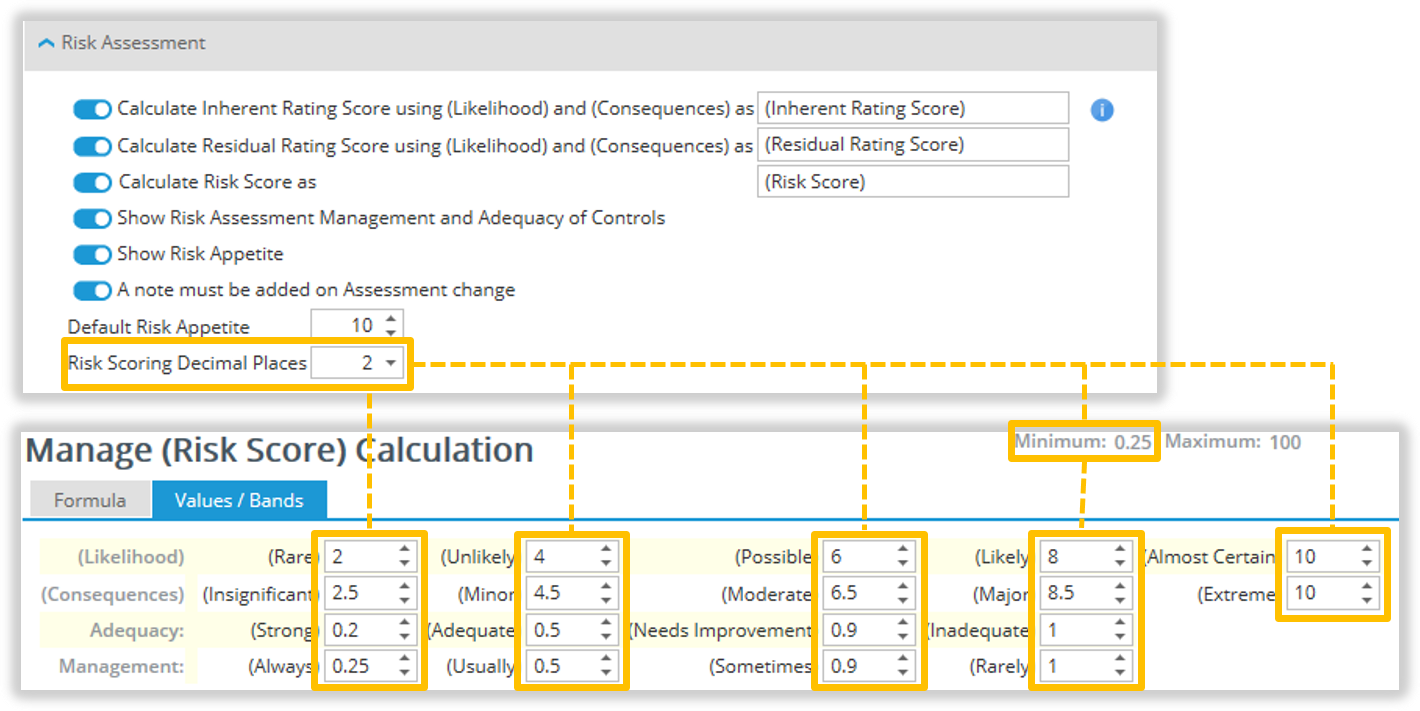
Risk Scoring Decimal Places: Set the granularity of Risk Score values.
Set this value to control the minimum allowable Risk Score value:
Setting (Decimal Places)
Minimum Risk Score value
2
.01
1
.1
0
1
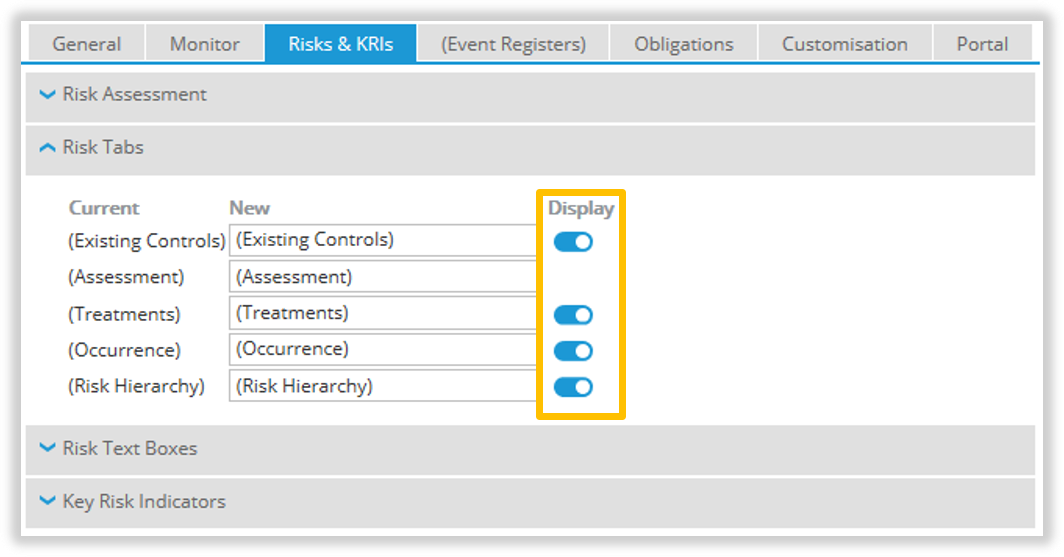
Edit Text Boxes and Tabs
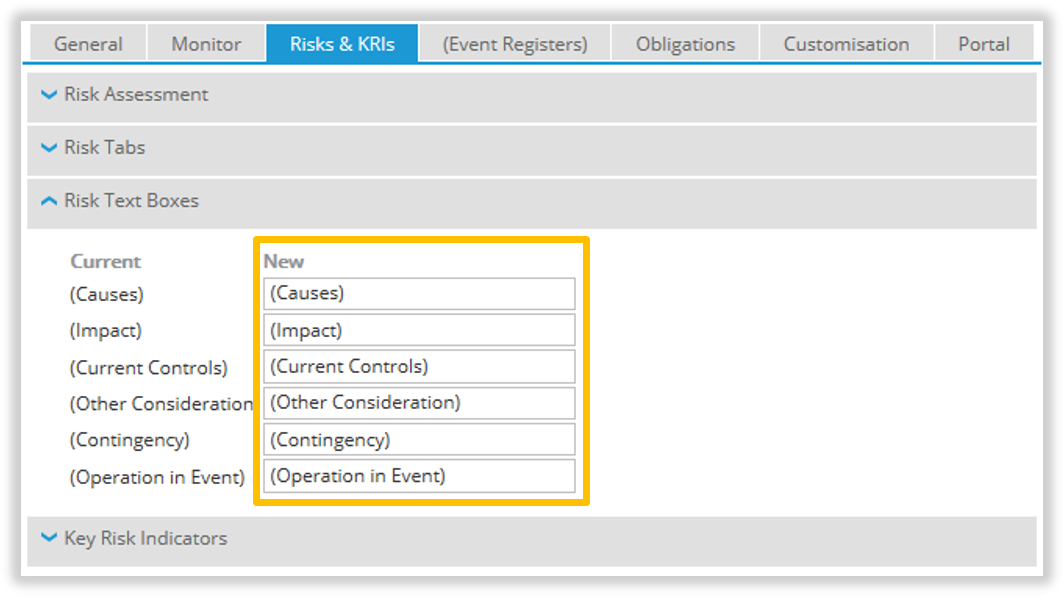
In the ‘Risk Text Boxes’ section of the Risks & KRI's tab, type a new title in the corresponding text field.
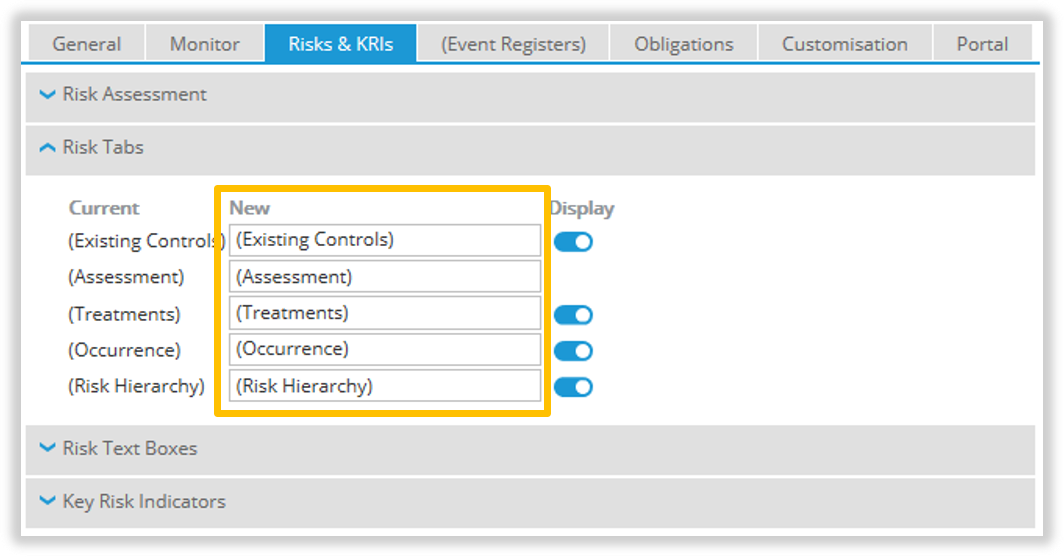
In the ‘Risk Tabs’ section of the Risks & KRI's tab, type a new title in the corresponding text field.
To disable a Risk tab (i.e. the tabs that are displayed for each Risk Record), un-tick the ‘Display’ box under ‘Risk Tabs’.
Configurable Risk Tabs and Fields
Tab
Rename?
Display Optional?
Fields and Associated Tabs
Existing Controls
Yes
Yes
‘Existing Controls’ tab and ‘Other Considerations’ tab (both can be renamed).
Assessment
Yes
No
‘Assessment’ tab.
Treatments
Yes
Yes
List of further control tasks.
Occurrence
Yes
Yes
‘Contingency’ tab (can be renamed), ‘Operation in Event’ tab (can be renamed) and ‘Actions’ tab.
Linked Compliance
Yes
Yes
List of linked Compliance Processes.
Risk Hierarchy
Yes
Yes
Manage parent and child Risks for a Risk Record.
Access Risk Maintenance Menu
The Risk Maintenance Menu items is displayed for Positions who are members of System Groups ‘Administrators’ or ‘Administrators - Risk’.
On the Main Menu, select Risk. Select the required option from the Maintenance section.
Manage Risk Category
Risk Category are used in Risk and KRI records.
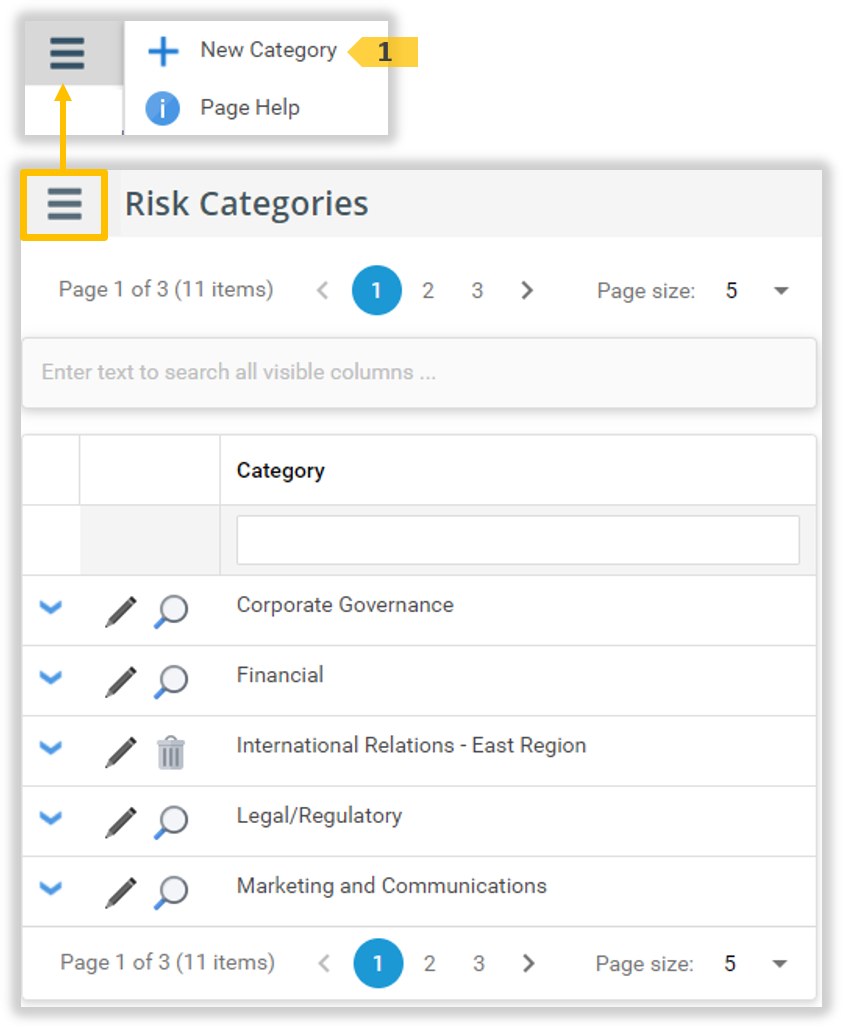
Add a Risk Category
On the Main Menu, select Risk | Categories. The ‘Risk Categories’ page displays. Hover over, or click, the Menu Options (hamburger) icon. Click the New Category1 Option.
The ‘Add New Risk Category’ window displays. Enter a unique name 1 for the new Risk Category. Click the Save 2 icon to add this Category. (Or, click the Cancel 3 icon to cancel.)
The window closes and the new Risk Category 1 is displayed in the list, and a confirmation message displayed at the bottom of the page. A Sub Category ‘All’ is automatically added to this Category.
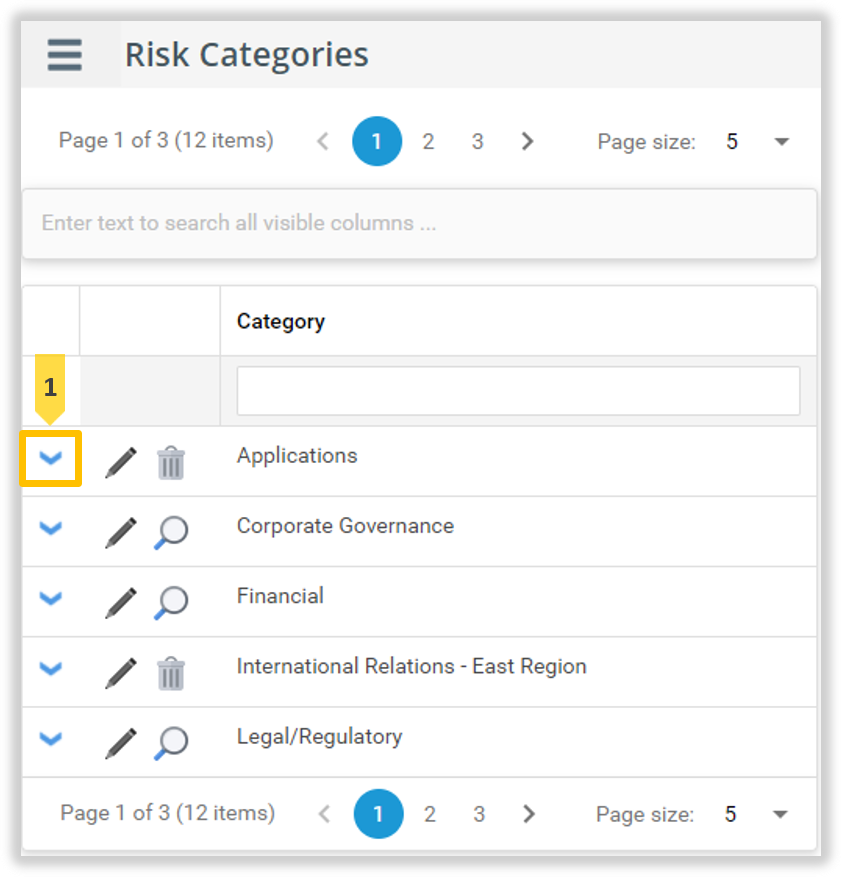
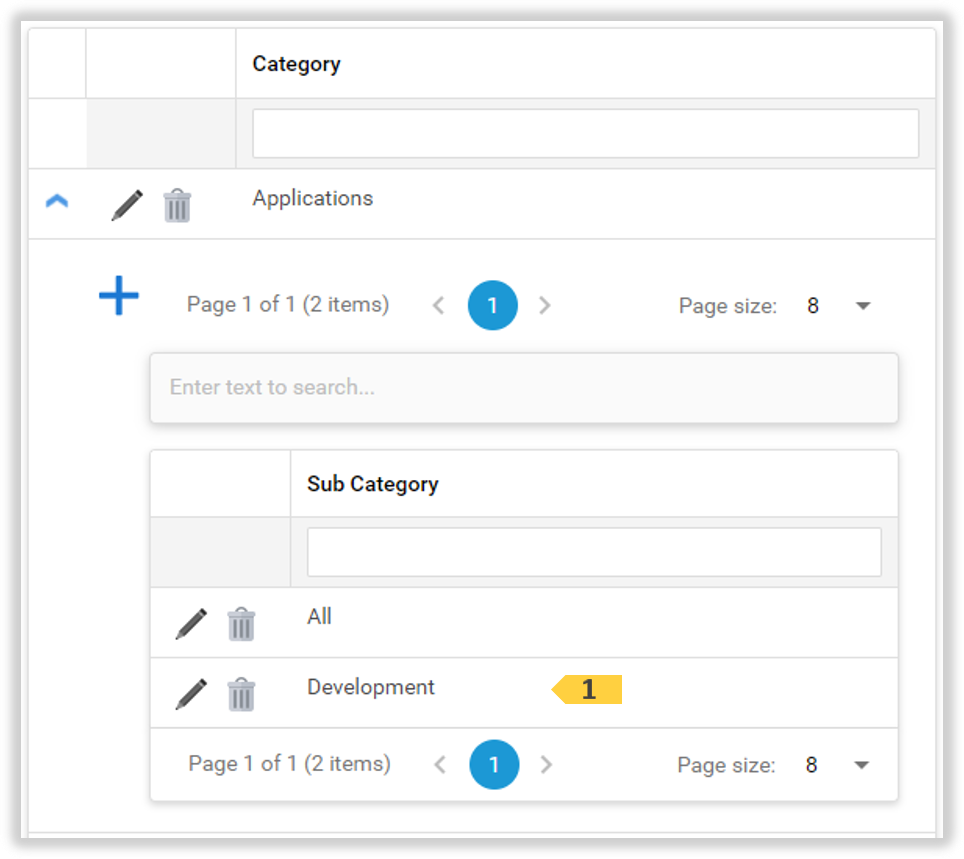
Add a Sub Category
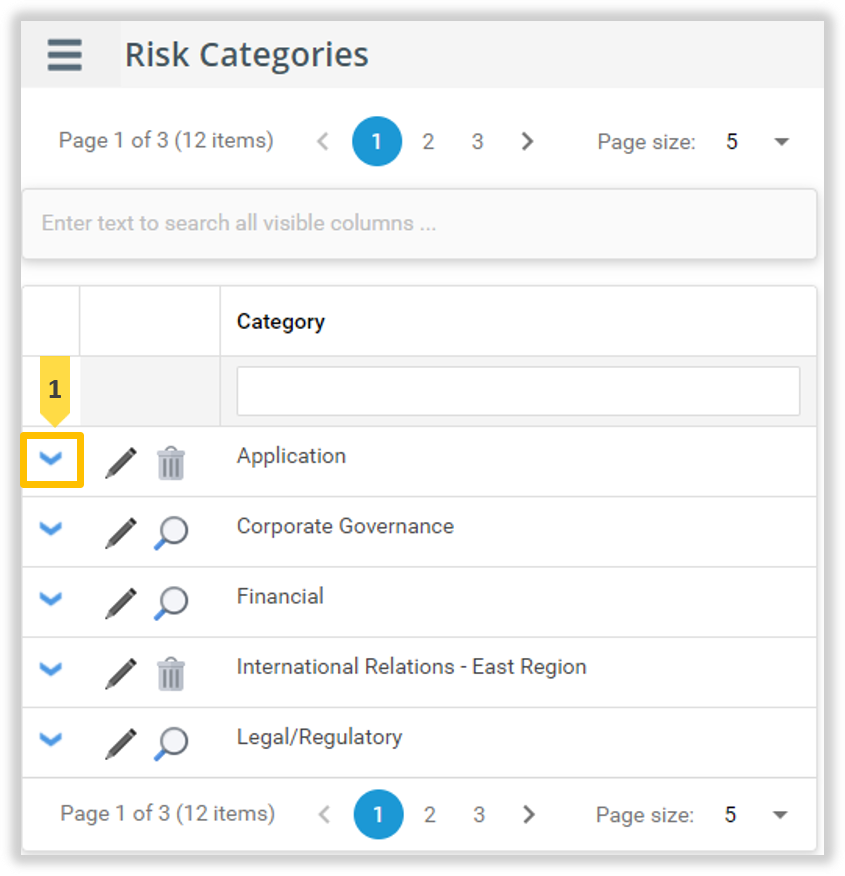
Click the down chevron 1 icon to display the selected Sub Categories of this Risk Category.
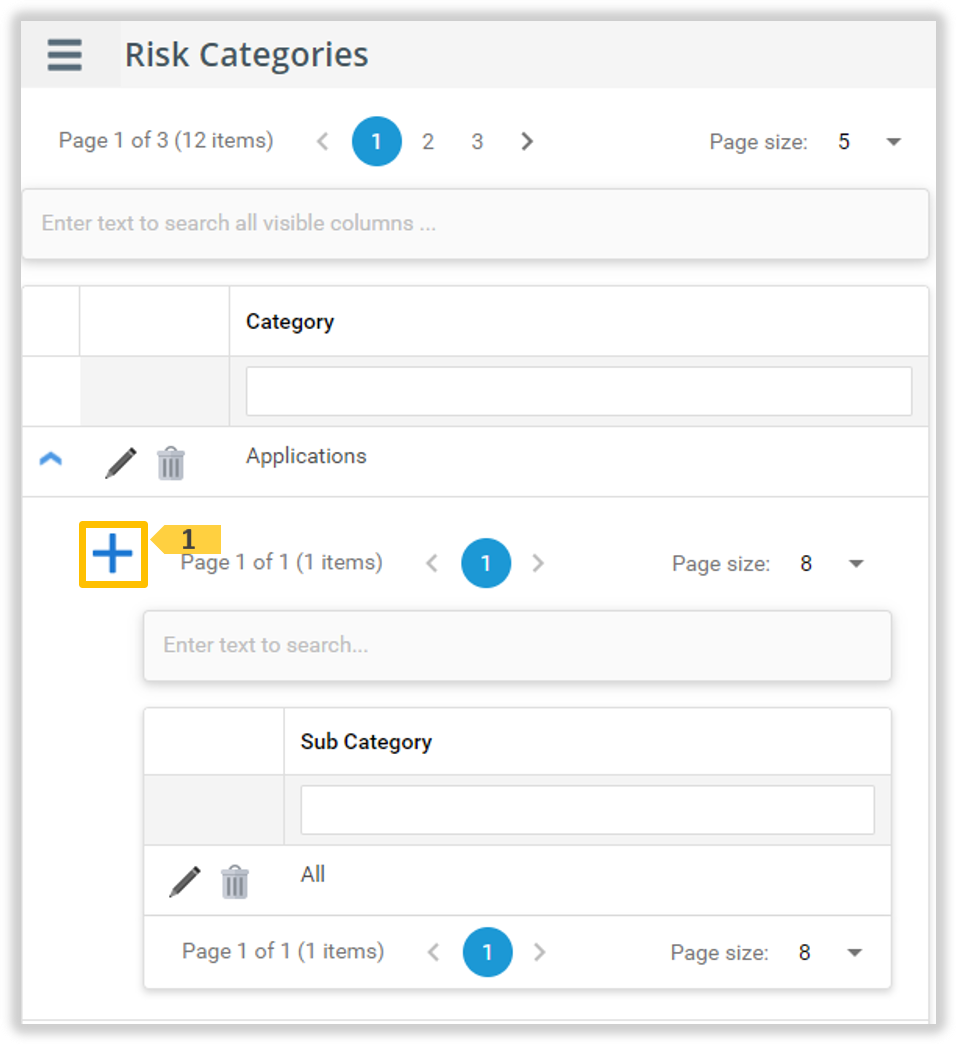
In the Sub Category panel, click the Add 1 icon to add a new Sub Category.
The ‘Add New Risk Sub Category’ window displays. Enter a unique name 1 for the new Sub Category. Click the Save 2 icon to add this Sub Category. (Or, click the Cancel 3 icon to cancel.)
The window closes and the new Sub Category 1 is displayed in the list.
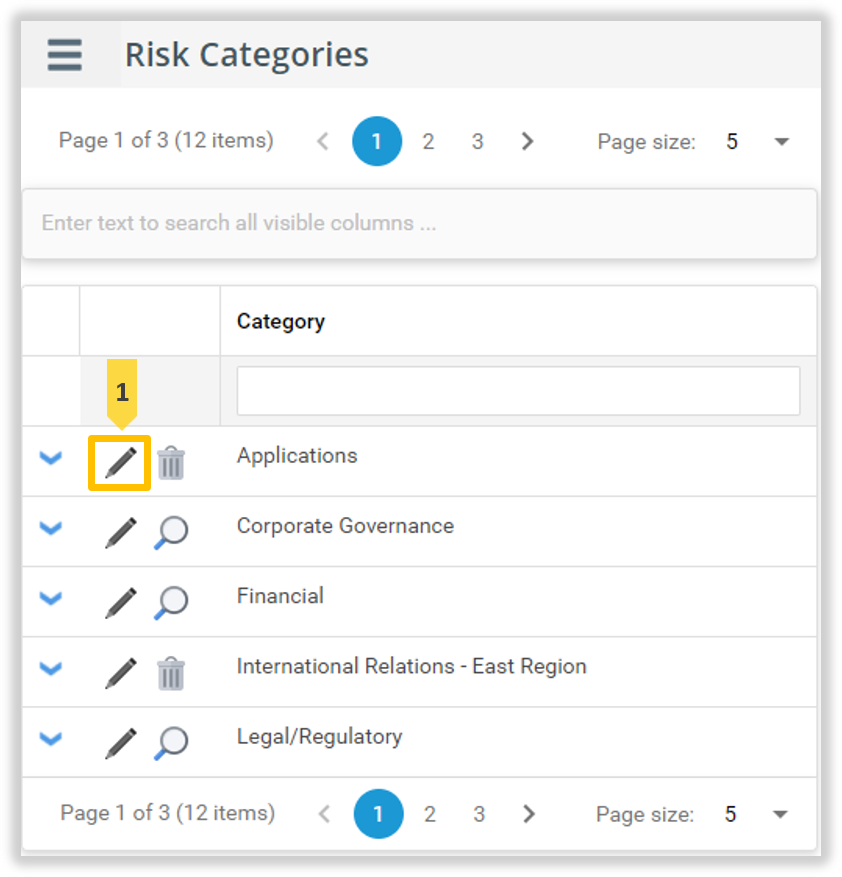
Edit a Risk Category
Any name change to a Risk Category will immediately apply to all records that use this Category. Use the Show Usage icon to display which records have this Category selected.
Click the Edit 1 icon to edit the selected Risk Category.
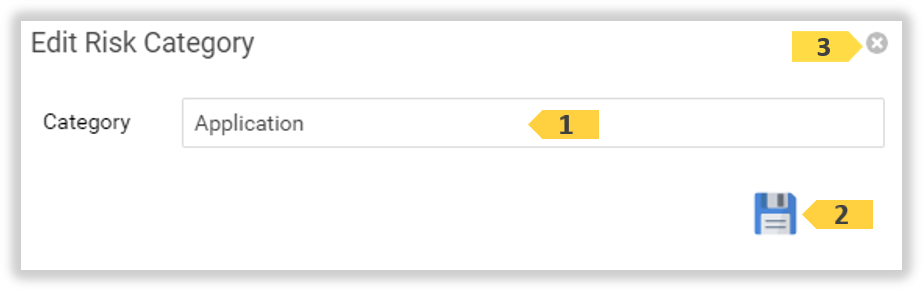
The ‘Edit Risk Category’ window displays. Update the Risk Category 1 as required. Click the Save 2 icon to save this change. (Or, click the Cancel 3 icon to cancel.)
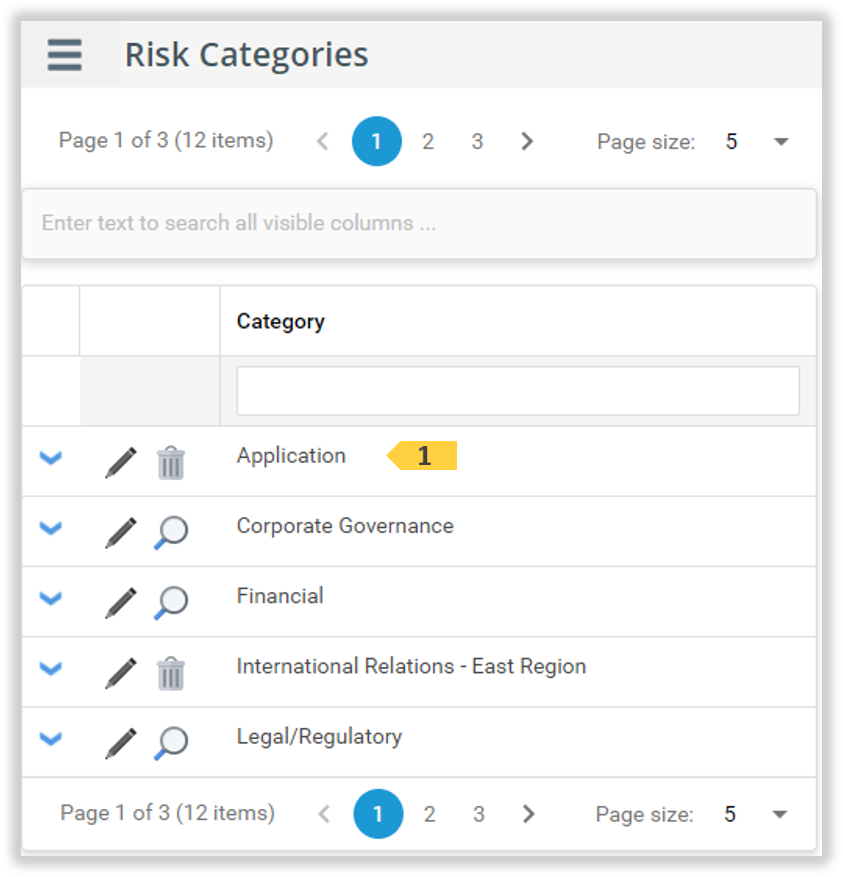
The window closes and the updated Risk Category 1 is displayed in the list.
Edit a Sub Category
Any name change to a Sub Category will immediately apply to all records that use this Sub Category.
Click the down chevron 1 icon to display the selected Sub Categories of this Risk Category.
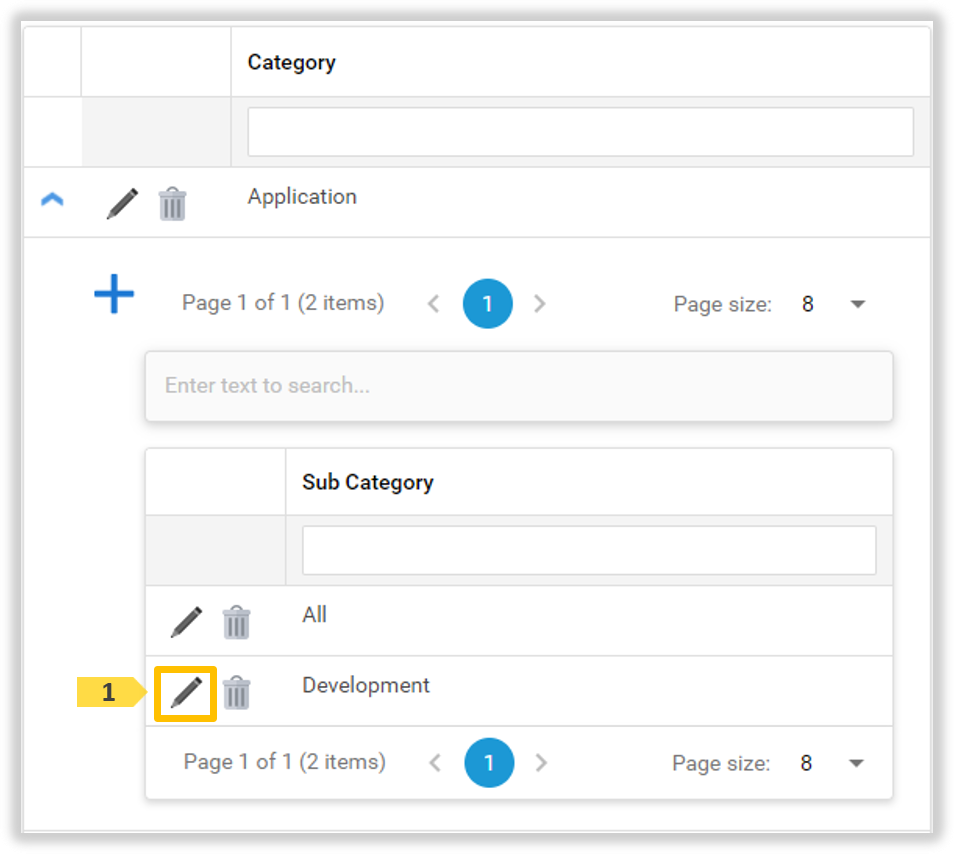
Click the Edit 1 icon to edit the selected Sub Category.
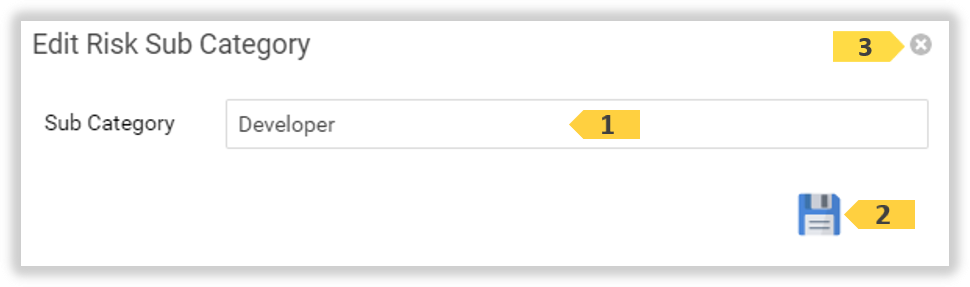
The ‘Edit Risk Sub Category’ window displays. Update the Sub Category 1 as required. Click the Save 2 icon to save this change. (Or, click the Cancel 3 icon to cancel.)
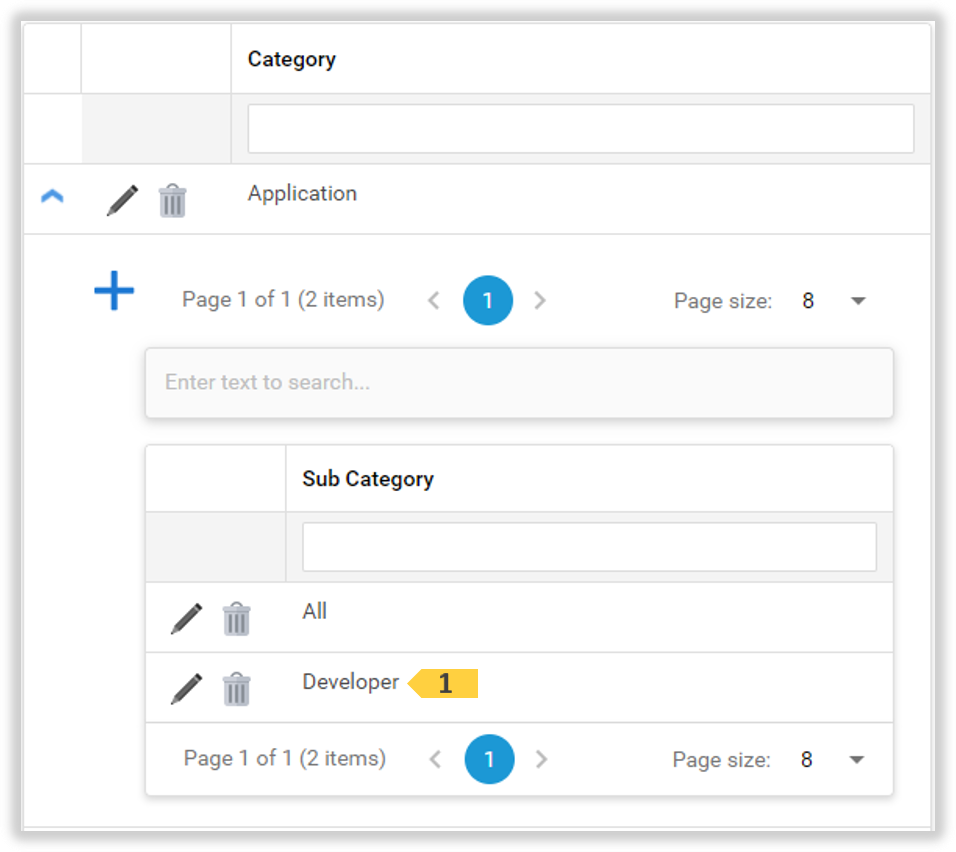
The window closes and the updated Sub Category 1 is displayed in the list.
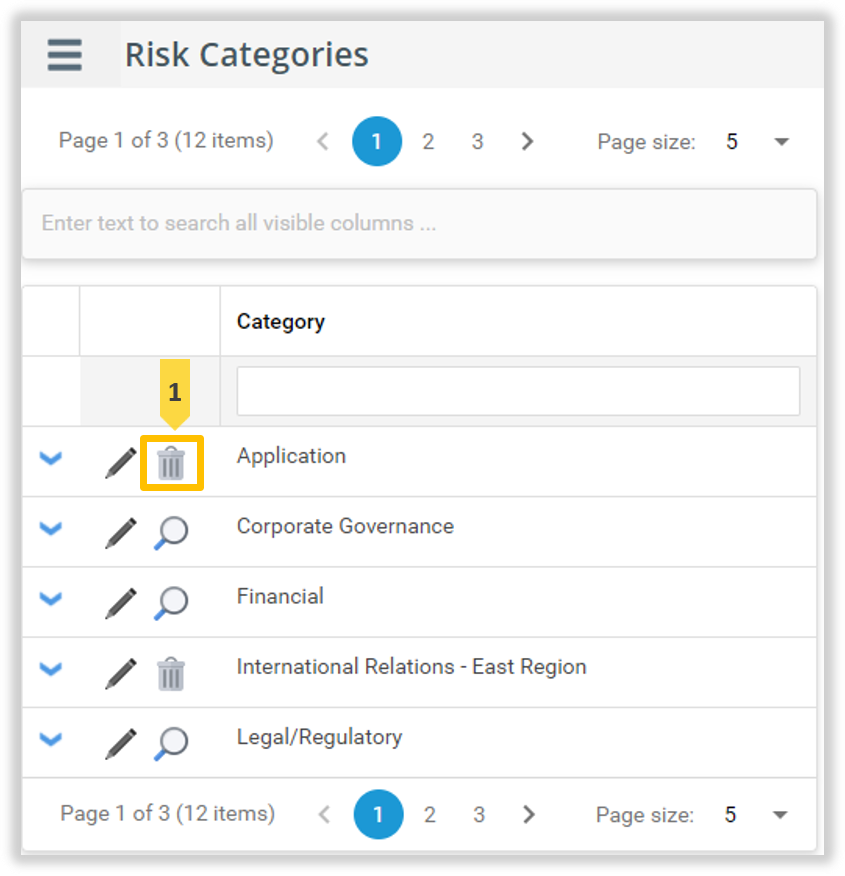
Delete a Risk Category
The Delete icon will only appear if the Category is not selected by any record in the system. Use the Show Usage icon to display which records have this Category selected.
Click the Delete 1 icon of the selected Risk Category.
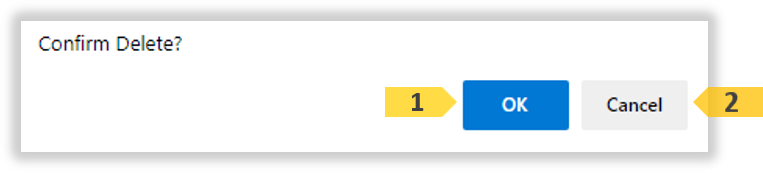
A ‘Confirm Delete’ window displays. Click the OK1 button to delete this Risk Category. The deleted Risk Category will no longer be displayed in the list and a confirmation message displayed at the bottom of the page. (Or, click the Cancel 2 button to cancel.)
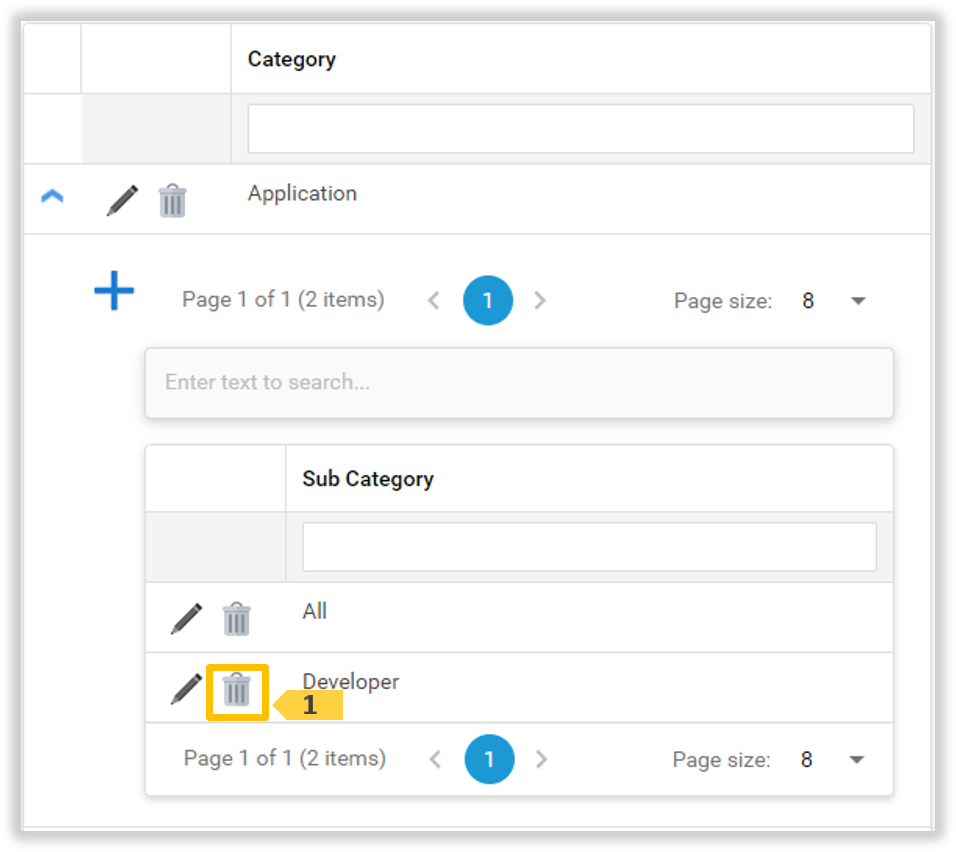
Delete a Sub Category
The Delete icon will only appear if the Sub Category is not selected by any record in the system.
Click the down chevron 1 icon to display the selected Sub Categories of this Risk Category.
Click the Delete 1 icon of the selected Sub Category.
A ‘Confirm Delete’ window displays. Click the OK1 button to delete this Sub Category. The deleted Sub Category will no longer be displayed in the list and a confirmation message displayed at the bottom of the page. (Or, click the Cancel 2 button to cancel.)
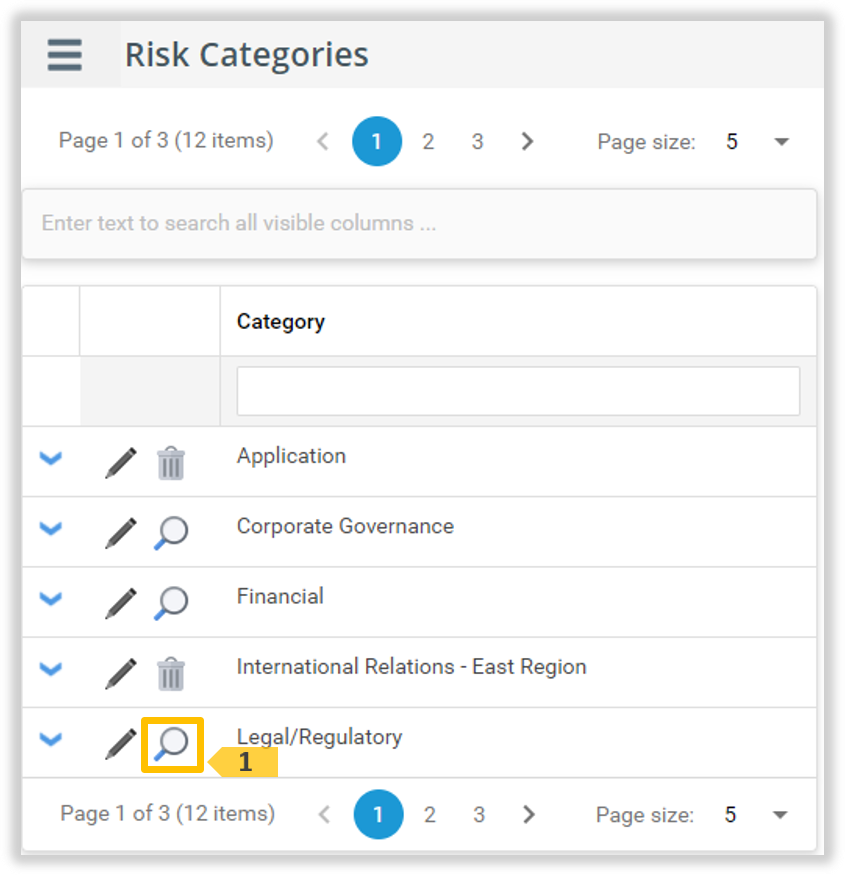
Show Risk Category Usage
The Show Usage icon will display when the Category has been selected on a Risk or KRI record.
Click the ‘Show Usage’ 1 icon of the selected Risk Category.
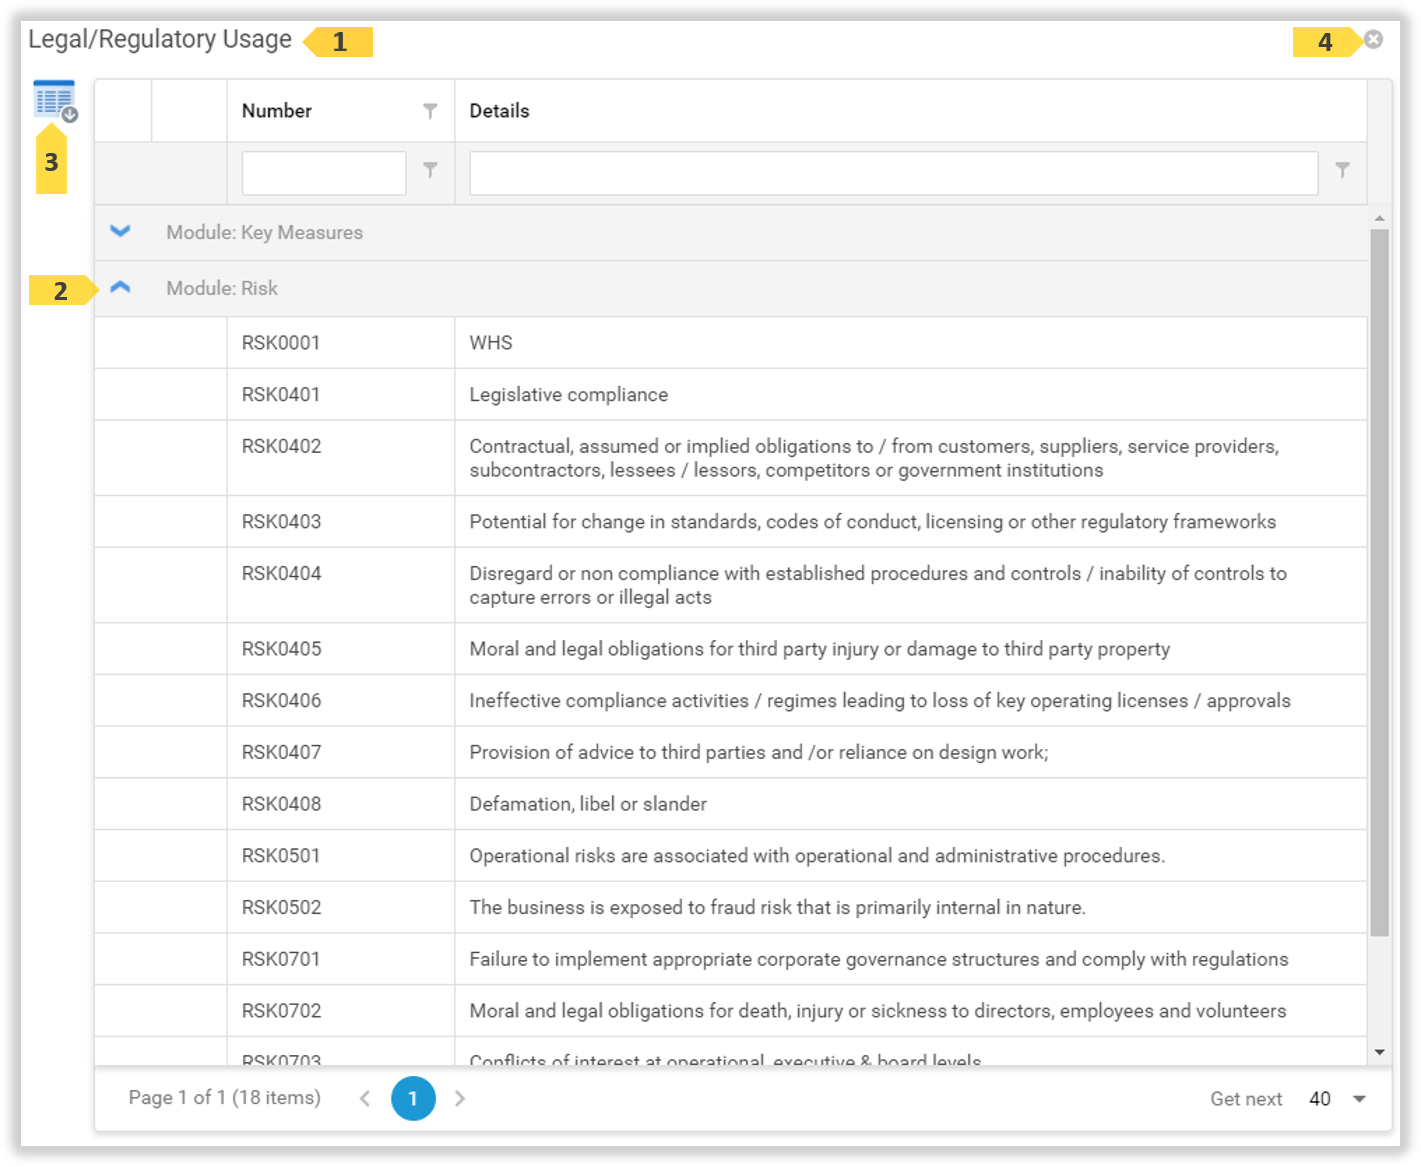
The Category 1 Usage window displays. The Modules using this Category are group listed. Click the chevron 2 icon to display all records of that module which use this Category. If required, click the Export 3 icon to save this list to a spreadsheet. Click the close 4 icon to close this window.
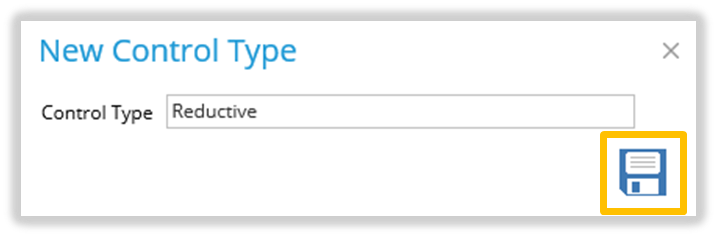
Add a Risk Control Type
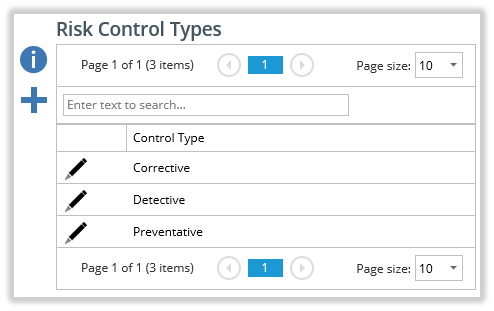
On the Main Menu, select Risk | Control Types. The Risk Control Types page loads.
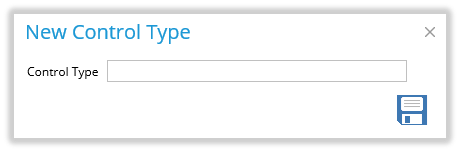
Click the icon. The ‘New Control Type’ popup window opens.
Type the name for the Risk Control Type.
Click the icon to save.
The new Risk Control Type will now display in the list.
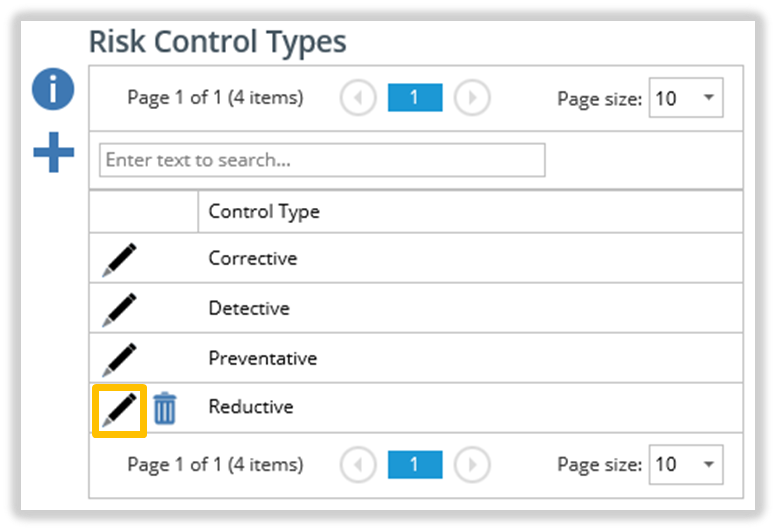
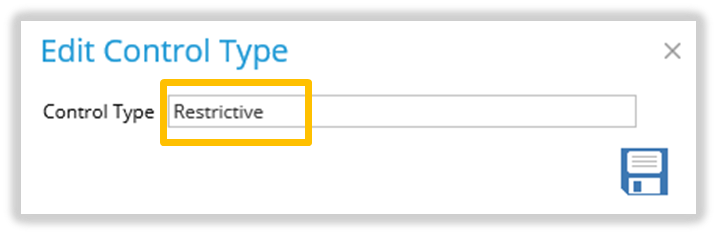
Edit a Risk Control Type
On the Main Menu, select Risk | Control Types. The Risk Control Types page loads.
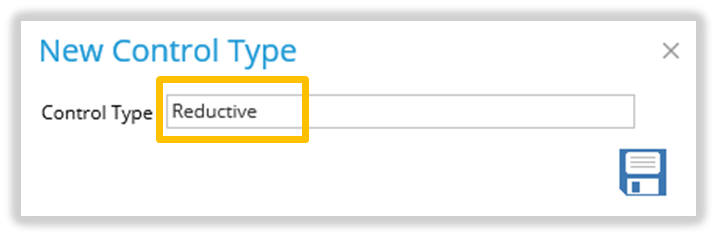
Click the icon next to the Risk Control Type you want to edit (e.g. ‘Reductive’).
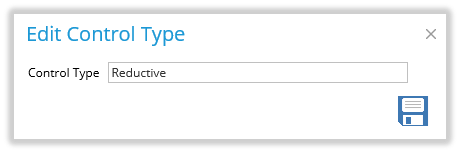
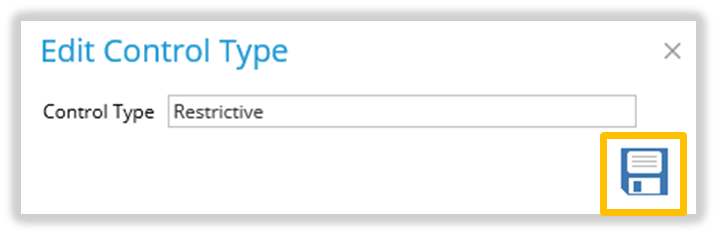
The ‘Edit Control Type’ popup window opens.
Edit the Risk Control Type.
Click the icon to save.
Changes made will now be displayed in the list.
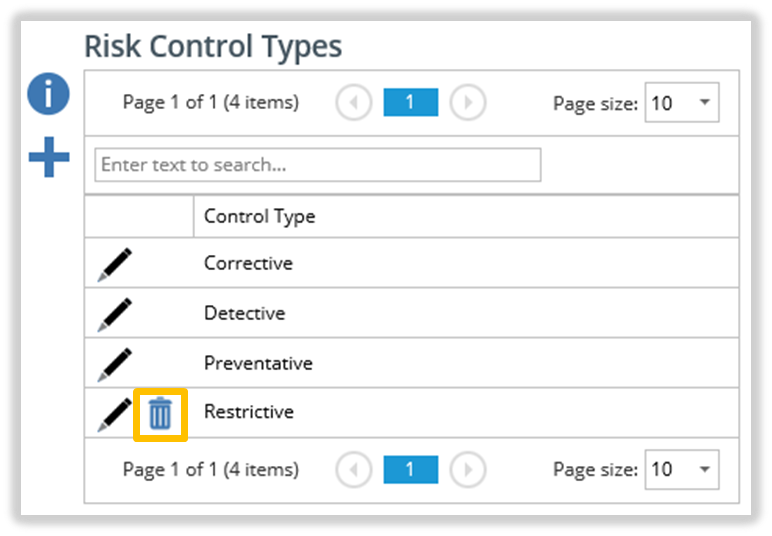
Delete a Risk Control Type
On the Main Menu, select Risk | Control Types. The Risk Control Types page loads.
Click the icon next to the Risk Control Type that you want to delete (e.g. ‘Reductive’).
Click OK to delete the record. The deleted Risk Control Type will no longer be displayed in the list.
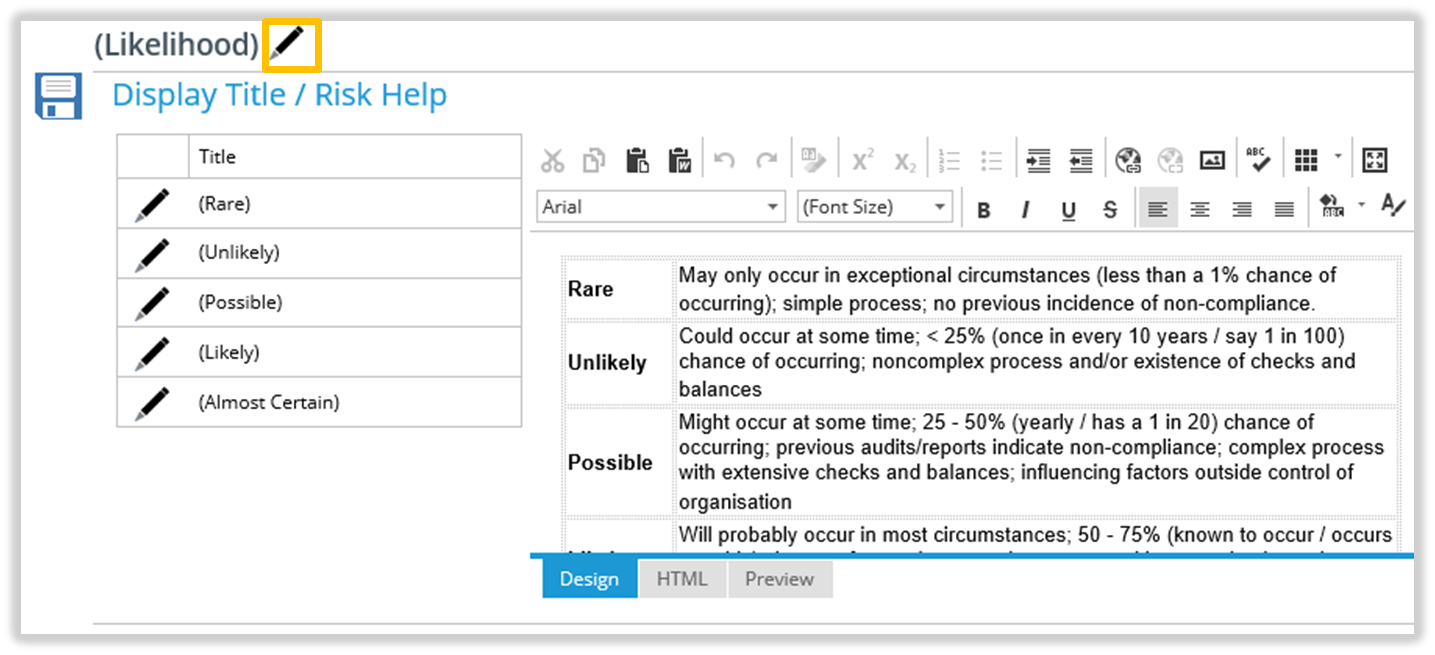
Edit Risk Likelihood Title
Note:
Titles and field values shown in (brackets) are customisable and may be different on your TriLine GRC system.
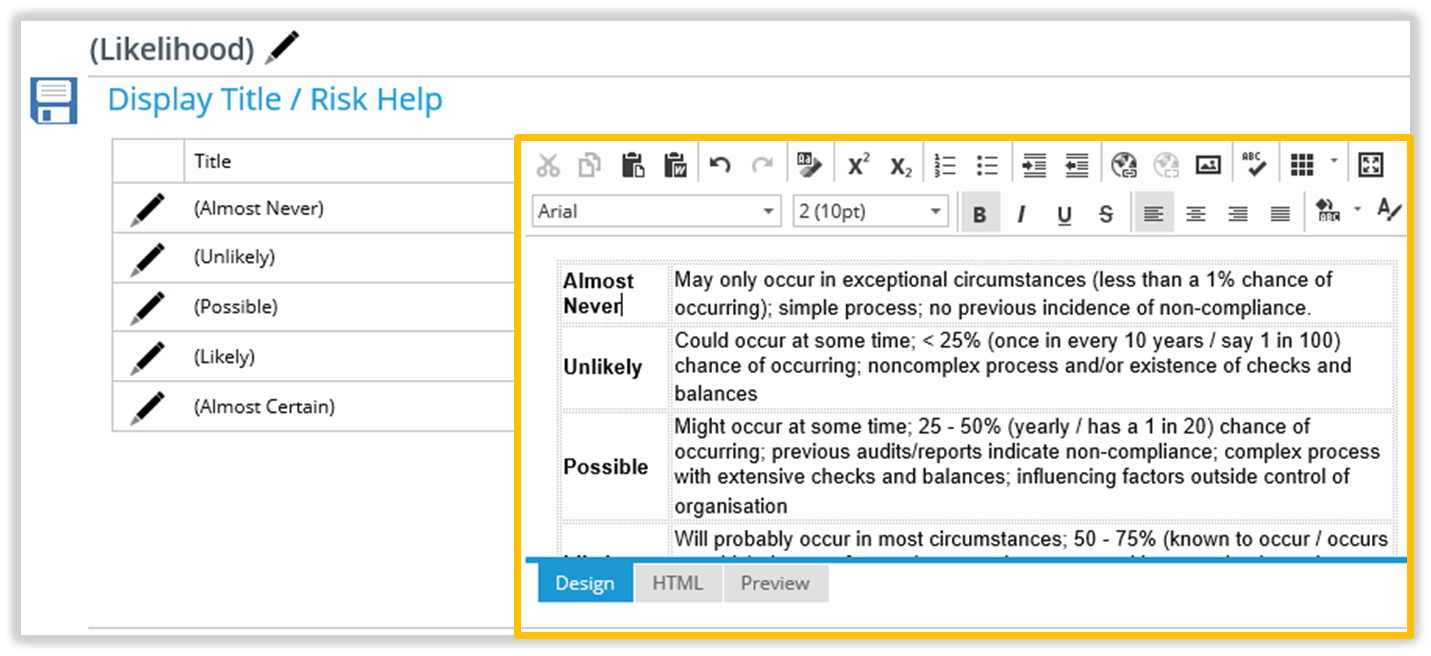
From the Main Menu, select Risk | Likelihood.
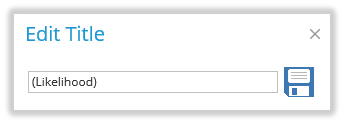
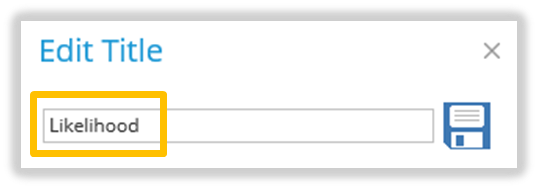
In The Likelihood page, click the icon next to the Likelihood heading.
The ‘Edit Title’ popup window opens.
Edit the Title.
Click the icon to save.
Your changes are shown.
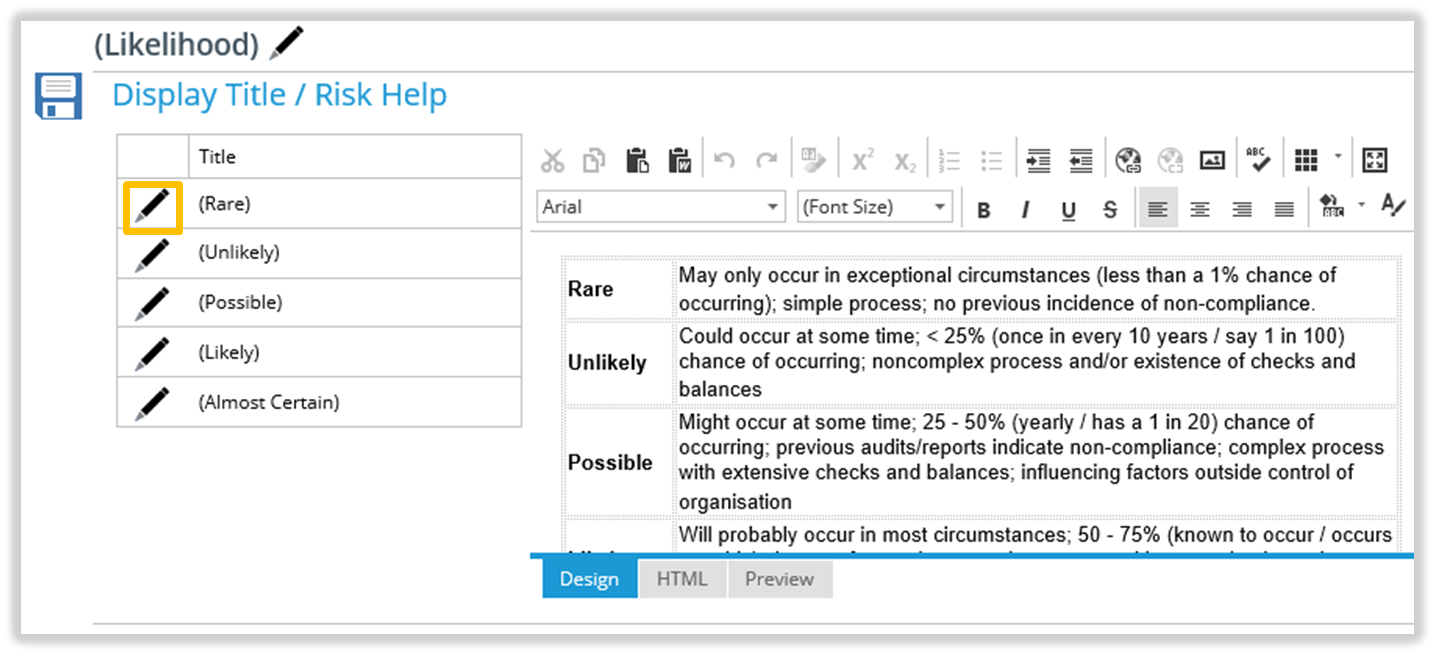
Edit Risk Likelihood Definitions
Note:
Titles and field values shown in (brackets) are customisable and may be different on your TriLine GRC system.
From the Main Menu, select Risk | Likelihood.
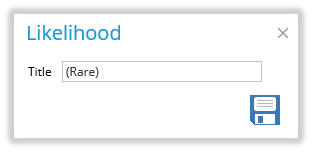
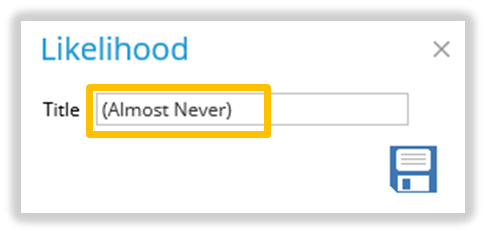
In The Likelihood page, click the icon next to the Likelihood title that you want to change (e.g. ‘Rare’).
The ‘Edit Likelihood’ popup window opens.
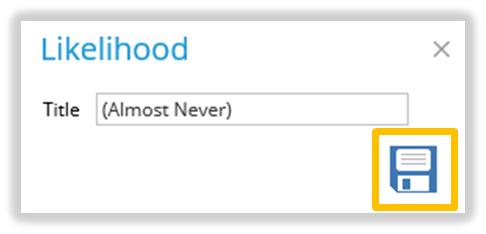
Edit the Title.
Click the icon to save.
Your changes will be reflected in the ‘Likelihood’ drop down lists and a confirmation message displayed at the bottom of the page.
Tip:
If you change a Likelihood title, check to see if the title exists in the Definition Help section and update if required. See Edit Risk Likelihood Definition Help.
Edit Risk Likelihood Definition Help
Note:
Titles and field values shown in (brackets) are customisable and may be different on your TriLine GRC system.
From the Main Menu, select Risk | Likelihood.
In The Likelihood page, edit the help text in the Text Editor.
Click the icon to save.
A confirmation message is displayed at the bottom of the page.
Your changes will be seen when a user accesses the Likelihood icon on the Risk Assessment screen.
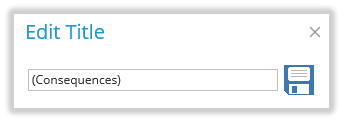
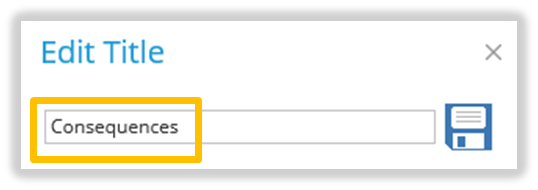
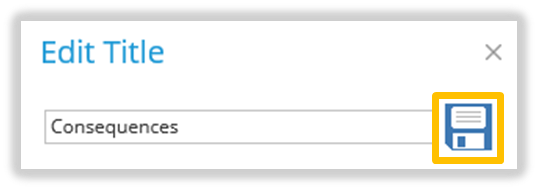
Edit Risk Consequences Title
Note:
Titles and field values shown in (brackets) are customisable and may be different on your TriLine GRC system.
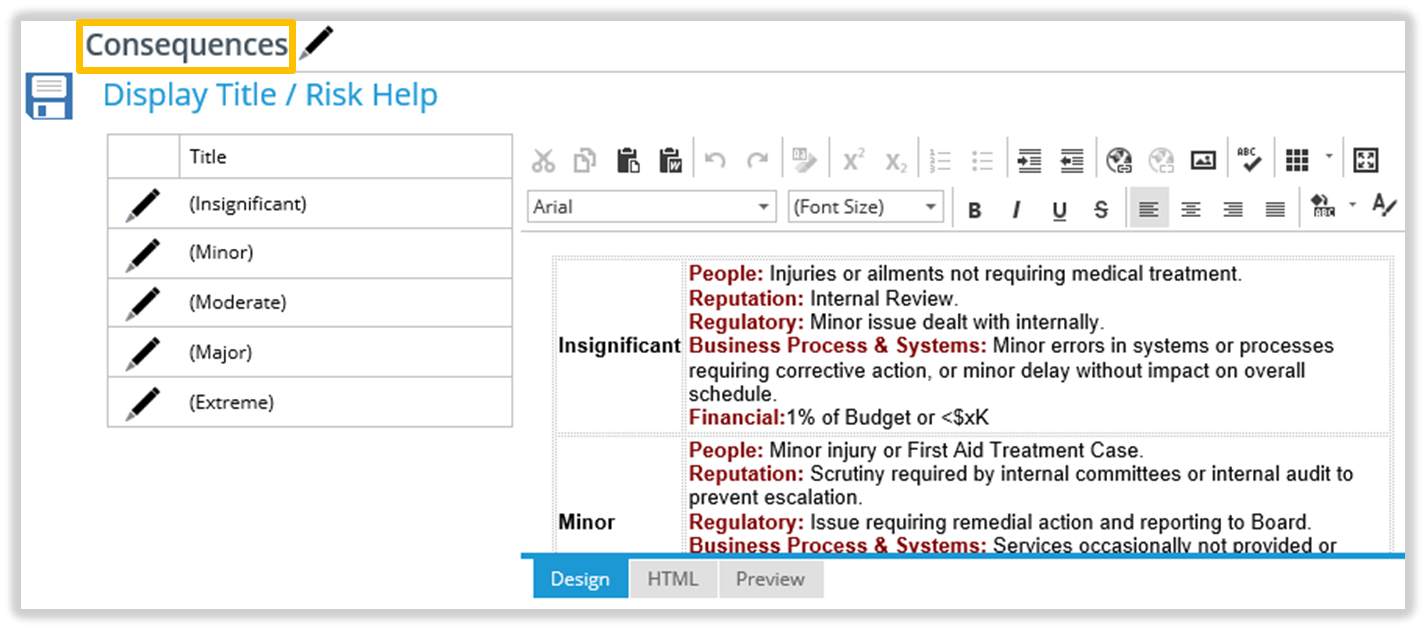
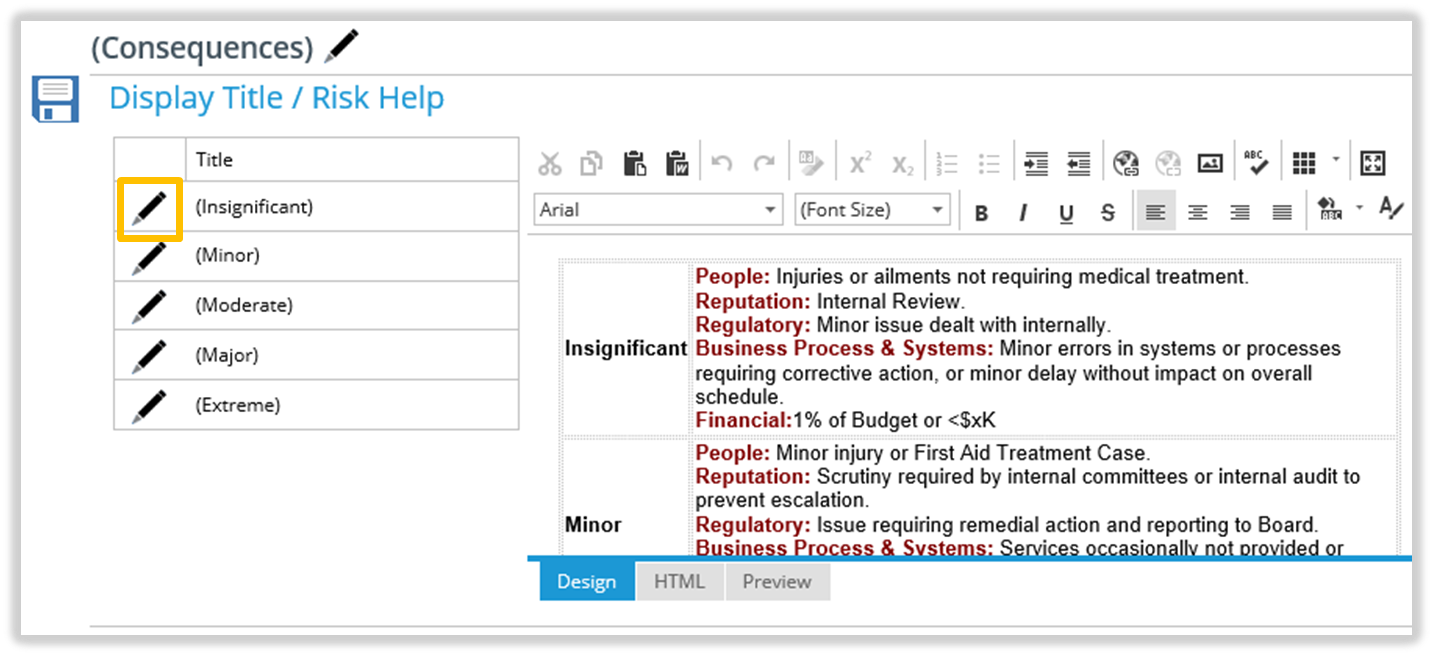
On the Main Menu, select Risk | Consequences.
On the ‘Consequences’ page, click the icon next to the Consequence heading.
The ‘Edit Consequences’ popup window opens.
In the ‘Edit’ popup window, edit the Title.
Click the icon to save your changes.
Changes made are shown.
Edit Risk Consequences Definitions
Note:
Titles and field values shown in (brackets) are customisable and may be different on your TriLine GRC system.
On the Main Menu, select Risk | Consequences.
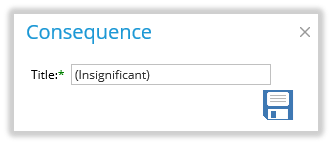
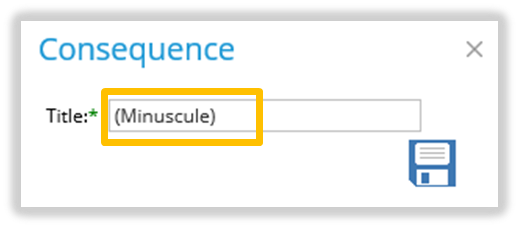
On the ‘Consequences’ page, click the icon next to the Consequence Level whose title you want to change (e.g. ‘Insignificant’).
The ‘Edit Consequences’ popup window opens.
In the ‘Edit’ popup window, edit the Title.
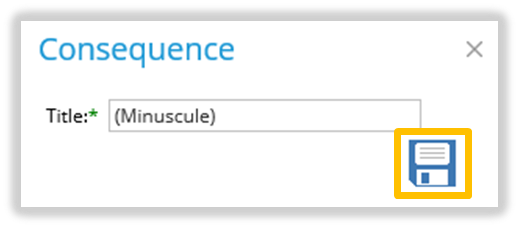
Click the icon to save your changes.
Changes made will now be displayed in the list and a confirmation message displayed at the bottom of the page.
Your changes will appear in the ‘Consequences’ drop down list on the Risk Assessment page.
Tip: If you change a Consequence title, check to see if the title exists in the Definition Help section and update if required. See Edit Risk Consequences Definition Help.
Edit Risk Consequences Definition Help
Note:
Titles and field values shown in (brackets) are customisable and may be different on your TriLine GRC system.
On the Main Menu, select Risk | Consequences.
In the ‘Consequences’ page, edit the details in the Text Editor.
Click the icon to save your changes.
A confirmation message is displayed at the bottom of the page.
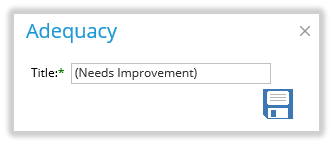
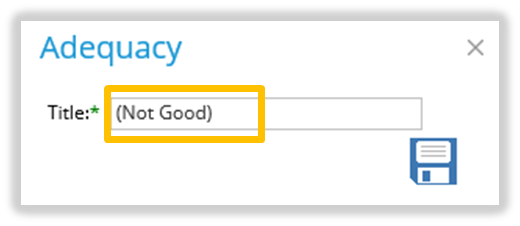
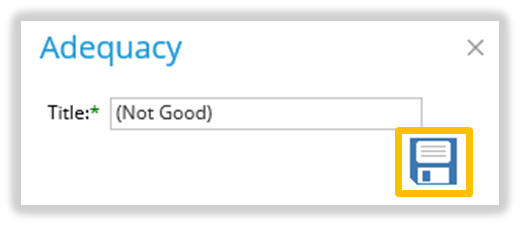
Edit Risk Adequacy Definitions
Note:
Titles and field values shown in (brackets) are customisable and may be different on your TriLine GRC system.
From the Main Menu, select Risk | Control Adequacy.
On the Adequacy page, click the icon next to the Adequacy Level title that you want to change (e.g. ‘Needs Improvement’).
The ‘Adequacy’ popup window opens.
Edit the Title.
Click the icon to save.
A confirmation message is displayed at the bottom of the page.
Your changes will appear in the ‘Adequacy’ drop down list on the Risk Assessment page.
Tip:
If you change an Adequacy title, check to see if the title exists in the Definition Help section and update if required. See Edit Risk Adequacy Definition Help.
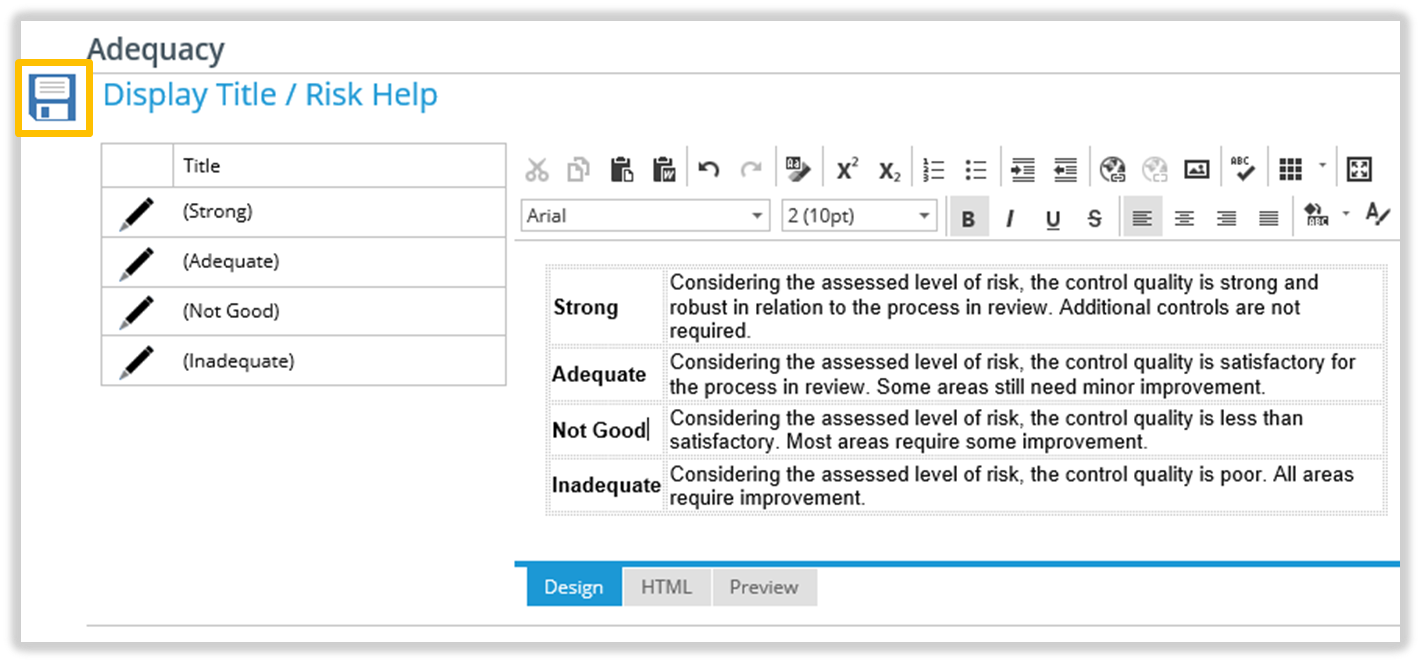
Edit Risk Adequacy Definition Help
Note:
Titles and field values shown in (brackets) are customisable and may be different on your TriLine GRC system.
From the Main Menu, select Risk | Control Adequacy.
On the ‘Adequacy’ page, edit the details in the Text Editor.
Click the icon to save.
A confirmation message is displayed at the bottom of the page.
Your changes will be displayed in the Help text for Adequacy Levels on the Risk Assessment page.
Edit Risk Management Definitions
Note:
Titles and field values shown in (brackets) are customisable and may be different on your TriLine GRC system.
From the Main Menu, select Risk | Control Management.
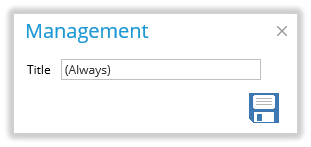
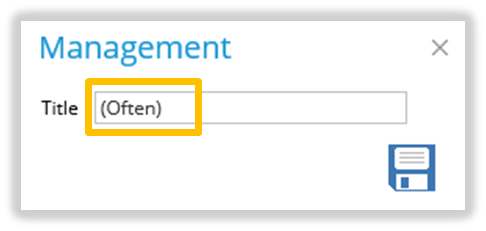
On the Management page, click the icon (e.g. ‘Always’).
The ‘Management’ popup window opens.
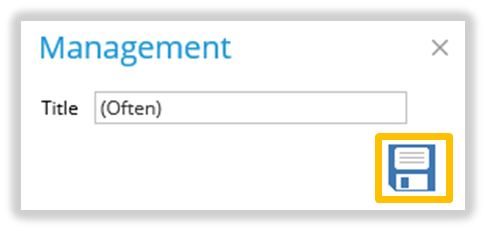
Edit the Title.
Click the icon to save.
A confirmation message is displayed at the bottom of the page.
Your changes will be seen in the ‘Management’ drop down list in the Risk Assessment screen.
Tip:
If you change a Management title, check to see if the title exists in the Definition Help section and update if required. See Edit Risk Management Definition Help.
Edit Risk Management Definition Help
Note: Titles and field values shown in (brackets) are customisable and may be different on your TriLine GRC system.
From the Main Menu, select Risk | Control Management.
In the Management page, edit the Help details in the Text Editor.
Click the icon to save.
A confirmation message is displayed at the bottom of the page.
Your changes will be seen in the ‘Management’ level Help text window in the Risk Assessment screen.
Edit Risk Matrix Values
Note: Titles and field values shown in (brackets) are customisable and may be different on your TriLine GRC system.
From the Main Menu, select Risk | Matrix. The ‘Risk Matrix’ Page is displayed.
On the ‘Risk Matrix’ tab, click the icon next to the Risk Rating you want to change and select the new value.
Repeat step 1 for any other desired Consequence/Likelihood combinations and then click the icon to save your changes.
Your changes will be reflected throughout TriLine GRC.
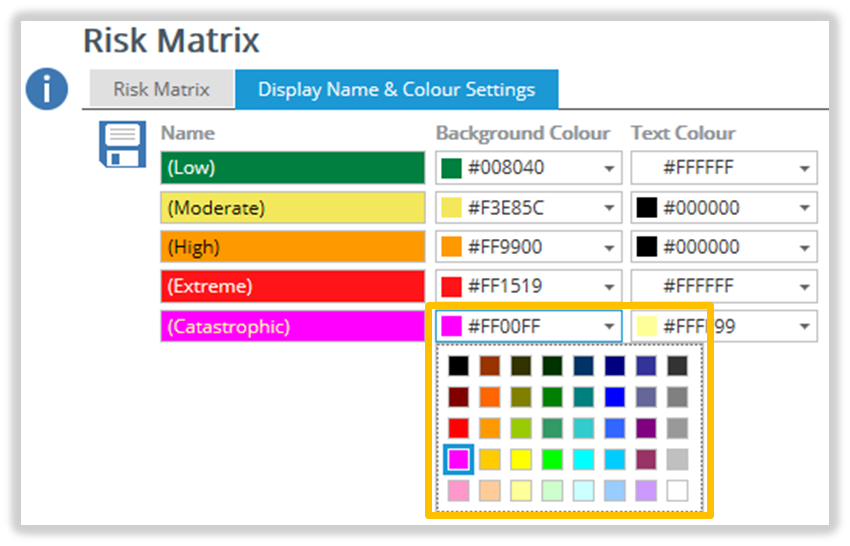
Edit Risk Matrix Display Names and Colours
Notes:
Titles and field values shown in (brackets) are customisable and may be different on your TriLine GRC system.
You can create five (5) different display name and colour settings to represent the various Risk combinations in the Risk Matrix.
From the Main Menu, select Risk | Matrix. The ‘Risk Matrix’ Page is displayed.
On the ‘Display names & Colour Settings’ tab, change a Value name by typing a new value in the ‘Name’ column (for example, ‘Catastrophic’).
To change a Background Colour or Text Colour, click the corresponding icon and select the colour you want to use.
Click the icon to save your changes. These changes will be reflected throughout TriLine GRC.
Edit Risk Score Calculation general settings
Notes:
Titles and field values shown in (brackets) are customisable and may be different on your TriLine GRC system.
Based upon your Risk Configuration settings, Risk Scoring may be disabled and therefore ‘Manage Risk Score Calculation’ may not be available from the Main Menu.
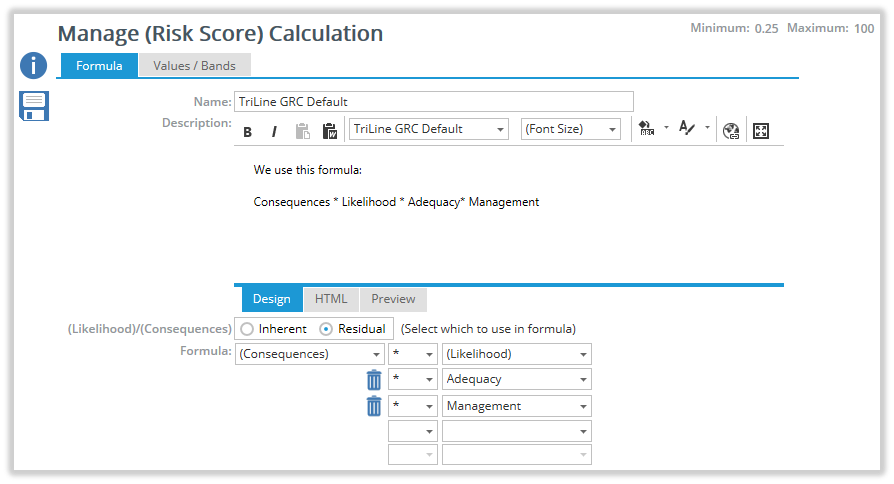
From the Main Menu, select Risks | Manage Risk Score Calculation. The Manage Risk Score Calculation Page loads. Click on the ‘Formula’ tab.
The Risk Score Calculation Page
Decide on the scoring model for your organisation:
Common scoring models for an organisation include ranges between 0–10, 0–25, 0–50, 0–100, and 0–1000.
Each of the options for Consequences, Likelihood, Adequacy and Management are given a numeric value. The Risk Score is calculated by creating a mathematical formula using the individual values. The default formula is Consequences * Likelihood.
Note: If Adequacy and Management options have been enabled in the ‘Risk Assessment’ settings in Configuration, then the default formula would be Consequences * Likelihood * Adequacy * Management.
In the ‘Name’ field, type the name of the scoring model you are going to use.
In the ‘Description’ field, type a brief explanation of the scoring model you are going to use.
Click the icon to save.
A confirmation message is displayed at the bottom of the page.
Set the Risk Score Formula
Notes:
Titles and field values shown in (brackets) are customisable and may be different on your TriLine GRC system.
Based upon your Risk Configuration settings, Risk Scoring may be disabled and therefore ‘Manage Risk Score Calculation’ may not be available from the Main Menu.
From the Main Menu, select Risks | Manage Risk Score Calculation. The Risk Score Calculation Page loads. Click on the ‘Formula’ tab.
The Risk Score Calculation Page
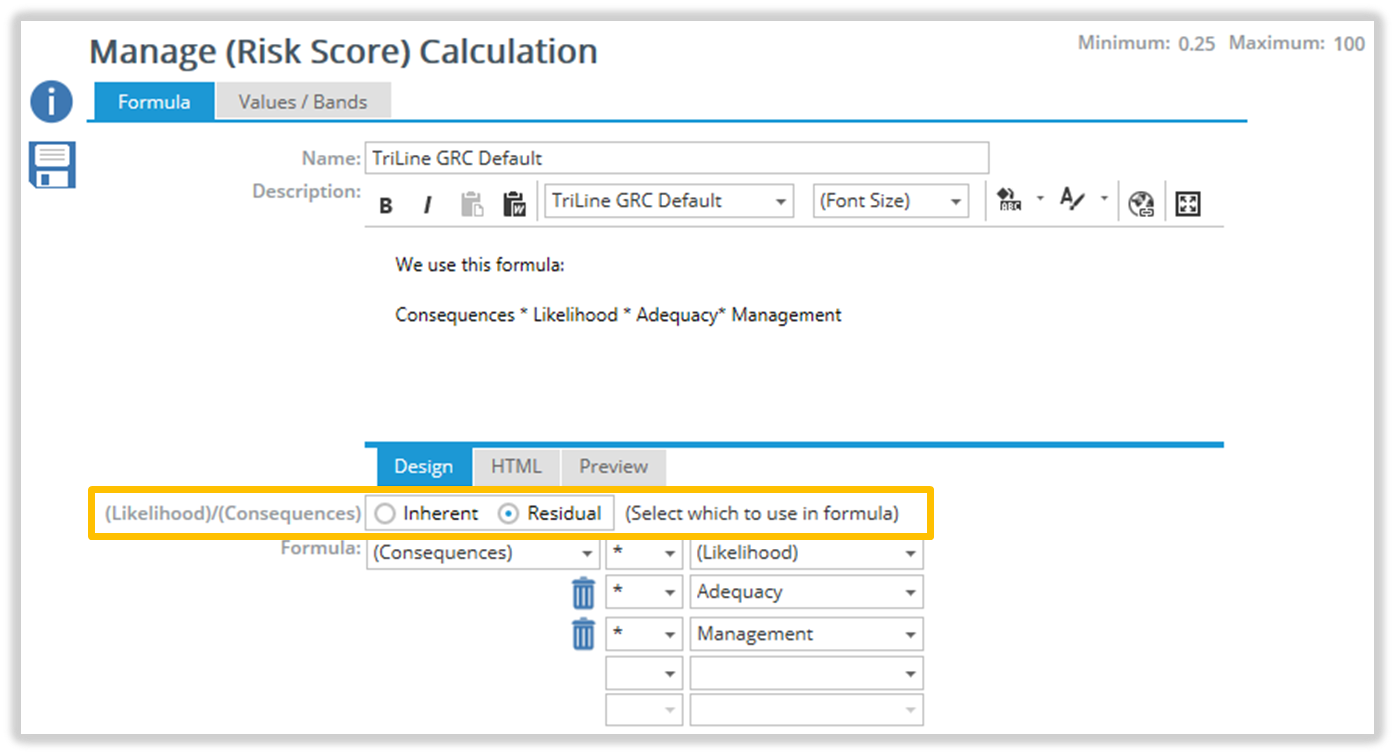
Select whether you want the formula to use the Inherent Rating or Residual Rating.
The Risk Score Calculation Page
Note: There is still only one formula, not one formula for each.
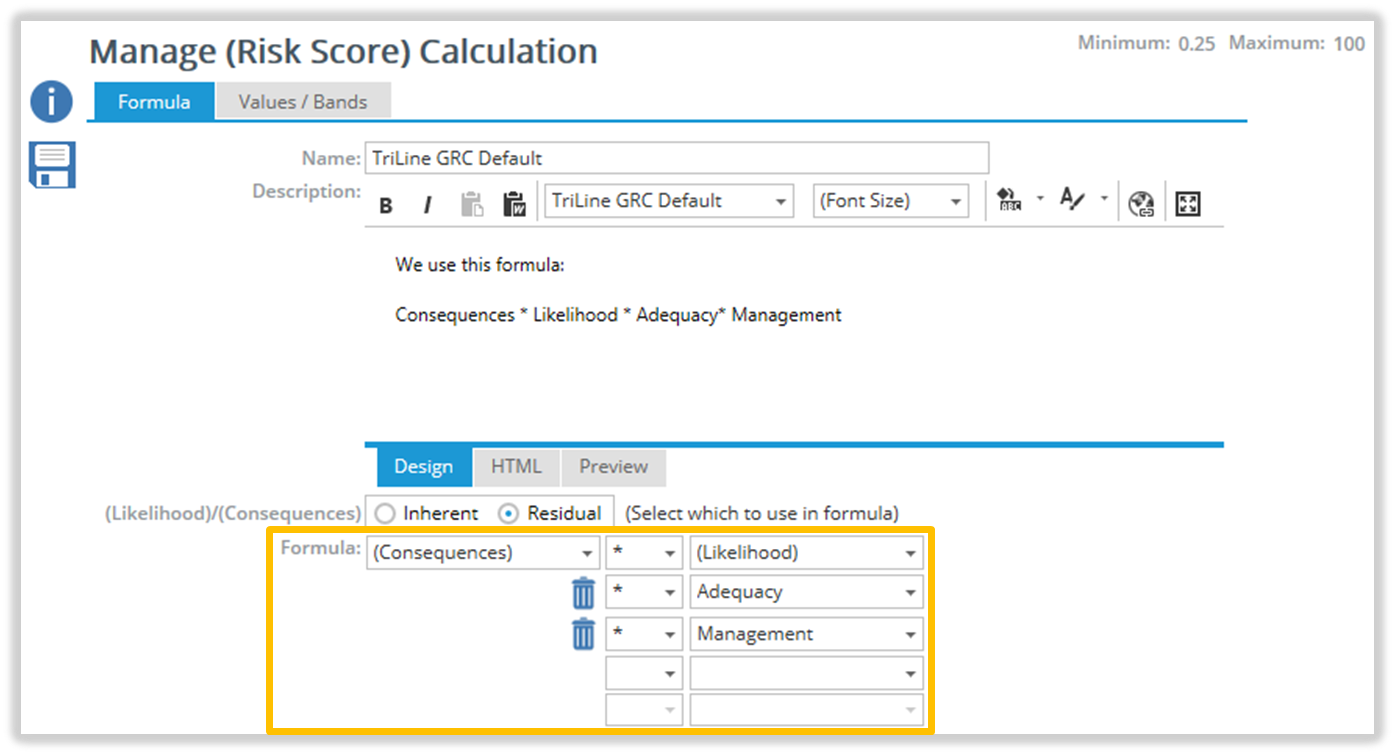
Construct the Risk Score Formula using the drop down fields in the Formula section.
Formula section of the ‘Manage Risk Score Calculation’ Page
Each element used in the calculation (e.g. Consequences) can be selected along with the appropriate mathematical symbol. The calculation is sequential. For example if the formula is Consequences * Likelihood + Consequences, Consequences and Likelihood are multiplied, then the Consequences value is added to the product.
Note: ‘Inherent’ and ‘Residual Rating’ Scores do not take Adequacy or Management into account; however, they do use the same formula as Risk Score (i.e. the one formula is used across all calculations).
As one formula is used across all calculations, make sure that any formula you set always includes Consequence and Likelihood as the first two components (in any order), followed by Adequacy and/or Management (in any order) if required.
Set the Risk Score Values
Notes:
Titles and field values shown in (brackets) are customisable and may be different on your TriLine GRC system.
Based upon your Risk Configuration settings, Risk Scoring may be disabled and therefore ‘Manage Risk Score Calculation’ may not be available from the Main Menu.
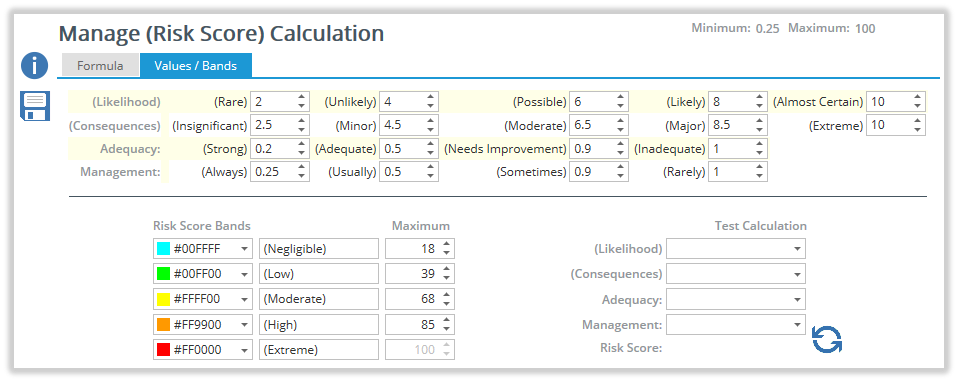
From the Main Menu, select Risks | Manage Risk Score Calculation. The Risk Score Calculation Page loads. Click on the ‘Values / Bands’ tab.
The ‘Values / Bands’ tab
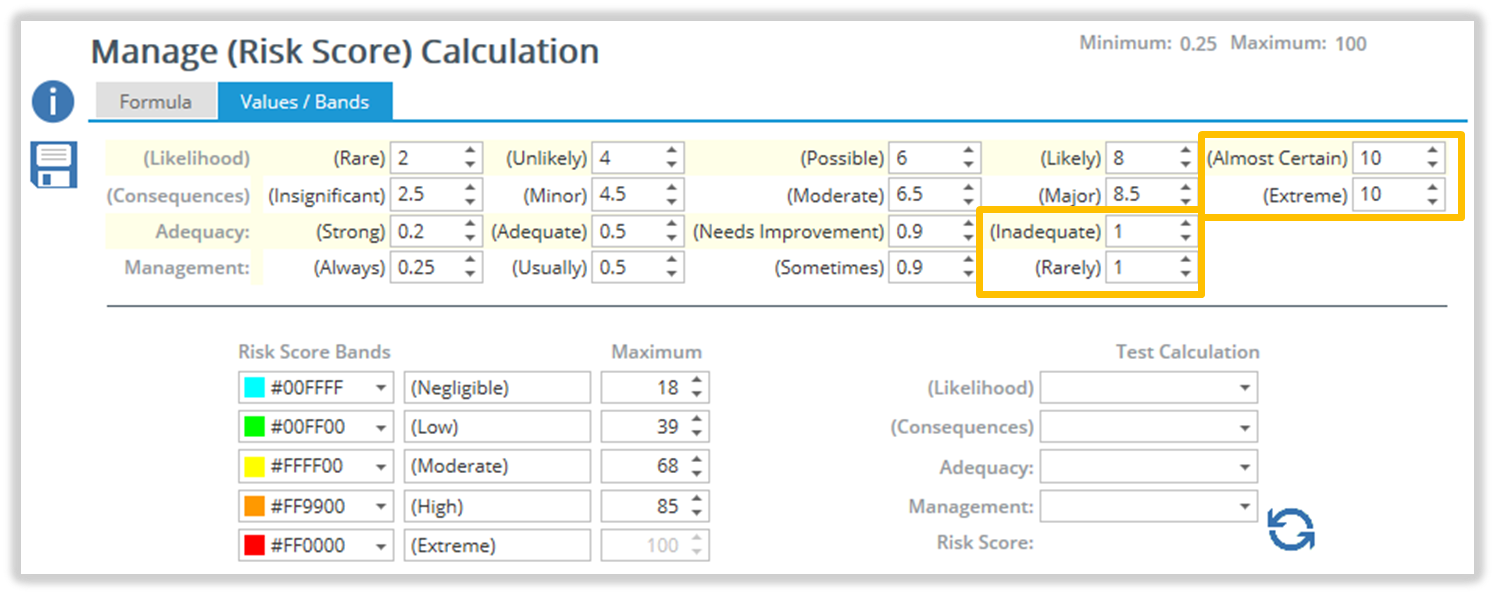
Change the values as required using the controls. The lowest value allowed in any field depends on the ‘Risk Scoring Decimal Places’ setting in the TriLine GRC Configuration Page. The maximum value allowed is 1000.
As an example of value settings, if you want the maximum Risk Score to be 25 then change the maximum values for Extreme, Almost Certain, Inadequate and Rarely so that, when multiplied, they calculate to 25 (as shown in the example below).
Maximum Value settings
Tip: Use values between 0.01 and 0.99 for positive control options—these will reduce the Risk Score when multiplied.
Perform a Risk Score test calculation
Notes:
Titles and field values shown in (brackets) are customisable and may be different on your TriLine GRC system.
Based upon your Risk Configuration settings, Risk Scoring may be disabled and therefore ‘Manage Risk Score Calculation’ may not be available from the Main Menu.
From the Main Menu, select Risks | Manage Risk Score Calculation. The Risk Score Calculation Page loads. Click on the ‘Values / Bands’ tab.
The ‘Values / Bands’ tab
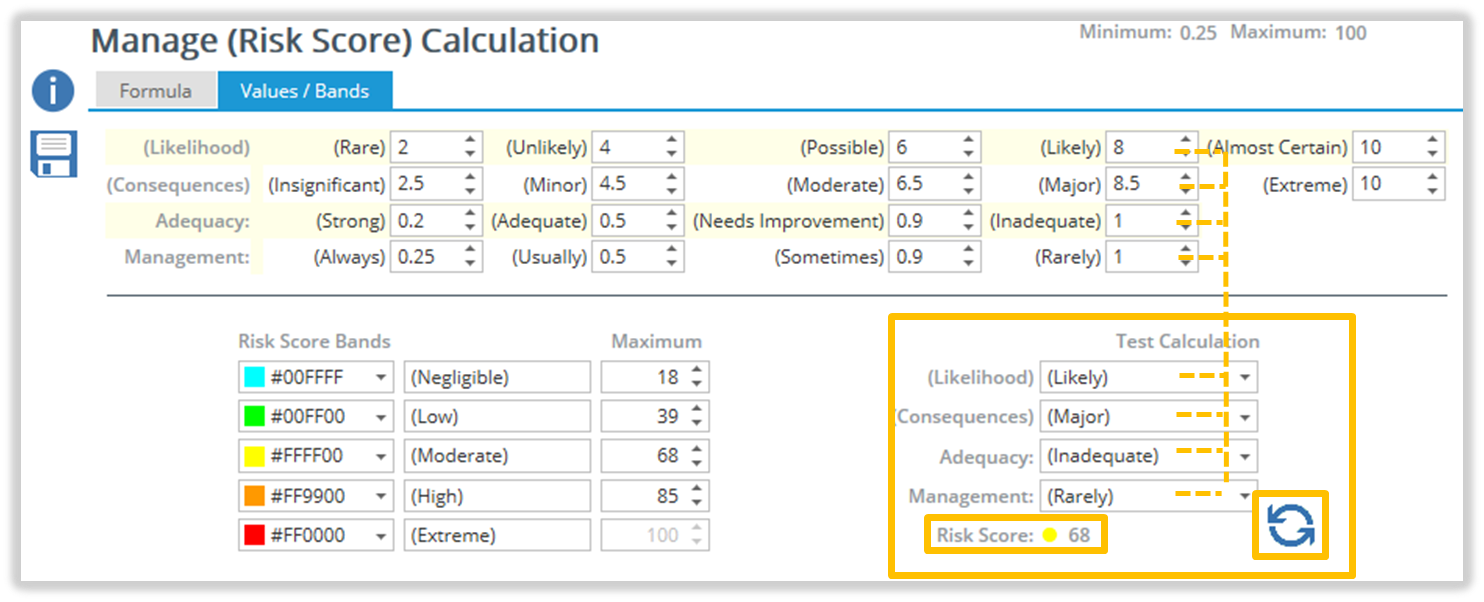
In the ‘Test Calculation’ section, select each Risk Score element, then click the icon. The Risk Score will be displayed at the bottom of the Test Calculation section.
The Test Calculation section
Note: When testing calculations, ensure that each available field in the Test Calculation section contains a value, even if that field is not part of the formula you have set up. If you leave one or more fields blank, clicking the icon will not return a result.
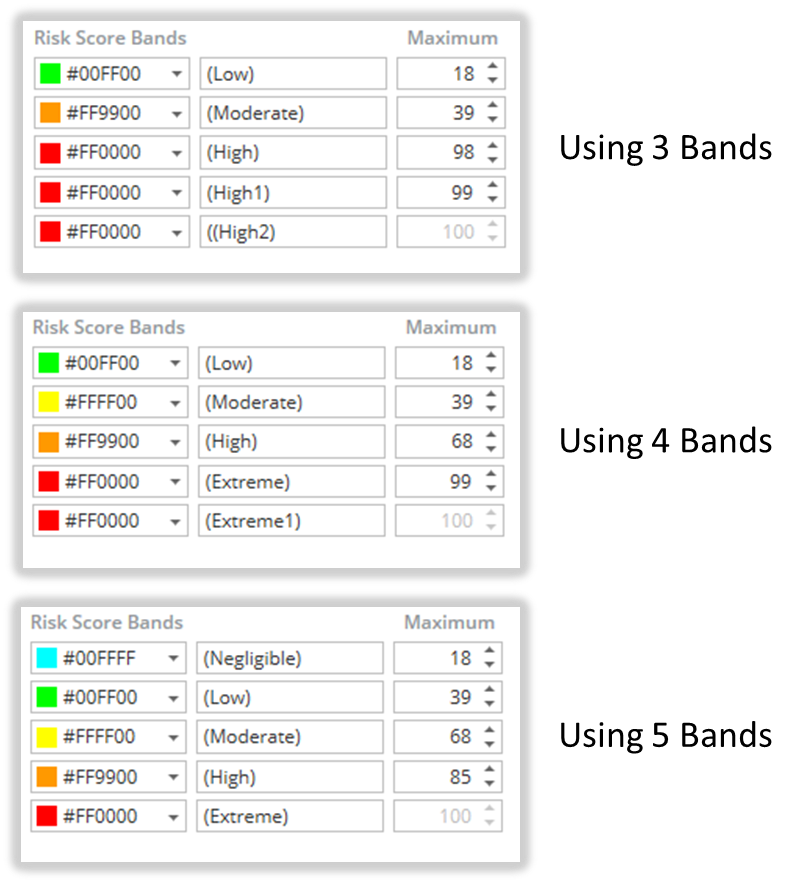
3, 4 or 5 Risk Score Bands
You can configure your TriLine GRC site to use 3, 4 or 5 Risk Score Bands. Example setups:
The ‘Values / Bands’ tab
Set the Risk Score Bands
Notes:
Titles and field values shown in (brackets) are customisable and may be different on your TriLine GRC system.
Based upon your Risk Configuration settings, Risk Scoring may be disabled and therefore ‘Manage Risk Score Calculation’ may not be available from the Main Menu.
From the Main Menu, select Risks | Manage Risk Score Calculation. The Risk Score Calculation Page loads. Click on the ‘Values / Bands’ tab.
The ‘Values / Bands’ tab
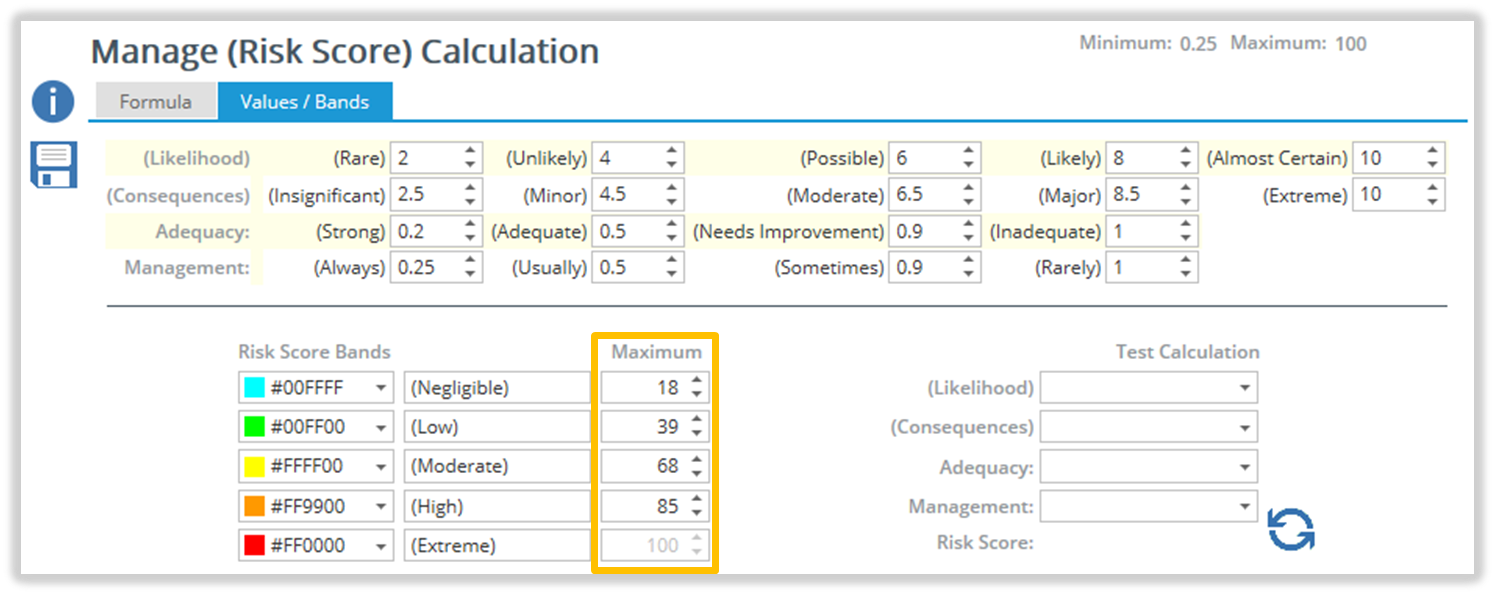
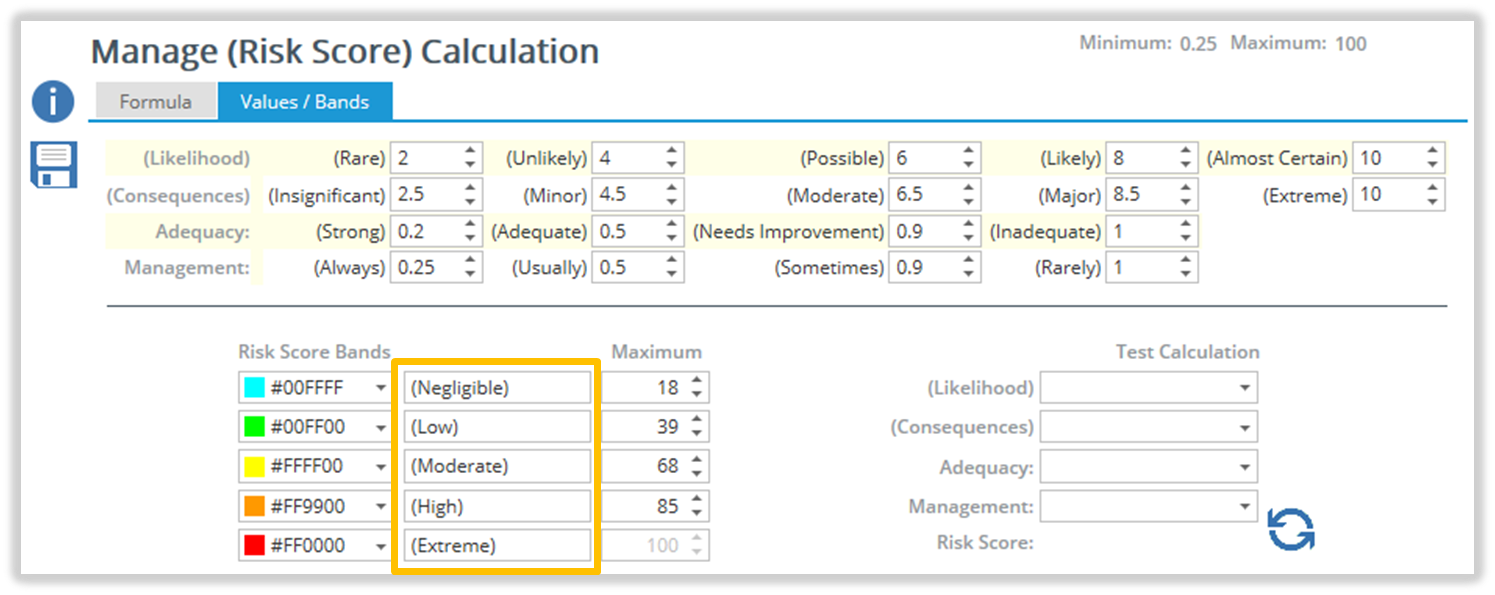
Set the maximum values for the Low, Moderate and High Risk Bands. Change the values as required using the controls or typing the number in the field.
The ‘Values / Bands’ tab
Note: The highest Risk Score Band (‘Extreme’ in the example above) automatically sets to the maximum value and cannot be changed. The second-highest band (‘High’ in the example above) must be set to a value less than the maximum, even if it’s only by 0.01.
If desired, change the title(s) of the Risk Score Bands by selecting the existing text in each text field and typing the new Risk Band title.
Example of Risk Score Band title change
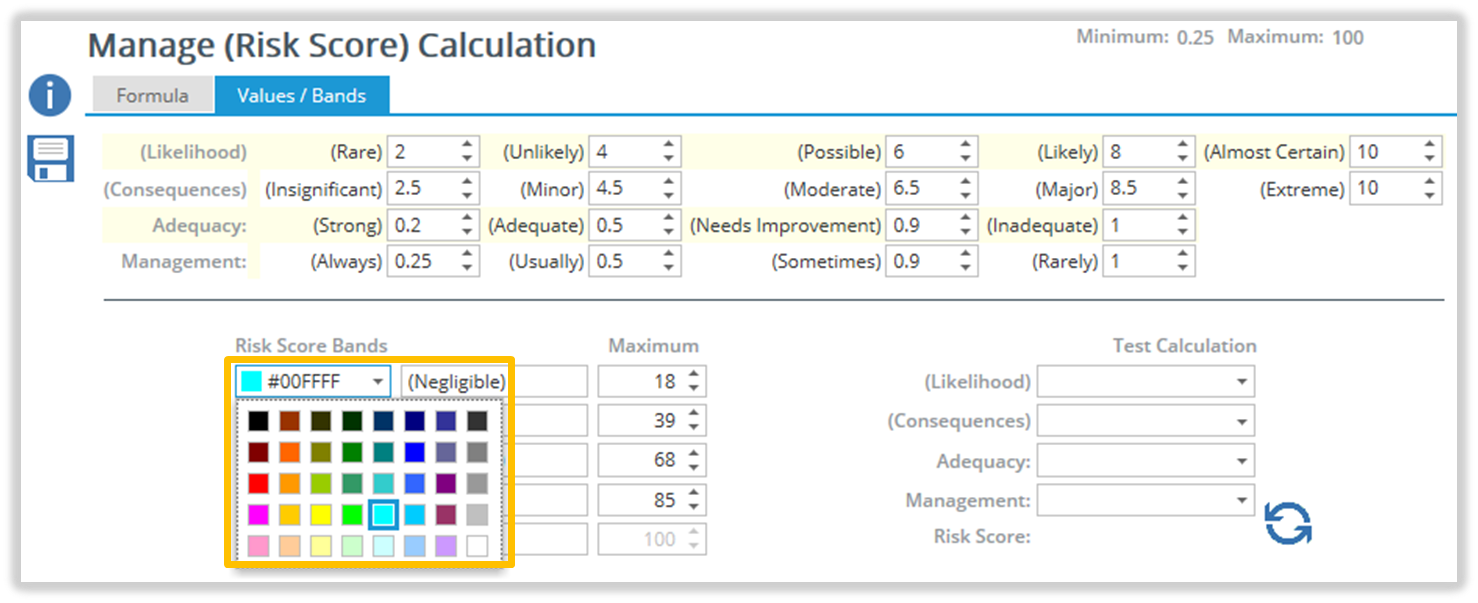
If desired, change the colour(s) of the Risk Score Bands by selecting a new colour from the colour picker.
Example of Risk Score Band title change
Click the icon to save your changes.
Add a Risk Status
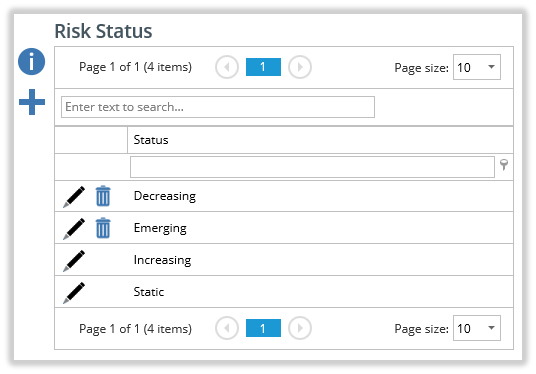
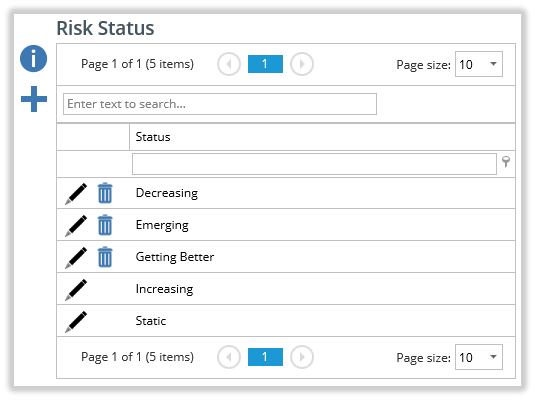
From the Main Menu, select Risk | Status. The ‘Risk Status’ page loads.
The ‘Risk Status’ Page
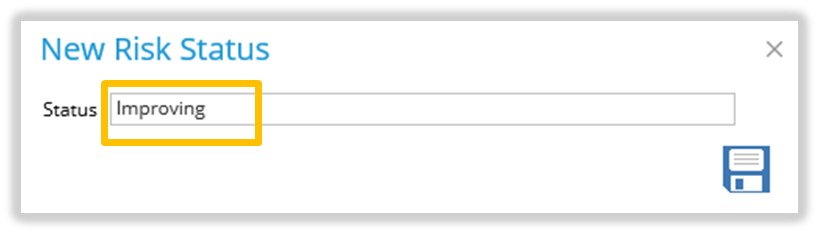
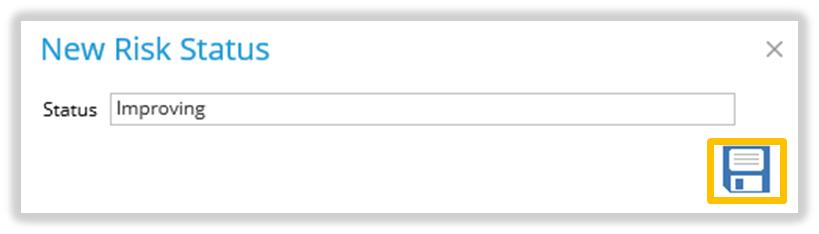
Click the icon. The ‘New Risk Status’ popup window opens.
The ‘New Risk Status’ popup window
Type the description of the status.
Type status description
Click the icon to add the new Risk Status.
Click the Save icon
The new Risk Status is displayed in the list and a confirmation message shown in red at the bottom of the page.
Edit a Risk Status
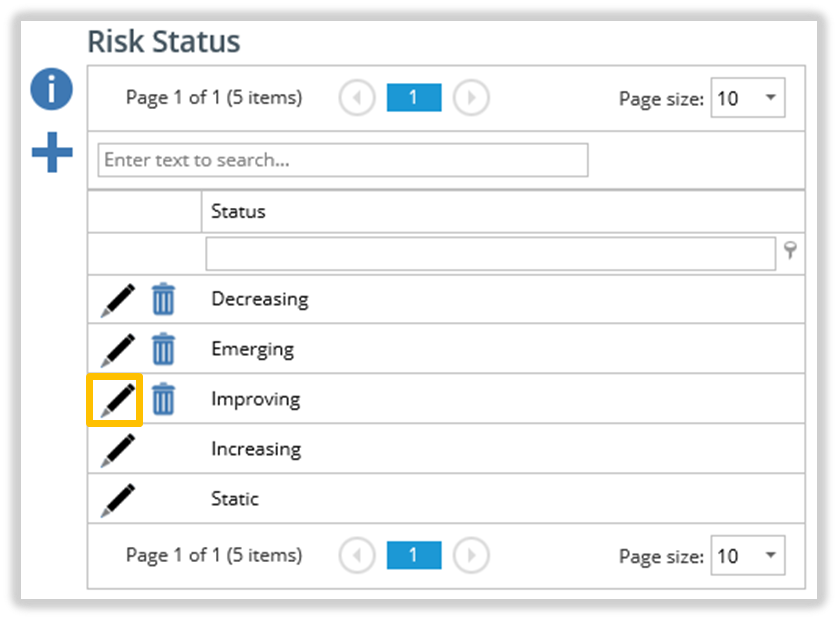
From the Main Menu, select Risk | Status. The ‘Risk Status’ page loads.
The ‘Risk Status’ Page
Click the icon next to the Status that you want to change (e.g. ‘Improving’).
Edit icon in list
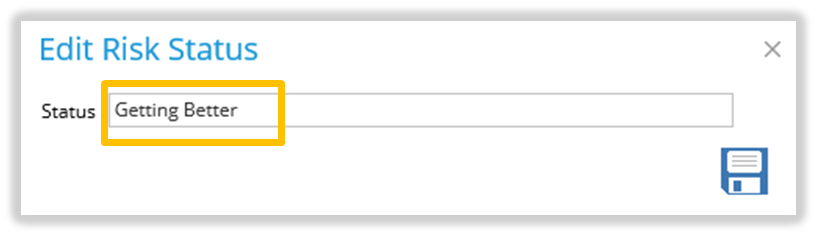
The ‘Edit Risk Status’ popup window opens.
The ‘Edit Risk Status’ popup window
Edit the description.
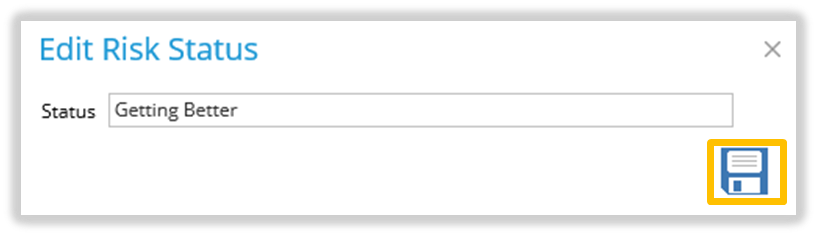
The Save icon
Edit the description and then click the icon to save your changes.
The Save icon
Your changes appear in the Risk Status list and a confirmation message is displayed.
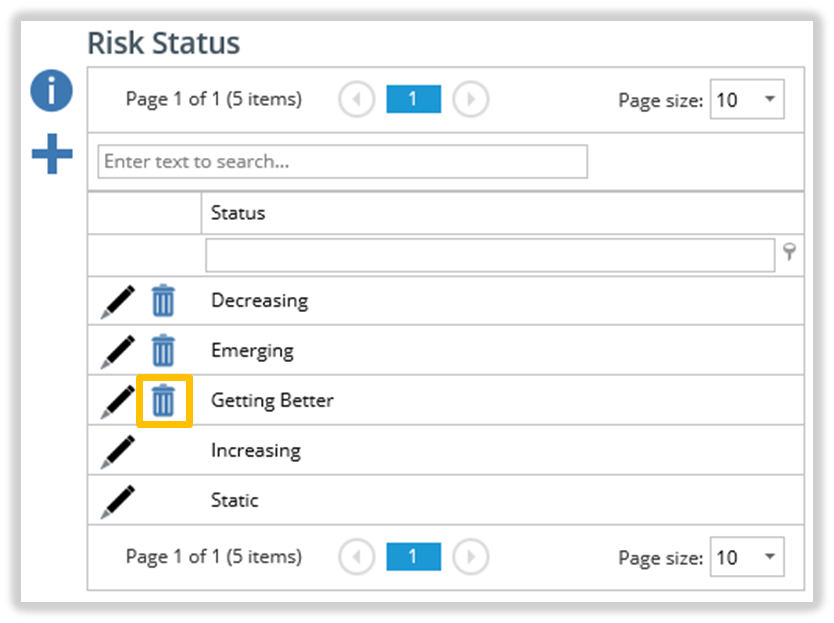
Delete a Risk Status
From the Main Menu, select Risk | Status. The ‘Risk Status’ page loads.
The ‘Risk Status’ Page
Click the corresponding icon (e.g. ‘Getting Better’).


 icon next to the Risk Rating you want to change and select the new value.
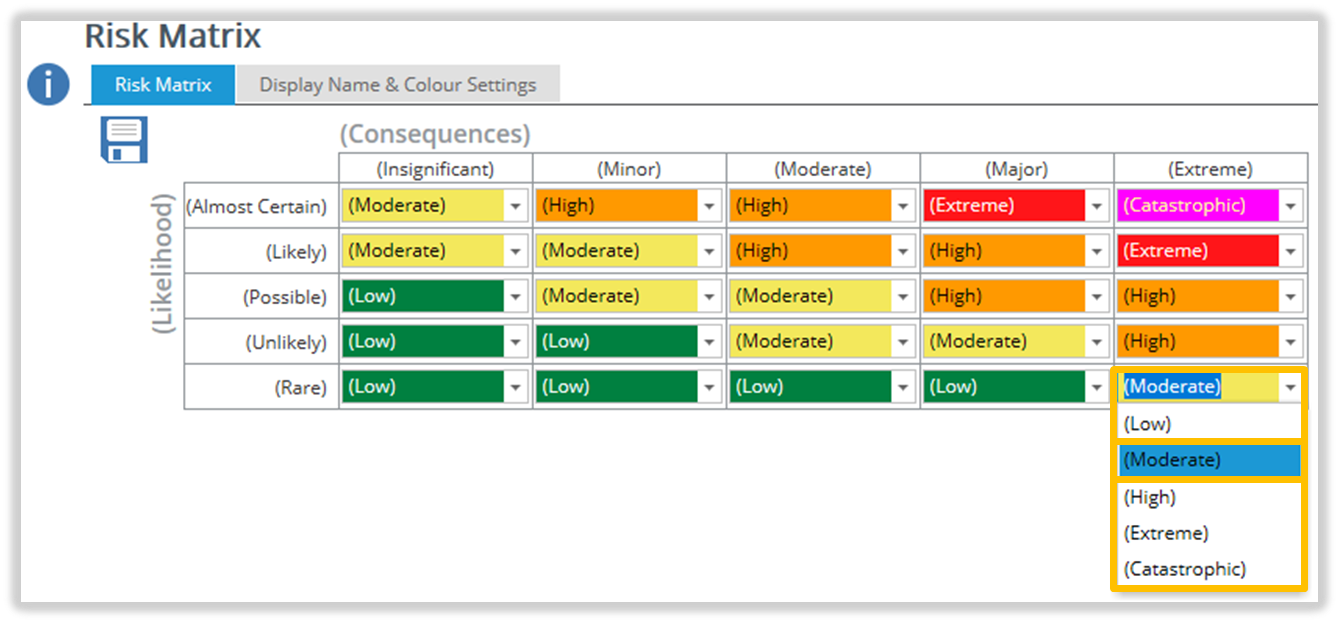

 controls. The lowest value allowed in any field depends on the