TriLine GRC is highly configurable, from the definition of your Business Units to how a Risk Score is calculated. This allows you to set up and maintain the system to meet your business needs.
Configuration is performed from various menu options on the ‘Maintenance’ Menu. You can perform Basic Configuration via the Configuration Page, including:
Hover over, or click the Menu Options (Hamburger) 1 icon.
The Save option will appear. Click the Save 2 option.
Click on each tab 3 to change tabs. The current tab will underline blue to show it is selected.
On the General tab, click each section 4 to display that sections options. Clicking another section will open that section and close this section as only one section can be open at a time.
General Page functions
Procedures
Accessing the Configuration Page
From the Main Menu, select Maintenance | Configuration. The Configuration Page is displayed.
The Maintenance menu items are only available to Positions in the Administrators System Security Group.
Managing General settings
Administrators can manage general settings on the Configuration Page ‘General’ tab:
In the Main Menu, select Maintenance | Configuration.
The ‘Configuration’ Page is displayed.
On the ‘Configuration’ Page, click the ‘General’ tab.
The general settings are displayed.
To Open or Close any Section on the General Tab, click that Section.
Update fields as required.
To Save any changes, hover over, or click the Menu Options (Hamburger) icon. Click the Save option.
The ‘General’ section settings
The General section contain information on your Organisation’s Capital Amount (optional), Country and Time Zone (mandatory so the Monitor runs at the correct time), and Business Unit Title (also mandatory).
Click the Section to open and close this section.
The Configuration ‘General’ section
‘General’ section elements
ID
Element
Description
1
‘General’ section
Click this section to open or close this section.
2
‘Capital Amount’ field
If your organisation is subject to the Internal Capital Adequacy Assessment Process (ICAAP), type in your organisation’s Asset Base Value for reporting purposes.
This field is optional and it’s value can be left at 0.
3
‘Country’ Selector
Select your Organisation country from the drop-down list so that your system uses the correct date format for your region.
4
‘Time Zone’ Selector
Select the Time Zone you want your system to operate in from the drop-down list.
Note: This setting is also the Time Zone for the Monitor.
5
‘Logon_Security’_Selector
This Option Not Shown in the image. For Self Hosted sites, choose the type of security that you want to apply to access your system. Your Login options are:
Windows: This option uses Windows Authentication—administrators must enter the user’s Microsoft Windows User ID and Password when adding a new Position. The windows user will be automatically logged in.
Website: This option uses the TriLine GRC User ID and Password. See adding a new Position. The user is required to enter their TriLine GRC user id and password.
6
‘Business Unit Title’ field
The default term Business Unit describes an organisation’s divisions or departments. If your organisation uses a different term (e.g. Department), type that term in this field and it will be displayed as the title of all relevant fields throughout your system.
7
‘Permitted IP Addresses’ field
Optional field. Enter all intended access IP address(es) in this field to lock logging in to only occur from these addresses. Note: Currently, the first 3 of the 4 IP numbers are applied to the lock, hence if you have multiple IP numbers where only the 4th number is different, you only need to enter one of those IP addresses to use all addresses in the 4 band.
The ‘Data Retention’ section settings
The Data Retention section display how long non critical information is retained on the system.
These logs contain information about all emails that have been sent to Positions.
Access the logs via the Main Menu select Maintenance, then select Monitor Logs option.
For housekeeping purposes, The Monitor deletes logs that are older than the ‘Days to retain Monitor Logs’ setting. Adjust this setting to suit your organisation’s requirements. The minimum recommended setting is 180 days.
3
Days to retain ‘Deleted Records’ field
Determines how long Records with the Status ‘To Be Deleted’ are held in your system until they are completely removed by The Monitor. (See Deleted Records for more information.) The higher this number, the longer you will have to recover deleted records.
Note: Changing the number of deletion days does not affect existing ‘To Be Deleted’ Records, only subsequent Records that are deleted. Increasing the number of days has no impact on space, speed or performance of your system.
4
‘Scheduled Reports’ field
This field displays how long the stored Scheduled reports will remain on the system.
5
‘Snapshot_Data_retention’ field
This field displays how long the stored Snapshot Data will be retained on the system.
6
‘Audit Trail’ label
Shows how many days Systems activity will be recorded and held for on this site. Contact support@trilinegrc.com to inquire about changing this value. Note: This setting has NO effect on task history records which are kept for the entirety of parent records life.
The ‘Interface’ section settings
This section contains various settings that effects the behaviour of TriLine GRC.
The Configuration ‘Interface’ section
‘Interface’ section elements
ID
Element
Description
1
‘Interface’_section
Click this section to open or close this section.
2
‘Return to Last Page’ switch
Click this switch on to allow users to be returned to the last page of their previous session, the next time they login back in. The Home Page defaulting facility disappears with this option on.
3
‘Failed Login’ switch
Click this switch on for an alert email to be sent to the Notification Email address if there is any failed login attempts.
4
‘Show Password Strength’ switch
Click this switch on to show the password strength of the current user logging in.
5
‘Edit Rights Over Own Data’ switch
This switch only effects Positions with ‘See Own Data Only’ set on and the records these Positions have Edit rights (by belonging to the appropriate Security Group). Click this switch on to allow a ‘See Own Data Only’ Position to have full visibility rights to records for which they have Edit access. This entails them being also able to see and edit all tasks, and task completion history’s, for this record only. This setting is very pertinent to ‘See Own Data Only’ Positions that are in the record Owner or Responsible position and need full record visibility of all of that record.
The Tasks Section Settings
This section contains various settings that effects the behaviour of all TriLine GRC tasks.
The Configuration ‘Tasks’ section
‘Tasks’ section elements
ID
Element
Description
1
‘Tasks’ section
Click this section to open or close this section.
2
‘Attestation_Comment’_switch
Click this switch on if your organisation requires users to provide a Comment when completing a Task, regardless of the outcome.
If you leave this checkbox unticked, Comments will not be required where the task outcome is positive with a ‘Yes’ or a ‘True’ (e.g. Each electrical appliance in the office has a valid and current Electrical Test Tag. Outcome - True). Express Complete is not available when this switch is on.
3
‘Show Express Complete Button’ switch
Click this switch on if you want users to be able to ‘Express Complete’ a positive outcome task that does not require a Comment. Note: ‘Attestation Comment’ switch 2 must be off for this option to work.
4
‘Express Complete One Click’ switch
Click this switch on if you want users to be able to ‘Express Complete’ a positive outcome task that does not require a Comment in a single click of the Express Complete Button, as opposed to it’s default two click confirming action. Note: ‘Attestation Comment’ switch 2 must be off for this option to work.
5
‘Show Not Completed Button’ switch
Click this switch on if you want users to be able to close a Task as ‘Not Completed’.
This option can be left switched off, but can be switched on on the rare occasions it is required, and then switched off again.
6
‘Use Critical Tasks’ switch
Click this switch on if you want users to be able to flag a Task as a Critical Task. A Critical task will send an additional reminder notification to the Actioned By Position if the generated Task is still outstanding (not completed) on the Scheduled Due Date. This reminder notification will be sent on the Scheduled Due Date, at the configured time (default setting is midday. See The Monitor configuration settings item 6).
This tab only displays for self hosted sites (not shown). Important:Do not change the database settings unless specifically advised by TriLine GRC Staff or your IT Department as you could render your TriLine GRC system inaccessible to all users.
Database Connection settings
The Database Connection settings are located in the Configuration Page ‘Database’ tab.
Database Configuration fields
Field
Description
Server
The name or IP address of the Server hosting MS SQL.
Database
The name of the database within MS SQL (usually _TriLine GRC(your organisation)_).
User Name
The MS SQL User setup to access the database.
User Password
The password for the Microsoft SQL Server user.
Setting up The Monitor
The Monitor settings are located from the main menu Maintenance | Configuration Page, ‘Monitor’ tab. Adjust these settings to determine how The Monitor operates.
TriLine GRC allows Logo and some colour customisations. The Customisation settings are located in the main menu Maintenance | Configuration Page, ‘Customisation’ tab.
The ‘Customisation’ tab
The ‘Customisation’ tab
The Configuration ‘Customisation’ tab elements
ID
Element
Description
1
‘Report Colours’ fields
Select the colour to highlight that section of the Report.
2
‘Show all Pages’ switch
Set this switch on to have Reports defaulting to scrolling through all pages. The paging is still changeable in the report for either setting of this switch.
Use the uploader to brand your TriLine GRC system with your company Logo.
Note: You must select ‘Use Logo on Pages’ 4 to see the logo appear on all pages. You may need to close and reopen your browser and clear the browser cache for a new uploaded logo to appear.
4
‘Use Logo’ switches
Select where you would like the Logo to appear; on all Reports, on the TriLine GRC screens, and on the Portal.
Note: If no logo is loaded, the TriLine GRC logo will be used by default. When the Use Logo on Pages is selected on, a ‘floating’ Powered by TriLine GRC banner will appear on bottom right of the page.
5
‘Set page background’ field
Select from the dropdown, or enter the colour number, for the page background colour.
6
Reset page background icon
Click the Reset icon to return to the default page background colour.
7
Page Help icon
Click this icon to display basic information about how to work with this Page.
The Logo Uploader
The Logo Uploader allows you to brand your TriLine GRC site and Reports with your company logo. When uploaded and ‘Use Logo on pages is selected’, your company logo will replace the TriLine GRC logo appearing in the top left hand corner of the page. (A ‘floating’ ‘Powered by TriLine GRC’ brand will also appear on bottom right of the page.)
The ‘Logo Uploader’
The ‘Logo Uploader’ elements
ID
Element
Description
3a
Logo image
This is used to preview your uploaded logo.
Note: Images can be ‘drag and drop’ here directly if preferred instead of using the ‘Logo preview icon’ 3b.
3b
Logo preview icon
Click the icon to find the Logo file to be uploaded and click open; your logo will appear in 3a.
Note: Logo Properties: - Format: PNG, JPG or GIF. - Max Size: 15KB. - Recommended Max Dimensions: 150px x 45px. - Larger files will be forced to this sizing.
3c
Clear Logo icon
If you want to remove your logo branding, click this icon to clear the Logo; also switch off ‘Use Logo on pages’ .
Note: TriLine GRC is the default logo when no logo is used.
The Portal settings
Note: Add the Domain names (the email suffix) that the Portal users use.
New Events and Registers can be created by non TriLine GRC users in the TriLine Portal. The Portal settings are located in the main menu Maintenance | Configuration Page, ‘Portal’ tab.
The Portal is designed for all the people in your organisation who do not require access to TriLine GRC, but are still required to record Events and Registers, and require access to read documents. Access to the portal requires a Portal User ID and internet access to the Portal URL.
People in your organisation who have an email address can self register themselves, and depending on the setting below, be able to access the Portal immediately. Otherwise, after registering a Portal User ID, they must wait for access to be approved by your TriLine administrator, before using the Portal. The subject and body of this waiting for approval notification is also configurable.
Administrators can also register Portal User IDs.
The Configuration ‘General’ tab
The Configuration ‘Portal’ tab elements
ID
Element
Description
1
‘Show Captcha’ switch
Set this switch on if you require additionally login security.
2
‘Show Portal History’ switch
Set this switch on to allow the logged in user to see limited information of still ‘open’ records of the Events and Registers they created.
3
‘Registration Approval’ switch
Set this switch on to require Administrator approval of all self registering Portal users.
4
‘Approval Required Subject’ field
Only used if 3 is selected. Enter the Subject line of the notification email of pending approval to the self registering Portal user.
5
‘Approval Required Message’ field
Only used if 3 is selected. Enter the body of the notification email of pending approval to the self registering Portal user.
Managing (Business Unit)
Note: (Business Unit) appears in brackets to indicate that the label is configurable.
The TriLine GRC default term (Business Unit) describes an organisation’s divisions or departments.
You can change that term (The ‘General’ section settings - item 6) to your preferred description if your organisation uses a different term (e.g. Department).
TriLine GRC uses the (Business Unit) to identify groupings within a business for all Risks, Compliance Processes, Key Measures, (Events), (Control Inventory) and Contracts records.
These grouping can then be used for filtering in Reports and charts.
Accessing the (Business Unit) Page
Administrators can access the ‘(Business Unit)’ Page via the Main Menu:
From the Main Menu select Maintenance | (Business Unit)
The (Business Unit) page is displayed.
The Business Unit Page
The (Business Unit) page displays all Business Unit’s added to your site. (Business Units) with a ‘Show Usage’ icon are currently in use in the system. (Business Units) with a ‘Delete’ icon are not currently in use in the system.
Use the controls in the Column Headers to sort and filter the (Business Unit) 4 List.
4
(Business Unit) List
Each (Business Unit) is displayed in this list.
5
‘Edit’ icon
Click this icon in a (Business Unit) entry to change the name of that (Business Unit).
Note: Changing a (Business Unit) renames all instances of that (Business Unit) throughout your TriLine GRC system.
6
‘Delete’ icon
Click this icon in a (Business Unit) entry to delete that (Business Unit). A ‘Confirm Delete’ dialog is displayed. Click the OK button in the ‘Confirm Delete’ dialog to remove the (Business Unit) from the (Business Unit) 4 List.
Note: The Delete icon only appears if the (Business Unit) is not being used anywhere in the TriLine GRC system.
7
‘Show Usage’ icon
Click this icon to display which records use this (Business Unit) in your TriLine GRC system.
Note: The Show Usage icon only appears if the (Business Unit) is being used in the TriLine GRC system.
8
‘New (Business Unit)’ icon
Click this icon to add a new (Business Unit).
9
‘Reset Grid’ icon
Click this icon to reset the (Business Unit) 4 List.
10
Page Help icon
Click this icon to display basic information about how to work with this Page.
Add a New (Business Unit)
Hover over, or click, the Menu Options (hamburger) icon. Click the ‘New (Business Unit)’ option (item 8above). The Add New (Business Unit) window appears.
Enter the new unique (Business Unit) 1. Press tab.
Optional, enter a Comment 2 if required.
Click the Save 3 icon. (Or, Click the cancel 4 icon to cancel).
The new (Business Unit) will appear in the (Business Unit) List (item 4above).
The ‘New (Business Unit)’ window
Add New (Business Unit) window elements
‘New (Business Unit)’ window elements
ID
Element
Description
1
‘(Business_Unit)’_field
Type a unique (Business Unit) name in this field.
2
‘Comments’ field
This field is optional. Type a brief comment, or further information in this field.
3
‘Save’ icon
Click this icon to add the new (Business Unit). The ‘New (Business Unit)’ window closes. The new (Business Unit) is displayed alphabetically in the (Business Unit) List (item 4above).
4
‘Close’ icon
Click this icon to close the ‘New (Business Unit)’ window without adding the new (Business Unit).
Edit a (Business Unit)
Changing a (Business Unit) renames all instances of that (Business Unit) throughout your TriLine GRC system.
Click the ‘Edit’ icon (item 5above) of the (Business Unit) to be Edited. The Edit (Business Unit) window appears.
Update the (Business Unit) 1 as required. Press tab.
Optional, update the Comment 2 if required.
Click the Save 3 icon. (Or, Click cancel 4 icon to cancel).
The updated (Business Unit) will appear in the (Business Unit) List (item 4above).
The ‘Edit (Business Unit)’ window
Edit (Business Unit) window elements
‘Edit (Business Unit)’ window elements
ID
Element
Description
1
‘(Business Unit) Name’ field
In this field, replace the existing (Business Unit) name with another, unique, name.
2
‘Comments’_field
This field is optional. Type a brief comment or further information in this field.
3
‘Save’ icon
Click this icon to update the (Business Unit) name. The ‘Edit (Business Unit)’ window closes. The updated (Business Unit) name is displayed alphabetically in the Business Unit List (item 4above).
Note: Changing a (Business Unit) renames all instances of that (Business Unit) throughout your TriLine GRC system.
4
‘Close’ icon
Click this icon to close the ‘Edit (Business Unit)’ window without changing the (Business Unit) name.
Delete a (Business Unit)
Click the ‘Delete’ icon (item 6above of the (Business Unit) to be deleted. The Confirm window appears.
Click the OK button to confirm the delete. (Or, Click the Cancel button.)
The (Business Unit) is deleted and no-longer displays in the (Business Unit) List (item 4above).
Show Usage of a (Business Unit)
Click the ‘Show Usage’ icon 7above of the (Business Unit). The Show Usage window appears.
The (Business Unit) Usage 1 Usage window displays. The Modules using this (Business Unit) are group list. Click the chevron 2 icon to display all records of that module which use this (Business Unit). If required, click the Export 3 icon to save this list to a spreadsheet. Click the close 4 icon to close this window.
The ‘(Business Unit)’ Usage window
Current Users
Use this feature to see who is current logged into TriLine GRC.
Accessing the Current Users Page
Administrators can access the ‘Current Users’ Page via the Main Menu:
From the Main Menu select Maintenance | Current Users
The Current Users page is displayed.
The Current Users Page
The Current Users page display the current users logged into TriLine GRC.
The ‘Current Users’ Page
The Current Users page elements
The Current Users page elements
ID
Element
Description
1
‘Search’ field
Enter the User Id you wish to search for.
1
Users window
Users currently logged in.
1
‘Count’ value
Number of users currently logged in.
Managing Domain Names
TriLine GRC uses the Domain Name to validate portal user registrations. The domain name is the last part of the email address after the @ symbol. The portal users ‘email domain name’ must appear in this list, otherwise the portal users will not be able to login. This feature prevents users from outside of your sanctioned domains from self registering and getting access to your portal. You will be notified if anyone attempts to do this.
Accessing the Domain Names Page
Administrators can access the ‘Domain Names’ Page via the Main Menu:
From the Main Menu select Maintenance | Domain Names
Use the controls in the Column Headers to sort and filter the Domain Names List 6.
6
Domain Names List
Each Domain Name is displayed in this list—over multiple pages if there are too many Domain Names to display on one page.
7
‘Edit’ icon
Click this icon in a Domain Names entry to change the name of that Domain Names. The ‘Edit Domain Names’ window is displayed.
8
‘Delete’ icon
Click this icon in a Domain Names entry to delete that Domain Names. A ‘Confirm Delete’ dialog is displayed. Click the OK button in the ‘Confirm Delete’ dialog to remove the Domain Names from the Domain Names List 6.
Add a New Domain Name
Click the ‘New Domain Name’ icon (item 2above). The New Domain Name window appears.
Enter the new Domain Name 1.
Click the Save icon 2, or Click cancel 3.
If you clicked Save, the new Domain Name will appear in the Domain Name List.
The ‘New Domain Name’ window
The ‘New Domain Name’ window elements
‘New Domain Name’ window elements
ID
Element
Description
1
‘Domain_Name’_field
Type a unique Domain Name name in this field.
2
‘Save’ icon
Click this icon to add the new Domain Name. The ‘New Domain Name’ window closes. The new Domain Name is displayed in the Domain Names List 6 on the ‘Domain Names’ Page.
3
‘Close’ icon
Click this icon to close the ‘New Domain Name’ window without adding the new Domain Name.
Edit a Domain Name
Click the ‘Edit Domain Name’ icon (item 7above). The Edit Domain Name window appears.
Update the Domain Name 1.
Click the Save icon 2, or Click cancel 3.
If you clicked Save, the updated Domain Name will appear in the Domain Name List.
The ‘Edit Domain Name’ window
The ‘Edit Domain Name’ window elements
‘Edit Domain Name’ window elements
ID
Element
Description
1
‘Domain_Name’_field
In this field, replace the existing Domain Name name with another, unique, name.
2
‘Save’ icon
Click this icon to update the Domain Name. The ‘Edit Domain Name’ window closes. The updated Domain Name is displayed in the Domain Names List 6 on the ‘Domain Names’ Page.
3
‘Close’ icon
Click this icon to close the ‘Edit Domain Name’ window without changing the Domain Name.
Delete a Domain Name
Click the ‘Delete Domain Name’ icon 1. The Confirm window appears.
Click OK to confirm the delete, or Click cancel.
If you clicked confirm, the Domain Name List will be refresh with a confirming message.
The ‘Domain Name’ delete icon
Managing Holidays
TriLine GRC will consider Holidays when processing Due Dates and Reminder Dates for Tasks.
If a task falls on a Holiday (or a weekend day), TriLine GRC will move the date forward to the previous working day.
Holidays can be marked as Perennial. A Perennial Holiday is one that occurs on the same date each year. The Monitor will automatically roll over Perennial Holidays.
Non-perennial Holidays are those that occur on a different date each year (e.g. a holiday marking an annual event but not tied to a set calendar date).
How many holidays do you need to setup?
For Perennial Holidays, you only need to setup the next occurrence of the Holiday.
For non-perennial Holidays, you need to have sufficient set-up based on the maximum cycle for any Task. For example, if your maximum cycle is 12 months then we suggest that you set up at least 2 years of Holidays.
Tip: Create a Process Control Task to ensure that Holidays are reviewed every 12 months.
Accessing the Holidays Page
Administrators can access the ‘Holidays’ Page via the Main Menu:
From the Main Menu select Maintenance | Holidays.
The Holidays page is displayed.
The ‘Holidays’ Page
Set up and manage Holidays via the ‘Holidays’ page, accessible via the Main Menu: Maintenance | Holidays.
Use the controls in the Column Headers to sort and filter the Holidays List 6.
6
Holidays List
Each Holiday is displayed in this list—over multiple pages if there are too many Holidays to display on one page.
7
‘Edit’ icon
Click this icon in a Holiday’s entry to change the name of that Holiday. The ‘Edit Holidays’ window is displayed.
8
‘Delete’ icon
Click this icon in a Holiday entry to delete that Holiday. A ‘Confirm Delete’ dialog is displayed. Click the OK button in the ‘Confirm Delete’ dialog to remove the Holiday from the Holidays List 6.
Add a Holiday
Click the ‘New Holiday’ icon (item <span class=“idcallout2”23 above). The New Holiday window appears.
Enter the new Holiday 1.
Enter the date of the Holiday 2.
Select if the Holiday is Perennial 3.
Click the Save icon 4, or Click cancel 5.
If you clicked Save, the new Holiday will appear in the Holidays List.
The ‘New Holiday’ window elements
‘New Holiday’ window elements
ID
Field
Description
1
Holiday
Type the name of the Holiday.
2
Date
Click the field and use the Date/Time Selector to set the date on which the Holiday occurs.
3
Perennial
Tick this checkbox if the Holiday occurs on the same date every year.
4
‘Save’ icon
Click this icon to add the new Holiday. The ‘New Holiday’ window closes. The new Holiday is displayed in the Holidays List 6.
5
‘Close’_icon
Click this icon to close the ‘New Holiday’ window without adding the new Holiday.
Edit a Holiday
Click the ‘Edit Holiday’ icon (item 7above). The Edit Holiday window appears.
Update the new Holiday 1, Date 2, or Perennial 3 as required.
Click the Save icon 4, or Click cancel 5.
If you clicked Save, the updated Holiday will appear in the Holidays List.
The ‘Edit Holiday’ window elements
‘Edit Holiday’ window elements
ID
Field
Description
1
Holiday
Update the name of the Holiday.
2
Date
Update the field and use the Date/Time Selector to set the date on which the Holiday occurs.
3
Perennial
Tick this checkbox if the Holiday occurs on the same date every year.
4
‘Save’ icon
Click this icon to update the Holiday. The ‘Edit Holiday’ window closes. The updated Holiday is displayed in the Holidays List 6.
5
‘Close’_icon
Click this icon to close the ‘Edit Holiday’ window without updating the Holiday.
Delete a Holiday
Click the ‘Delete Holiday’ icon 1. The Confirm window appears.
Click OK to confirm the delete, or Click cancel.
If you clicked confirm, the Holiday List will be refresh with a confirming message.
The ‘Holidays’ Page
Send an Email to all TriLine GRC Users
TriLine GRC can send an email to all users. This can be particularly useful in sharing important TriLine GRC information, procedures or outages.
Accessing the ‘Send Email to all Users’ window
Administrators can access the ‘Send Email to all Users’ window via the Main Menu:
From the Main Menu, select Maintenance | Send Email to all Users
The ‘Send Email to all Users’ window is displayed.
The ‘Send Email to all Users’ window
Click Include Portal Users1 if you require them to also receive this email.
Type the Subject2 of this email.
Type the Message3 of the email.
Click the Send Email icon 4, or click Cancel 5.
The ‘Send Email to all Users’ window
‘Send Email to all Users’ window elements
‘Send Email to all Users’ window elements
ID
Element
Description
1
‘Include Portal Users’ checkbox
Select to include all Portal Users receiving this email.
2
‘Subject’ field
Enter the Subject line of your email.
3
‘Message’ editor
Enter the text of message you wish to send to all TriLine GRC users.
4
‘Send Email’ icon
Click this icon to immediately send this email to all TriLine GRC users. This email will be signed with the Email Signature
5
‘Close’ page icon
Click this icon to close this page and not send the email.
Managing Tags
Tags are useful for linking diverse Records relating to a task, project or research activity. You can easily browse similarly-tagged Records using the ‘Linked by Tags’ Page.
You can use any word or phrase as a Tag.
Managing Tags (adding, renaming and deleting) is an administrator-only function. If you need a new Tag, talk to your administrator, who can manage Tags for you using the ‘Tags’ Page.
Accessing the ‘Tags’ Page
Administrators can access the ‘Tags’ Page via the Main Menu:
From the Main Menu, select Maintenance | Tags.
The ‘Tags’ Page is displayed.
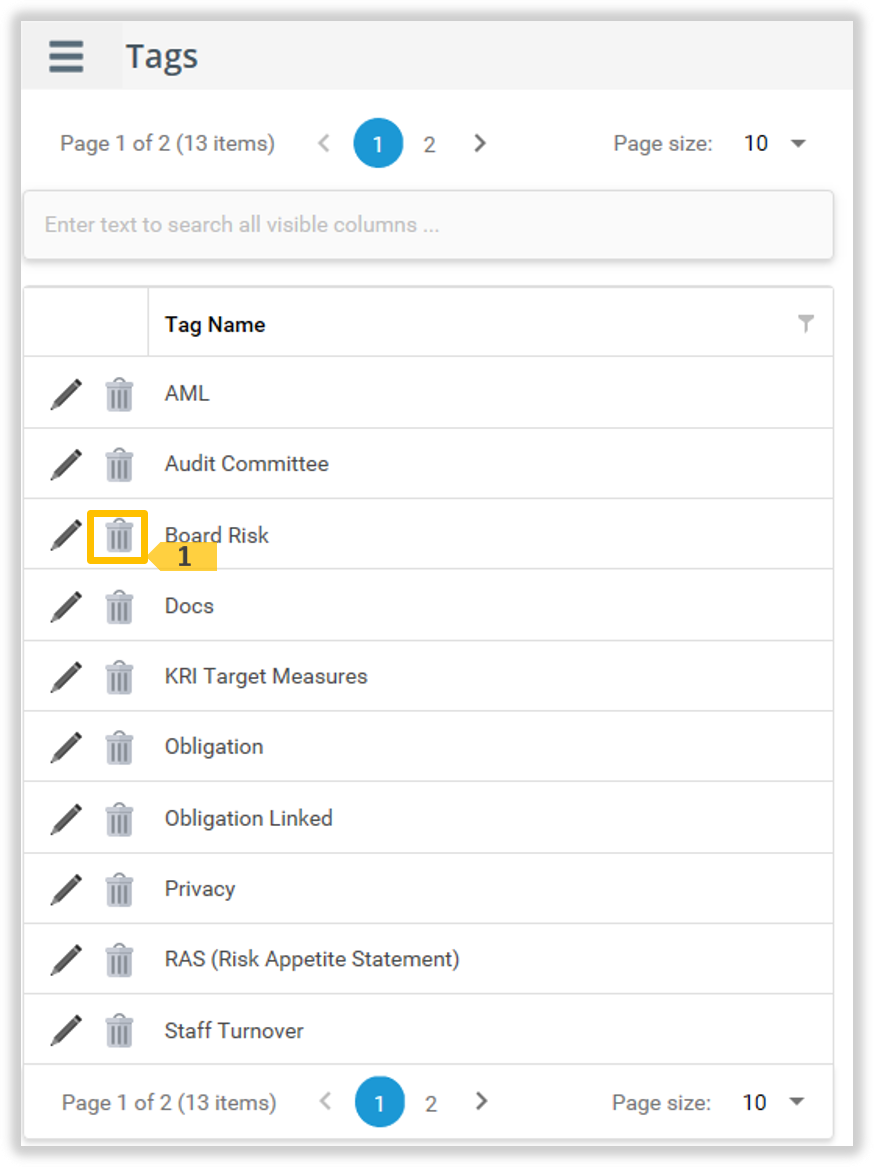
The ‘Tags’ Page
The ‘Tags’ Page
The ‘Tags’ Page elements
‘Tags’ Page elements
ID
Element
Description
1
‘Tags’ page title
This is the Tags title.
2
‘New Tag’ icon
Click this icon to add a new Tag. The ‘New Tag’ window is displayed.
Use the controls in the Column Headers to sort and filter the Tags List 6.
6
Tags List
Each Tag is displayed in this list—over multiple pages if there are too many Tags to display on one page.
7
‘Edit’ icon
Click this icon in a Tag entry to change the name of that Tag. The ‘Edit Tag’ window is displayed.
Note: Changing a Tag renames all instances of that Tag throughout your TriLine GRC system.
8
‘Delete’ icon
Click this icon in a Tag entry to delete that Tag. A ‘Confirm Delete’ dialog is displayed. Click the OK button in the ‘Confirm Delete’ dialog to remove the Tag from the Tags List 6.
Note: Deleting a Tag removes all instances of the Tag from your TriLine GRC system.
Add a New Tag
Click the ‘New Tag’ icon (item 2above). The New Tag window appears.
Enter the new Tag 1.
Click the Save icon 2, or Click cancel 3.
If you clicked Save, the new Tag will appear in the Tag List.
The ‘New Tag’ window
The ‘New Tags’ window elements
‘New Tag’ window elements
ID
Element
Description
1
‘Tag_Name’_field
Type a unique Tag name in this field.
Note: If you type a duplicate Tag name and click the ‘Update’ icon 2, an error message is displayed. The error message is also displayed in red text under the Tags List 6 on the ‘Tags’ Page.
2
‘Update’ icon
Click this icon to add the new Tag. The ‘New Tag’ window closes. The new Tag is displayed alphabetically in the Tags List 6 on the ‘Tags’ Page.
3
‘Close’ icon
Click this icon to close the ‘New Tag’ window without adding the new Tag.
Edit a Tag
Click the ‘Edit Tag’ icon (item 6above). The Edit Tag window appears.
Update the Tag 1.
Click the Save icon 2, or Click cancel 3.
If you clicked Save, the updated Tag will appear in the Tag List.
The ‘Edit Tag’ window
The ‘Edit Tags’ window elements
‘Edit Tag’ window elements
ID
Element
Description
1
‘Tag_Name’_field
In this field, replace the existing Tag name with another, unique, name.
Note: If you type a duplicate Tag name and click the ‘Update’ icon 2, an error message is displayed. The error message is also displayed in red text under the Tags List 6 on the ‘Tags’ Page.
2
‘Update’ icon
Click this icon to update the Tag name. The ‘Edit Tag’ window closes. The updated Tag name is displayed alphabetically in the Tags List 6 on the ‘Tags’ Page.
Note: Changing a Tag renames all instances of that Tag throughout your system. This cannot be undone.
3
‘Close’ icon
Click this icon to close the ‘Edit Tag’ window without changing the Tag name.
Delete a Tag
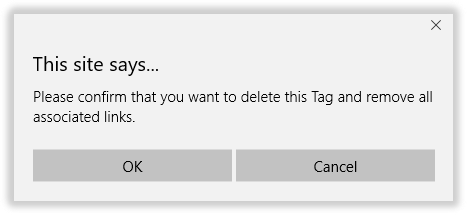
Click the ‘Delete Tag’ icon 1. The Confirm window appears.
Click OK to confirm the delete, or Click cancel. Note: Deleting a Tag removes all instances of the Tag from your TriLine GRC system.
If you clicked confirm, the Holiday List will be refresh with a confirming message.